Saludos Comunidad Hive Diy, estoy feliz de volver a publicar luego de un período de bloqueo mental y creativo para mis publicaciones de Diy, espero que haya terminado, aún no lo se, hoy simplemente pasó que pude tener una idea y llevarla a término. A veces me frusto por no tener una idea de creación, otras veces por no tener los materiales, incluso otras veces teniendo todos esos elementos a favor ha pasado que no tengo tiempo suficiente para tener un momento conmigo y mis manualidades.
Deseo que la musa o inspiración se mantenga a mi lado, porque hacer manualidades es lo que más me gusta realizar a nivel personal.
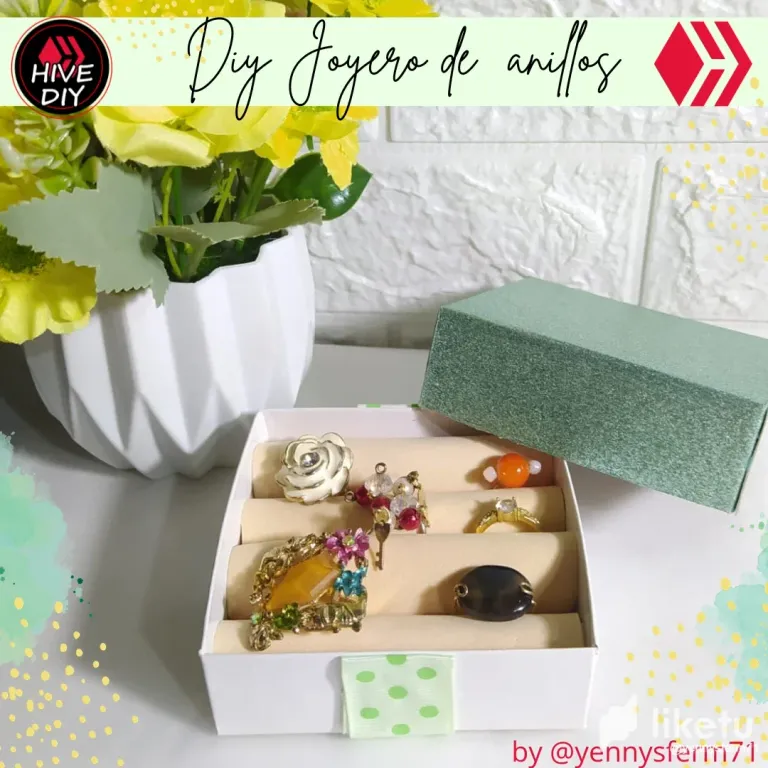
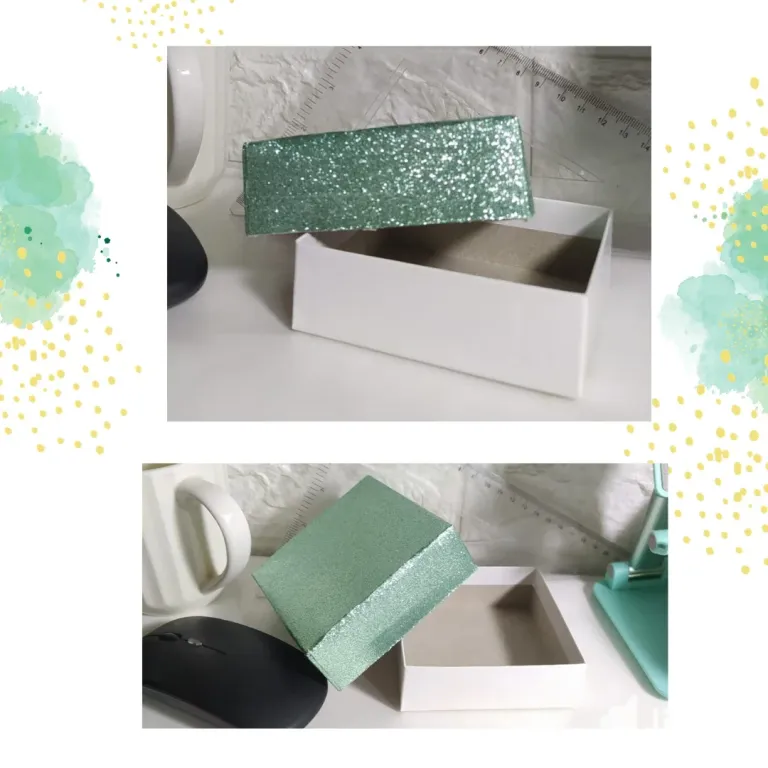
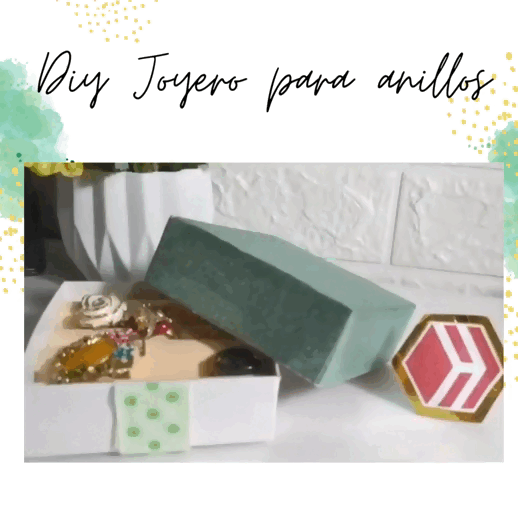
El día de hoy realicé un Diy Joyero para Anillos, lo realicé a partir de pensar en darle utilizada a una caja de audífonos que no quise botar en su momento, porque está realizada con buen cartón, fuerte y liso, de buena calidad.
Al ser un proyecto pequeño, tiene también pocos materiales y los voy a nombrar conforme vayan apareciendo en el proyecto.
Greetings Hive Diy Community, I'm happy to be posting again after a period of mental and creative block for my Diy posts, I hope it's over, I don't know yet, today it just happened that I was able to have an idea and bring it to fruition. Sometimes I get frustrated for not having a creation idea, other times for not having the materials, even other times having all those elements in my favor it has happened that I do not have enough time to have a moment with myself and my crafts.

I want the muse or inspiration to stay by my side, because making crafts is what I like to do most on a personal level.

Today I made a DIY Ring Jewelry Box, I made it from thinking about using a hearing aid box that I didn't want to throw away at the time, because it is made with good cardboard, strong and smooth, of good quality.

Being a small project, it also has few materials and I am going to name them as they appear in the project.
Para empezar tenemos la Caja de Audífonos, a la que retiré lo que tiene dentro, y voy a decorar la parte superior o tapa. Para esto utilizaré esta cartulina escarchada de color verde aguamarina, muy hermosa, y solo necesito el tamaño suficiente para forrar esta parte superior.
To start we have the Headphone Box, from which I removed what is inside, and I am going to decorate the top part or lid. For this I will use this very pretty aquamarine green frosty cardstock, and I only need enough size to line this top.
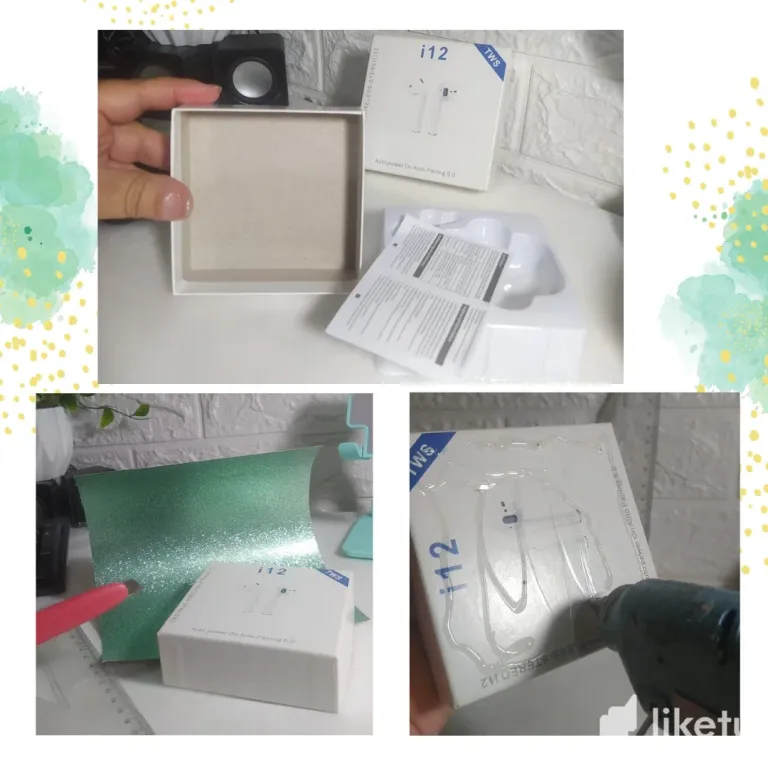
Otro proyecto en el que me herramienta preferida me acompaña, la pistola de silicón caliente. Coloco una cantidad suficiente en la parte superior de la tapa, y centro en la cartulina, presiono con fuerza para que quede bien establecida en ese lugar.
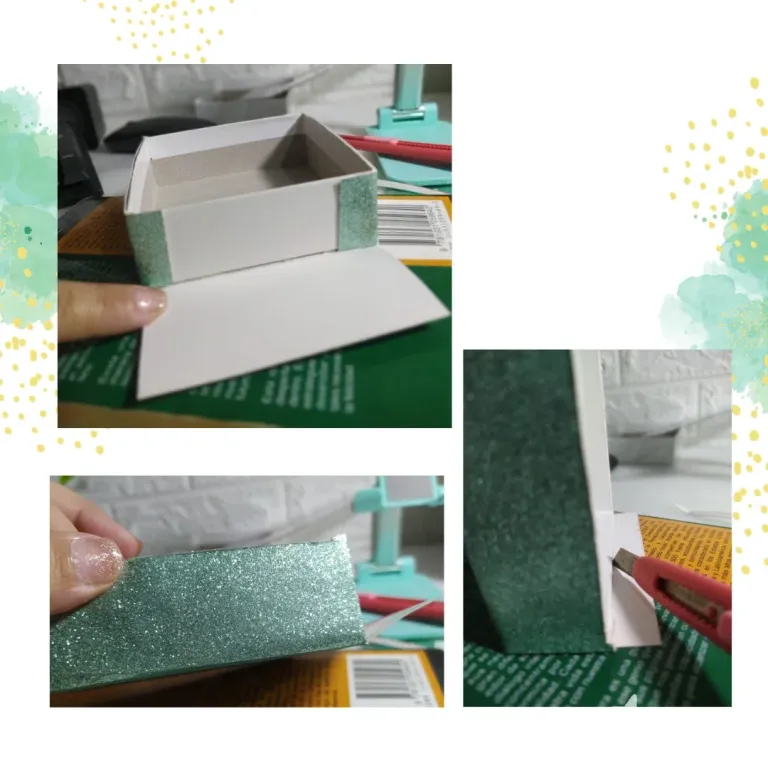
Luego para los laterales, me gusta pegar con la misma pistola de silicón caliente, dos de los lados, que están frente a frente, luego corto en las esquinas, dejando un espacio que será una pestaña para fijar en el lado contínuo.
Another project in which my favorite tool accompanies me, the hot glue gun. I place a sufficient amount on the top of the lid, and center it on the cardboard, pressing firmly so that it is well established in that place.

Then for the sides, I like to glue with the same hot glue gun, two of the sides, which are facing each other, then I cut in the corners, leaving a space that will be a tab to fix on the continuous side.
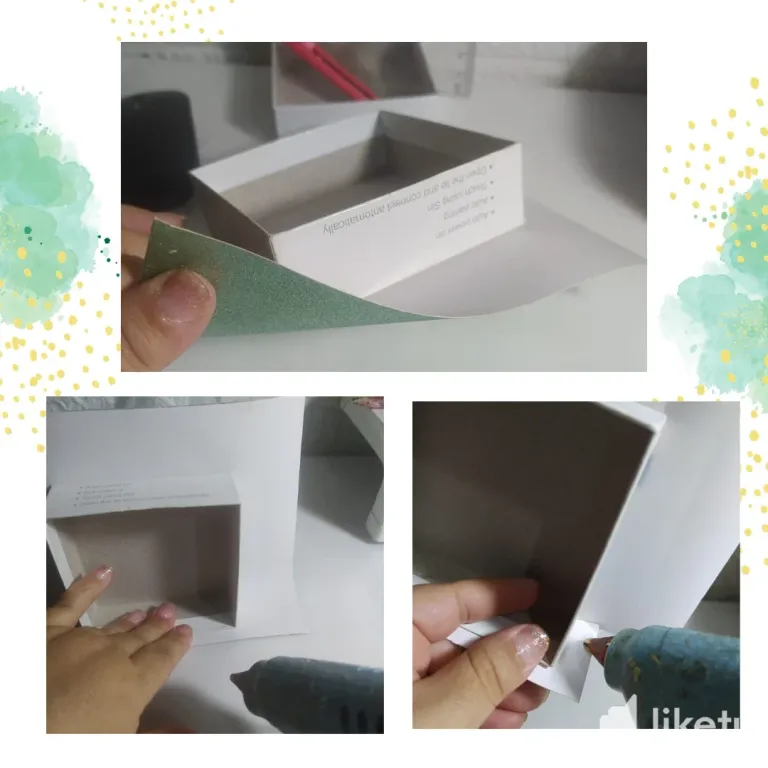
De acuerdo a lo que les comenté, pues quedará de la siguiente forma, dos lados pegados a la tapa con sus pestañas laterales, y luego de esto solo queda pegar los otros dos lados, que dado que los primeros lados se pegaron con la pestaña, eso permite que queden más prolijas las esquinas. Ya con esto queda lista la tapa.
According to what I told you, it will look like this: two sides glued to the lid with their side tabs, and after that all that remains is to glue the other two sides, since the first sides were glued with the tab, This allows the corners to be neater. With this the lid is ready.
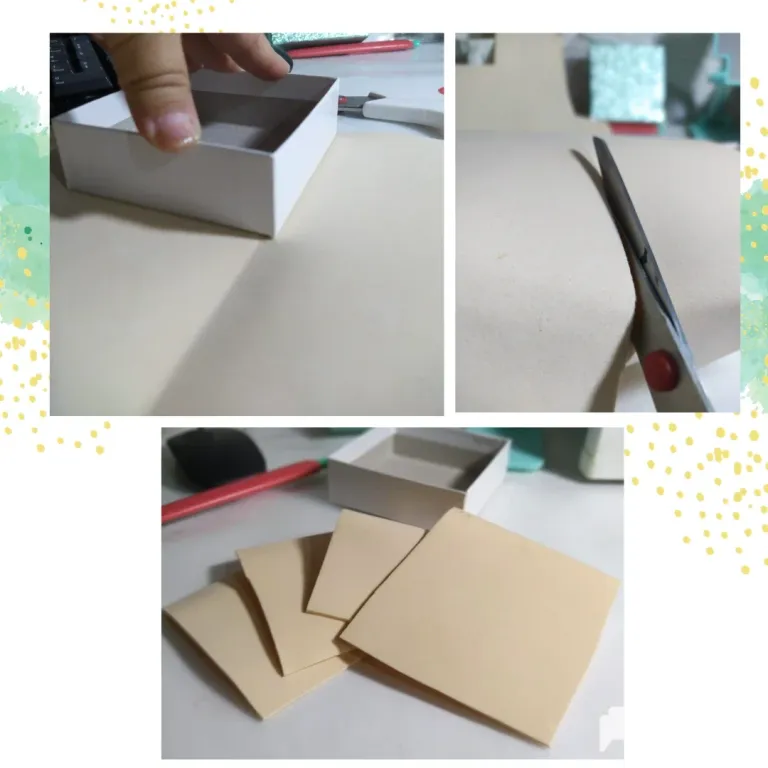
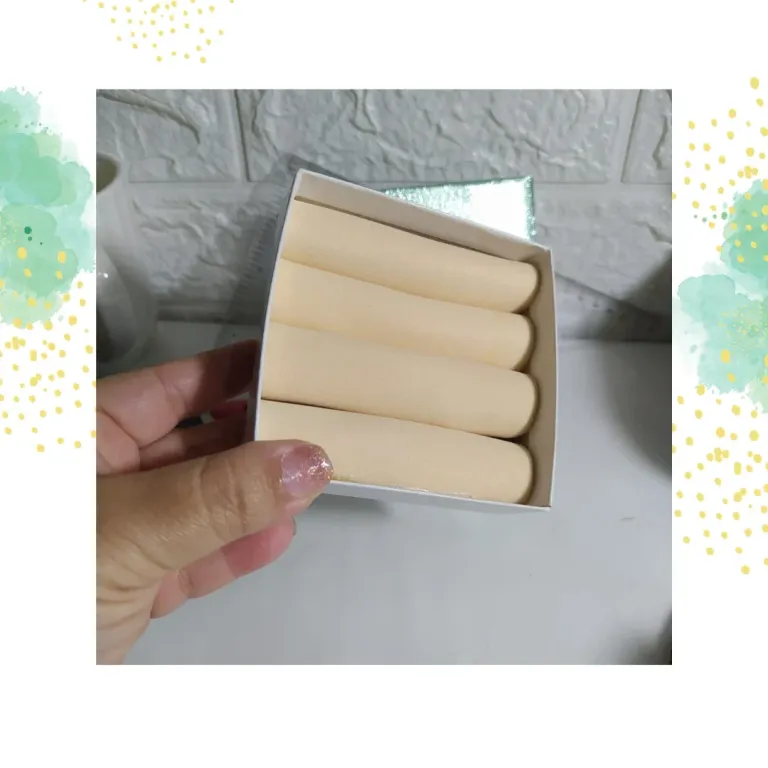
Para realizar la estructura que permitirá colocar los anillos en forma ordenada en la parte de adentro de la caja, o la parte inferior de la caja, utilicé foami color beige, ya que tenía disponible en mis materiales y por fin decidí utilizarlo en un proyecto. Tomando como referencia el ancho y largo de la caja, corté con la tijera cuatro cuadrados.
To make the structure that will allow the rings to be placed in an orderly manner on the inside of the box, or the bottom of the box, I used beige foam, since I had it available in my materials and I finally decided to use it in a project. Taking the width and length of the box as a reference, I cut four squares with scissors.
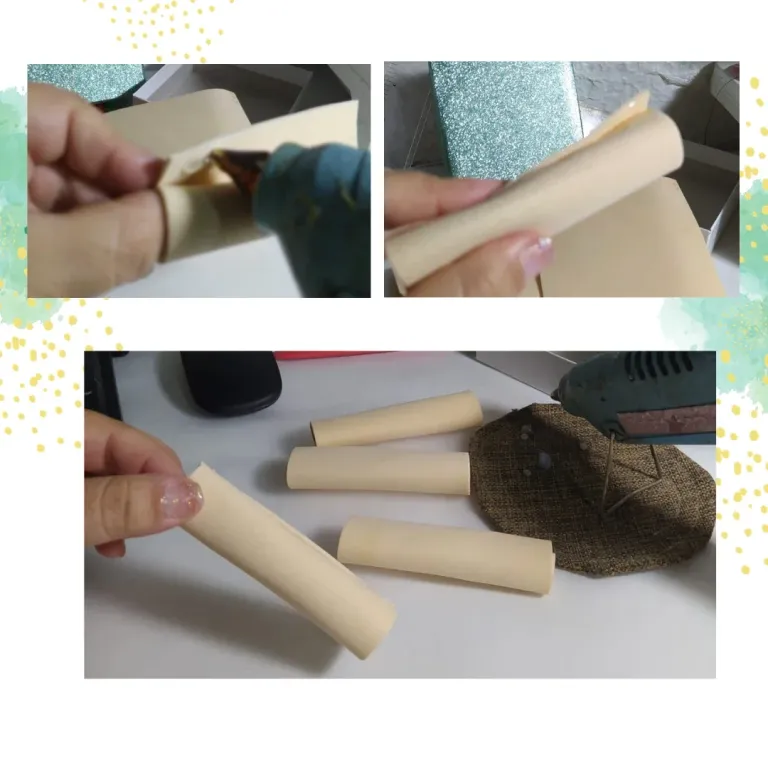
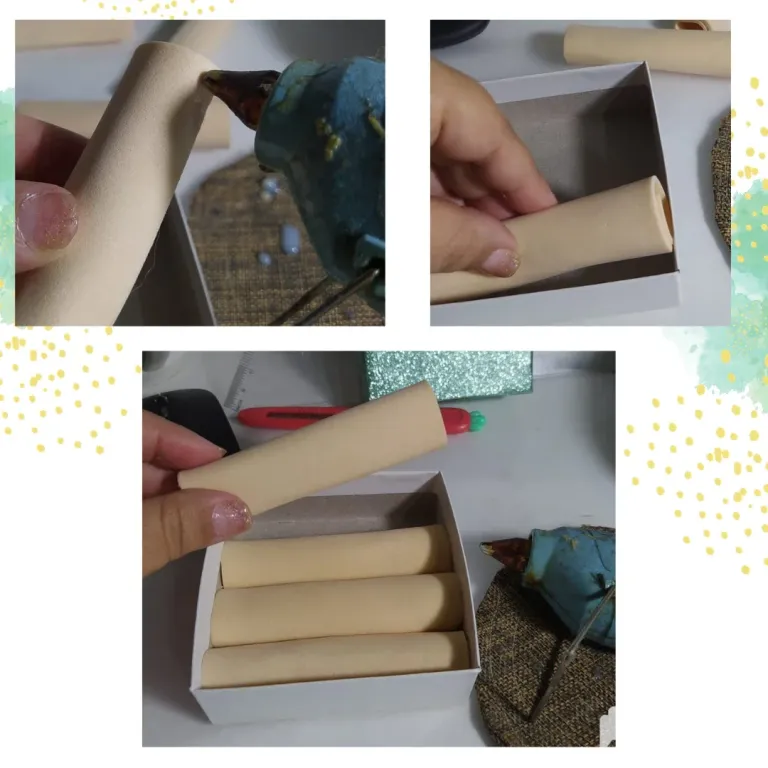
Luego, con la pistola de silicón realicé unos rollitos colocando unos puntos de contacto. Esto lo hice en los cuatro cuadritos y realmente fueron suficientes para abarcar toda la caja adentro. Para garantizar que no se movieran, también coloqué unos puntos de contacto con la pistola de silicón, pero creo que ni era necesario porque todo quedaba bien ajustado.
Then, with the silicone gun I made some rolls placing some contact points. I did this in the four squares and they were really enough to cover the entire box inside. To ensure they didn't move, I also placed some contact points with the glue gun, but I don't think it was necessary because everything was tight.
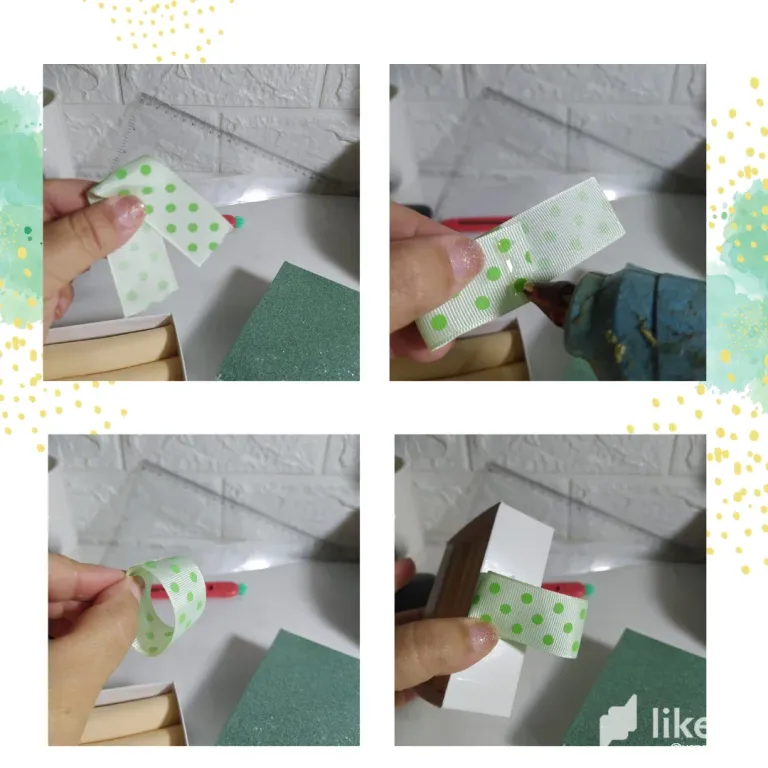
Para facilitar el abrir este joyero de anillos, coloqué dos trozos de cintas, que también son de los materiales que tengo guardados, que son retazos o descartes de otros proyectos. Formé dos óvalos o círculos colocando puntos de contactos con la pistola de silicón y luego pegué en dos de los lados de la cajita. Esto ayuda mucho a la hora de abrir la caja, que ahora puedo llamar Joyero para anillos, así no tengo que maniobrar para que abra fácilmente.
To make it easier to open this ring jewelry box, I placed two pieces of ribbons, which are also from the materials that I have saved, which are scraps or discards from other projects. I formed two ovals or circles by placing contact points with the glue gun and then glued them on two of the sides of the box. This helps a lot when opening the box, which I can now call the Ring Jewelry Box, so I don't have to maneuver it to open easily.
Con pocos materiales pero con ingenio podemos realizar estos pequeños proyectos que nos ayudan a organizar nuestras pertenencias, y me parece genial empezar el 2024 muy organizadas, por ello deseo que les haya gustado este Diy.
With few materials but with ingenuity we can carry out these small projects that help us organize our belongings, and I think it's great to start 2024 very organized, which is why I hope you liked this DIY.
Estoy tan motivada en este 2024 que decidí hacer esta publicación desde la Dapp consentida de Hive, @liketu , deseo que quede bien maquetado, y de todas formas, siempre la siguiente vez que lo haga será mejor que la anterior, así que lo importante es atrevernos y aprenden en el proceso.
I am so motivated in 2024 that I decided to make this publication from Hive's favorite Dapp, @liketu, I want it to be well laid out, and in any case, the next time I do it will always be better than the previous one, so the important thing is dare and learn in the process.
For the best experience view this post on Liketu
That's a very useful Craft! I have my rings rolling everywhere
¡¡¡Buen trabajo!!! Gracias por publicar tu excelente contenido en Hive Diy.
Que buena idea para esas cajitas que estan archivadas sin un uso en particular, redecorarlas y darles un nuevo uso como en este caso un bonito joyero 😍 que genialidad!