Saludos 👋 Queridos 💞 Amigos 😘!! // Greetings 👋 Dear 💞 Friends 😘!!!!
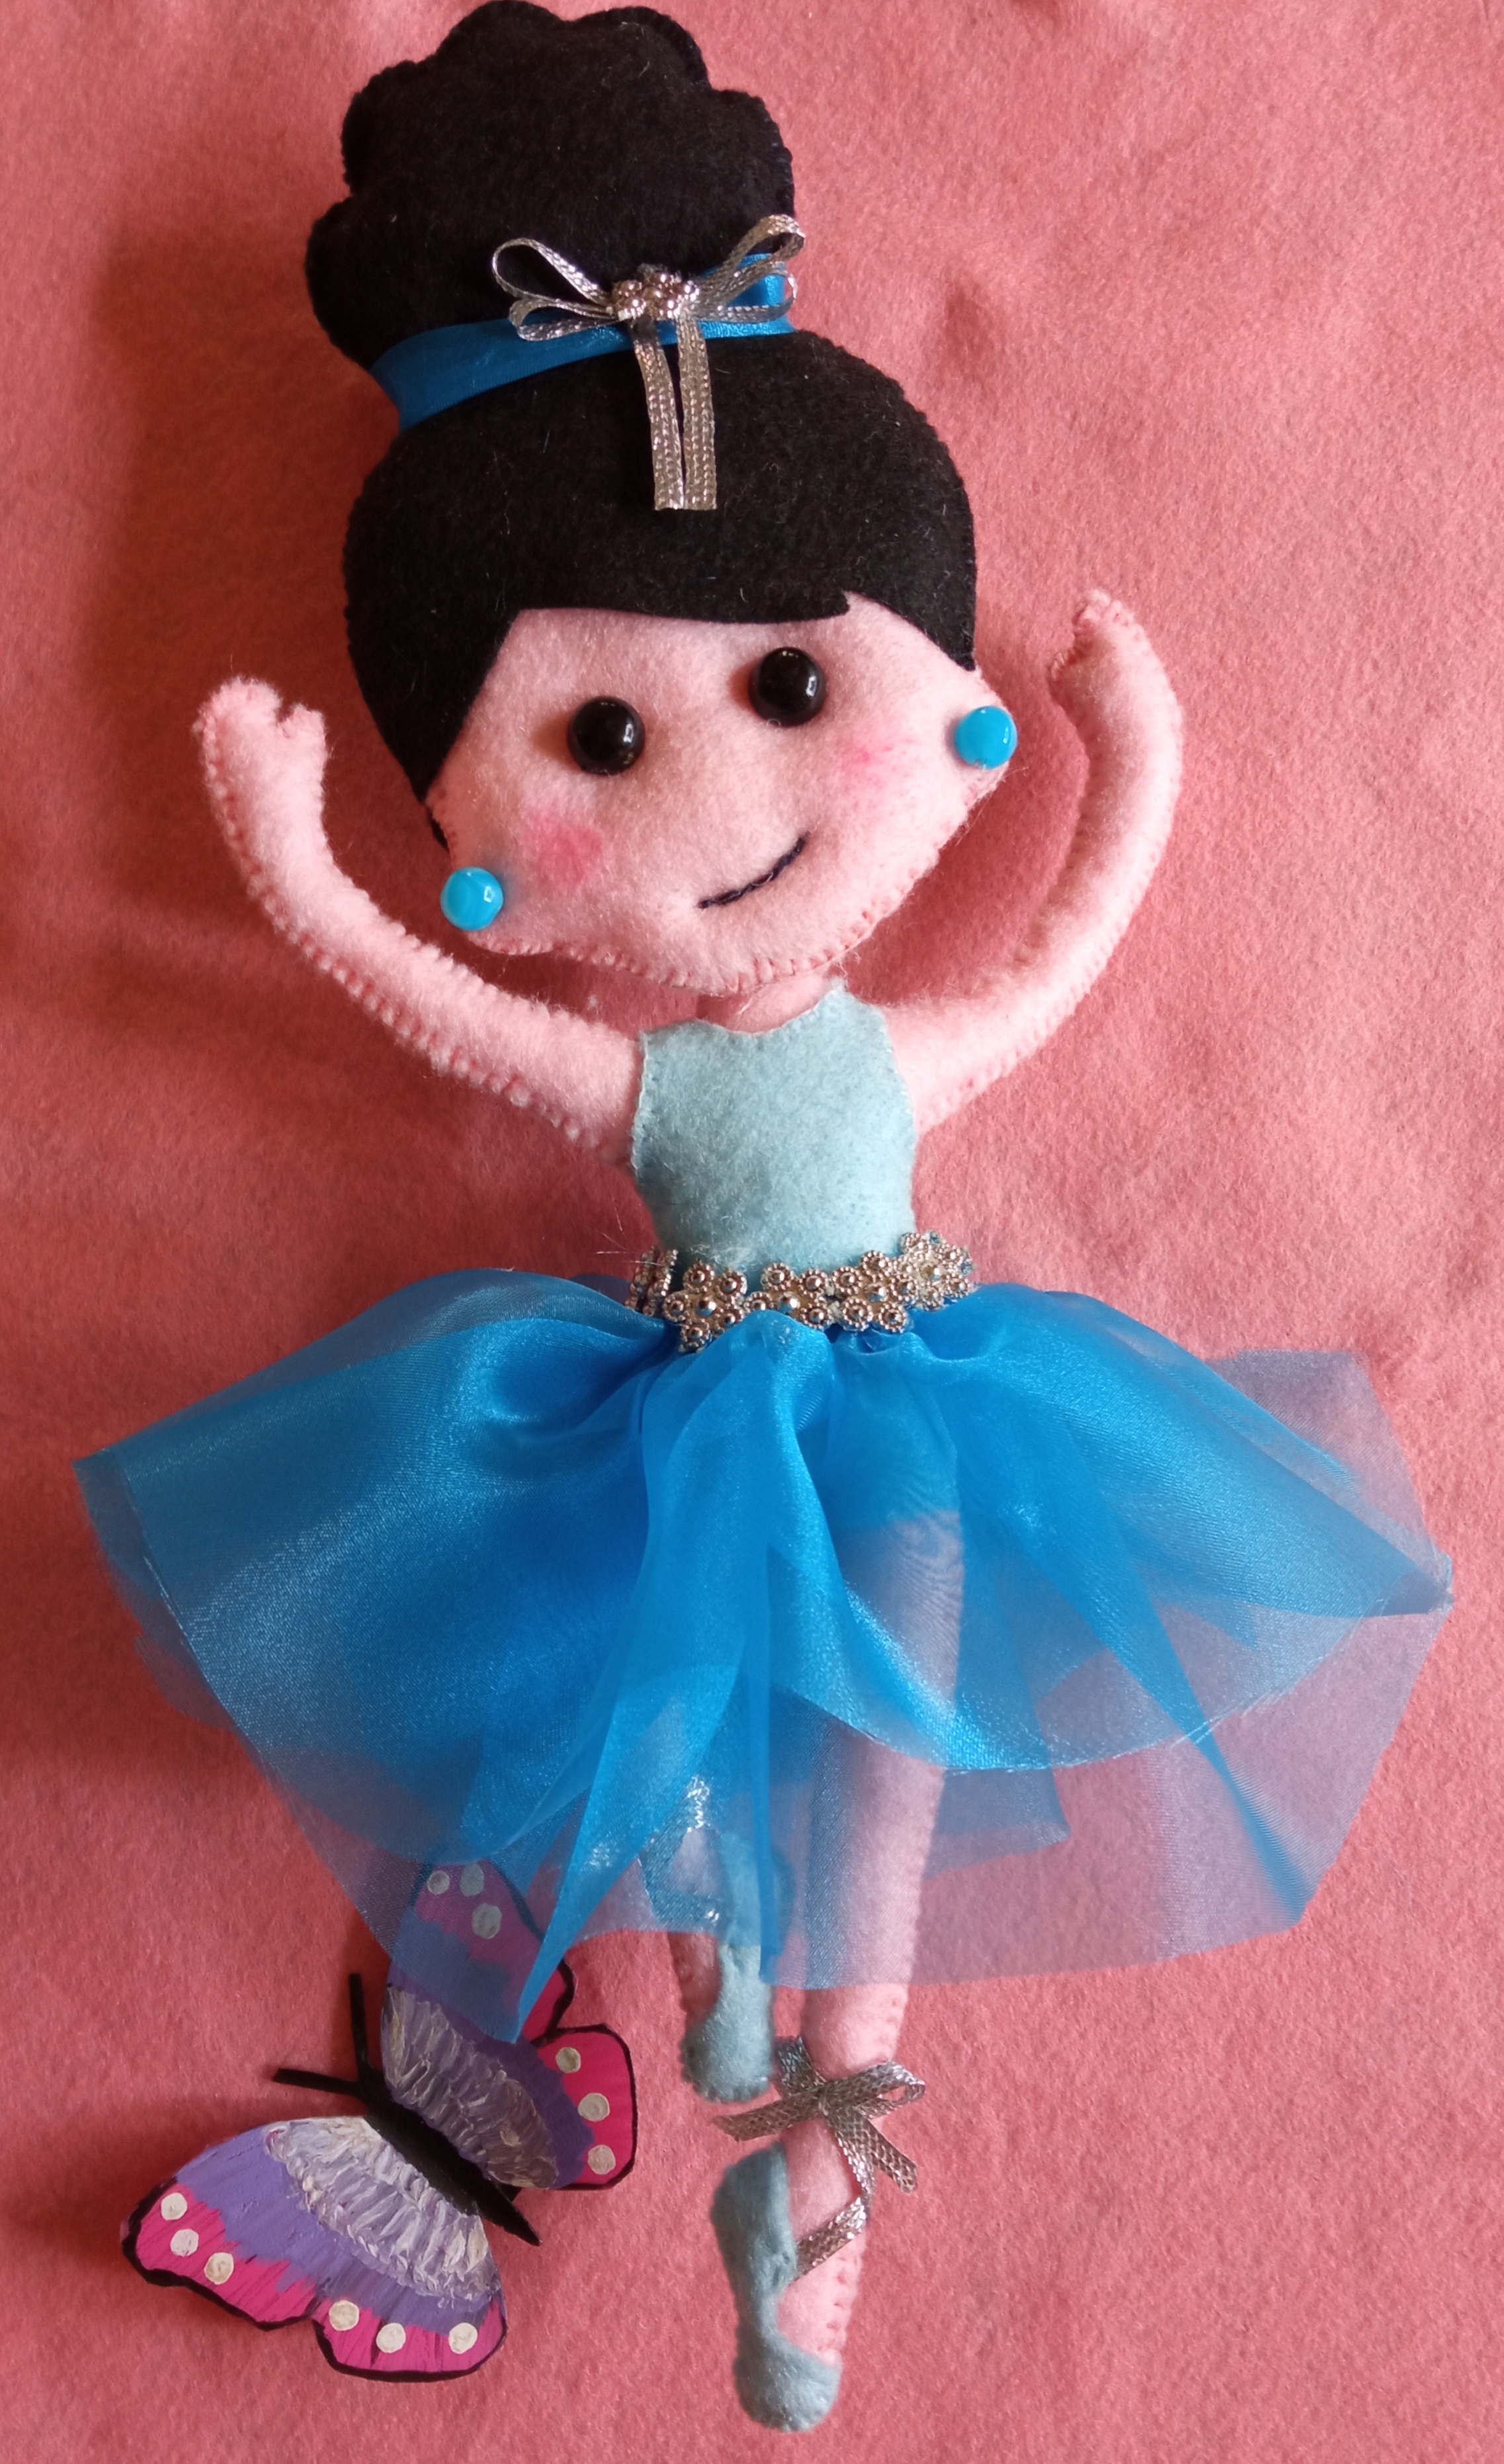
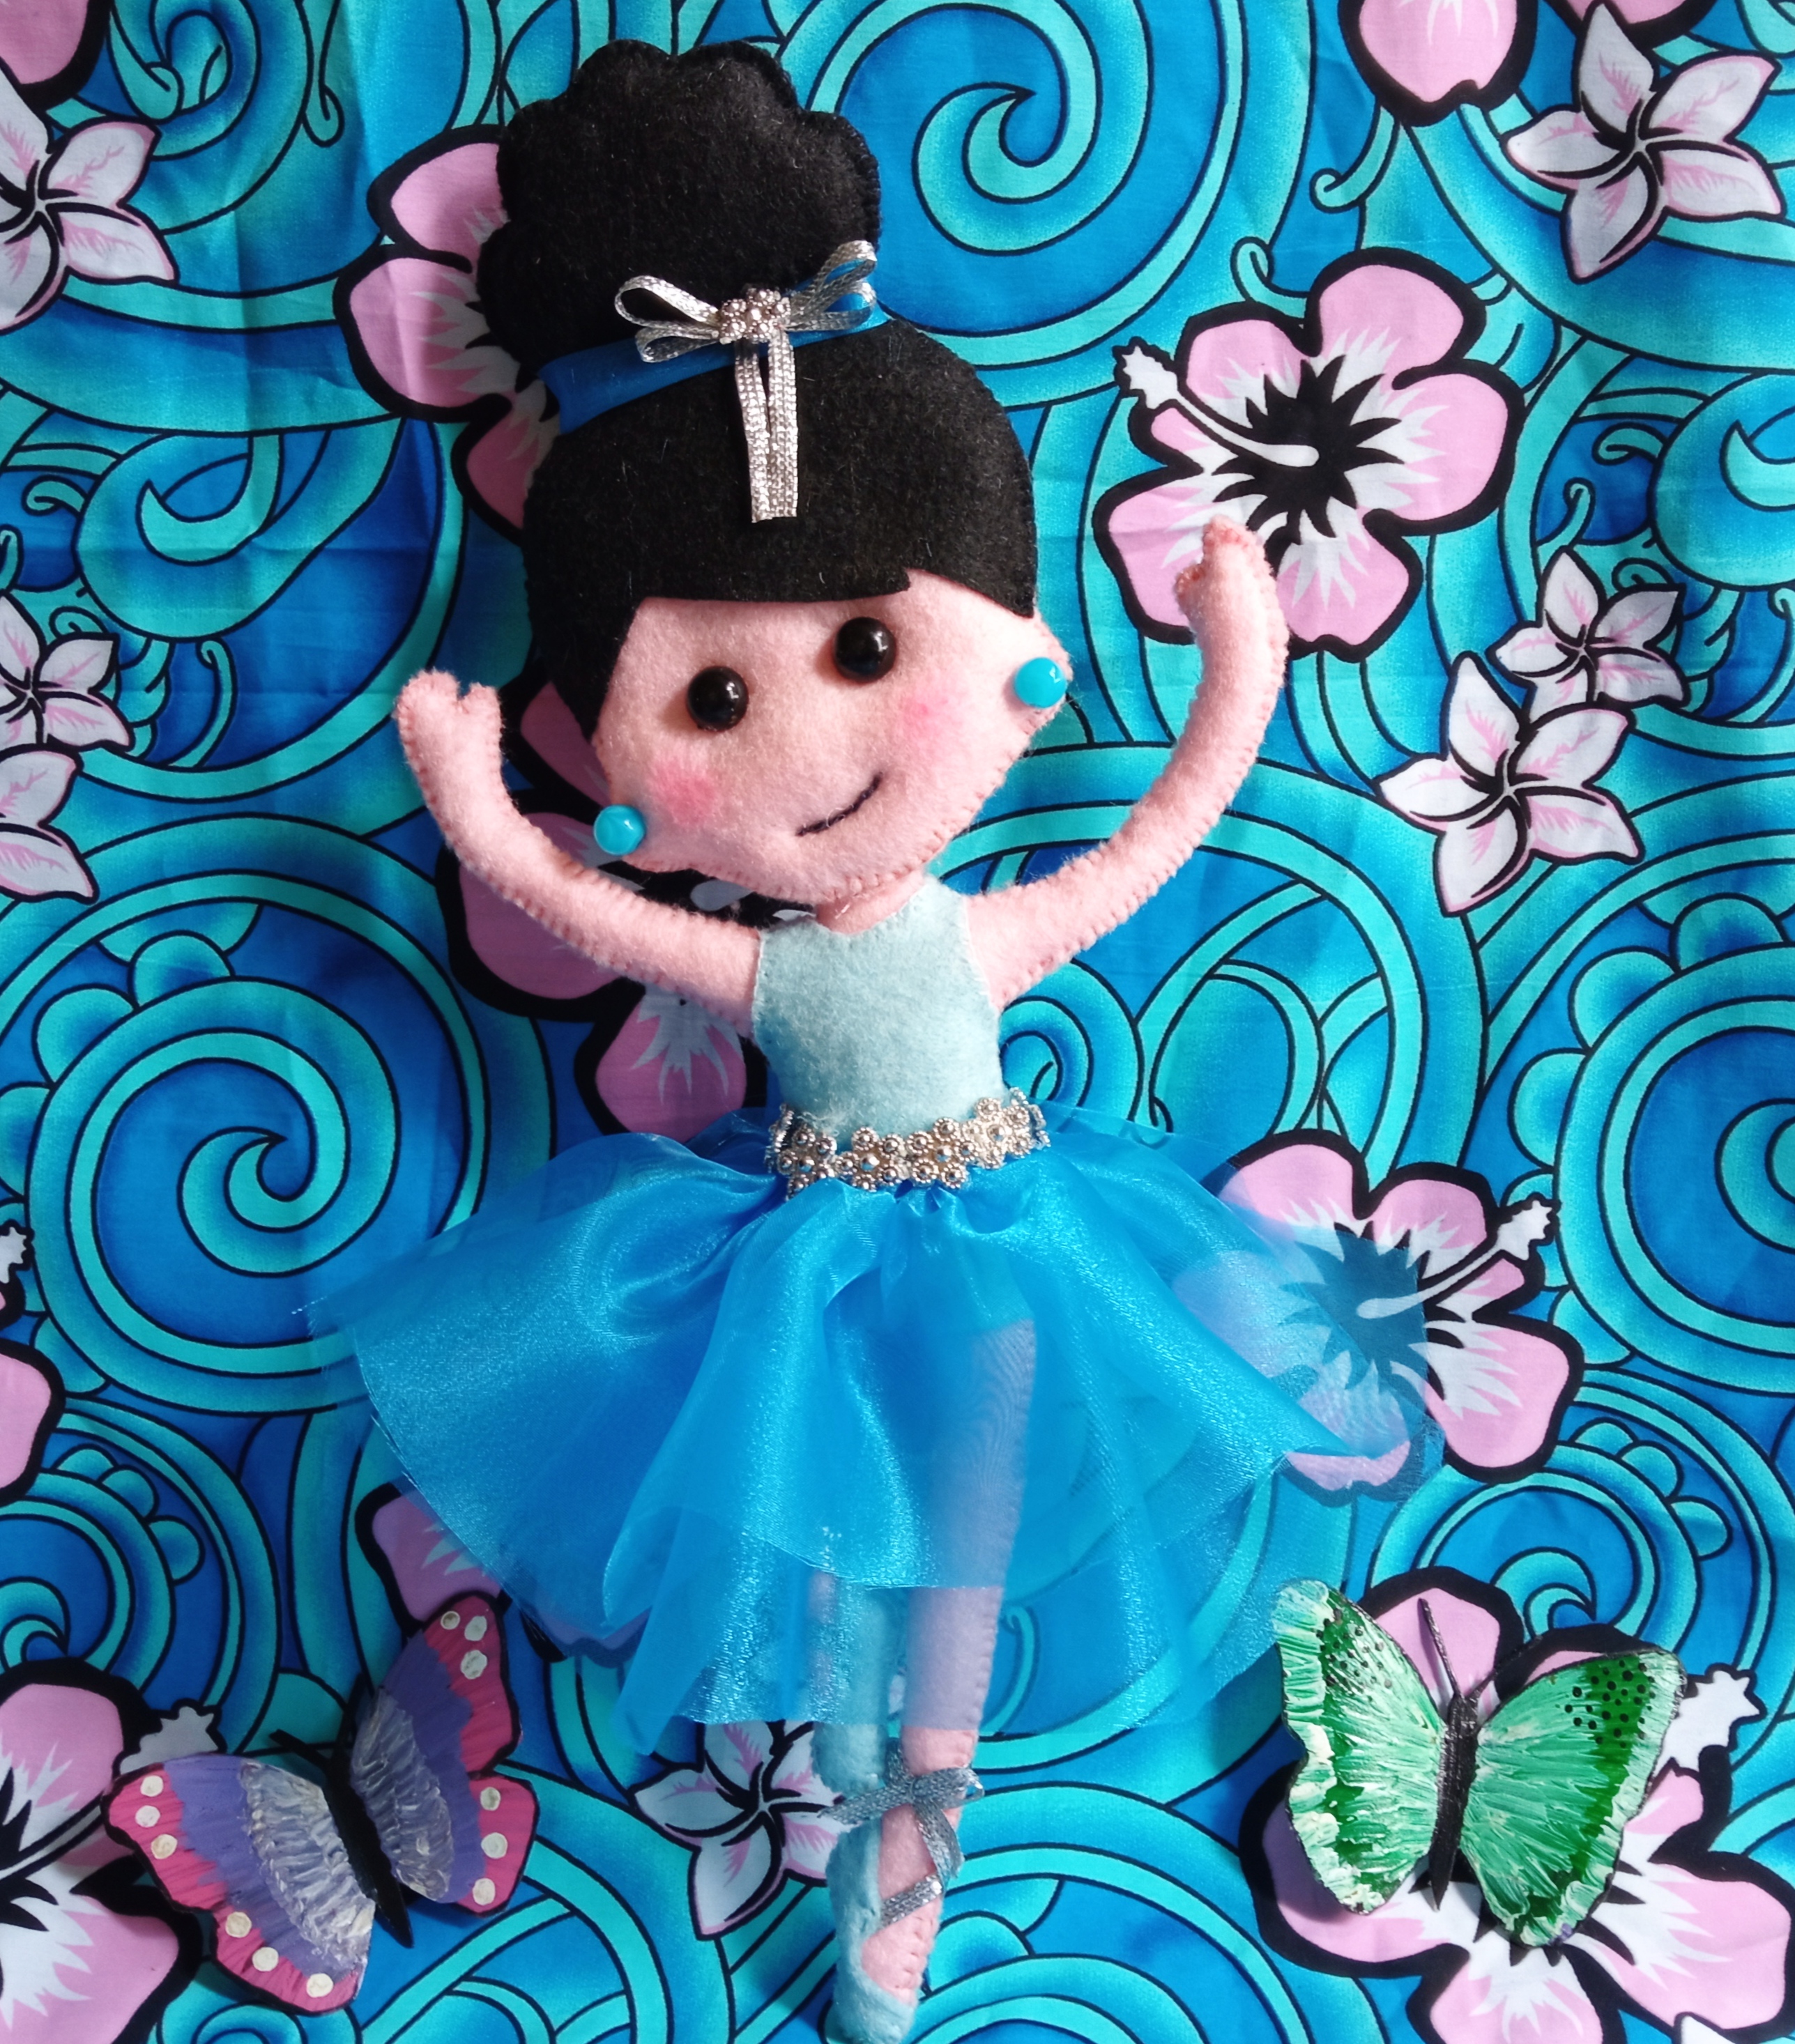
Hermosa 🥰 Muñeca Bailarina 🩰 Elaborada en fieltro // Beautiful 🥰 Ballerina Doll 🩰 Made of felt.
Hola, espero que se encuentren muy bien, hoy vengo a compartir con ustedes un maravilloso 💓 tutorial de cómo elaborar una hermosa 😍 muñeca bailarina 🩰 en fieltro cocida a mano el cual prepare para ustedes con mucho cariño, antes de comenzar quisiera contarles una pequeña historia, desde muy pequeña siempre tenía a mi lado una muñeca de trapo, así les decia las abuelitas yo tenía varias de ellas y a cada una les ponía nombre, eran tan hermosas, recuerdo a mi abuela sentada en su mesedora cociendolas y le colocaba cabellos de estambre.
osa 😍 ballerina doll 🩰 in handmade felt which I prepared for you with love, before I start I would like to tell you a little story, since I was a little girl I always had a rag doll by my side, so I called them grandmothers I had several of them and each one I named them, they were so beautiful, I remember my grandmother sitting in her chair cooking them and putting yarn hair.
Recordando siempre esas muñecas que hacía mi abuelita, así que a mis 16 años hice mi primera muñeca de trapo jejeje! No me quedo tan hermosa como las de ella pero recuerdo que a mi sobrinita le encantó, así que apartir de allí comencé a coser a mano casi que todo, descubrí que el coser me hacía feliz y no he dejado de hacerlo.
I always remember those dolls that my grandmother used to make, so when I was 16 years old I made my first rag doll hehehehe! It was not as beautiful as hers but I remember that my niece loved it, so from then on I started to sew by hand almost everything, I discovered that sewing made me happy and I have not stopped doing it.
Hace un año comencé a trabajar con fieltro, he elaborado de todo con este material jajaja 🤣 y cuando digo de todo es que no he parado jajaja! Es por ello que empecé hacer las muñecas de fieltro, está es mi tercera muñeca elaborada con fieltro y me encantó el resultado. Espero se animen y aprendan como hacerlas queda muy lindas.
A year ago I started working with felt, I have made everything with this material hahaha 🤣 and when I say everything is that I have not stopped hahaha! That's why I started making felt dolls, this is my third doll made with felt and I loved the result. I hope you are encouraged and learn how to make them, they are very cute.
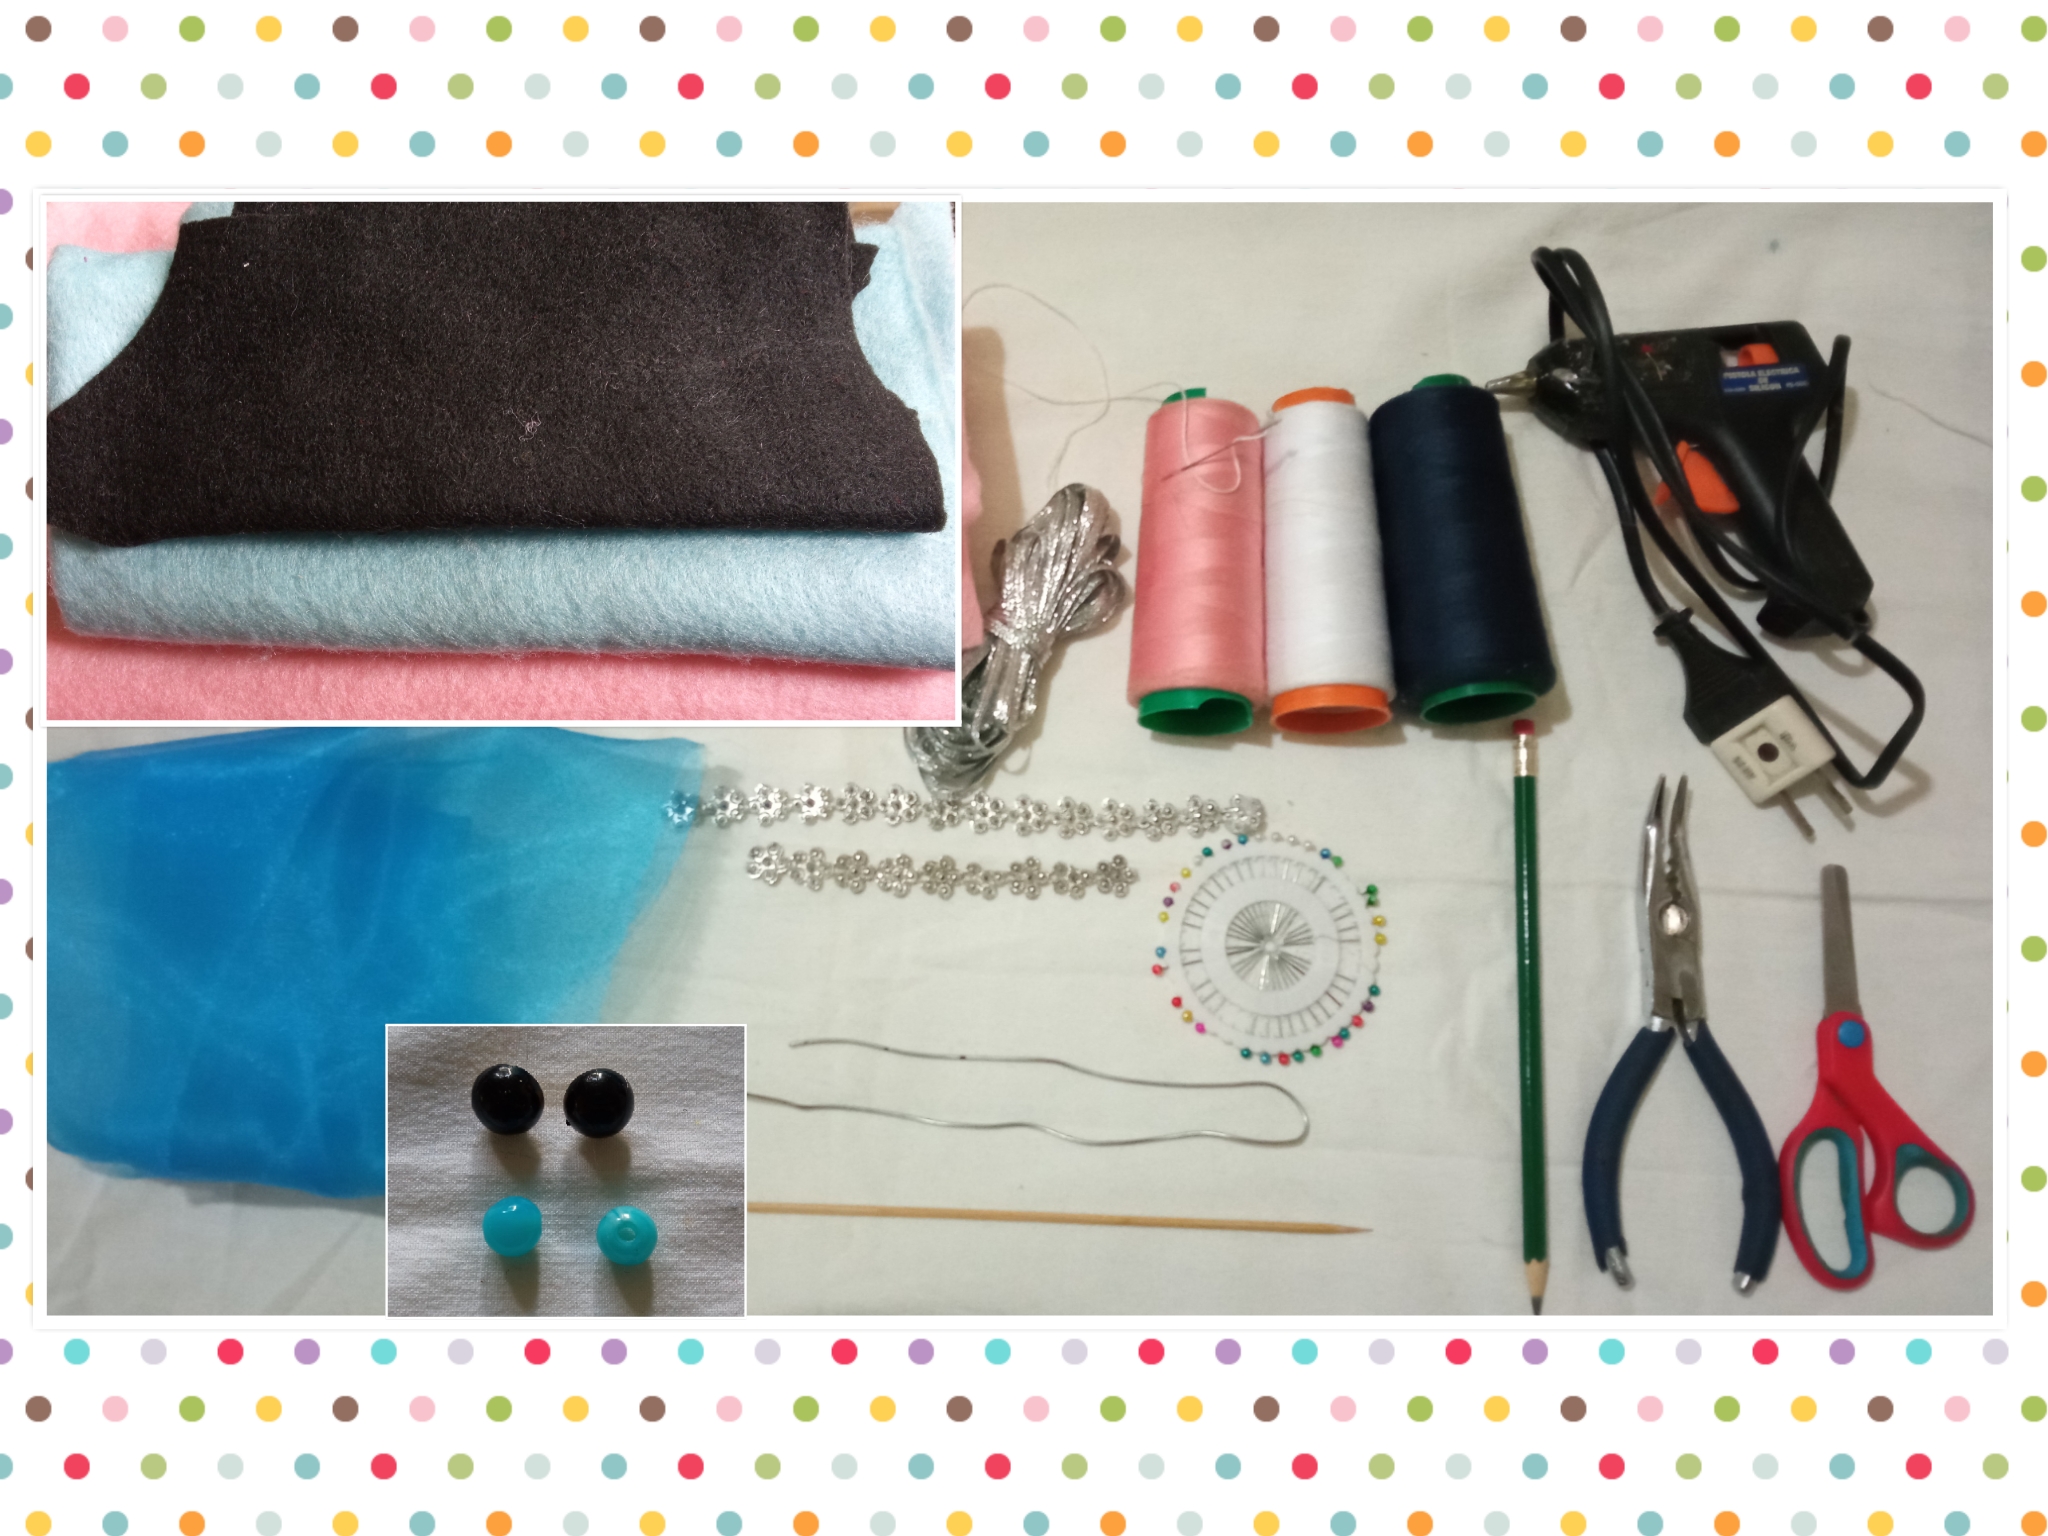
Es hora de comenzar! Antes le voy a detallar todos los materiales que utilice para la elaboración de esta hermosa 😍 Bailarina 🩰.
It's time to start! Before I am going to detail you all the materials I used for the elaboration of this beautiful 😍 Ballerina .
🩰 Materiales:🩰
- Fieltro de color rosado claro.
- Fieltro de color negro.
- Fieltro de color azul.
- Tela de tul color azul.
- Hilos de color blanco, rosado y negro.
- Cinta de 5 milímetros plateada.
- Cinta de flores plateada.
- Dos perlas azules. (Para los Zarcillos).
- Dos botones lizos negros. (Para los ojos).
- Un palito de altura.
- Alambre.
- Tijera.
- Agujas.
- lápiz.
- Hojas blancas para dibujar los patrones.
- Pistola de silicón.
🩰 Materials:🩰
- Light pink felt.
- Black felt.
- Blue felt.
- Blue tulle fabric.
- White, pink and black threads.
- Ribbon of 5 millimeters silver color.
- Silver-colored flower ribbon.
- Two blue pearls. (For the tendrils).
- Two black woolly buttons. (For the eyes).
- A stick of height.
- Wire.
- Scissors.
- Needles.
- Pencil.
- White sheets to draw the patterns.
- Silicone gun.
🩰 Elaboración:🩰 // 🩰 Elaboration:🩰
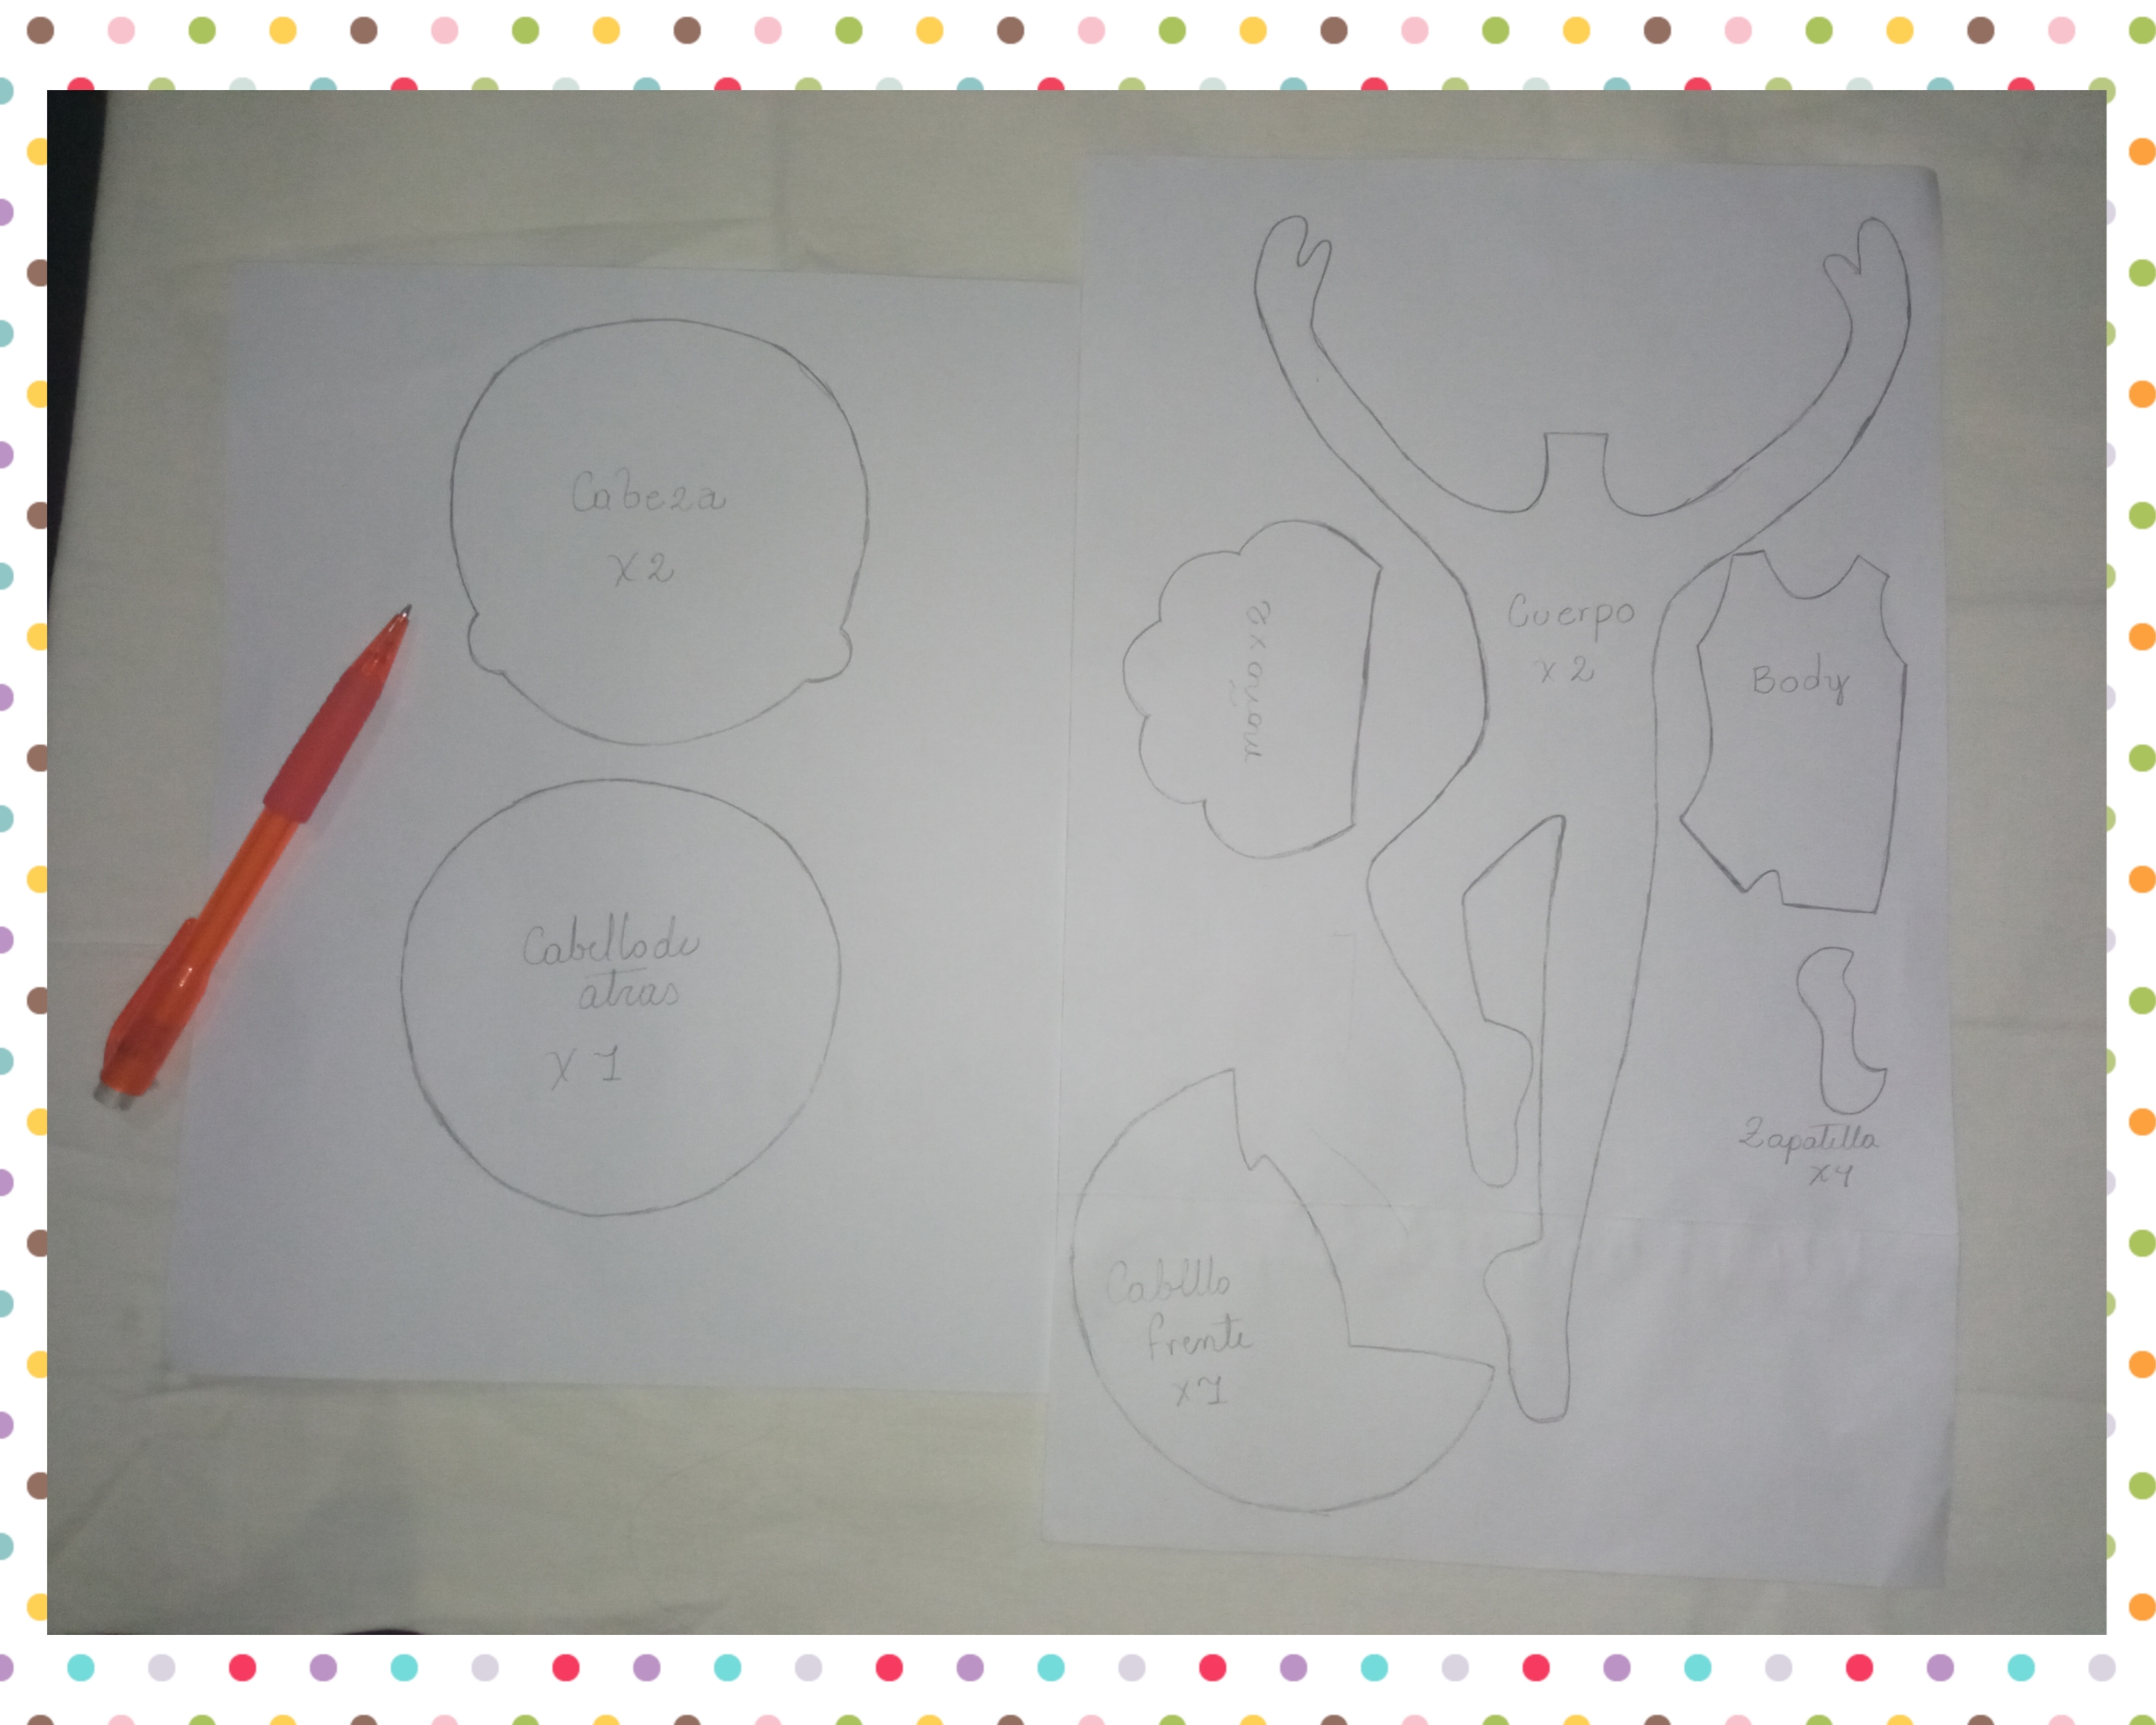
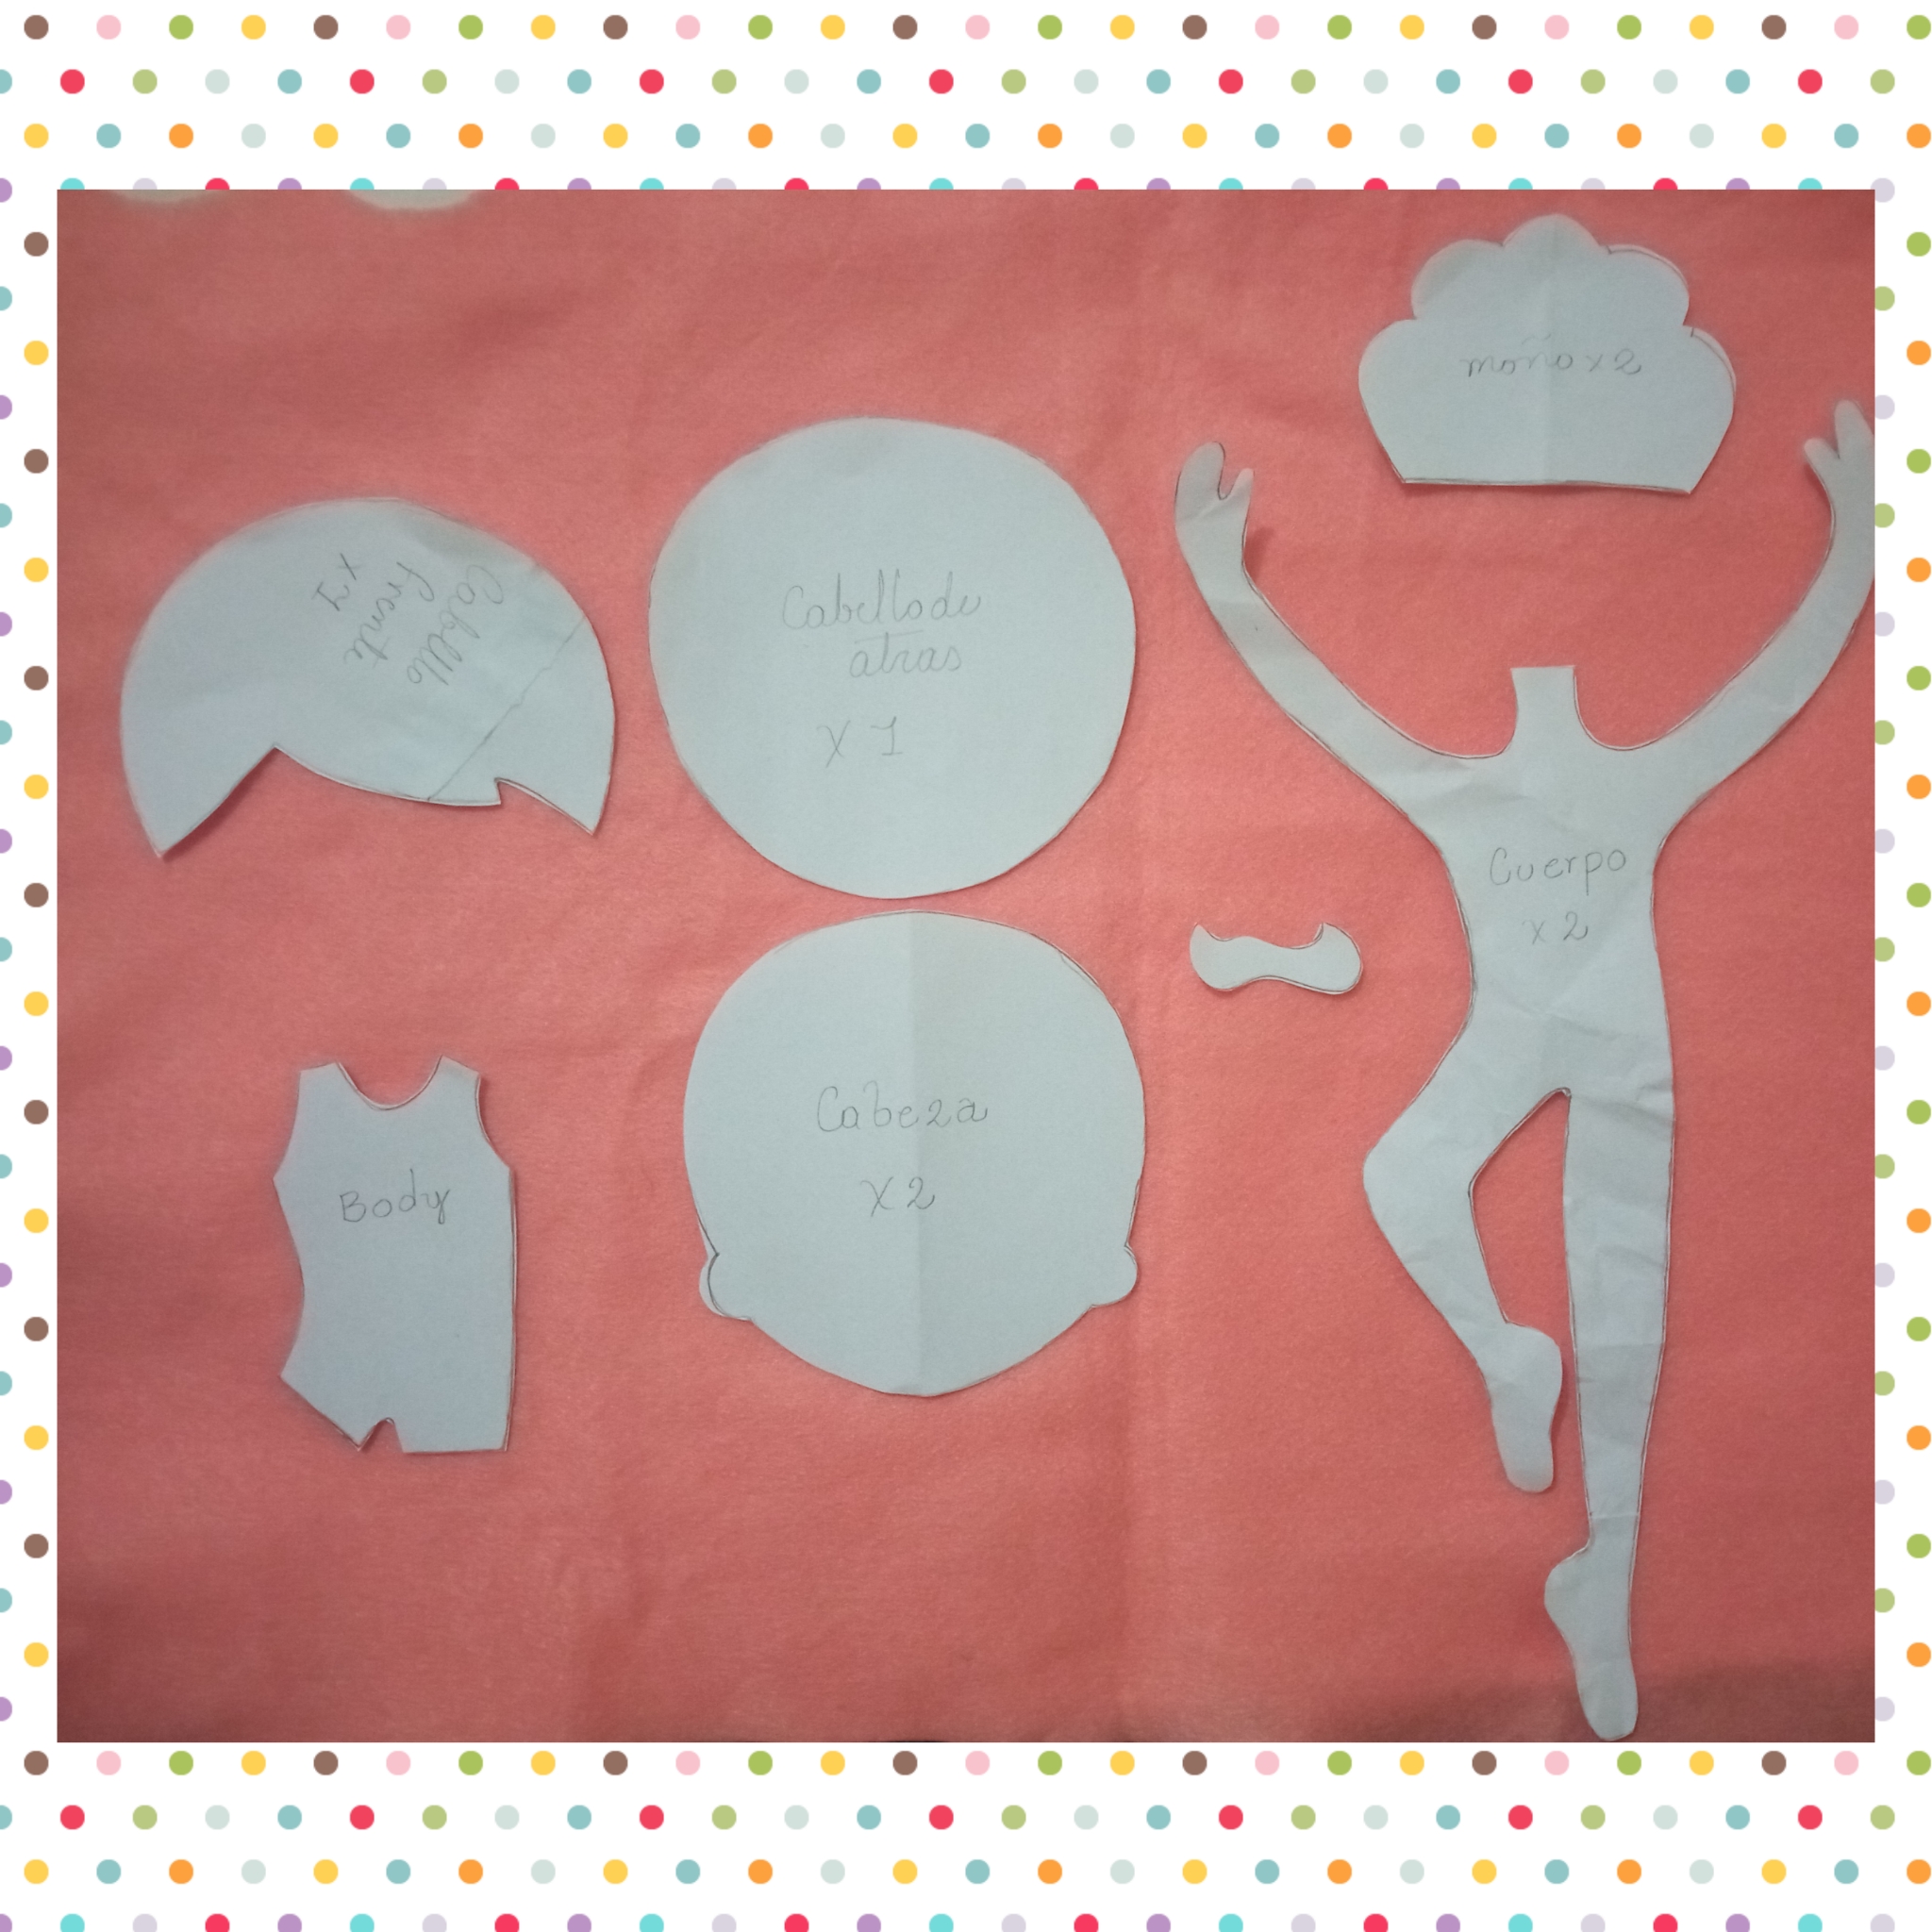
Paso 1:
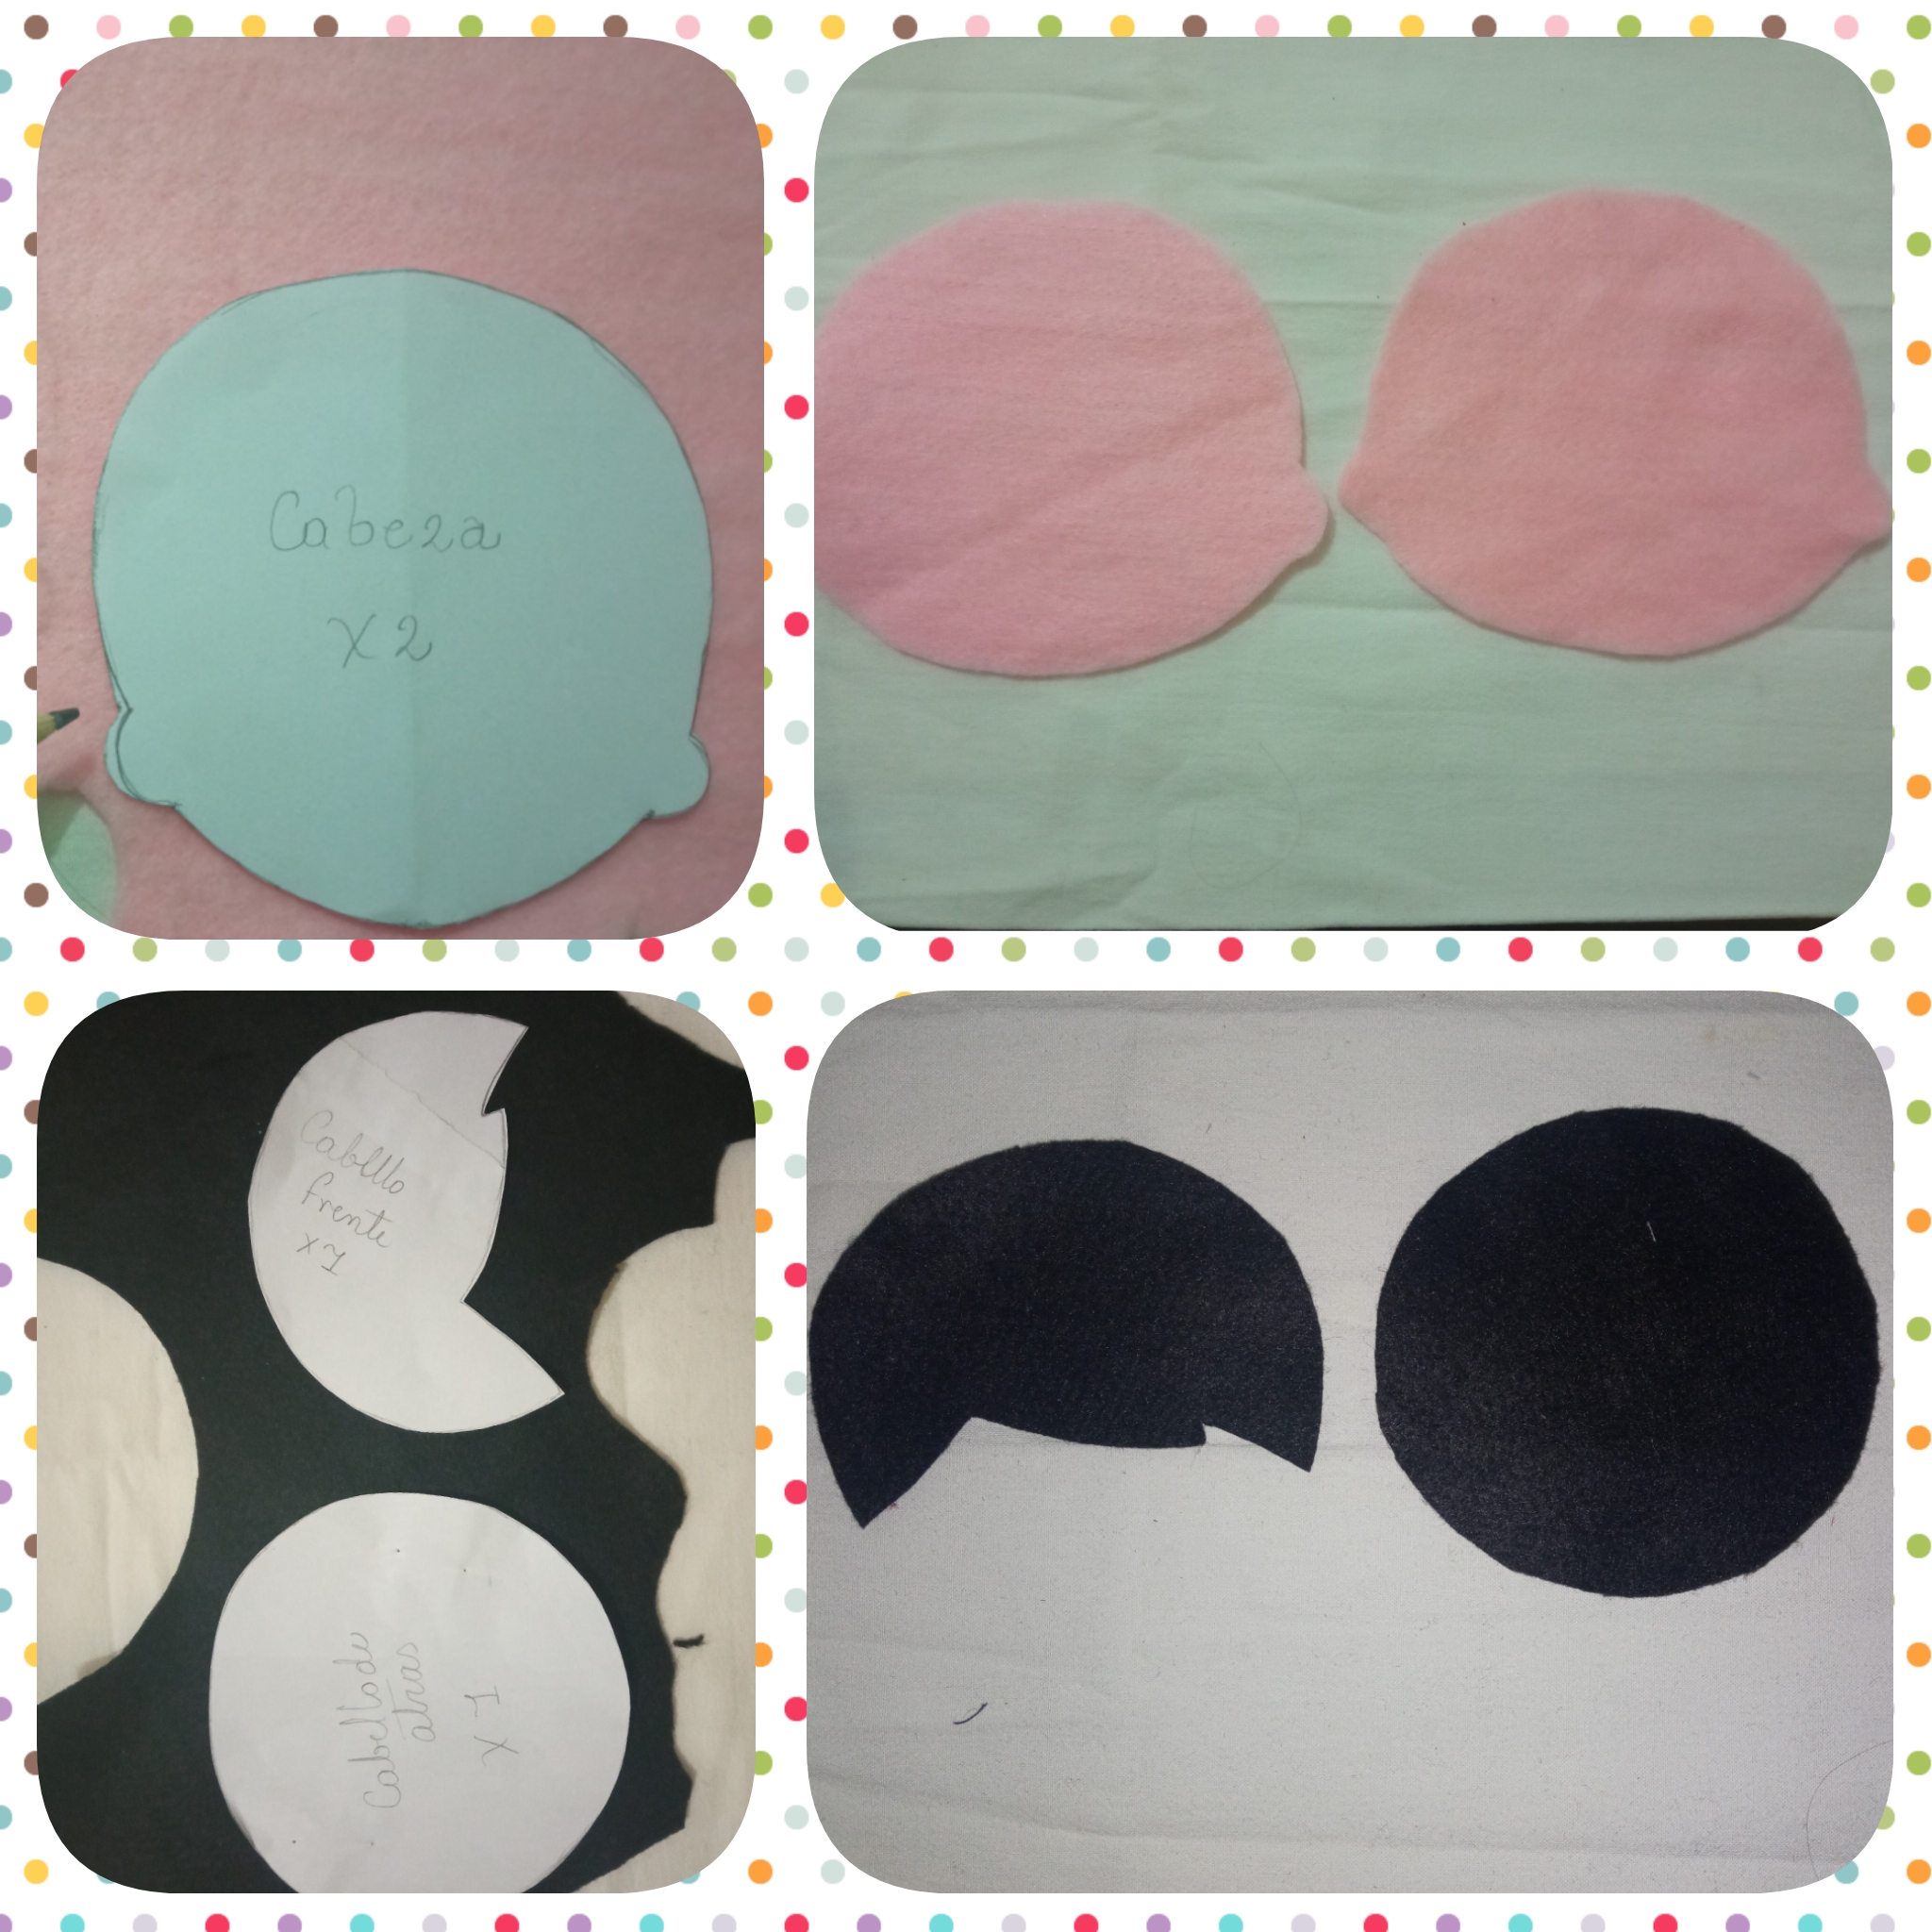
Para comenzar en una hoja blanca dibujo los patrones de la bailarina 🩰 luego los recortó uno a uno.
Step 1:
To begin with on a white sheet I drew the patterns of the ballerina 🩰 then cut them out one by one.
Paso 2:
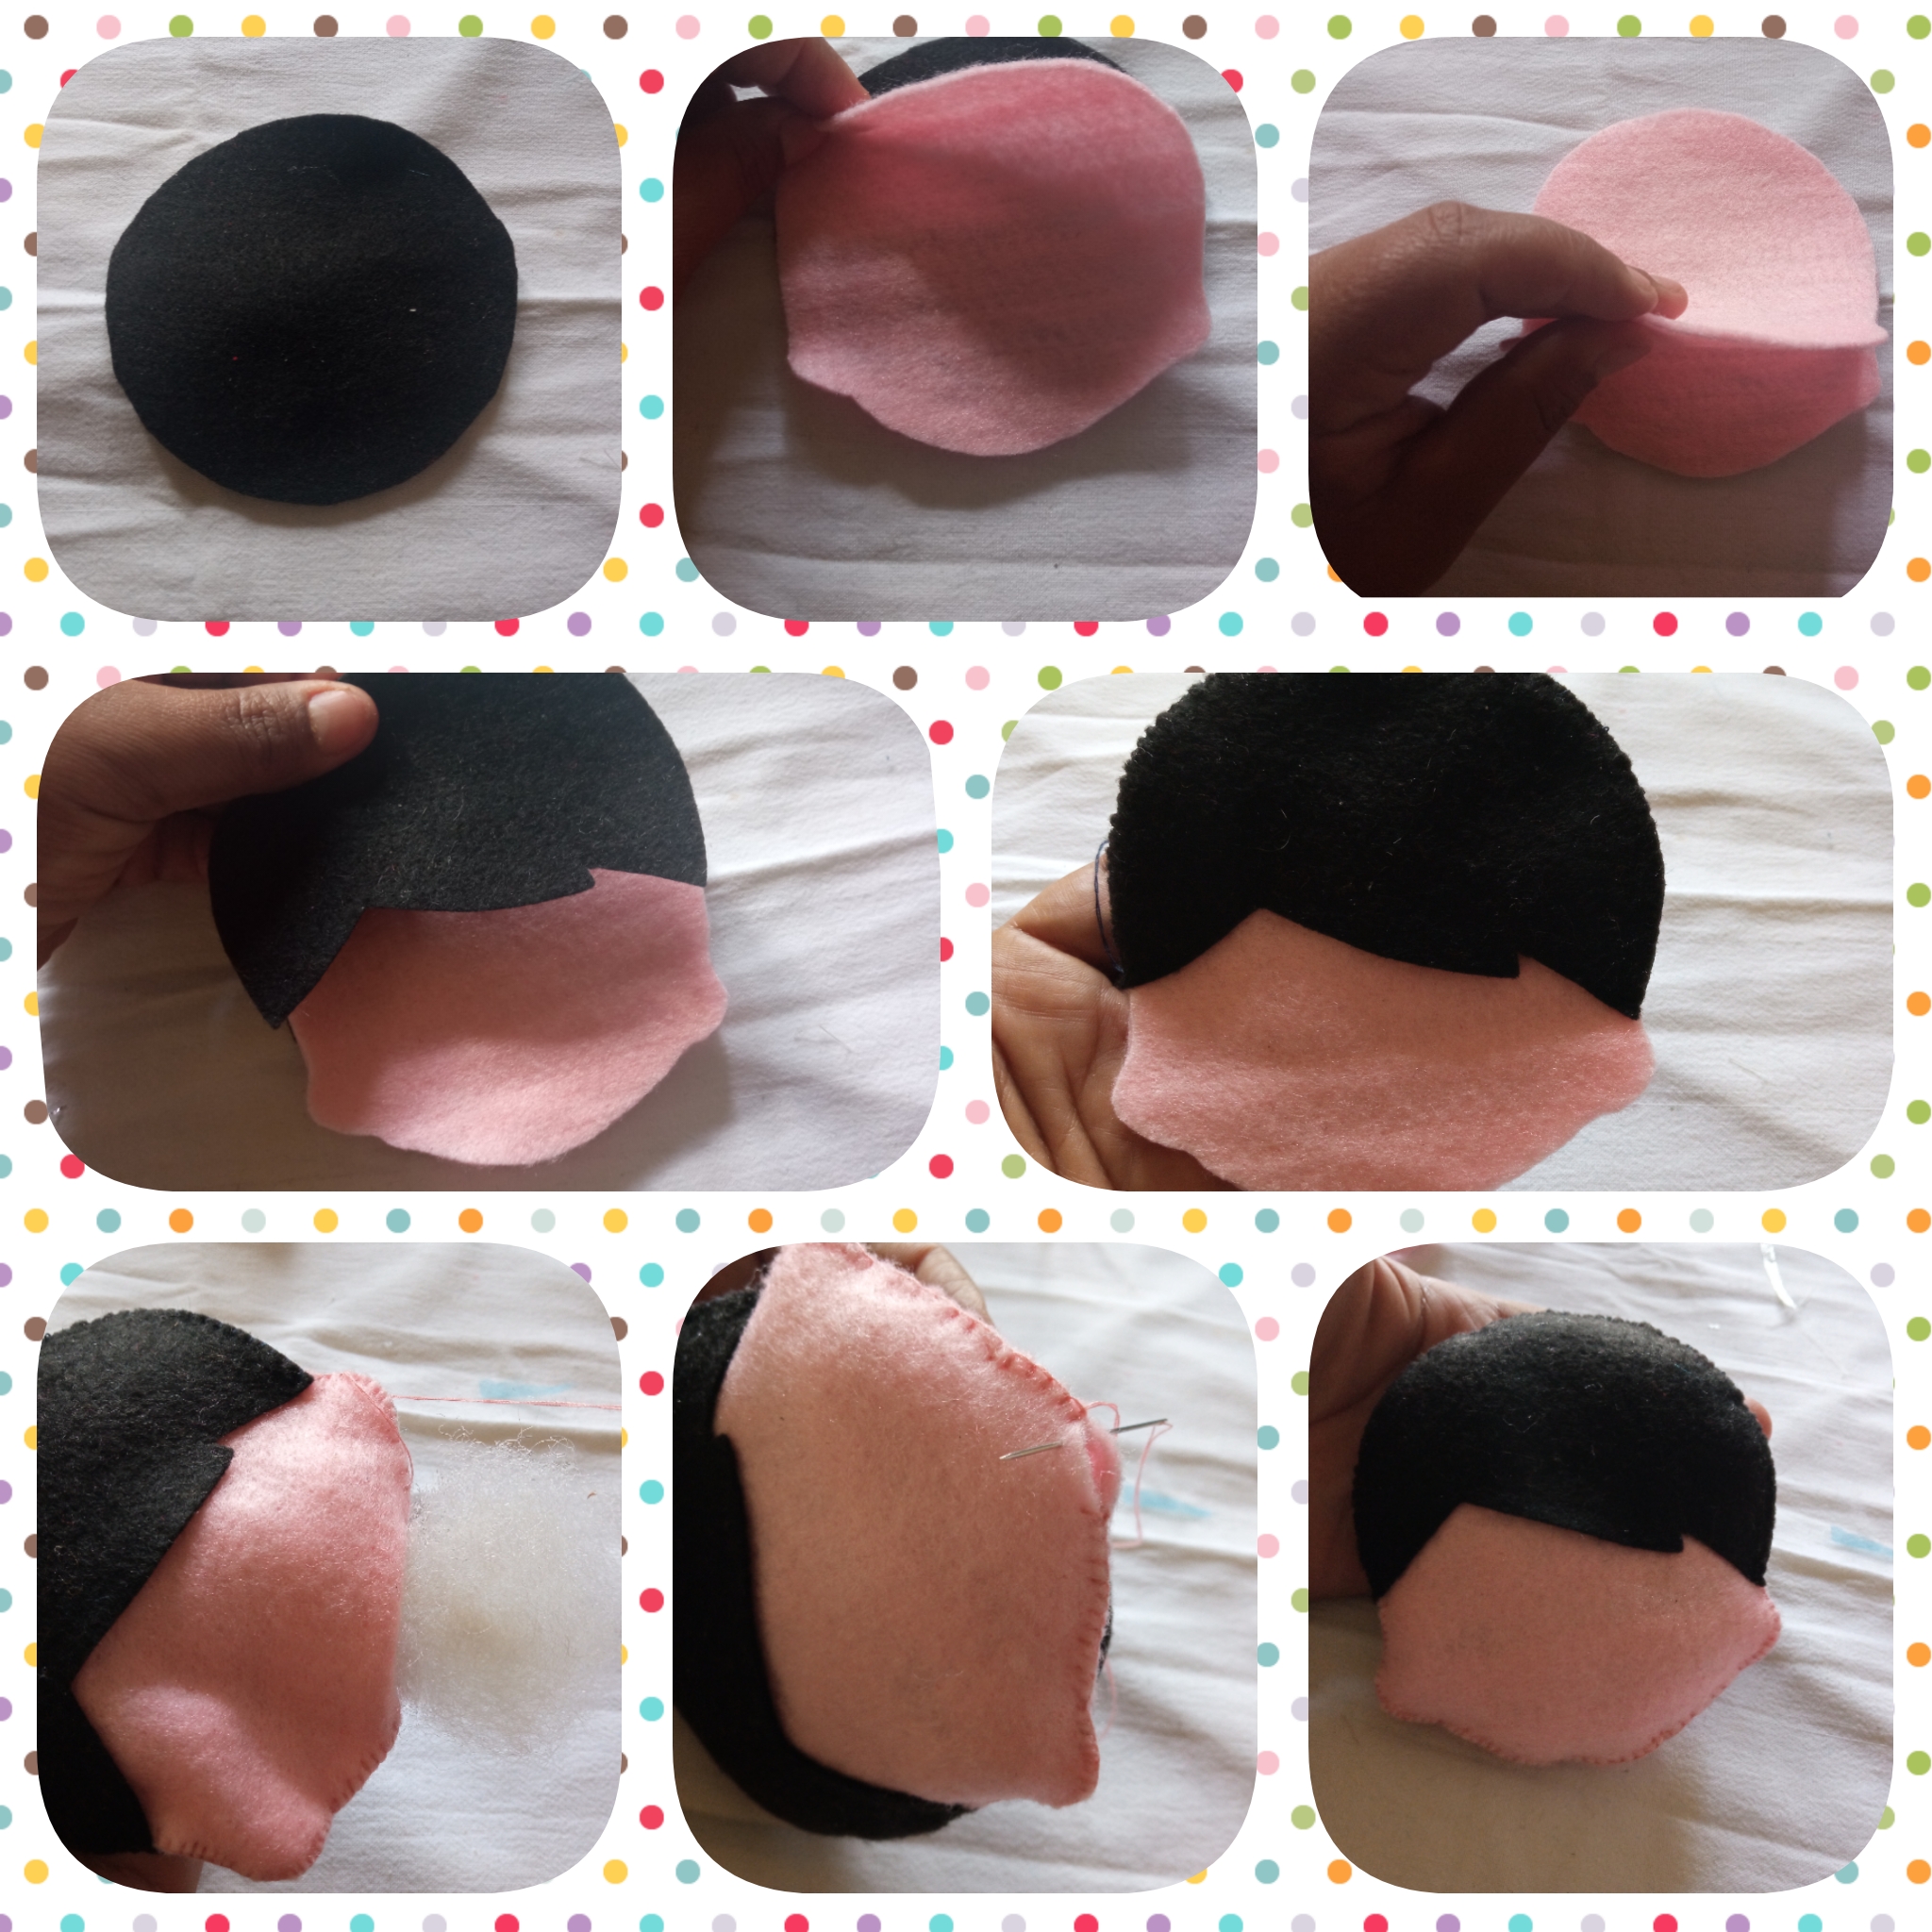
Tomo el patrón de la cabeza y lo marco en el fieltro rosado y corto dos piezas, luego tomo el patrón del cabello trasero corto una pieza, la pollina corto una pieza. Ahora uno el cabello trasero las dos piezas de la cara y a la pollina después comienzo a coser con hilo negro la parte del cabello y la parte de la cara con hilo rosado dejando un agujero rellenamos y terminamos de coser.
Step 2:
I take the pattern of the head and mark it on the pink felt and cut two pieces, then I take the pattern of the back hair and cut one piece, the skirt I cut one piece. Now I join the back hair to the two pieces of the face and to the skirt then I start to sew with black thread the part of the hair and the part of the face with pink thread leaving a hole we fill and finish sewing.
Paso 3:
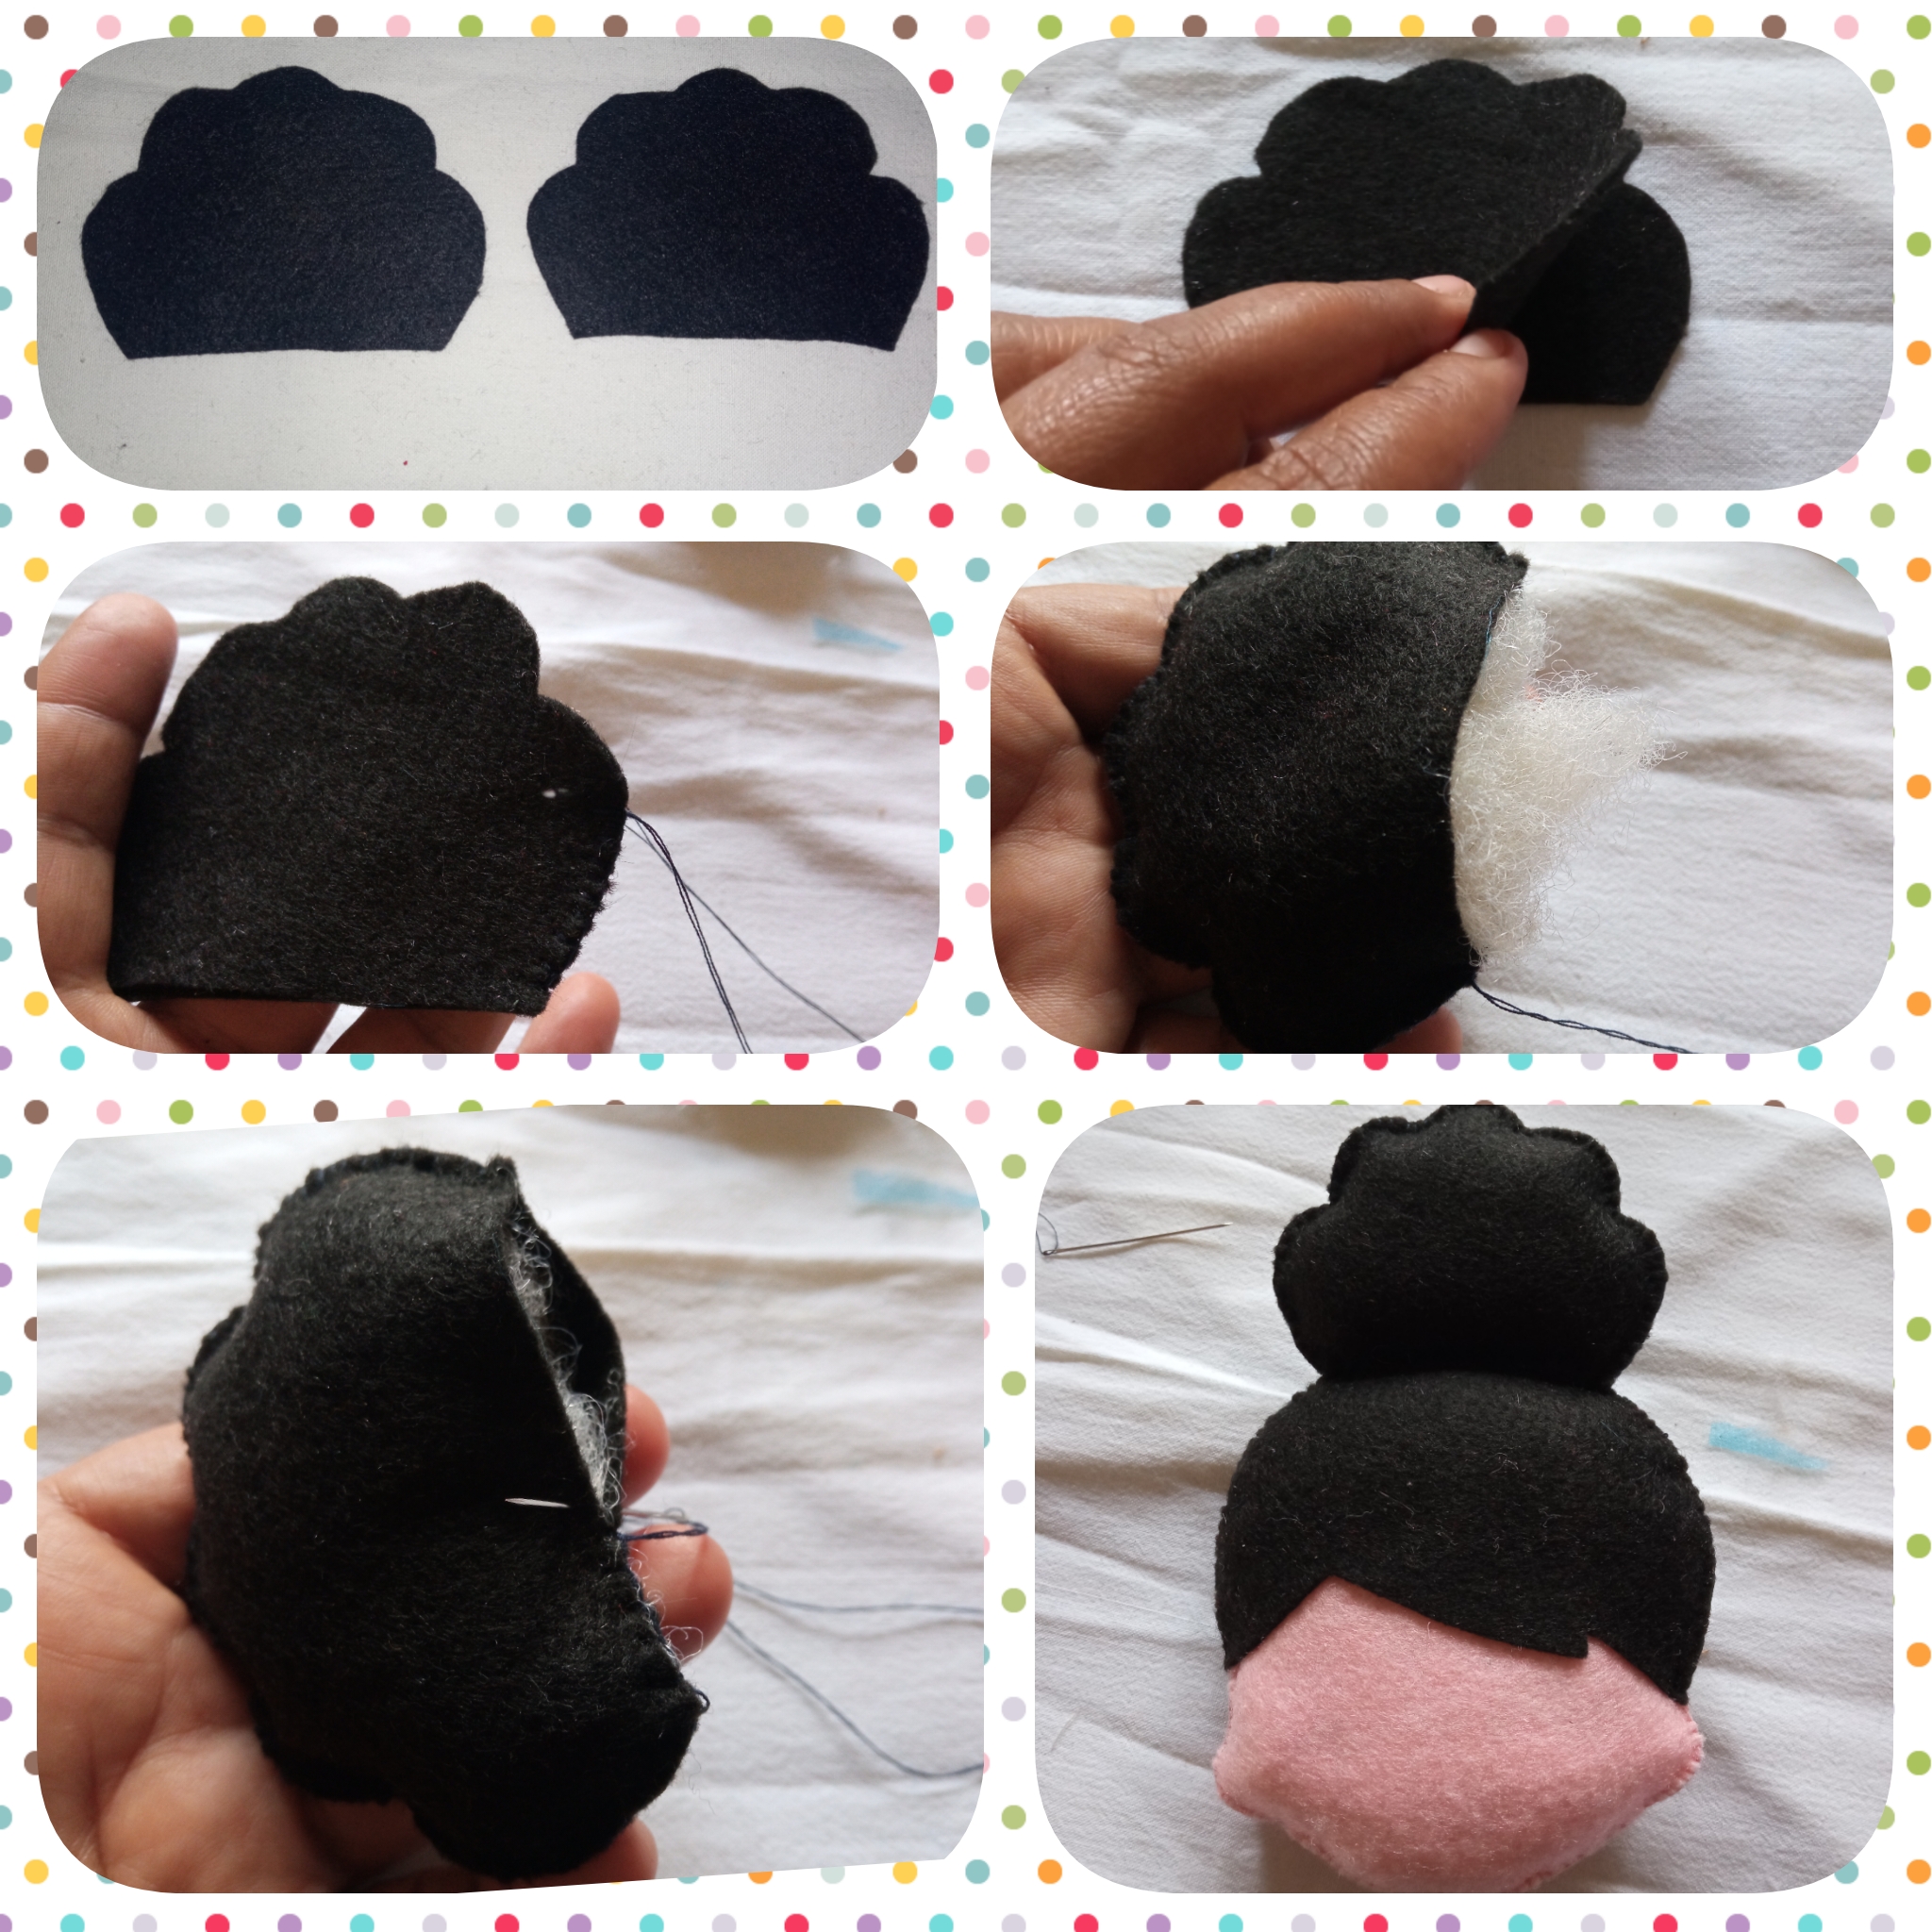
Cortamos dos piezas del moño con ayuda del patrón unimos y cosemos en punto ojal con hilo negro rellenamos y terminamos de coser, luego lo cosemos al cabello así como ven en la foto.
Step 3:
We cut two pieces of the bow with the help of the pattern we join and sew in buttonhole stitch with black thread we fill and finish sewing, then we sew it to the hair as you can see in the photo.
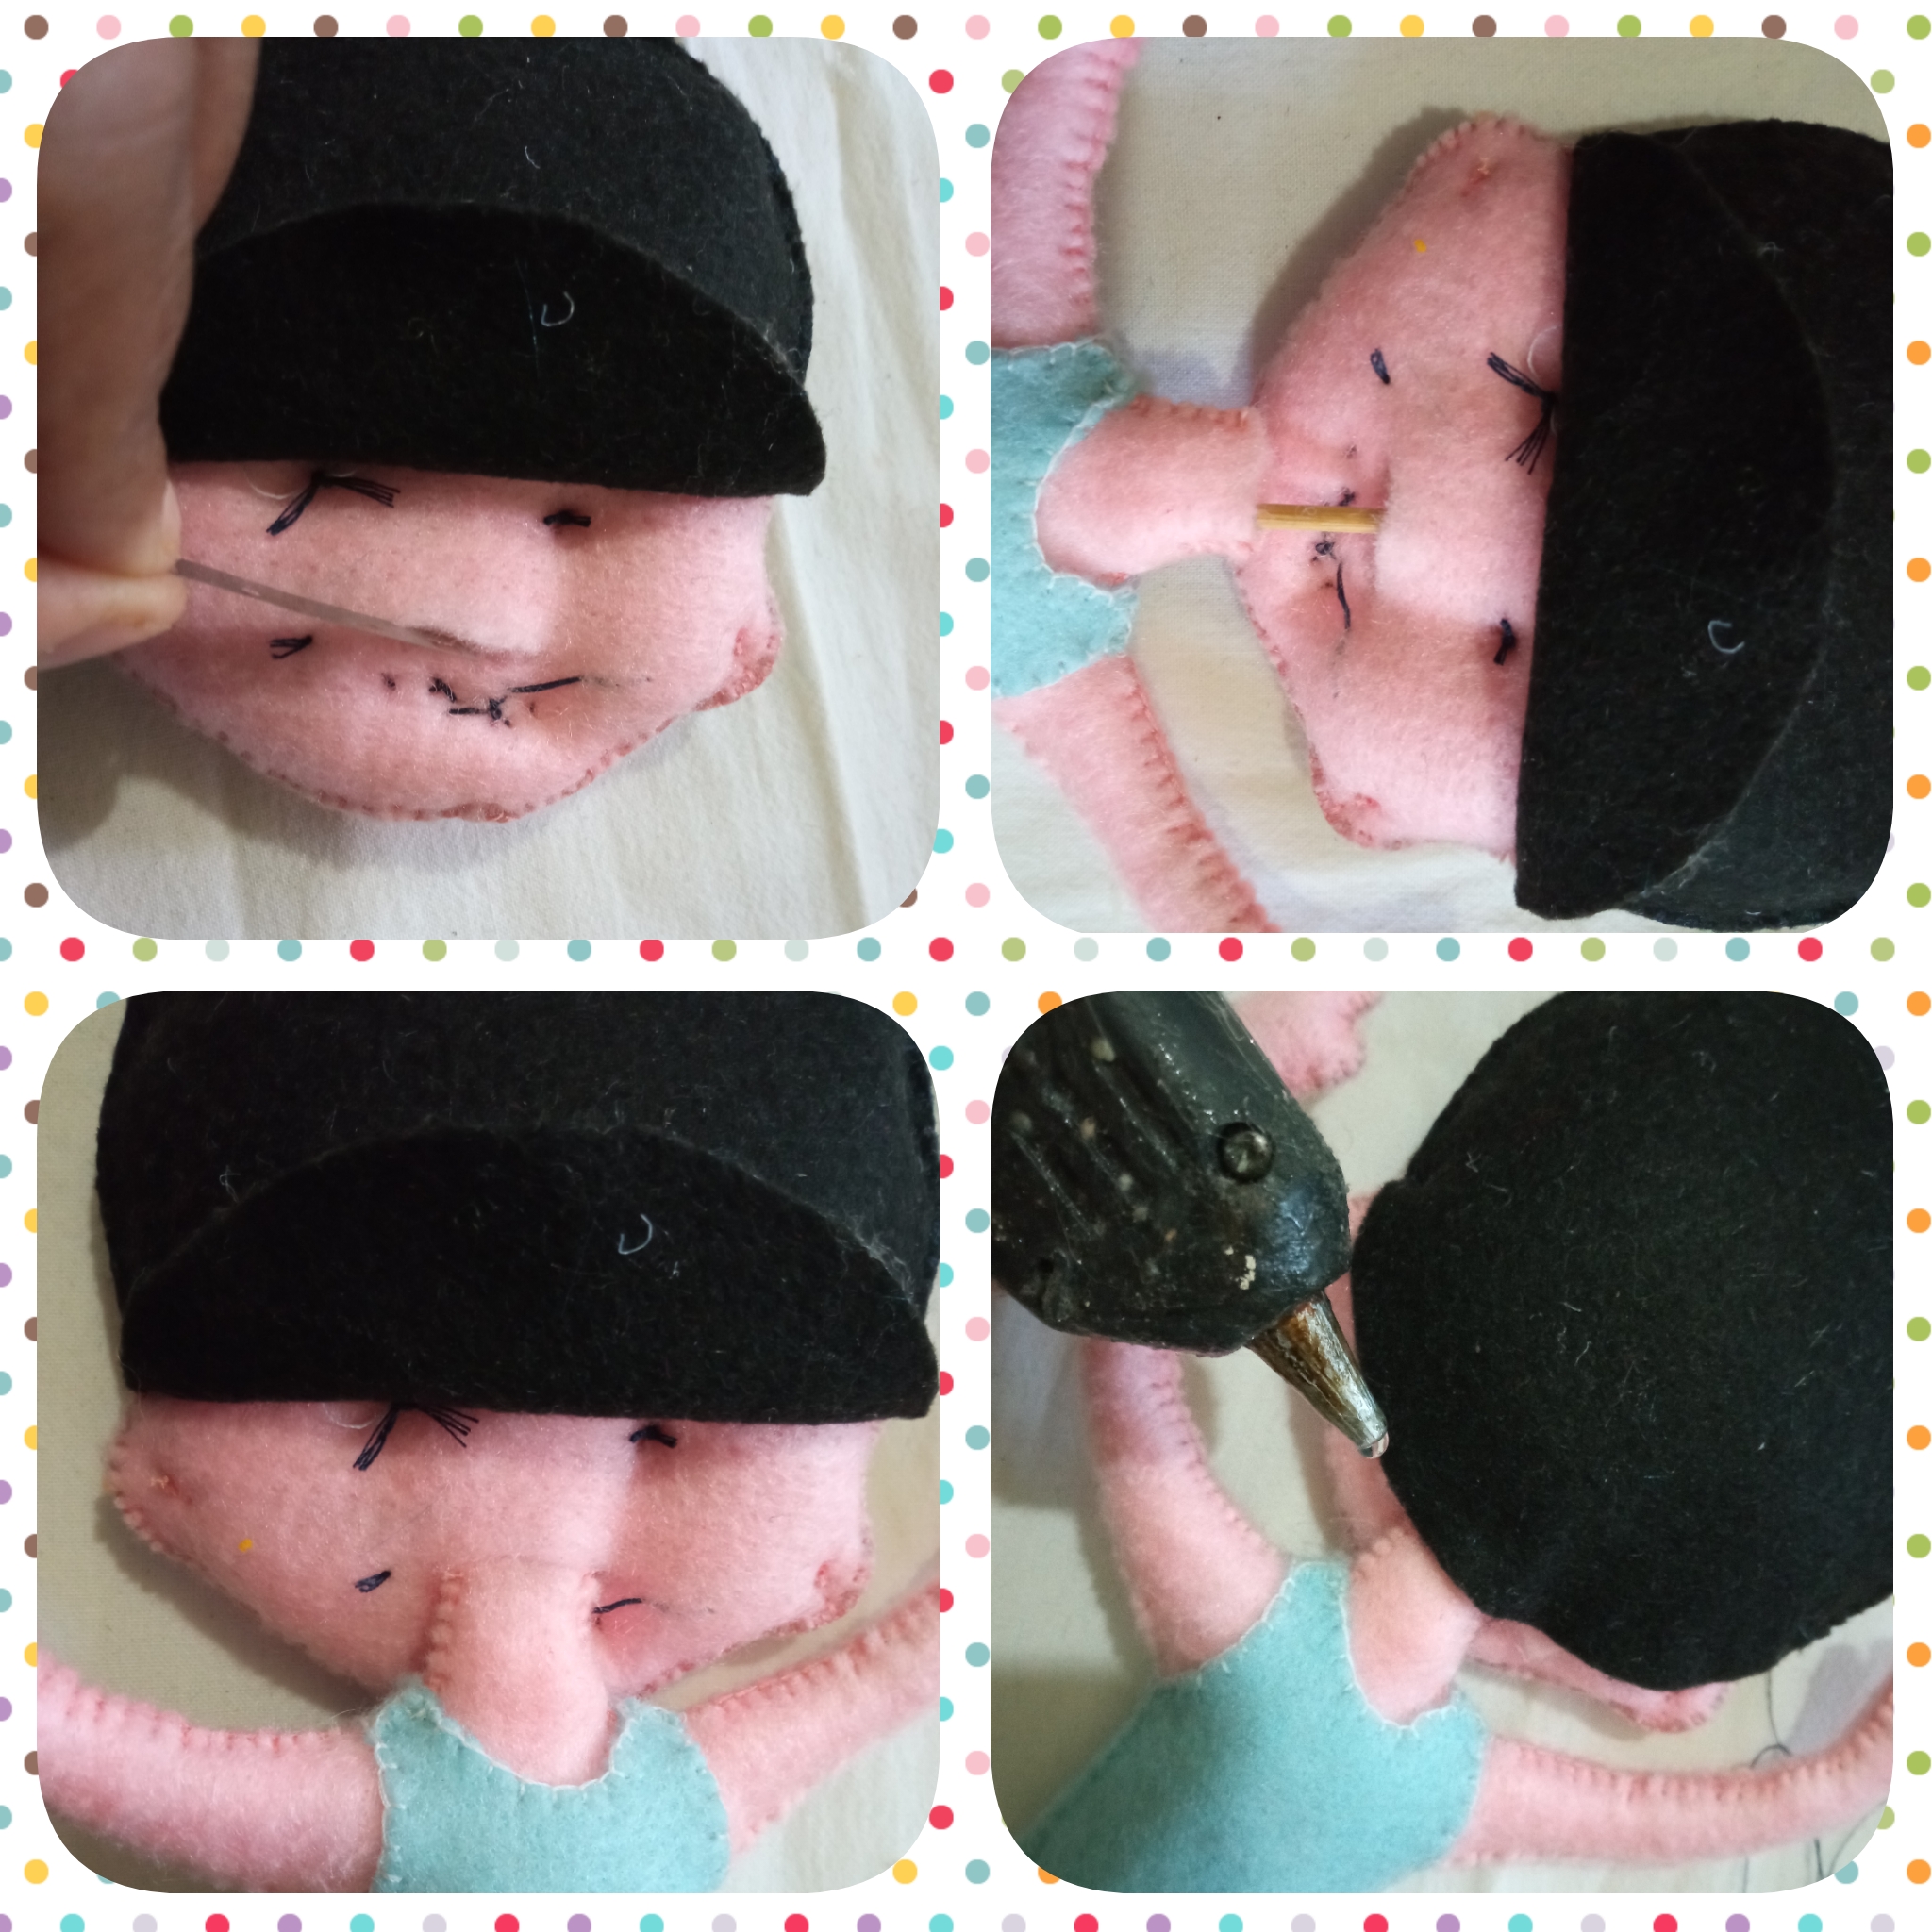
Paso 4:
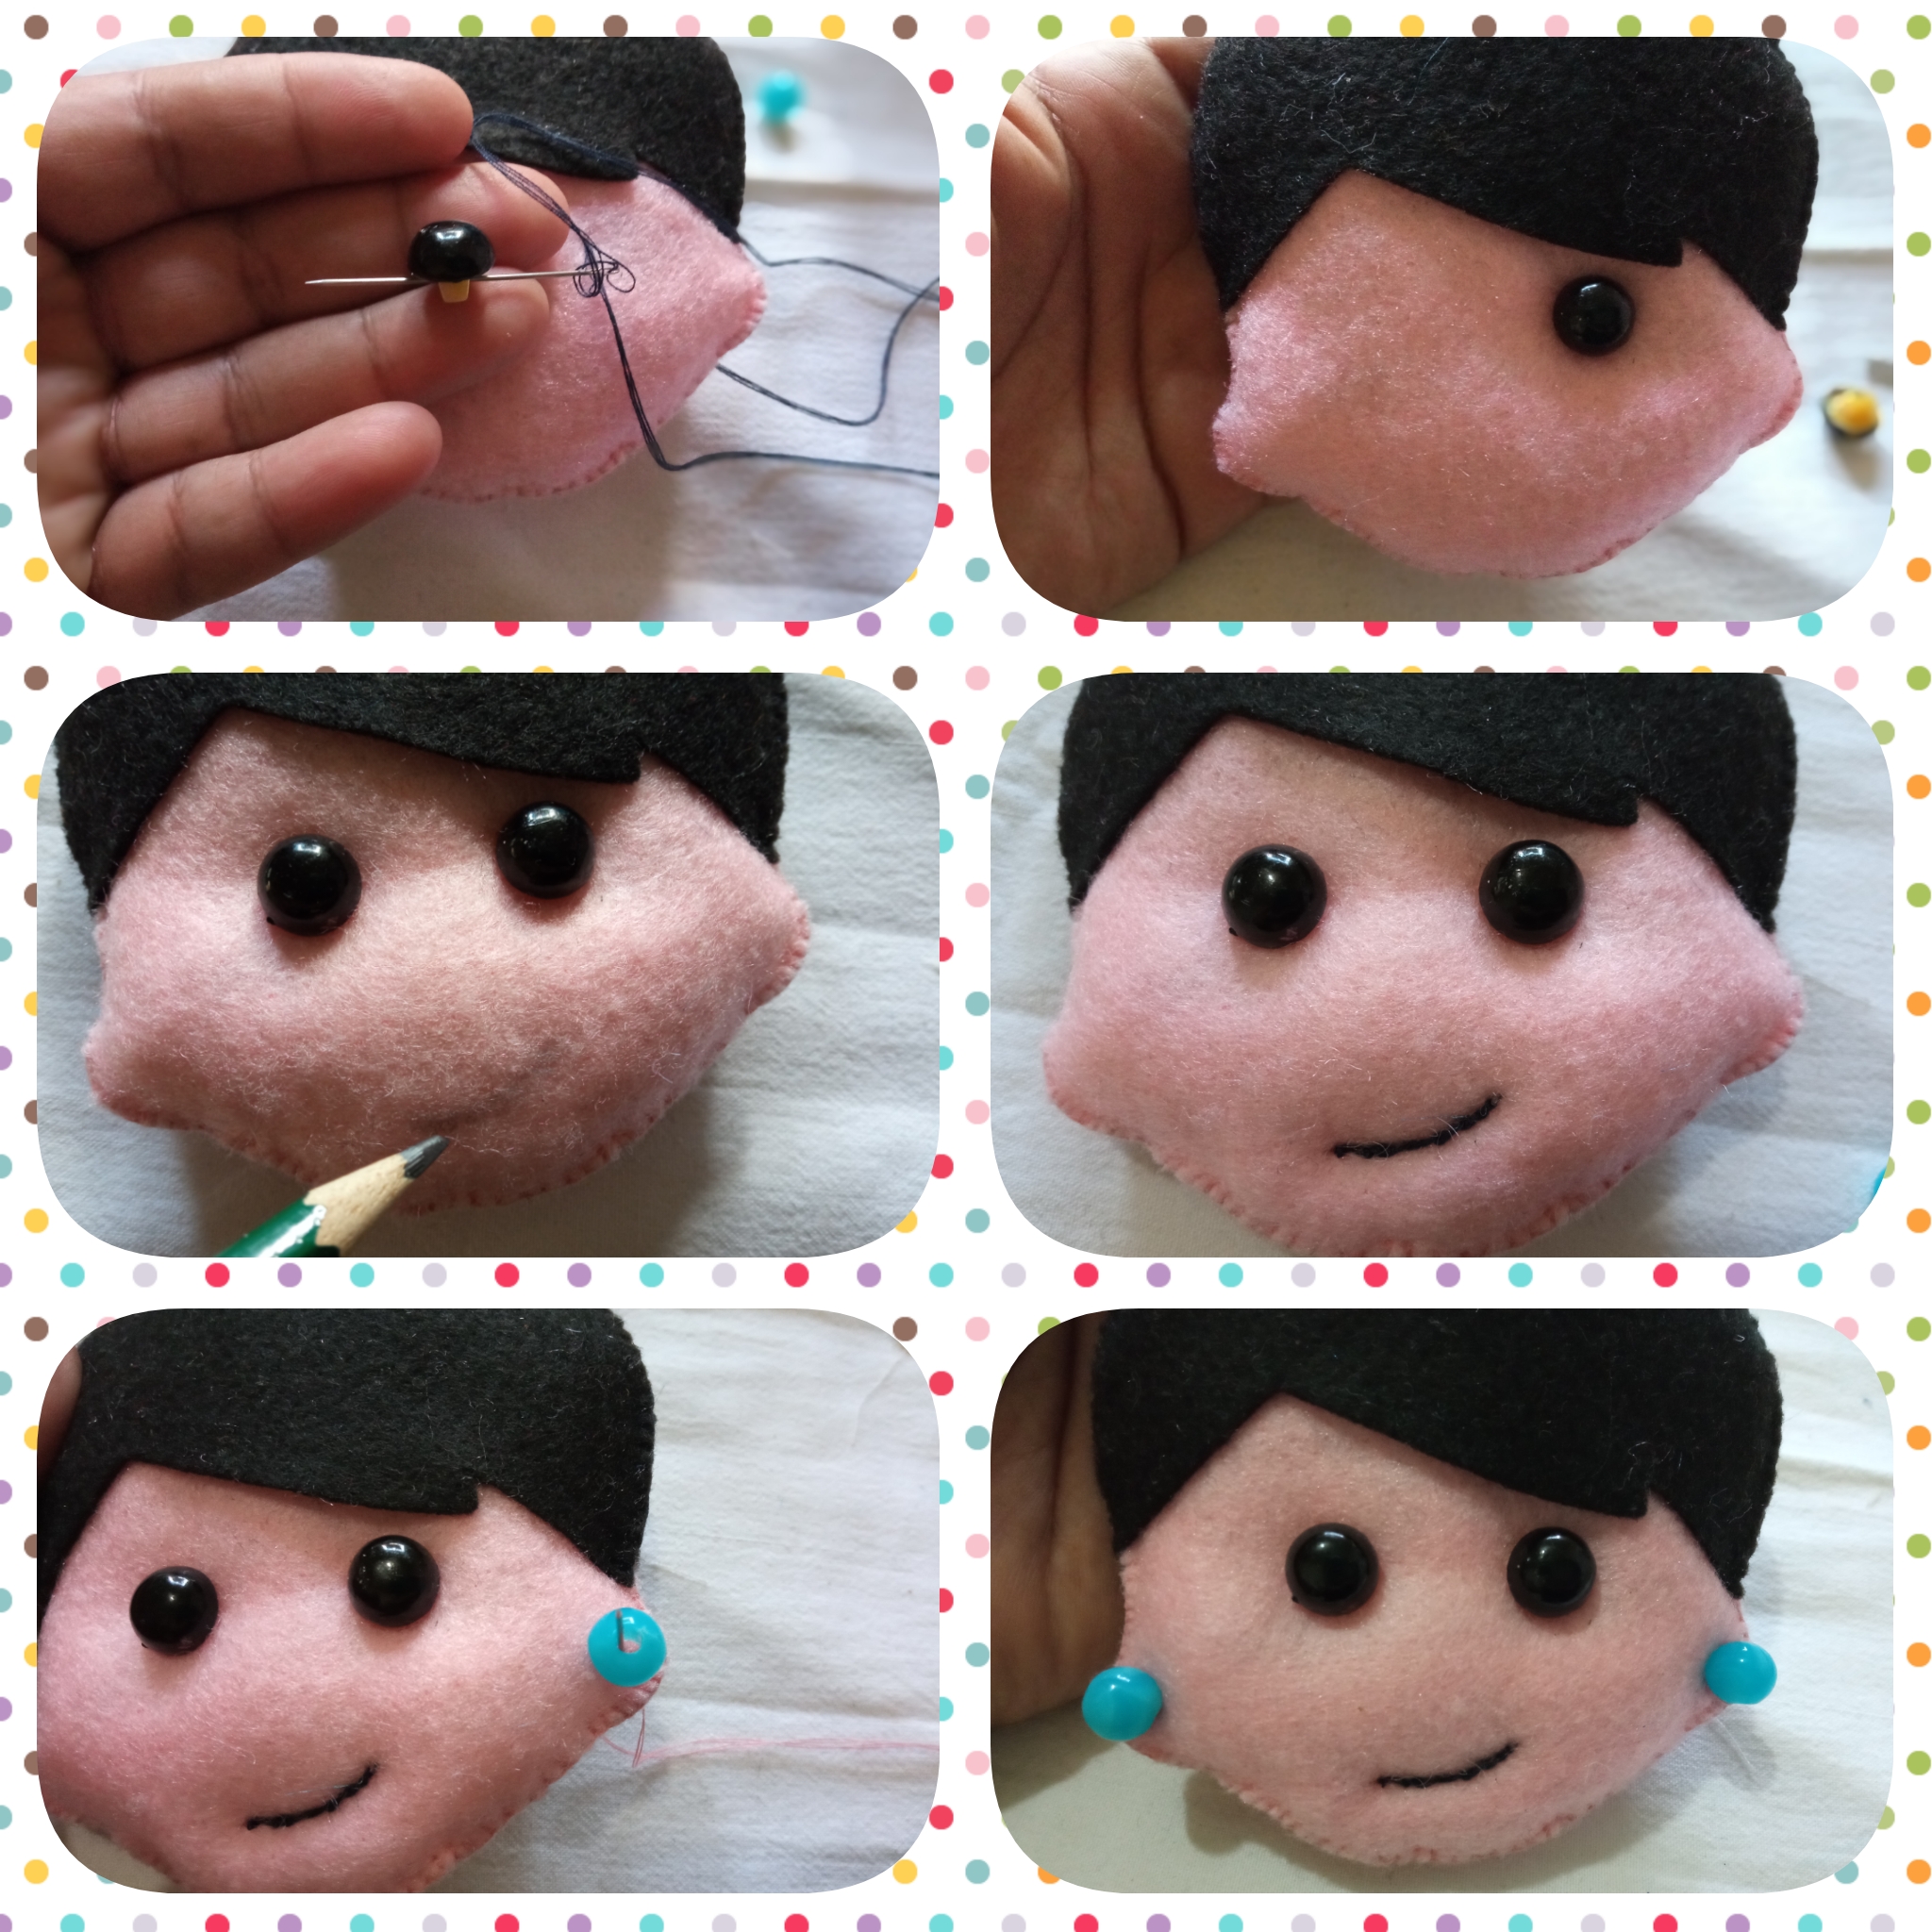
Ahora tomamos los botones lizos negros y lo cosemos a la cara prensando un poco por la parte de atrás para ello subimos el cabello, luego marcamos la boca con un lápiz y bordamos con hilo negro, después tomamos las perlas azules y la cosemos en las orejas quedando como Zarcillos.
Step 4:
Now we take the black buttons and sew them to the face pressing a little on the back part of the hair, then we mark the mouth with a pencil and embroider with black thread, then we take the blue pearls and sew them on the ears remaining as tendrils.
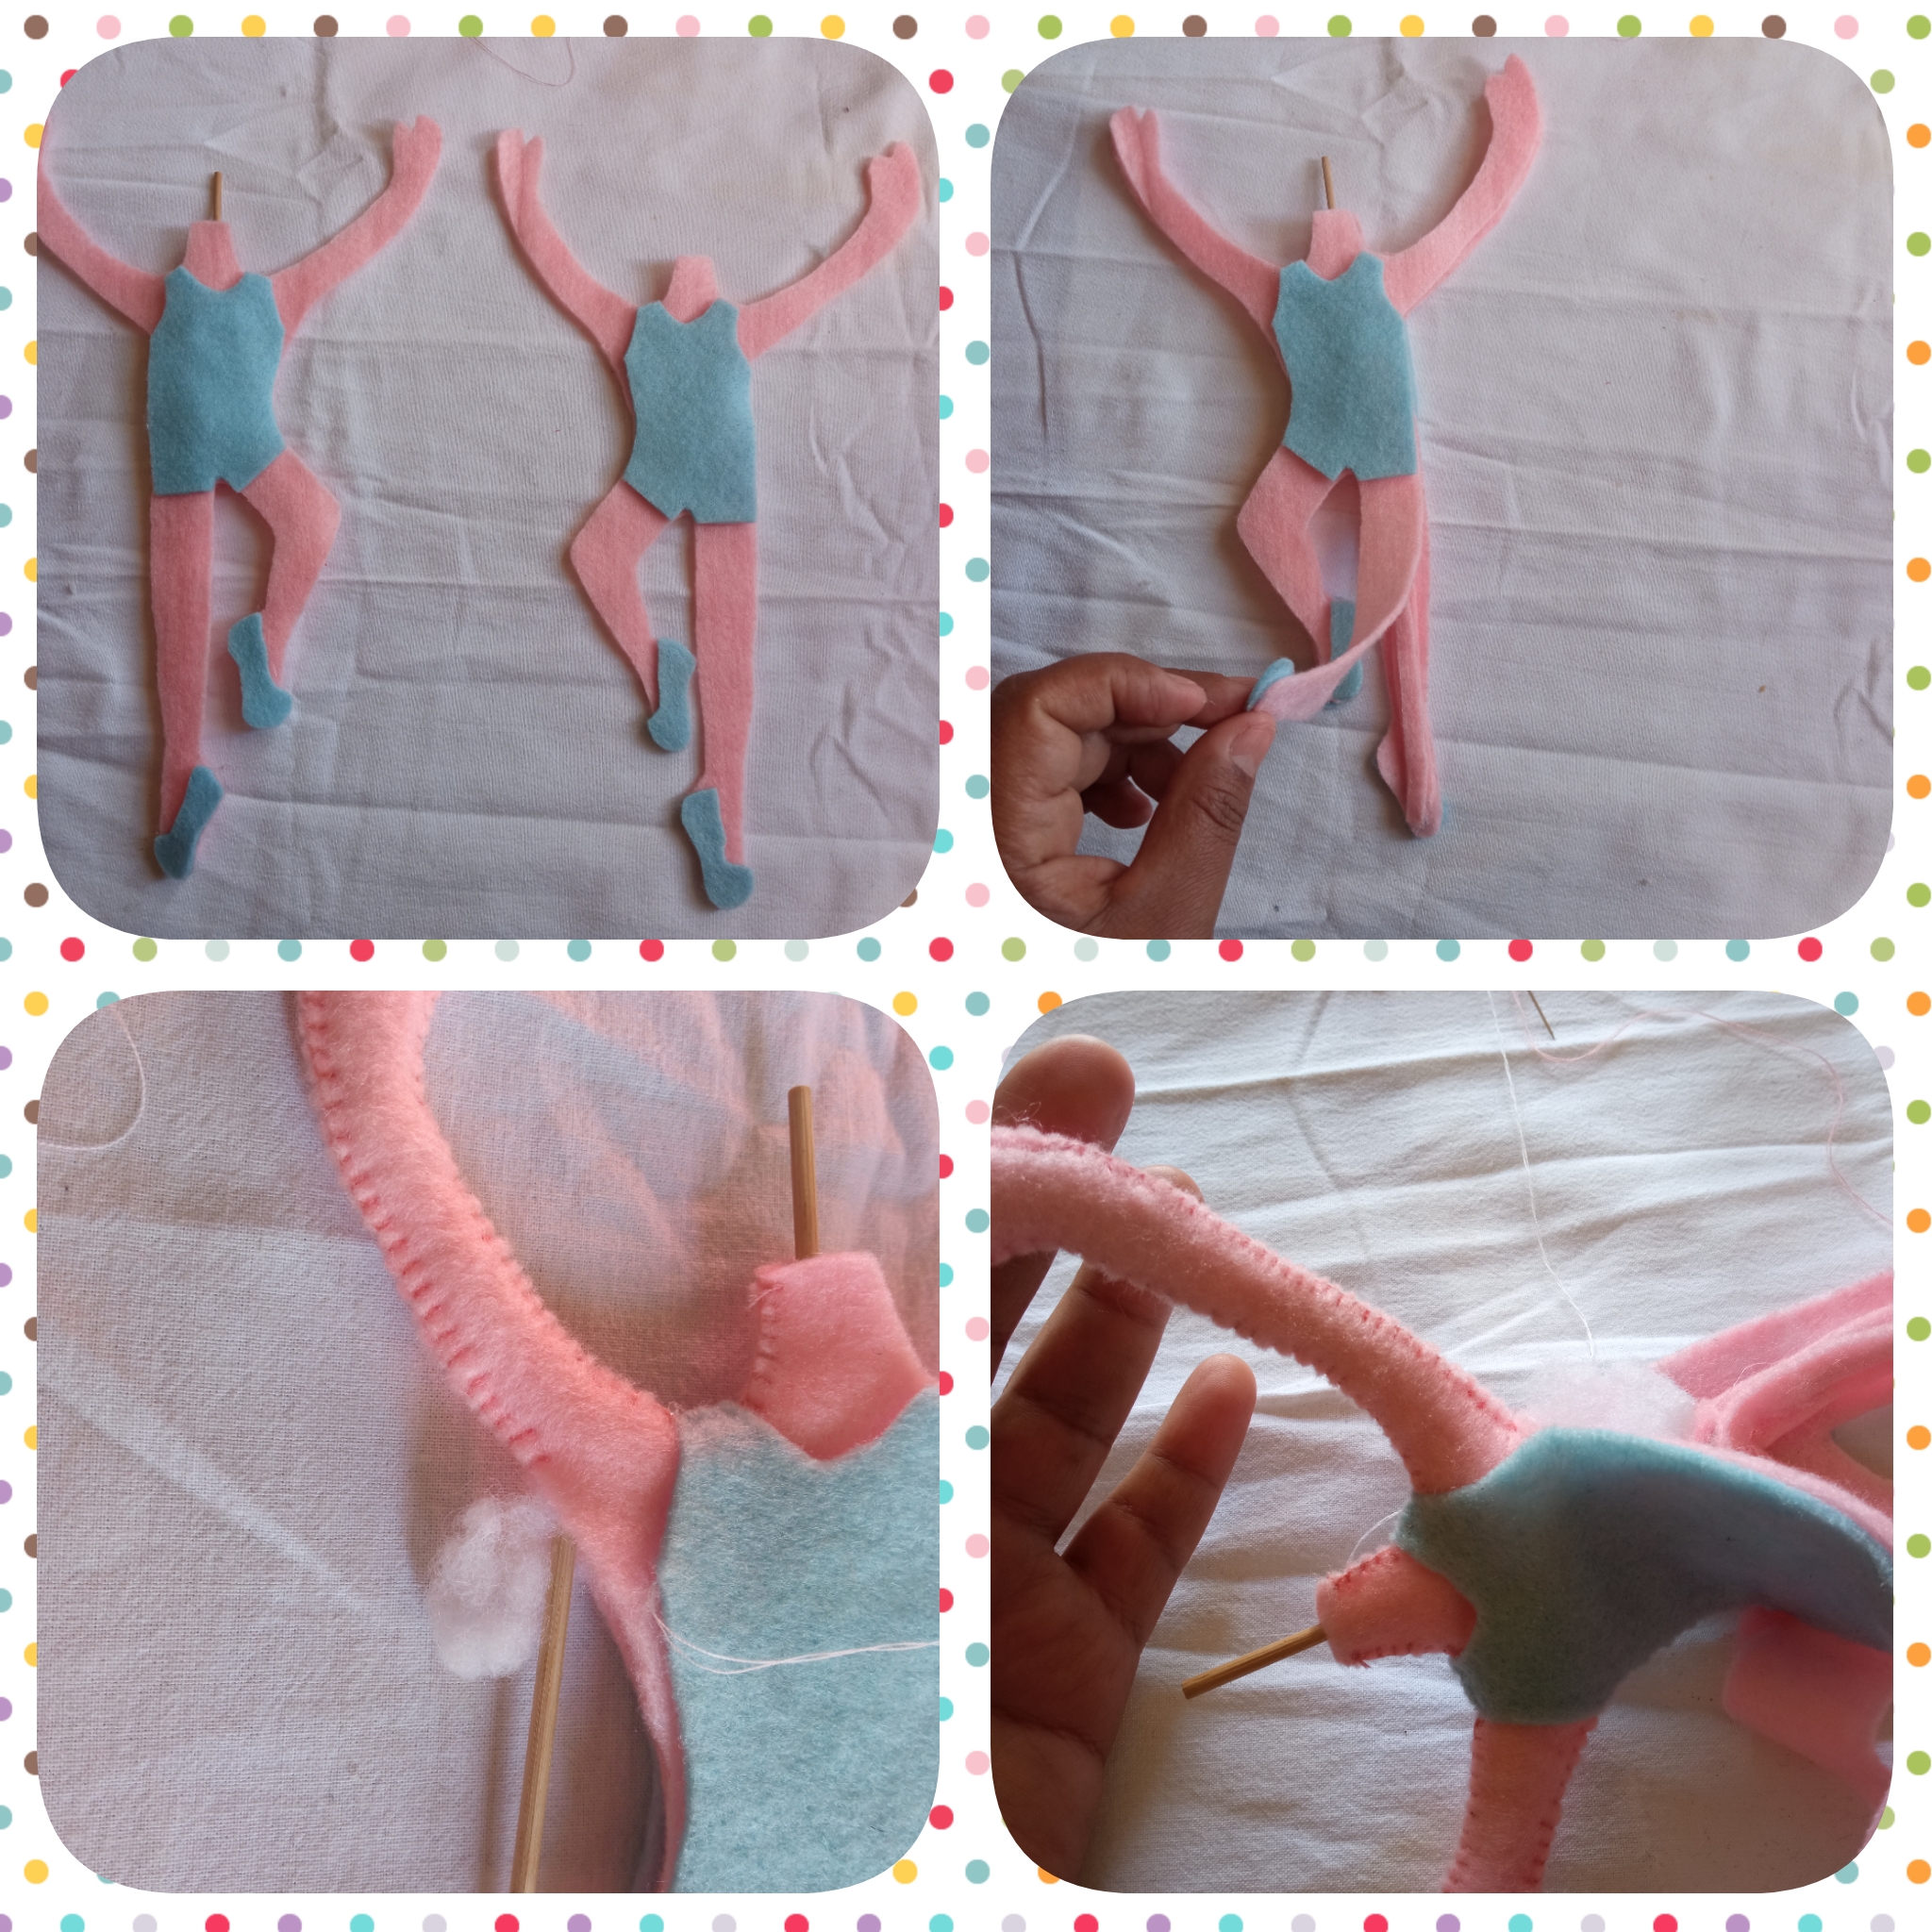
Paso 5:
Tomamos el patrón del cuerpo y en fieltro rosado cortamos dos piezas luego en una pieza del cuerpo pegamos con silicón caliente una tira de fieltro por las dos piernas después pegamos la figura de las piernas echa con alambre la cual debemos dobla muy bien las puntas, cortamos nuevamente una tira de fieltro rosado y lo pegamos encima del alambre. Cortamos un rectángulo en fieltro rosado y lo pegamos en el tronco para después pegar el palito de altura y le pegamos un trozo de fieltro.
Step 5:
We take the pattern of the body and in pink felt we cut two pieces then in a piece of the body we glue with hot silicone a strip of felt for the two legs then we glue the figure of the legs made with wire which we must bend the ends very well, we cut again a strip of pink felt and we glue it on top of the wire. Cut a rectangle in pink felt and glue it on the trunk and then glue the height stick and glue a piece of felt on it.
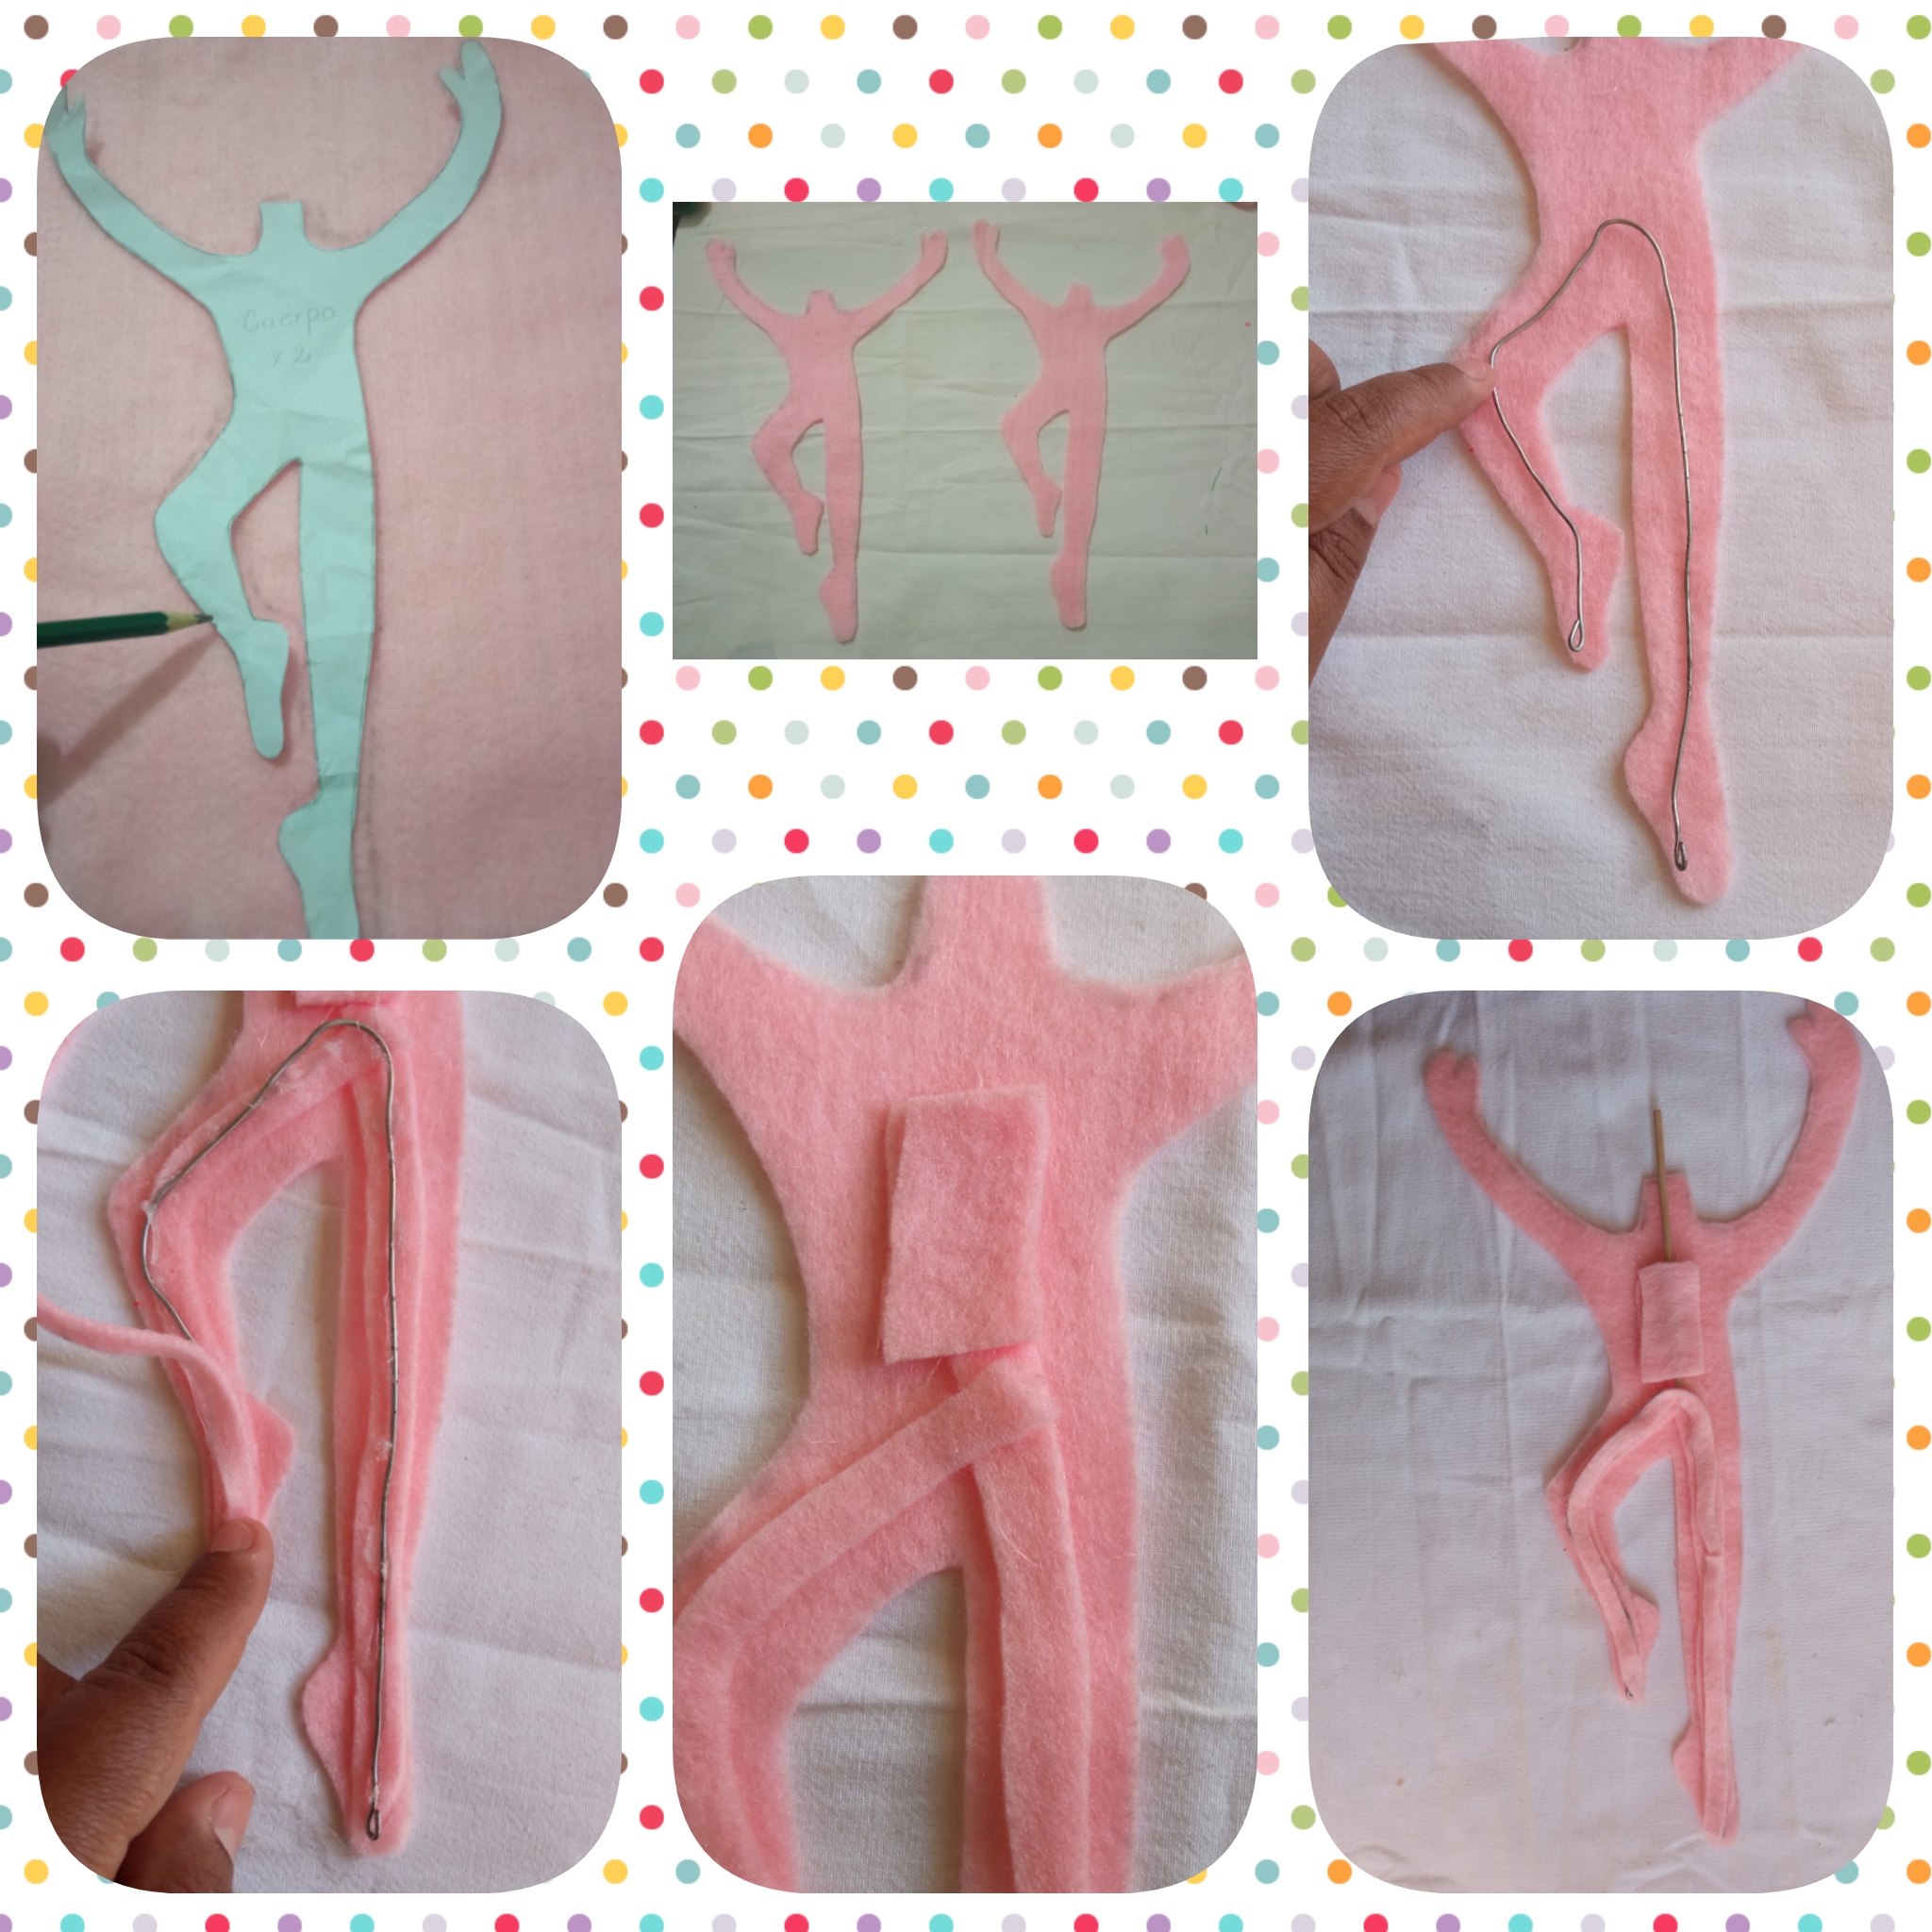
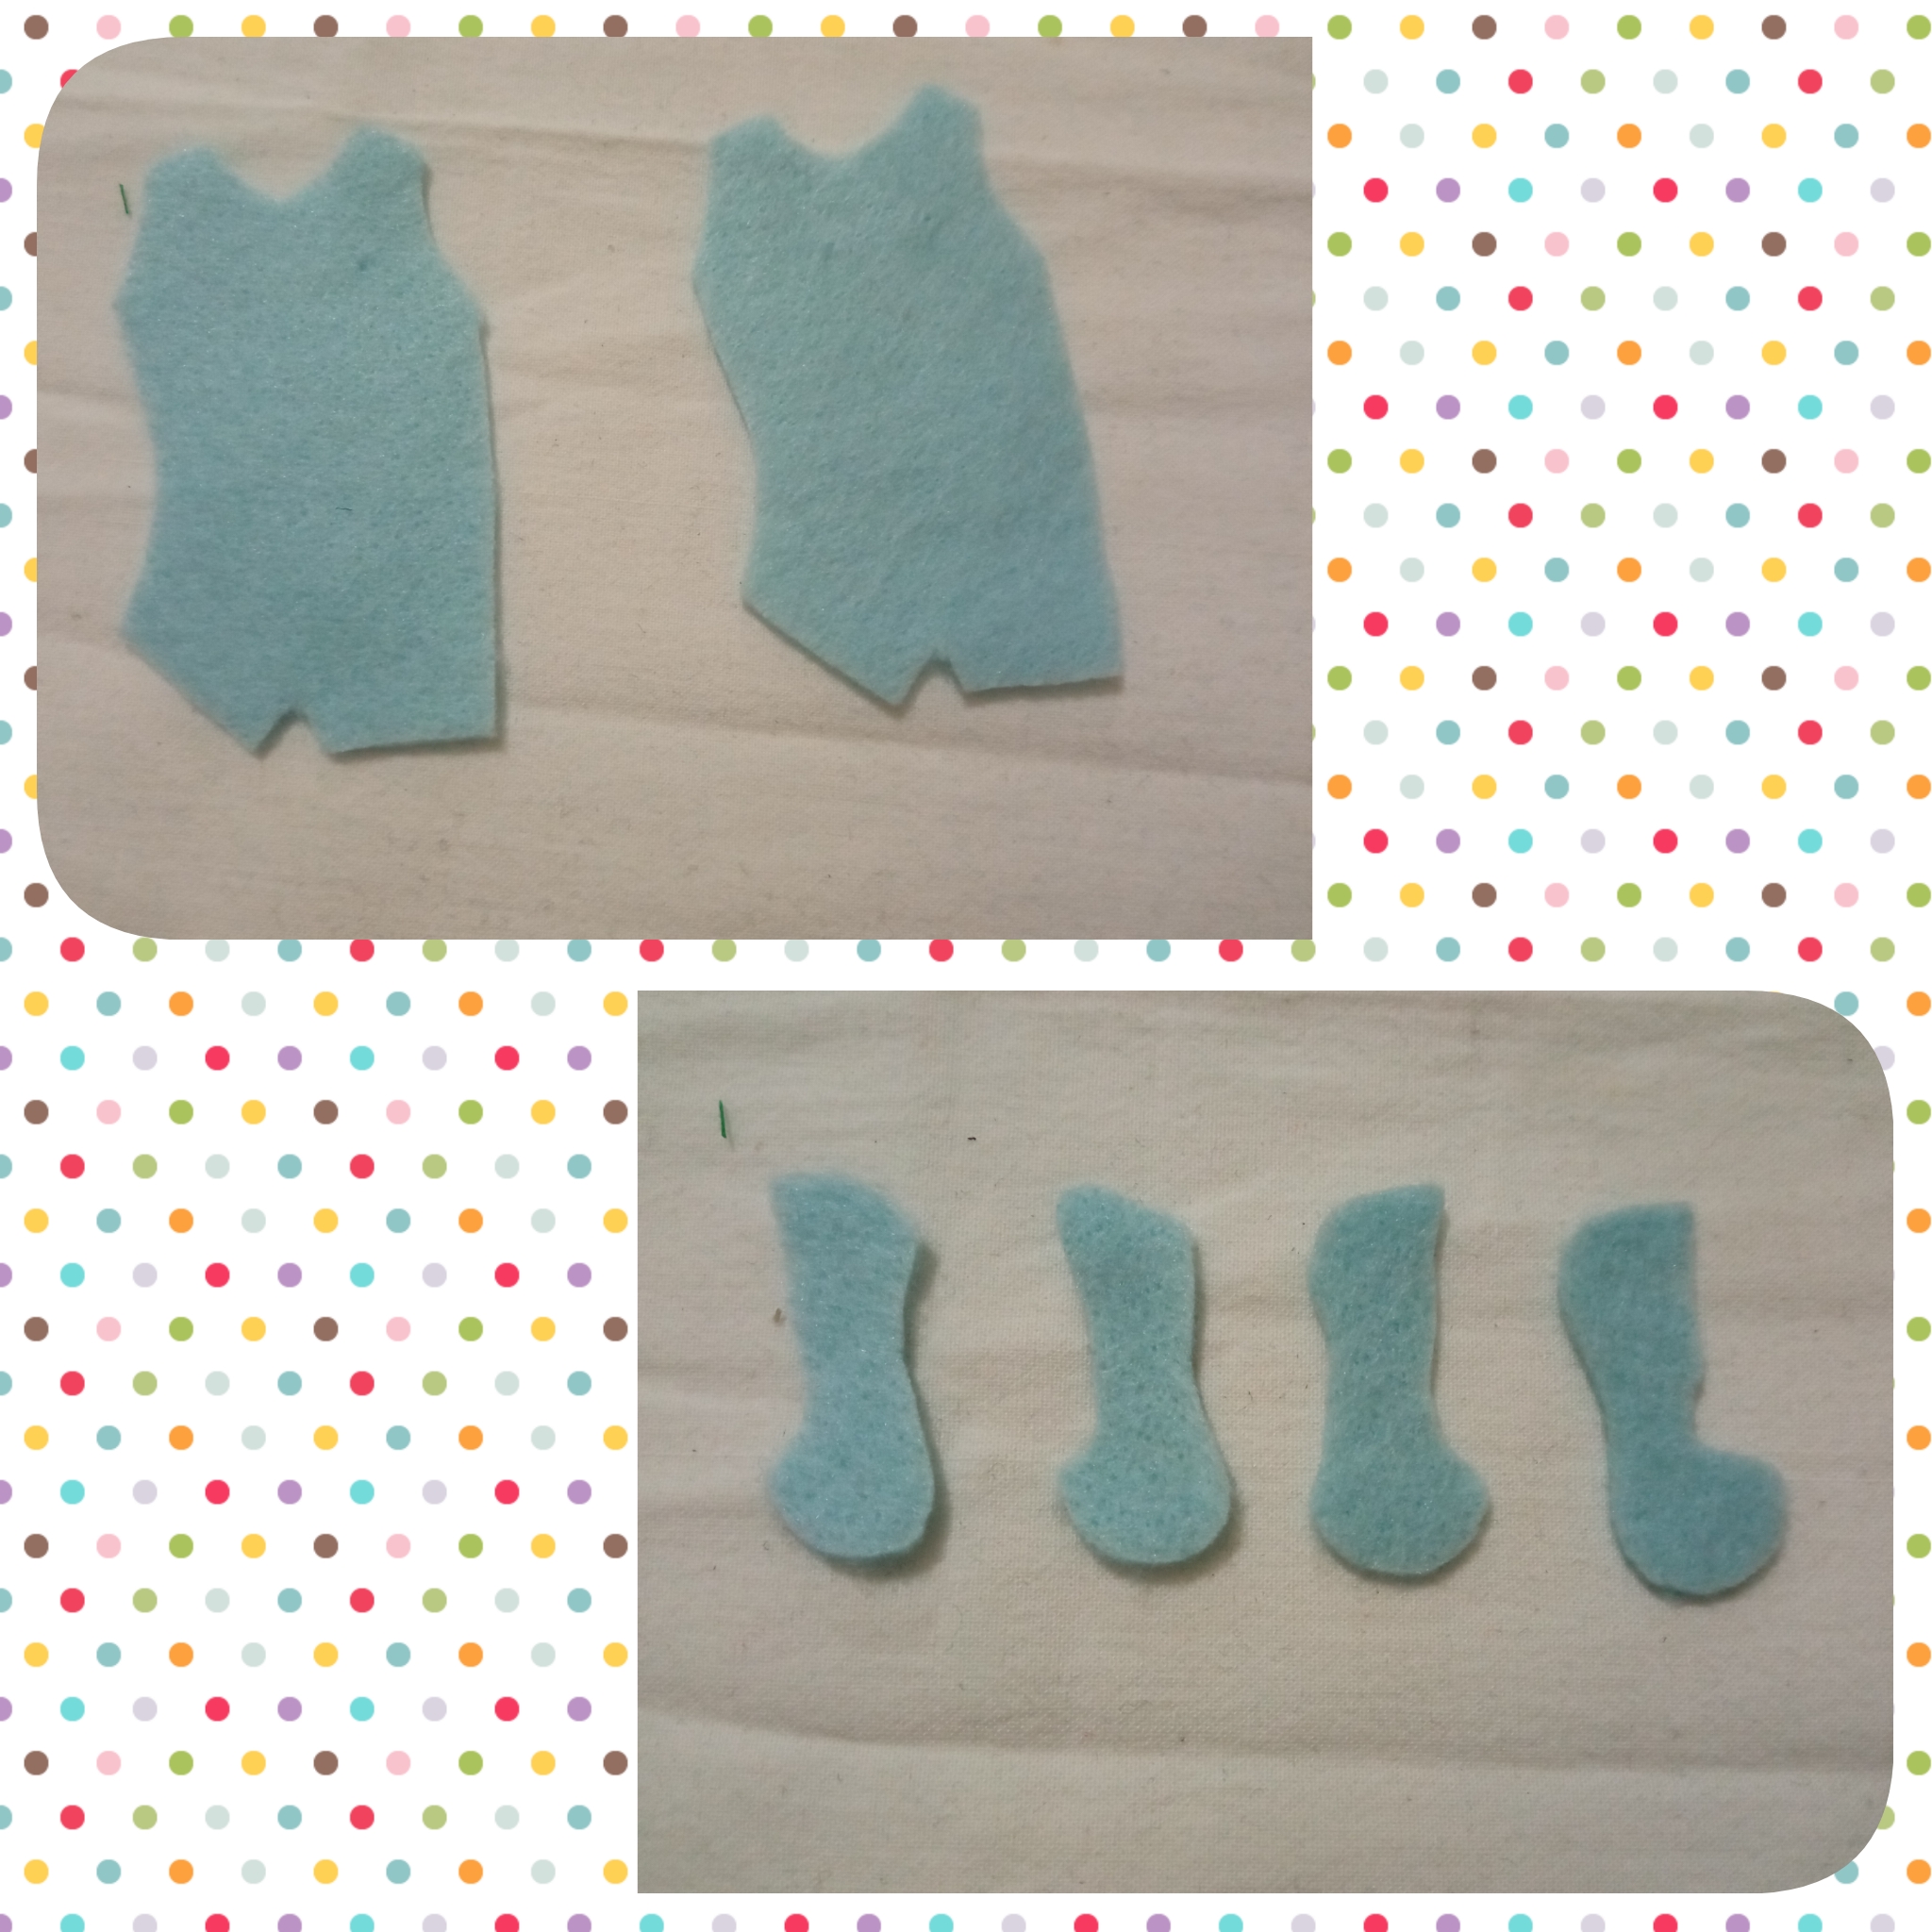
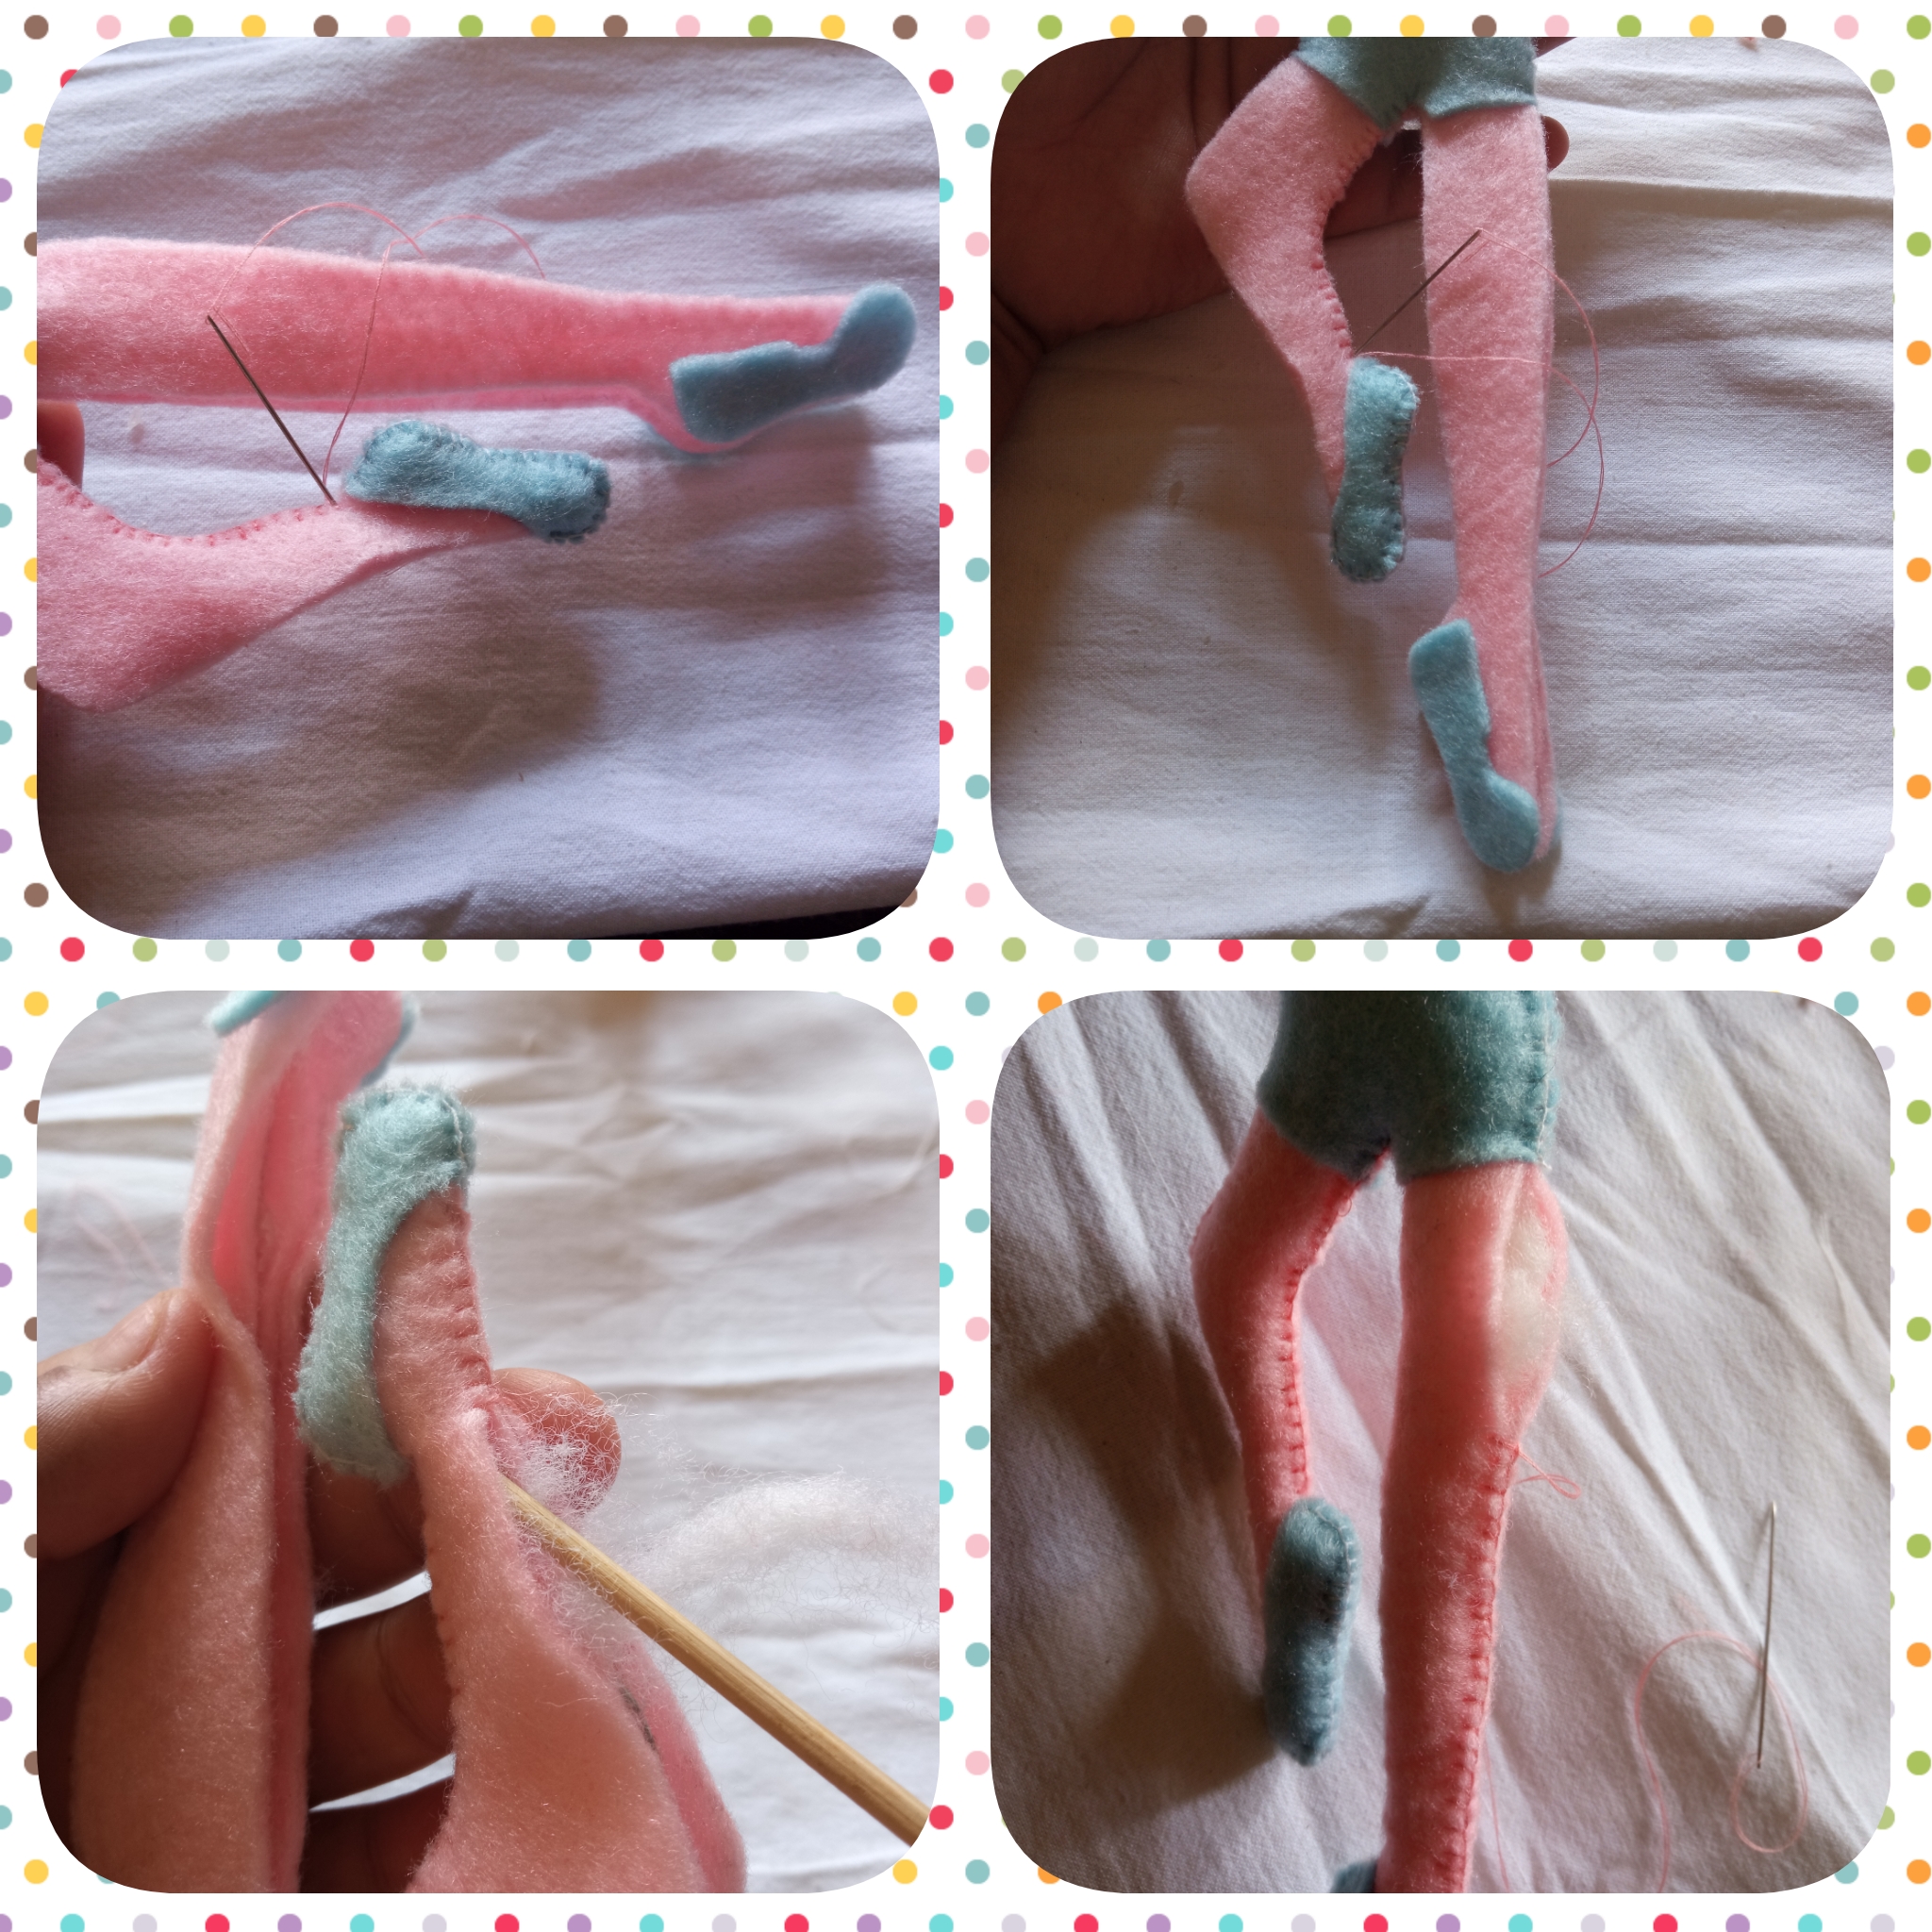
Paso 6:
En fieltro azul cortamos dos piezas del body y 4 piezas de las zapatillas 🩰, con ayuda del silicón fijamos el body y las zapatillas 🩰 en el cuerpo, luego unimos y comenzamos a coser con punto ojal con hilo rosado desde el cuello a las axilas y rellenamos los brazos.
Step 6:
In blue felt we cut two pieces of the bodysuit and 4 pieces of the slippers 🩰, with the help of the silicone we fix the bodysuit and the slippers 🩰 on the body, then we join and start sewing with buttonhole stitch with pink thread from the neck to the armpits and fill the arms.
Paso 7:
Terminamos de coser el cuerpo hasta llegar a las piernas luego rellenamos de manera que quede parejo el relleno del cuerpo cerramos.
Step 7:
We finish sewing the body until we reach the legs, then we stuff in such a way that the stuffing of the body is even and close it.
Paso 8:
Tomamos la cinta de 5 milímetros plateada y la cosemos a la zapatilla que quede cruzada, luego hacemos dos lazo y lo cosemos en casa amarre así como ven en la foto.
Step 8:
We take the 5 mm silver ribbon and sew it to the shoe so that it is crossed, then we make two loops and sew them at home as you can see in the photo.

Paso 9:
Ahora vamos a unir el cuerpo a la cabeza, volteamos la cabeza subimos el cabello y con ayuda de una hojilla hacemos un corte de 4 cm aproximadamente introducimos el palito de altura que está pegado al cuerpo hasta llegar al cuello pegando con silicón bien caliente, luego bajamos el cabello y lo pegamos con silicón de esta manera tapamos las imperfecciones.
Step 9:
Now we are going to join the body to the head, we turn the head up the hair and with the help of a blade we make a cut of 4 cm approximately we introduce the height stick that is glued to the body up to the neck sticking with very hot silicone, then we lower the hair and stick it with silicone in this way we cover the imperfections.
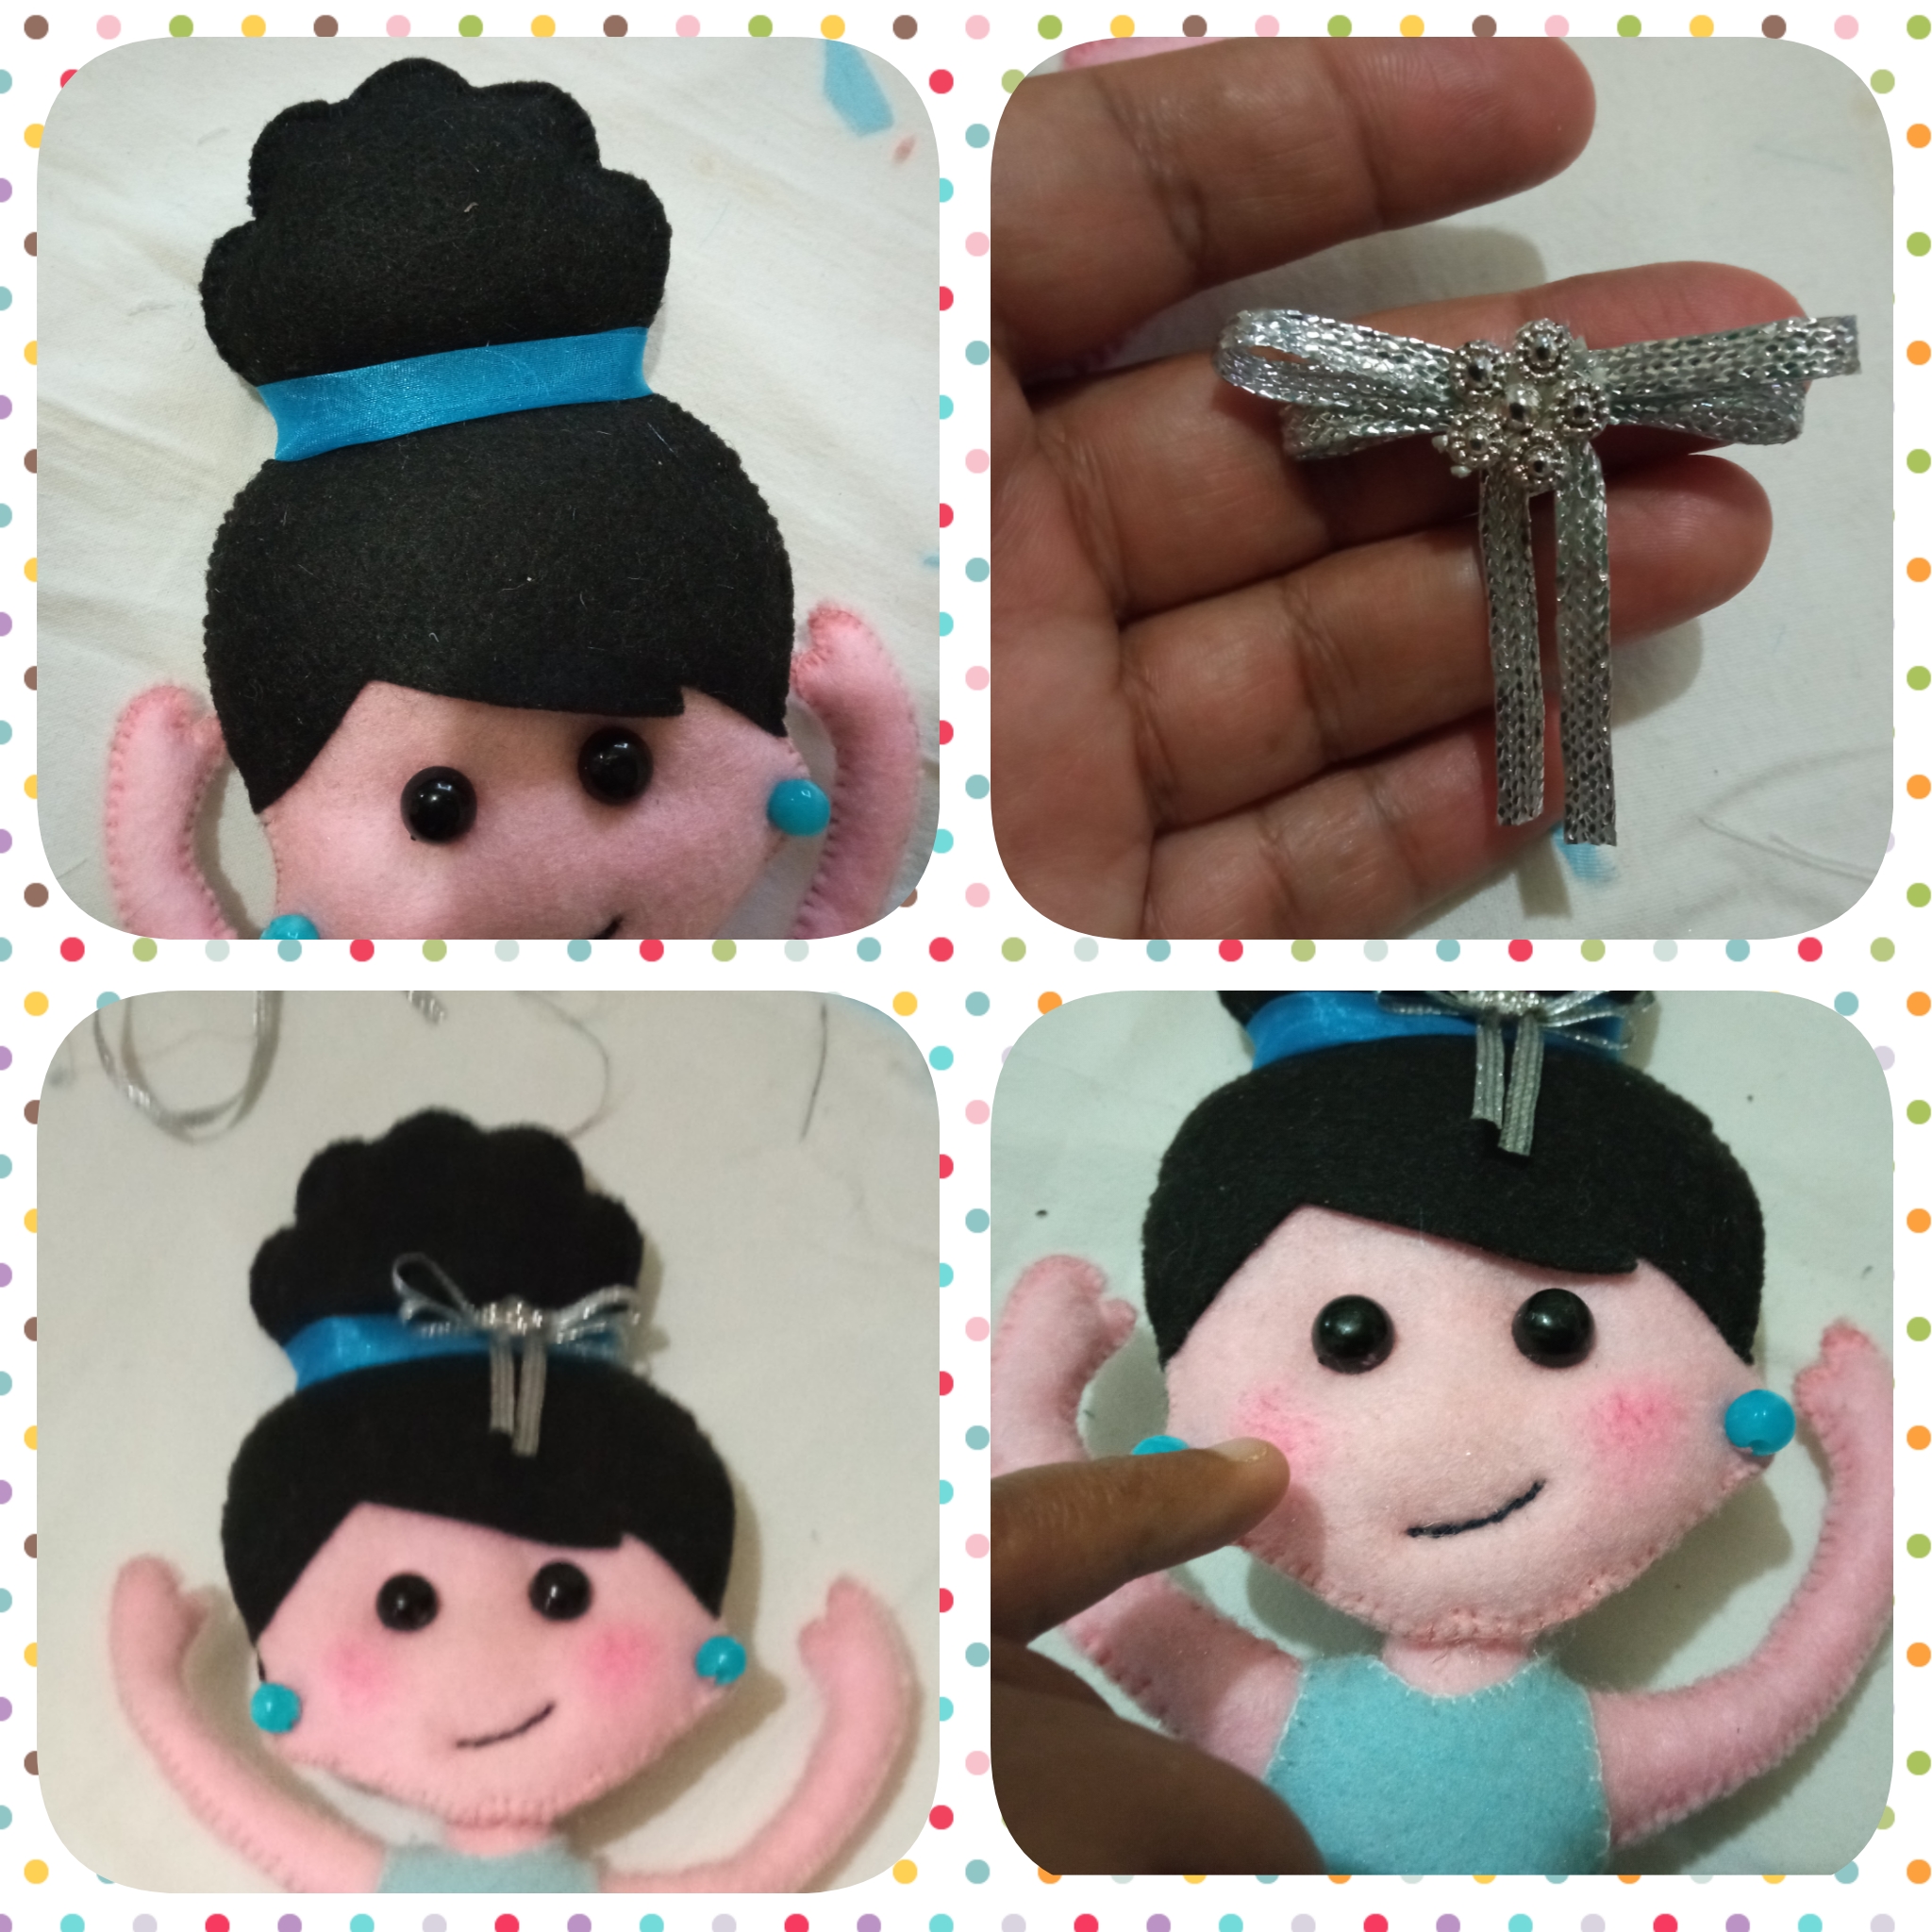
Paso 10:
Tomamos una tira de tul como de 10 de largo y 5 cm de ancho doblamos y lo cosemos al moño, hacemos un lazo en cinta plateada y le pegamos una flor plateada luego la pegamos a la tira del moño, con pintura roja le pintamos las mejillas un poco.
Step 10:
We take a strip of tulle about 10 cm long and 5 cm wide, we fold it and sew it to the bow, we make a silver ribbon bow and stick a silver flower on it, then we stick it to the bow strip, with red paint we paint the cheeks a little bit.
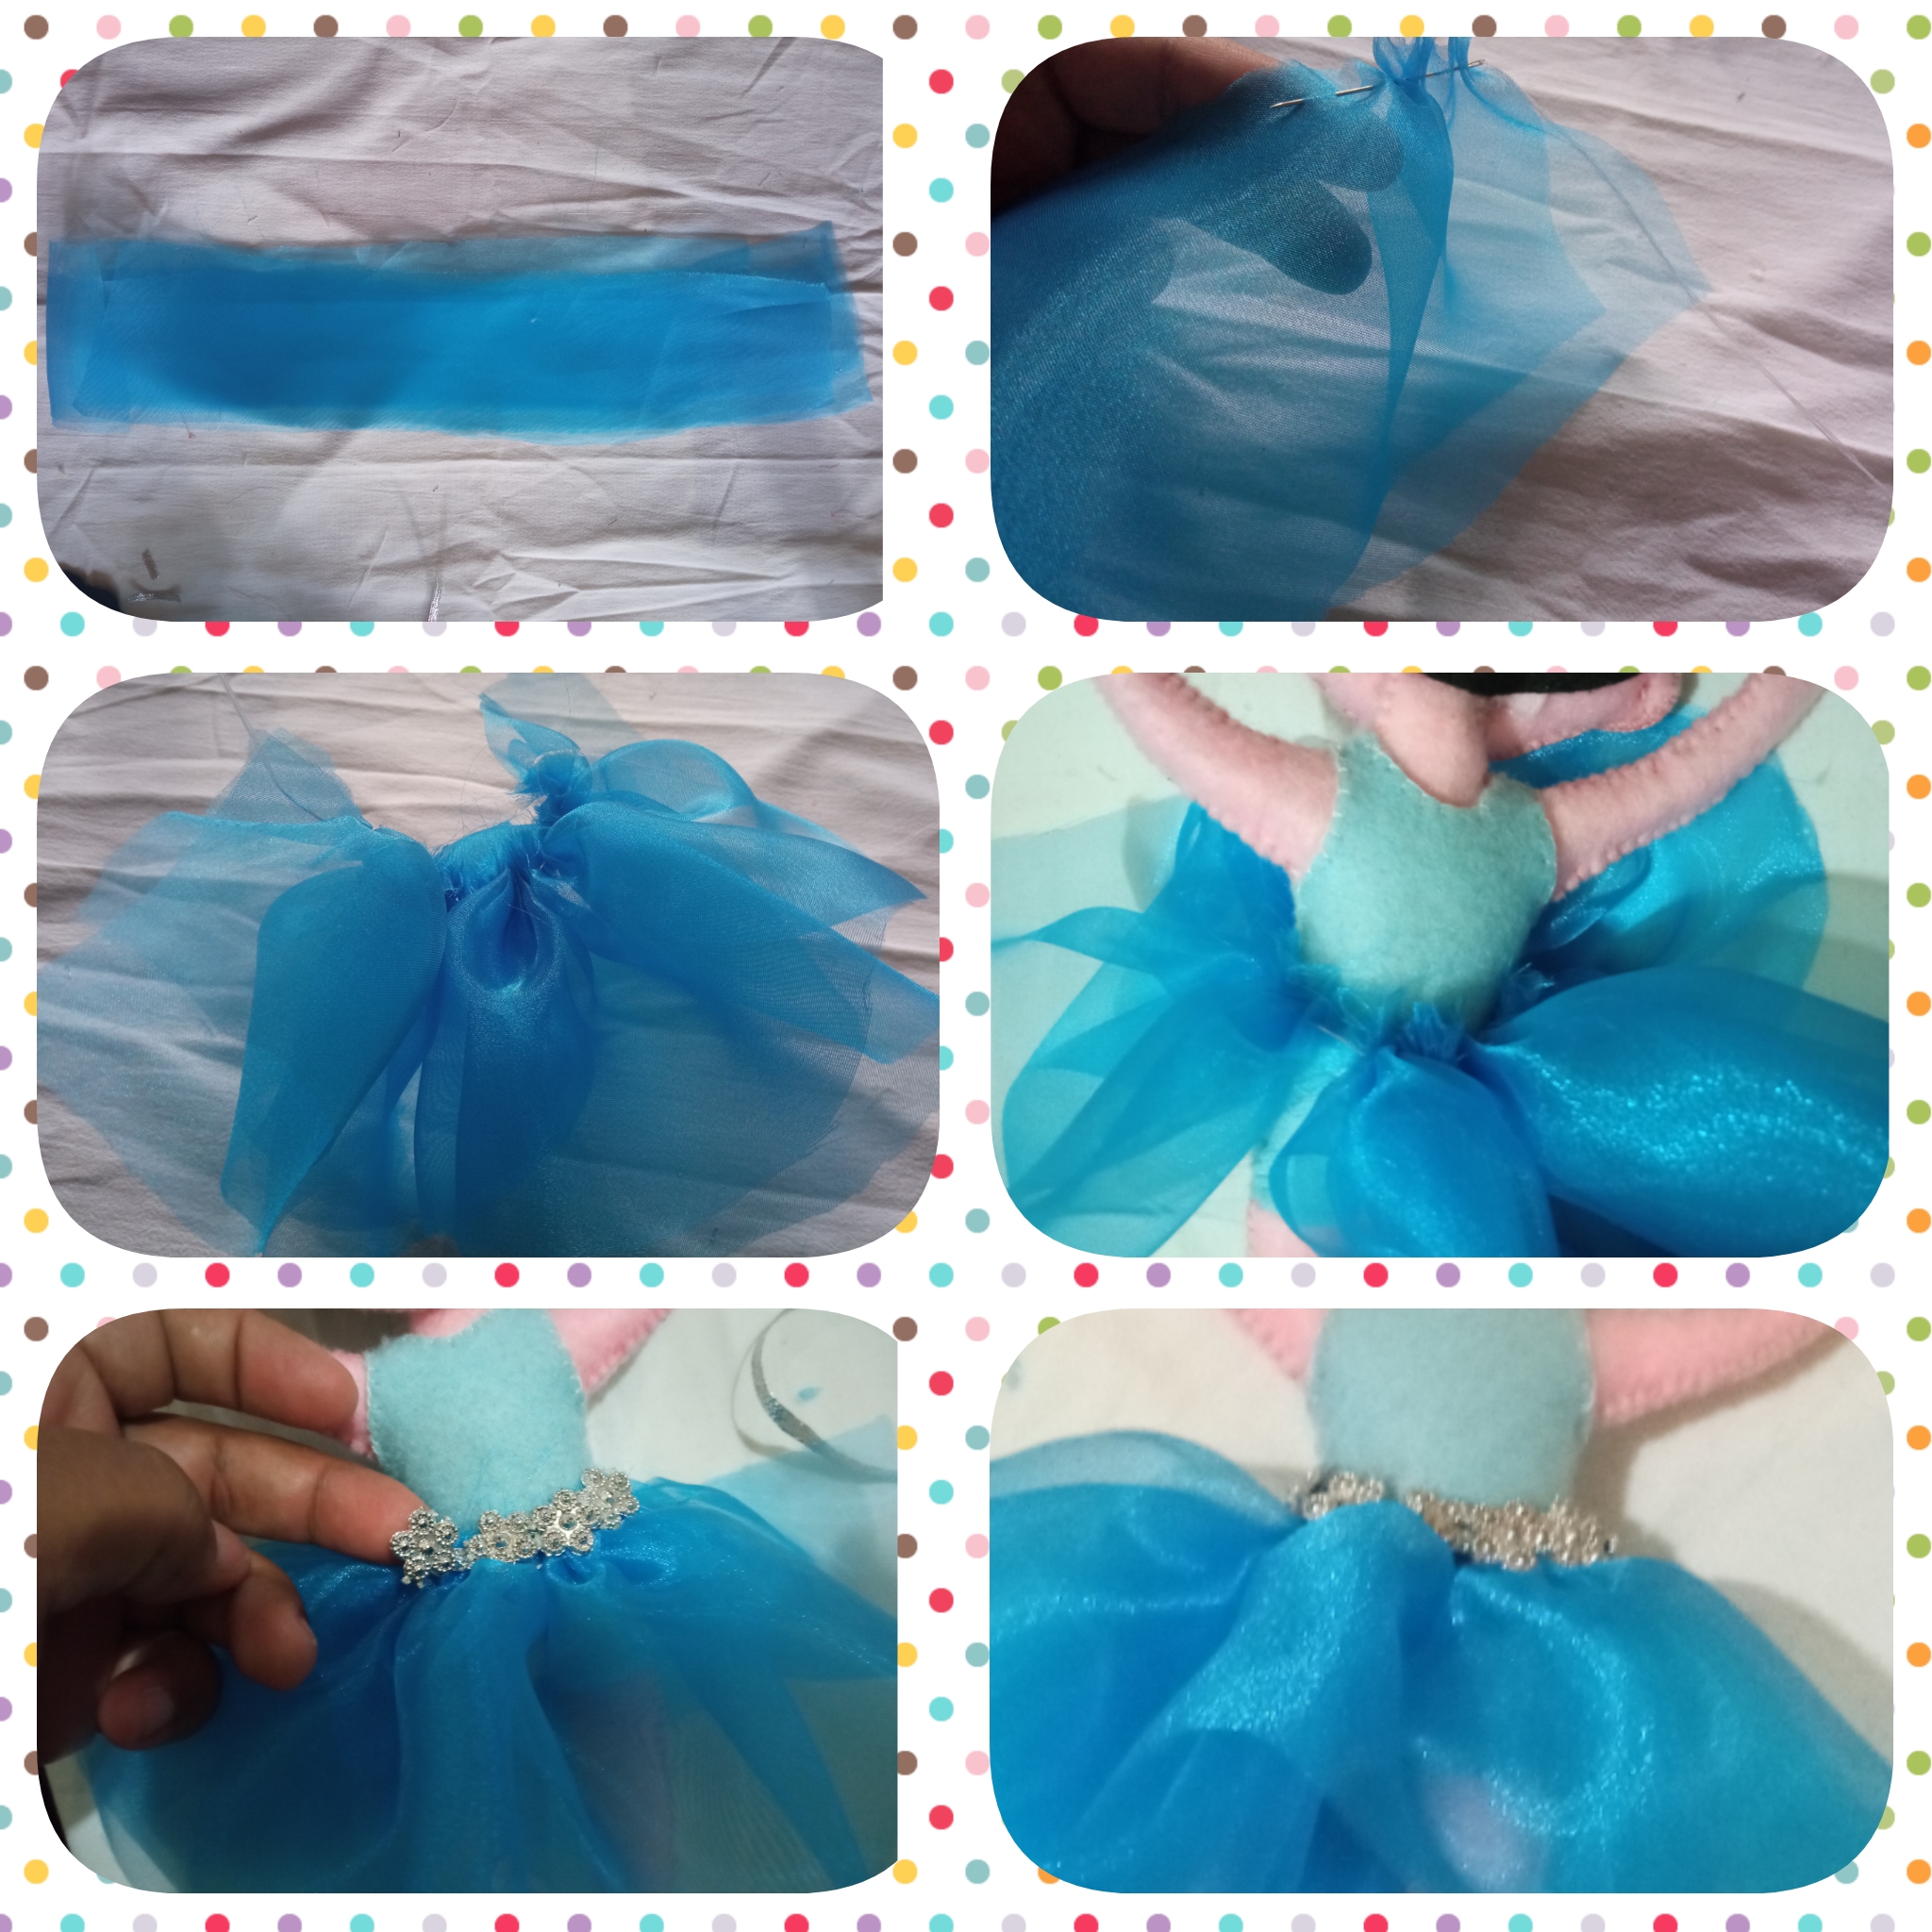
Paso 11:
Para realizar el tutú corto una tira de 100 cm de largo y 10 cm de ancho doblo a la mitad luego coso por toda la orilla con hilo blanco jalo el hilo para que quede arruchado lo mido a la cintura de la bailarina 🩰 luego amarro fuerte, para finalizar le pegó flores plateada por toda la falda así con les muestro en la foto.
Step 11:
To make the tutu I cut a strip of 100 cm long and 10 cm wide, fold it in half, then I sew all around the edge with white thread, I pull the thread so that it is crumpled, I measure it to the waist of the dancer 🩰 then I tie it tight, to finish I glue silver flowers all over the skirt as shown in the photo.
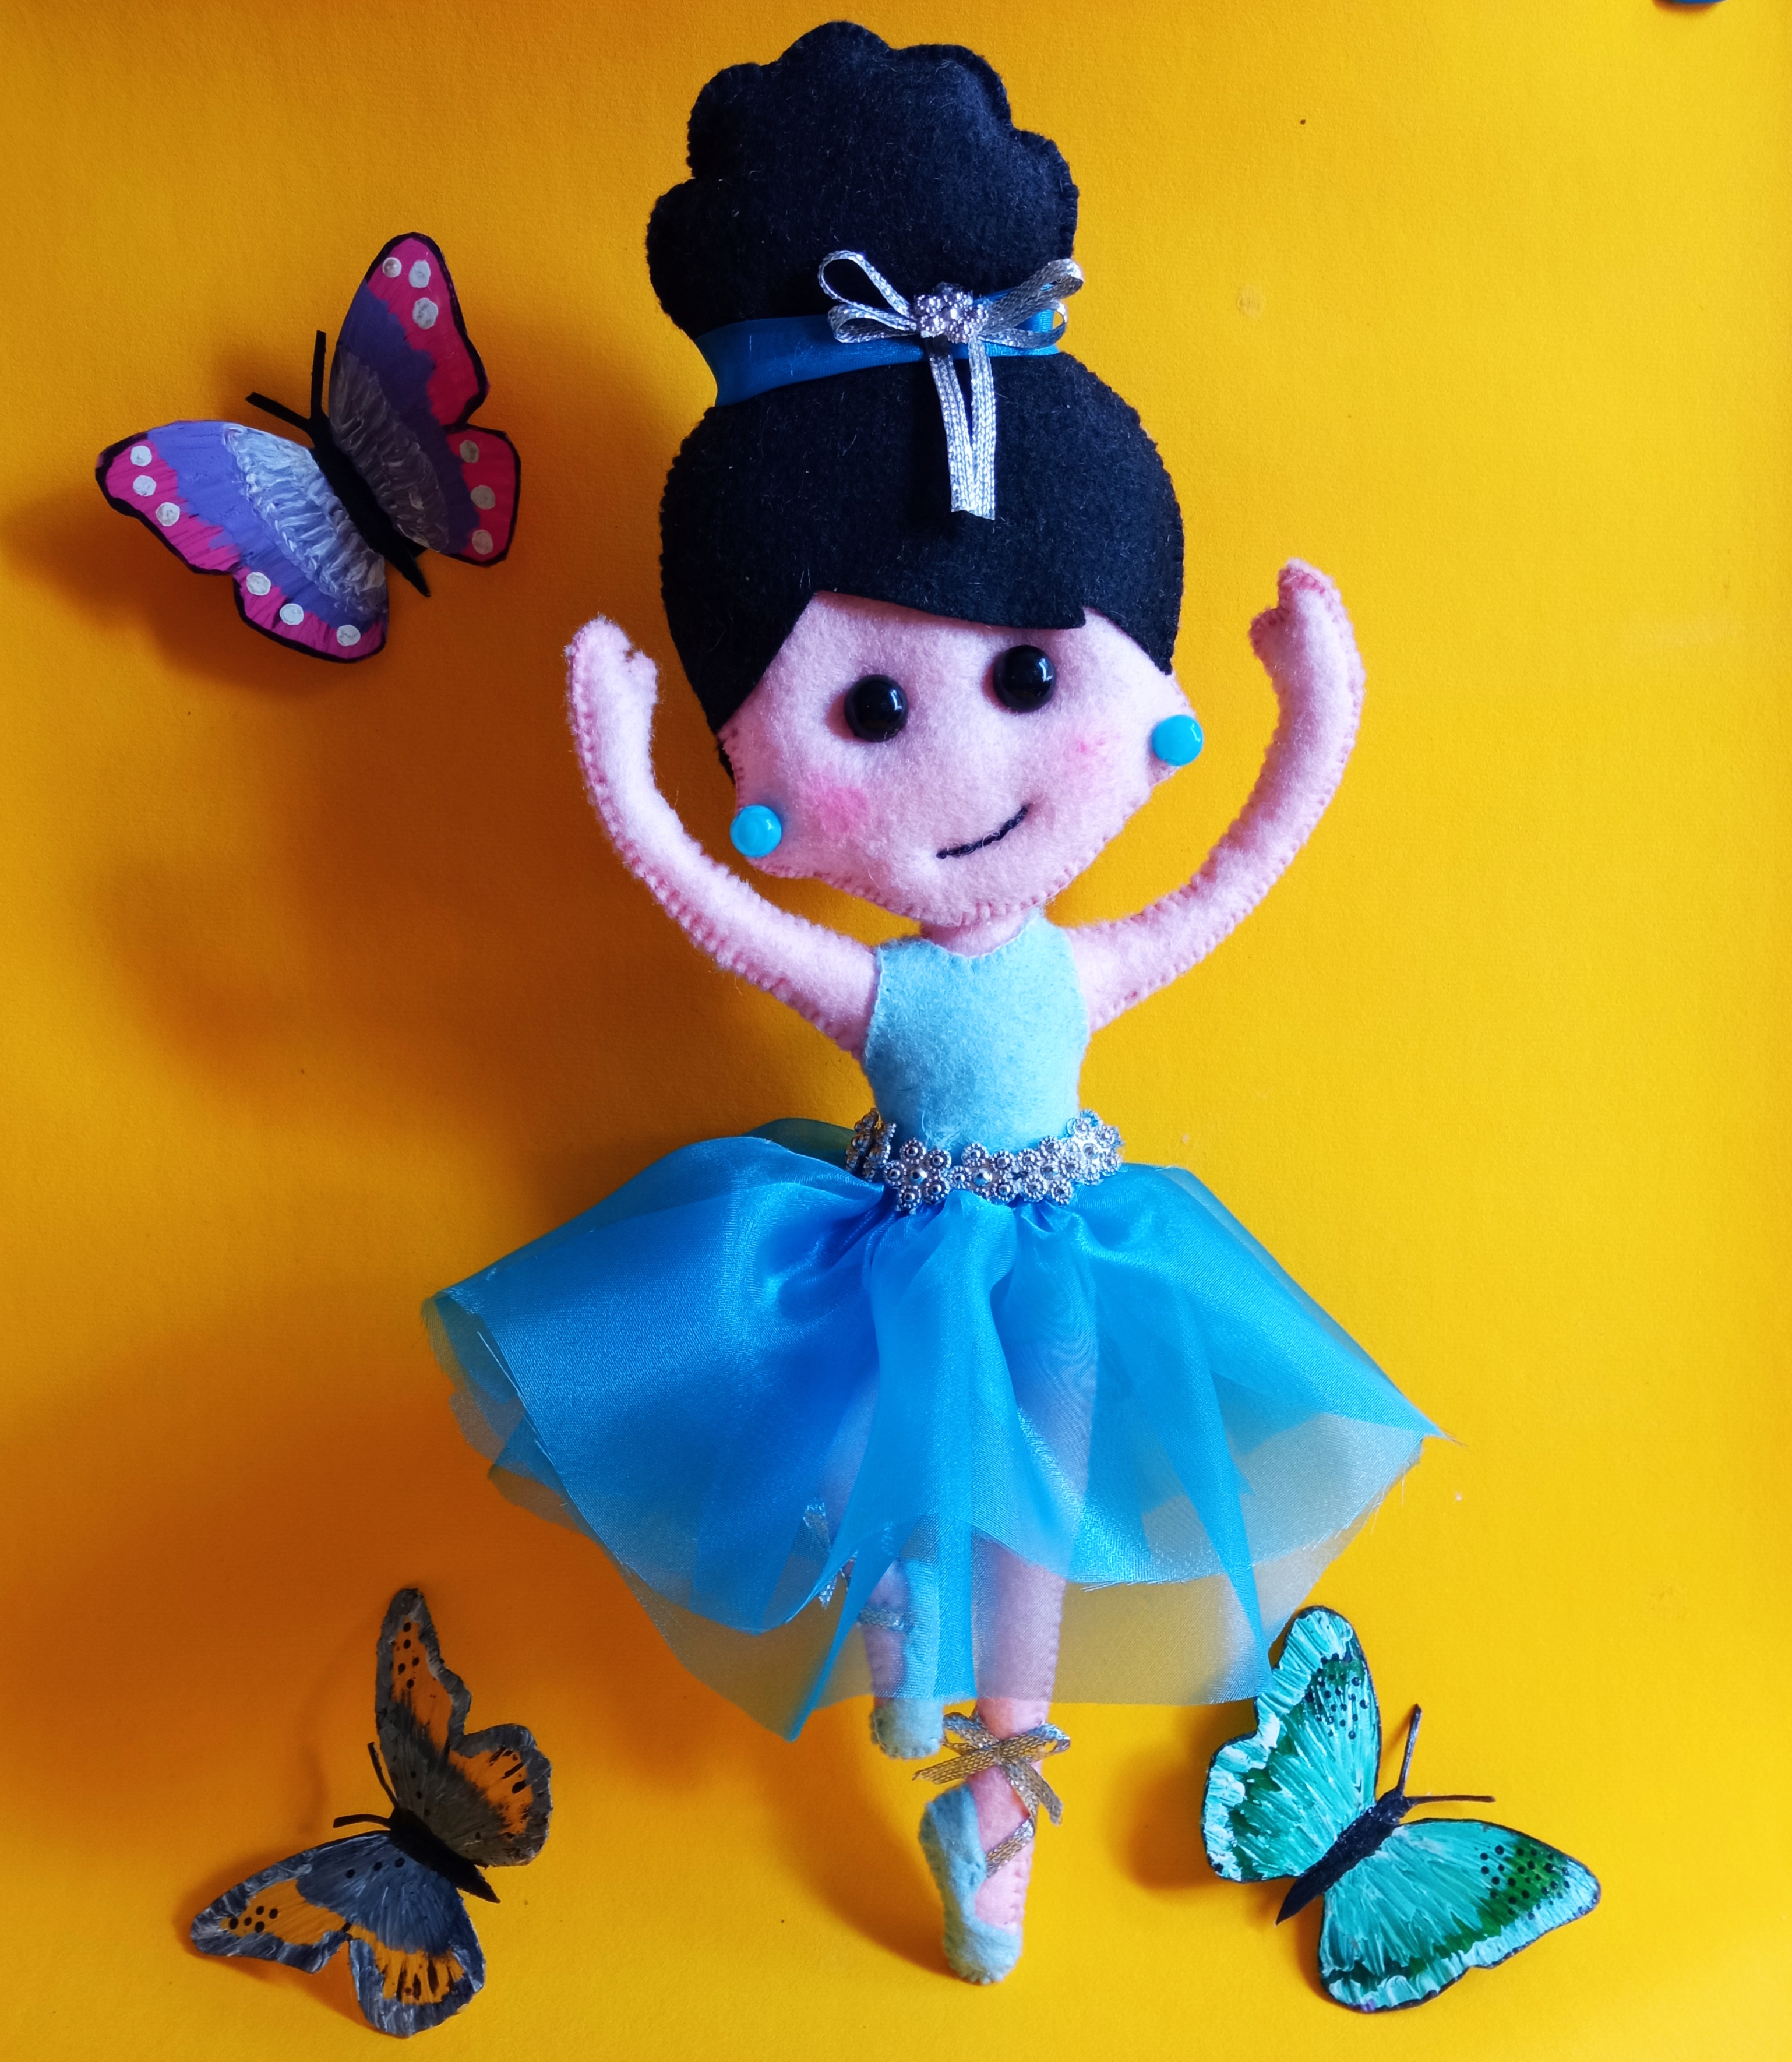
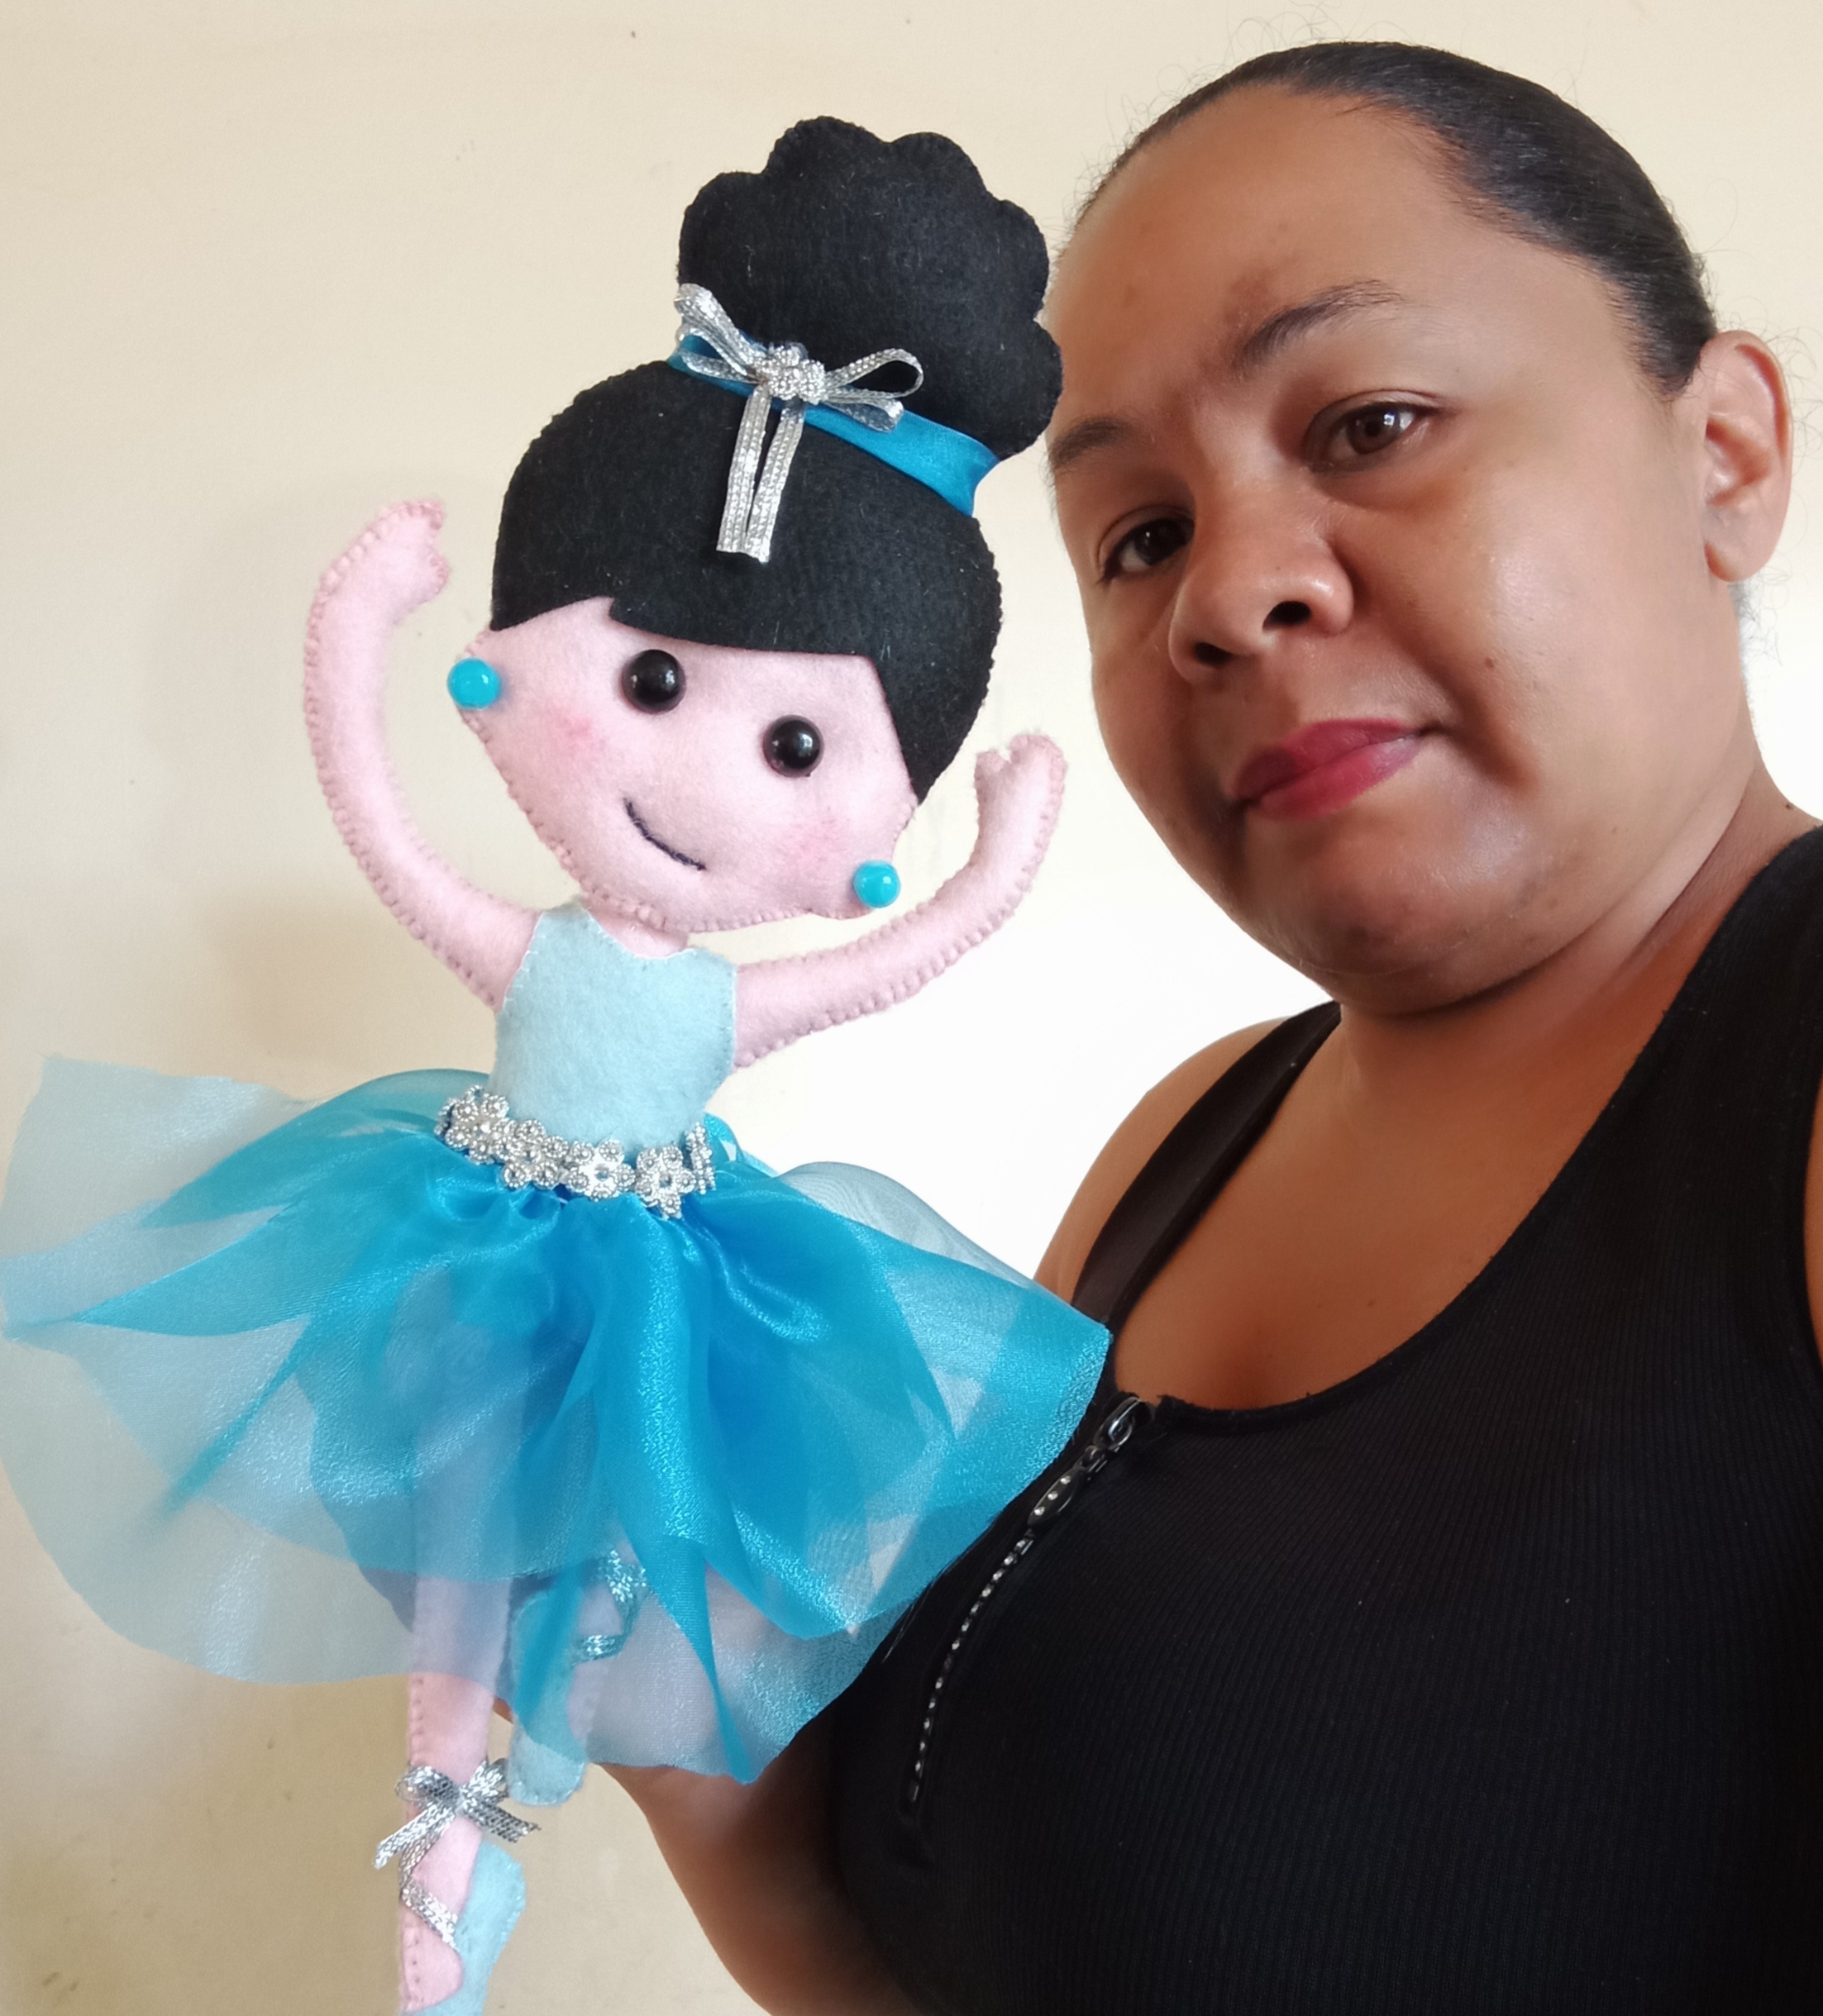
Ya mi Hermoso 😍 Bailarina 🩰 está Terminada!! // Already my beautiful 😍 Ballerina 😍 is finished!
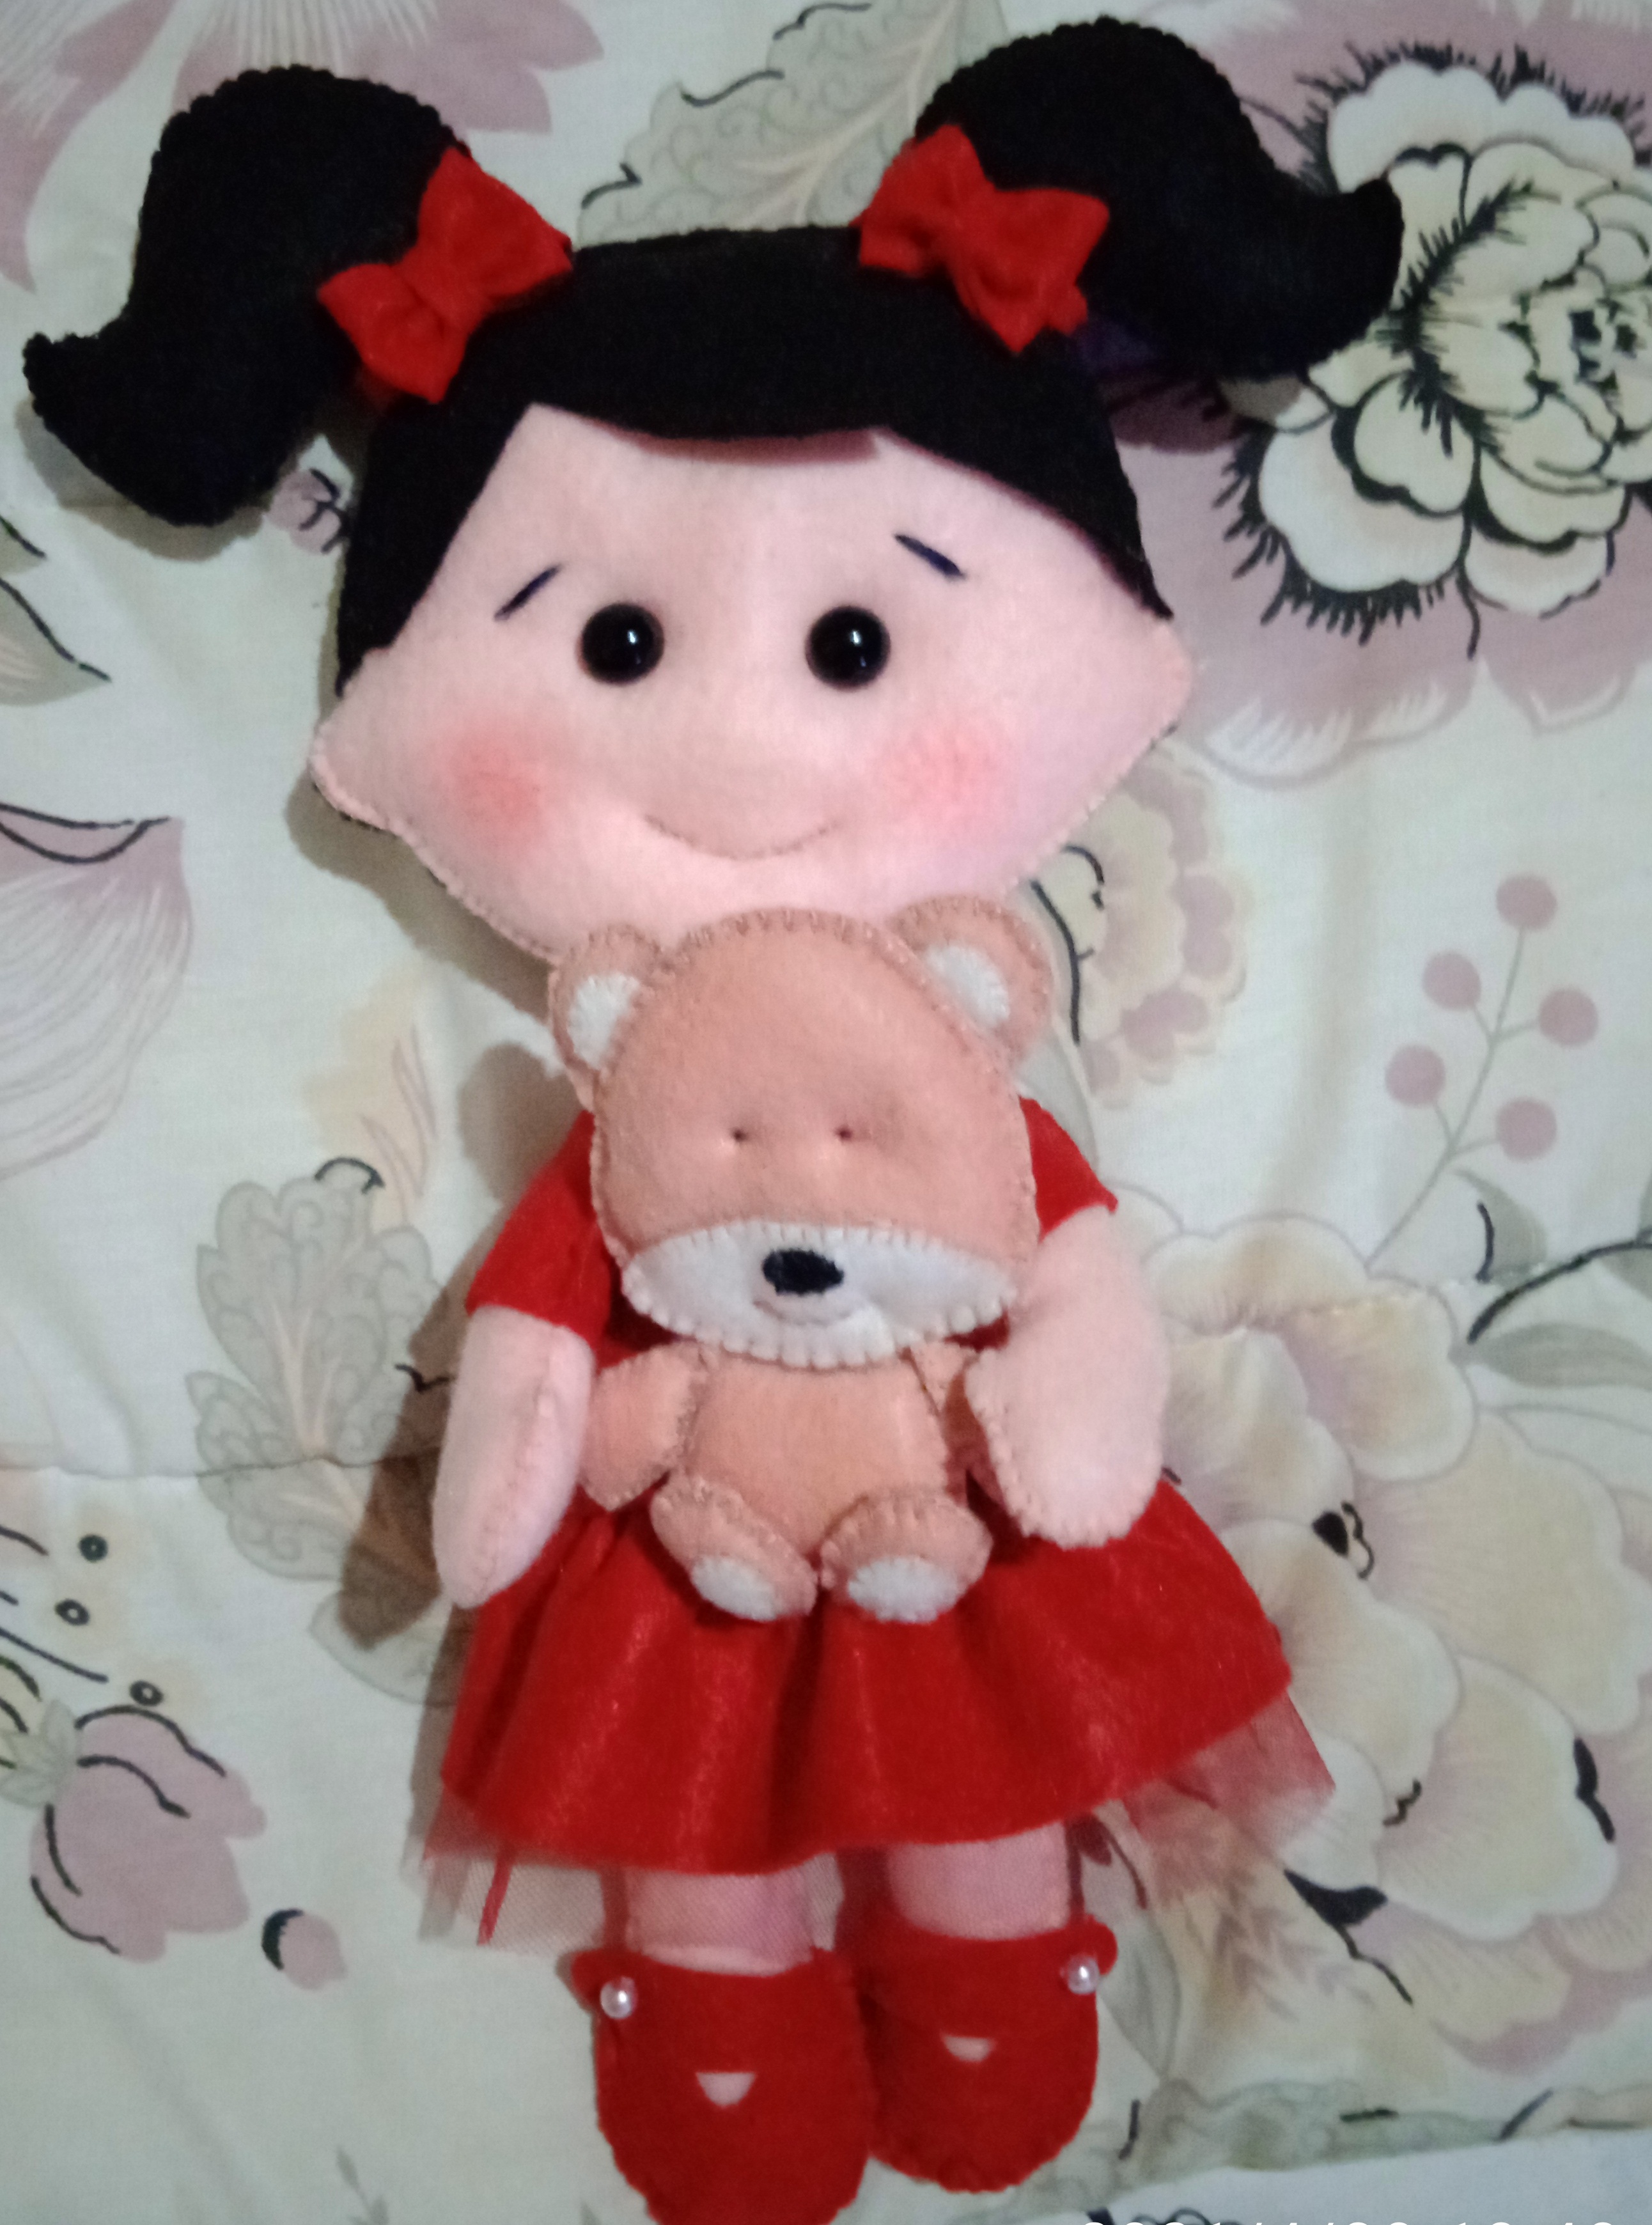
Aquí le voy a mostrar la primera muñeca con su osito 🧸 de fieltro que elaboré.
Here I am going to show you the first doll with her felt 🧸 teddy bear that I made.
Hasta aquí llego este maravilloso 💓 tutorial 😃 espero que sea de gran apoyo para que puedan elaborar está hermosa 🥰 muñeca Bailarina 🩰 cocida a mano para las pequeñas de la casa.
So much for this wonderful 💓 tutorial 😃 I hope it will be of great support so that you can make this beautiful 🥰 handmade 🥰 Ballerina doll 🩰 for the little ones at home.
Como siempre muy agradecida de poder mostrar mi trabajo para ustedes en esta maravillosa 😍 comunidad de #HiveDiy y ser parte de la familia #Hive.
As always very grateful to be able to showcase my work for you in this wonderful 😍 community #HiveDiy and be part of the #Hive family.
Nota: Para la elaboración de está bailarina 🩰 busque por internet apoyo de algunas ideas.
Nota: Para la elaboración de está bailarina 🩰 busque por internet apoyo de algunas ideas.
The rewards earned on this comment will go directly to the person sharing the post on Twitter as long as they are registered with @poshtoken. Sign up at https://hiveposh.com.
Que linda, felicidades,
Gracias amiga 😃!
Esta hermosa la danzarina. Una buena opción para regalar a las danzarinas de la congregación a la que asisto. ¡Esta bellisima!
Gracias amiga, es muy fácil de hacerla solo anímate en elaborarla y verás.
Te quedó muy linda ideal para regalar 🙋♀️👍
Gracias amiga, mi primera muñeca de fieltro que elaboré se la regale a mi hermana es la que está en la última foto, a ella le super encantó.
Congratulations @yurimar! You have completed the following achievement on the Hive blockchain and have been rewarded with new badge(s):
Your next target is to reach 3750 upvotes.
You can view your badges on your board and compare yourself to others in the Ranking
If you no longer want to receive notifications, reply to this comment with the word
STOPCheck out the last post from @hivebuzz:
Support the HiveBuzz project. Vote for our proposal!
Que bonita bailarina yurimar, muy clara tu elaboracion, me gustó te felicito.
Hola amiga @nhaydu espero que esté tutorial te sirva para que puedas lograr hacer una linda muñeca de fieltro.
Gracias por tu apoyo y comentario besos ☺️!!
Wow excelente elaboración se nota que tuvo algo de trabajo amiga, me encantaron las zapatillas quedaron genial. 😍
Hola 👋 amiga @mayi04, si tienes toda la razón la zapatillas quedaron hermosas ame esa parte de mi trabajo.
Gracias por tu apoyo y comentario 👍 abrazos!
Hola 👋
Quedo hermosa amiga, me encanta.
Muchas felicidades.
Hola @eumelysm , gracias por tu visita, me contenta que te gustará besos 😘.