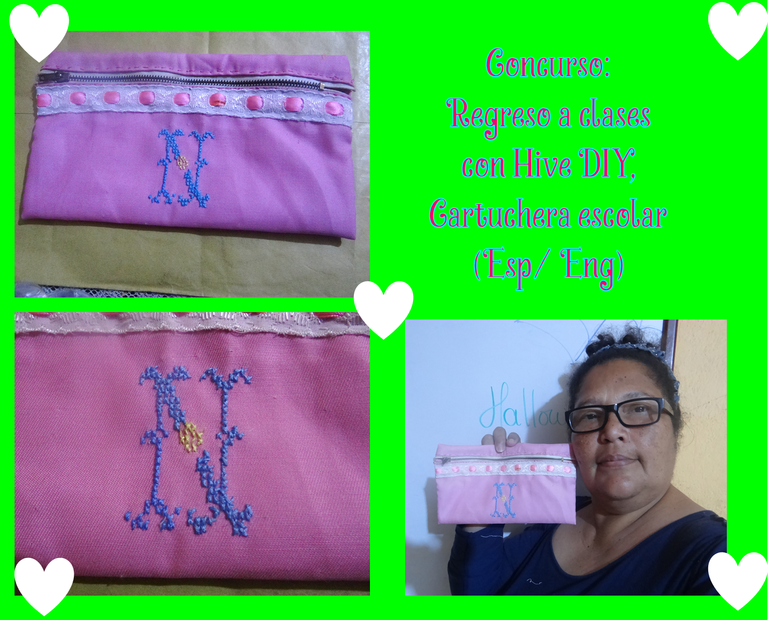
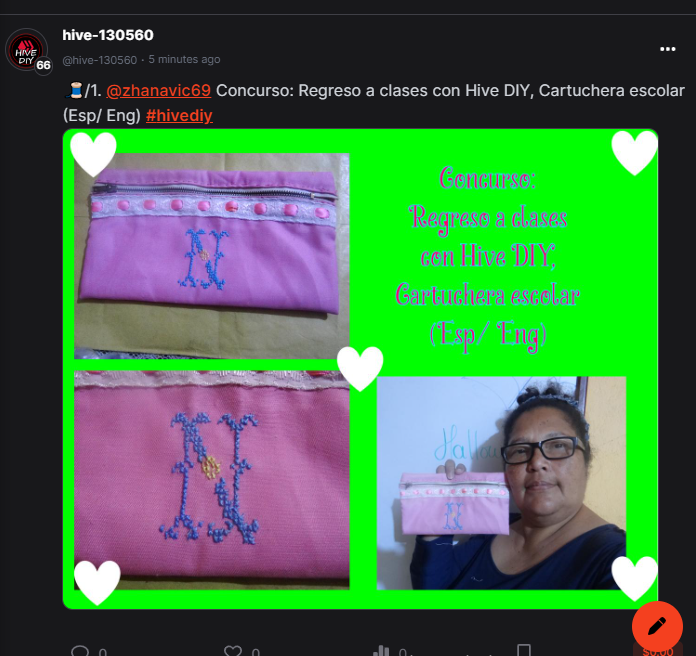
Una cartuchera para mi hija.
Hola mis artesanos, creadores, como les digo yo arañitas laboriosas, desde que mi amiga @carolinacardoza me invito a este concurso, porque sabe que me gustan ambas cosas los concursos y las manualidades, cuando vi la fecha de culminación dije tengo tiempo, resulta que hoy es el ultimo día y es cuando voy a publicar, quien quita que los últimos seamos los primeros, je je, pero mas me gusta enseñar lo que hago y ya he visto algunas cartucheras.
No me gusta dejar las cosas para ultima hora o momento, pero se presentan a veces situaciones que nos cambia muchas cosas. Pero lo importante es que estoy aquí y mi publicación.
Una cartuchera es un útil muy indispensable para todo, yo tengo varias, guardo documentos, tarjetas de vacunación y mas, pero muchos la asocian mas que todo con la cartuchera escolar donde los alumnos y maestros llevan sus lápices, colores,marcadores, sacapuntas y mas.
Mi hija esta empezando clases nuevo semestre en la universidad, estudia enfermería así que la cartuchera la hice para ella.
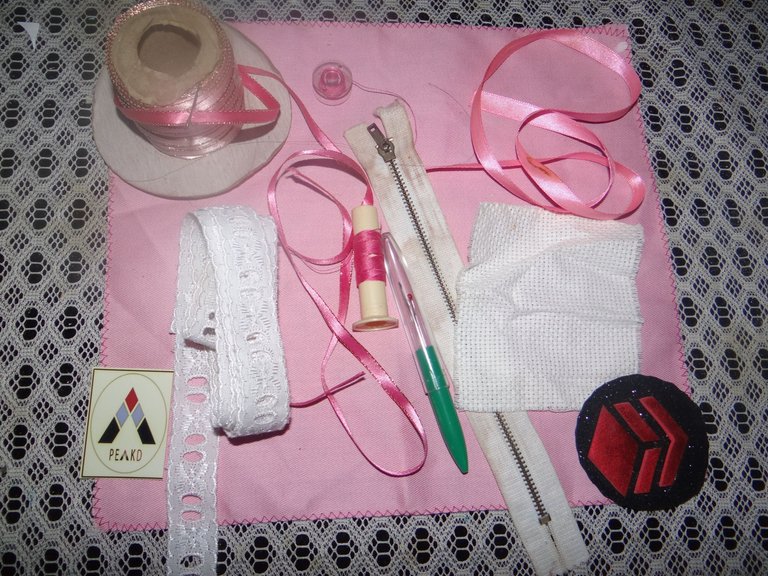
Los materiales los tenía en casa:
-Retazo de tela rosado. –Pasacinta blanca. –Cinta de raso rosado de 1 cm de ancho x 25 cms de largo. –Retazo de tela etamina. –Tijera, aguja, hilos de bordar y el normal. –Alfileres. –Cierre de 20 cms blanco. .Otras cintas.
Uno de las situaciones presentadas es que no tengo maquina de coser asi, que la cosi toda a manito. Y la otra situación que la vista aunque uso lentes me esta fallando, que me indica que debo cambiar los lentes.
Empezamos:

1.-Yo hace un tiempo hice muchas cartucheras como emprendimiento, ahí si tenia la maquina de coser de mi hermana, por lo que me quedo suficiente tela de varios colores, ya cortadas para las cartucheras de 25 cms de ancho por 30 cms de largo.
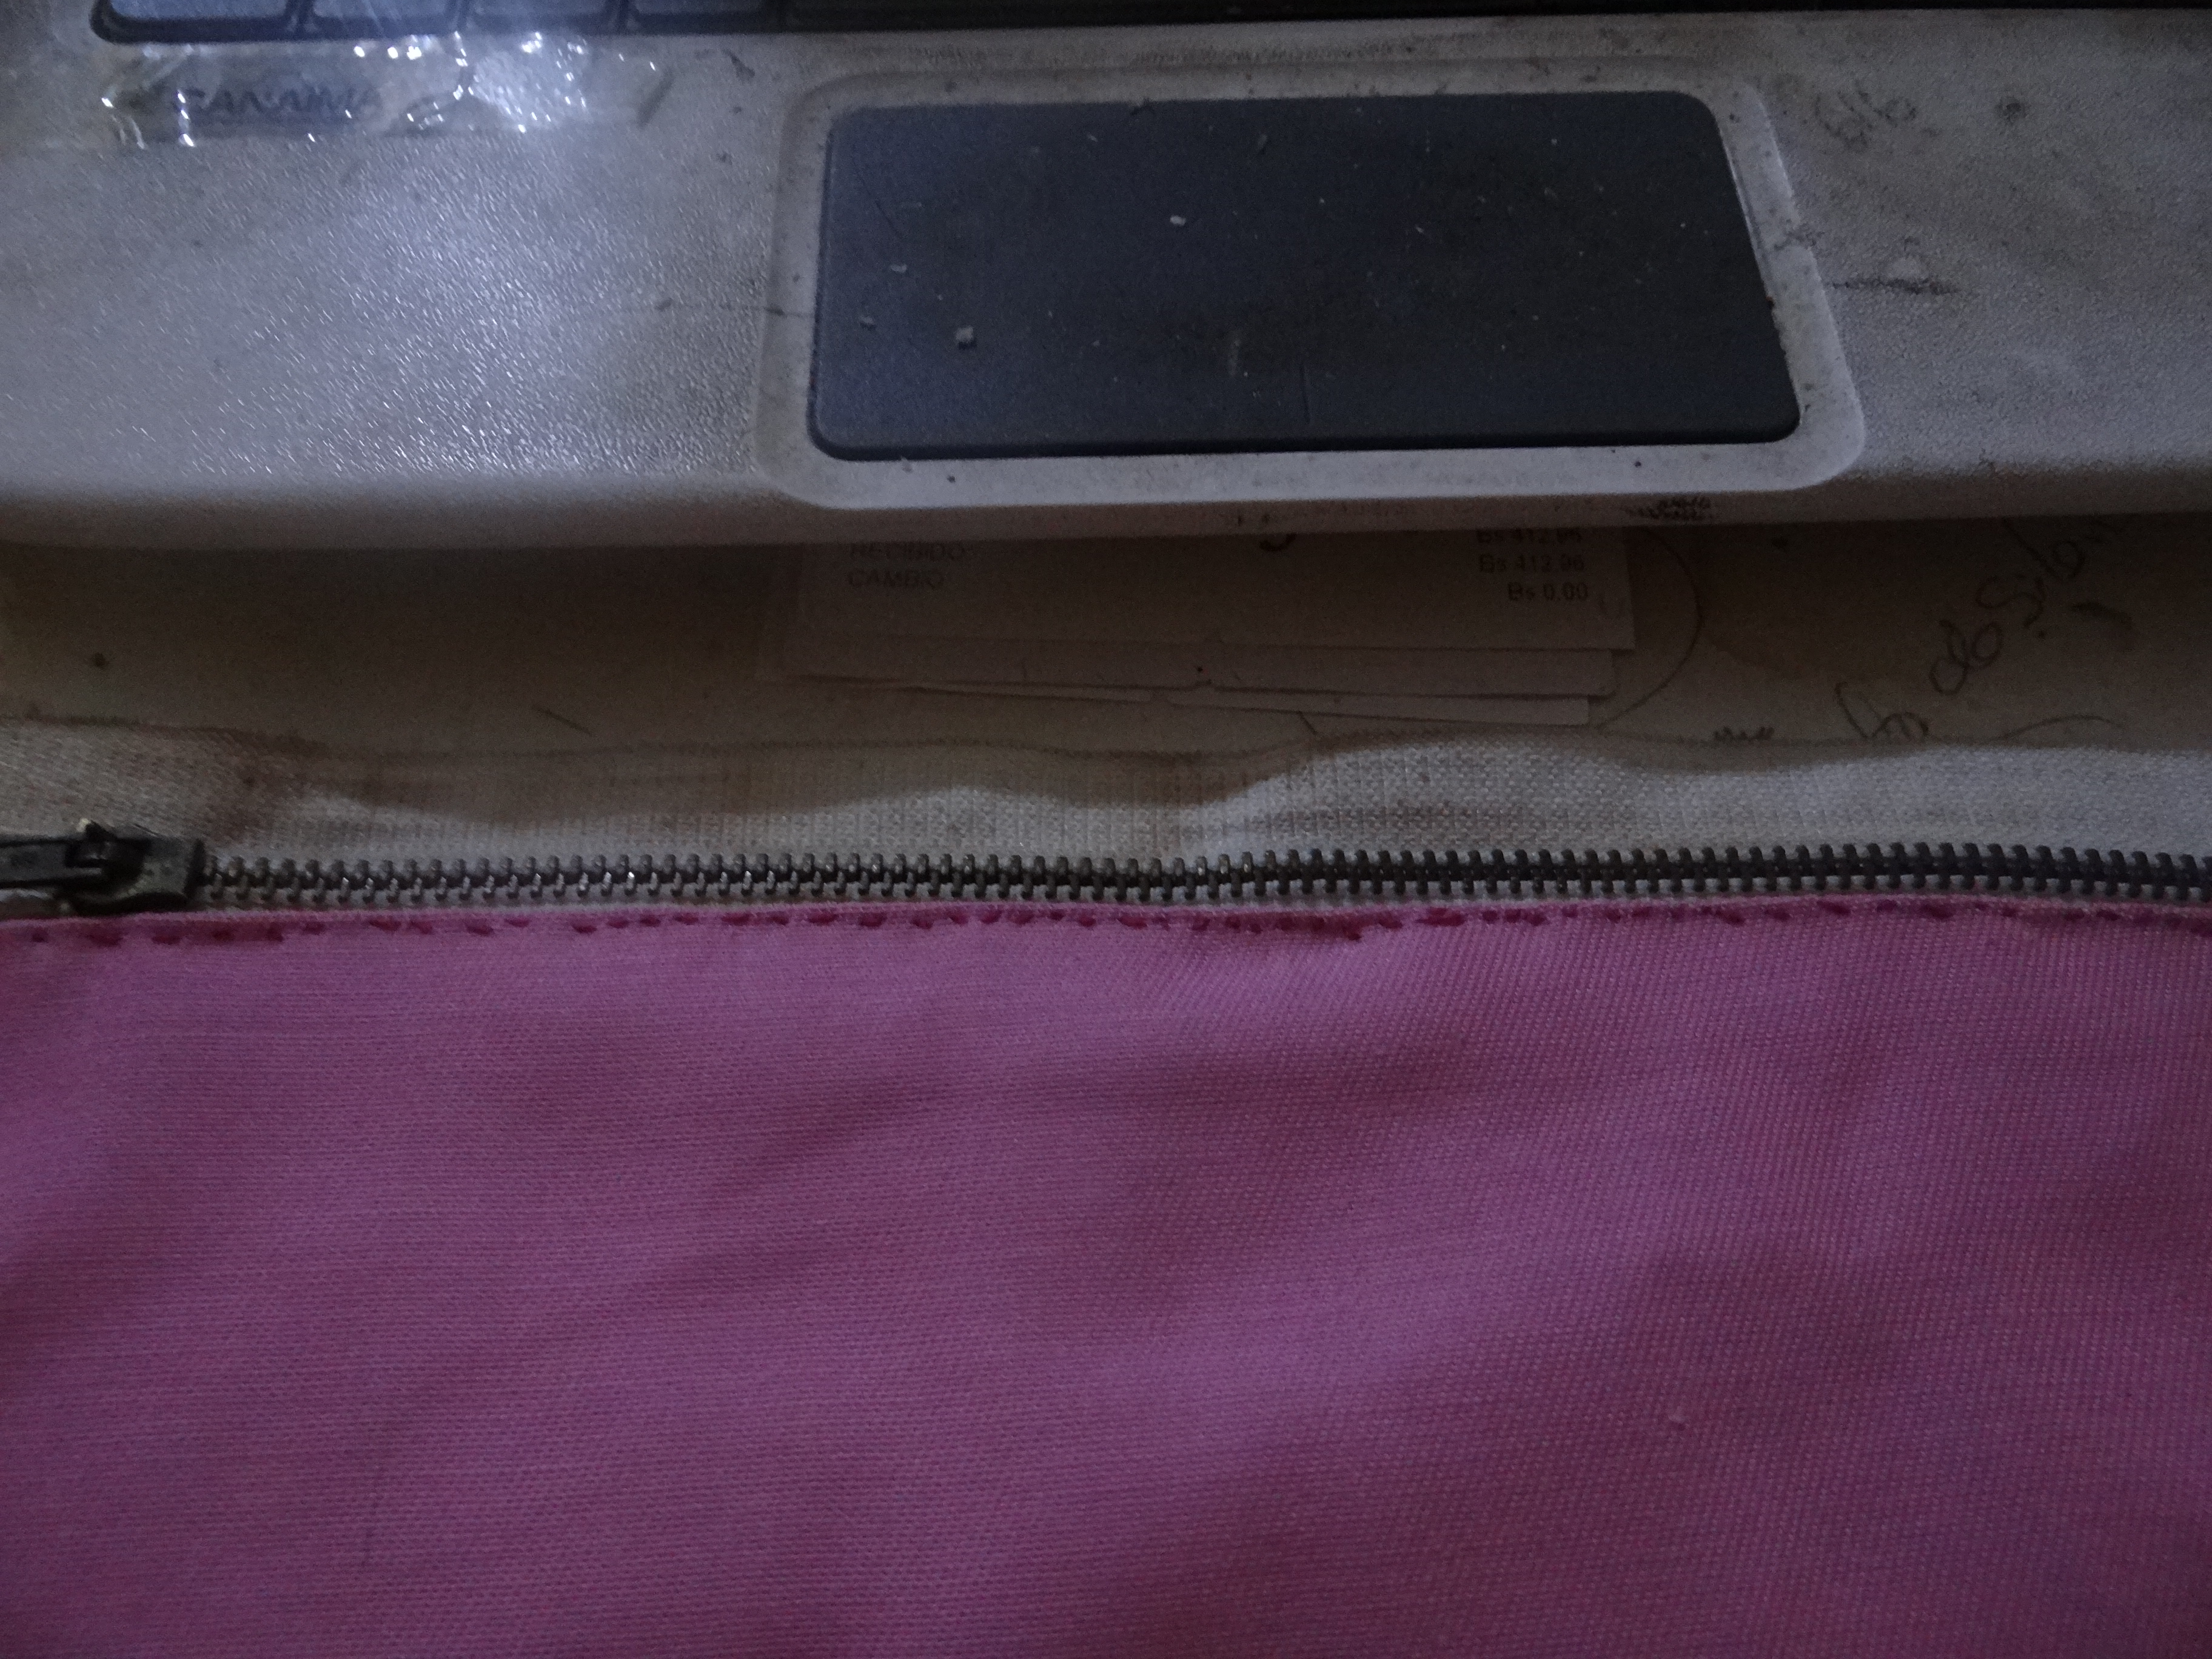
2.-Con ayude de los alfileres sujete con un borde de la tela este al cierre, que una vez que lo tenia así, comencé a coser con pequeñas puntadas similares a las de la maquina de coser del mismo color de la tela: rosado.
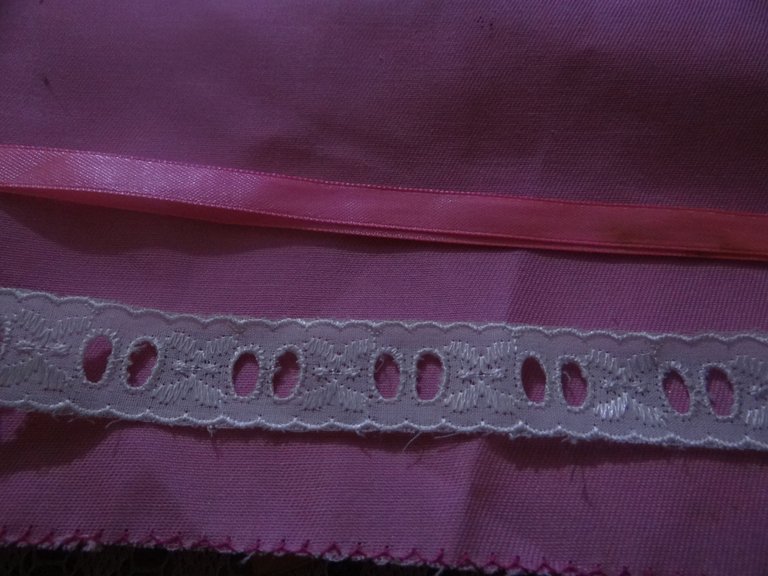

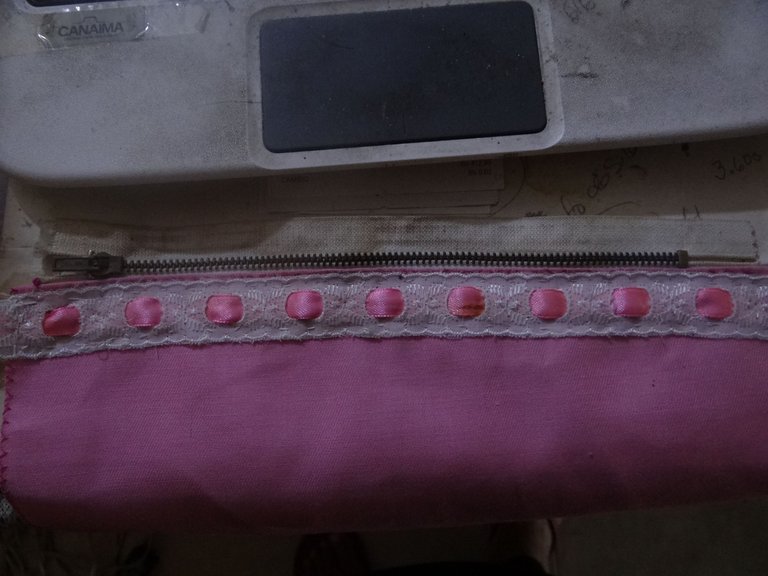
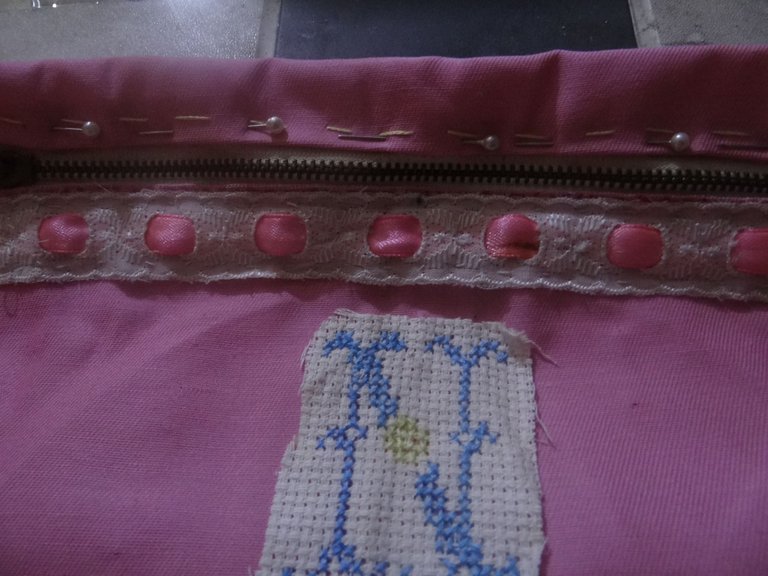
3.-Antes de seguir con la otra parte, coser el otro lado, pensé como decorarla, por eso use la cinta pasacinta, que tiene unos huecos por donde pasamos las cintas de raso que también es rosada, siempre y si es a la mano, fijar con alfileres todo, para luego coser, aquí use el hilo blanco ya que la pasa cinta es blanca.
4.-Termine aquello, pero sentí que estaba como muy sencilla, como es para mi hija decidí personalizarla con la letra inicial de su nombre N, se llama Nayarit, para esto es la tela etamina.
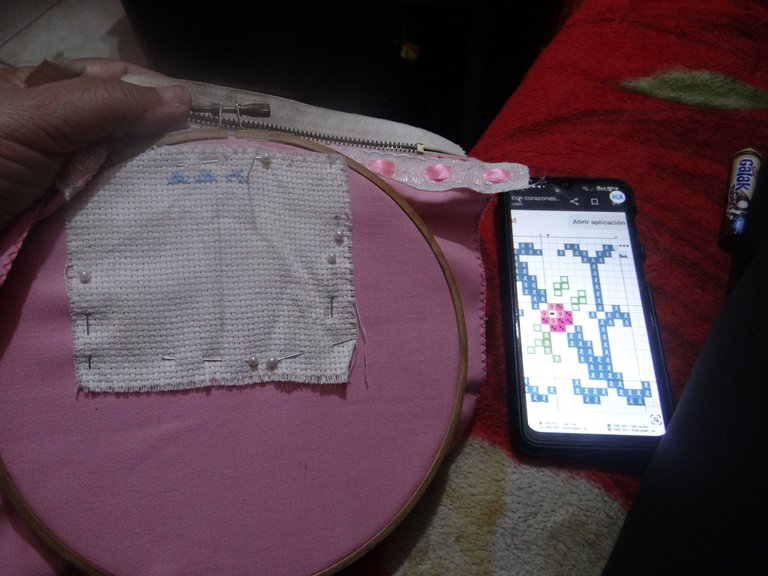
5.-Busque una letra N bonita no muy recargada, por el tiempo y por mi vista. Esto hay que calcular, contar a ver si me quedaba bien, fije la tela a la de la cartuchera si con los alfileres, luego busque en tambor de bordar, hay que prensar y estirar la tela mi tambor es muy grande, el pequeño se rompió, si debo comprar otro.
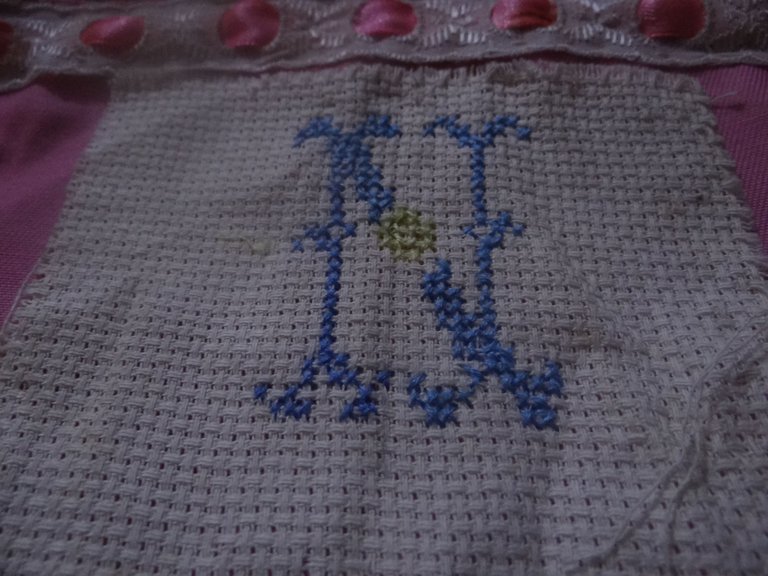
6.-Empece el bordado, aquí hay que contar muy bien los espacios a bordar porque si nos equivocamos en uno o dos cuadritos, debemos deshacer el bordado, empezar otra vez.
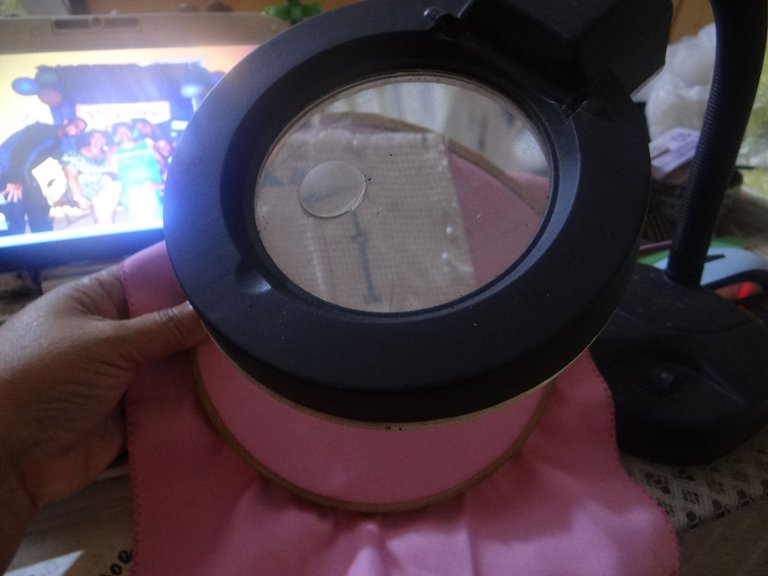
7.- Como la vista vi que no me ayudaba, fui a buscar una lámpara que tiene lupa, pero no prende, pero con la lupa puedo ver mejor y bordar.
8.-Menos mal que con ayuda de la lámpara avance mas rápido.
9.-Cuando se borda en etamina, esta tela se coloca, se cose a otra tela como una aplicación, pero aquí no iba ser así, ya verán al final.
10.-Ya esta lista la letra N, así que a coser la otra parte del cierre, hice el mismo proceso anterior.
11.-Una vez que el cierre quedo listo, voltee la cartuchera, para coserla a los lados, para luego voltearlas de nuevo.
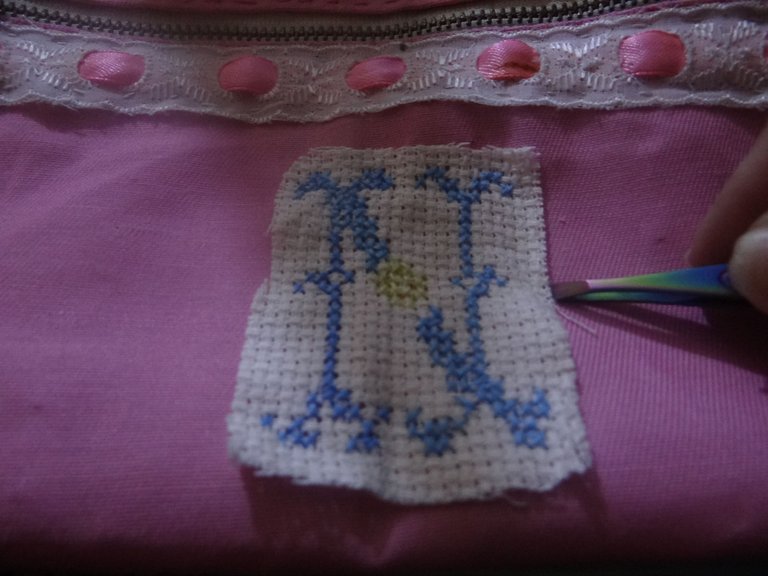
12.-Ahora vamos a deshilachar la tela etamina, es lo bueno y lo malo, porque para lo que quiero se deja deshilachar, pero cuando se usa como aplicación hay que hacer zic zac a la tela para evitar que se deshilache.

13.-Pero para hacerlo mas rápido recorto el sobrante de la tela lo mas que pueda, luego con una pinza de cejas u otra, empezamos a halar los hilos y deshilachar.
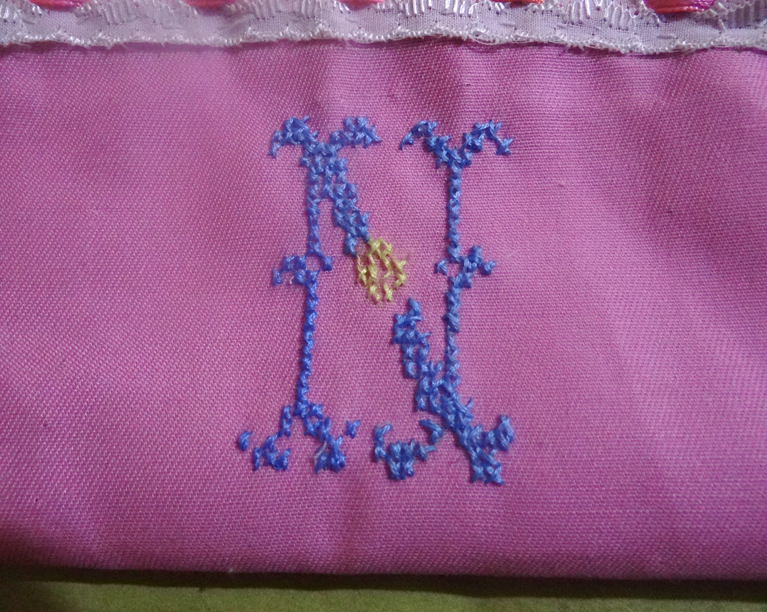
14.-Ya una vez que sacamos o deshilachamos toda la tela, vemos que queda en la cartuchera la letra inicial bordada en punto de cruz. Yo ya la he hecho en franelas con la inicial de mi nombre Z y hasta con mi signo de cáncer un cangrejito.
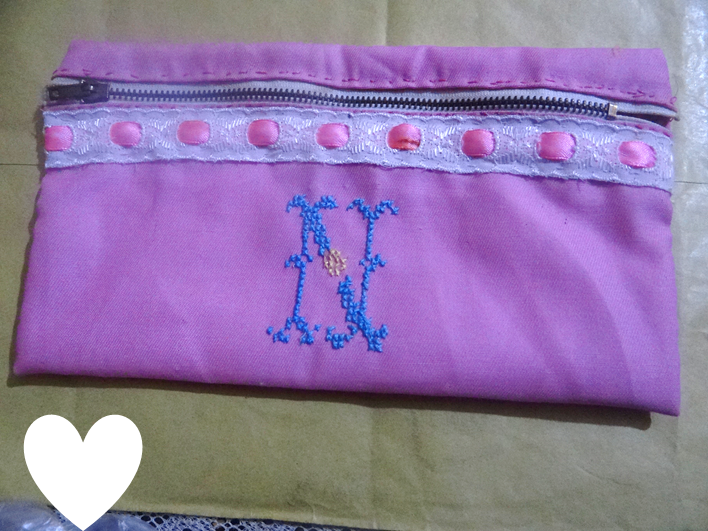
15.-Y ya termine mi cartuchera para mi hija, que no se podrá perder, porque otra cartuchera asi no hay es un diseño único y especial.
Todo el paso a paso en fotos con mi cámara Sony.
Traducción del contenido con la aplicación Deepl.
Imágenes editadas en PowerPoint.
Espero que sea de su agrado y hasta puedan hacer las suyas propias.
Gracias Señor que pude terminar.
A pencil case for my daughter.
Hello my artisans, creators, as I call them arañitas laborious, since my friend @carolinacardoza invited me to this contest, because she knows that I like both things, contests and crafts, when I saw the date of completion I said I have time, it turns out that today is the last day and is when I will publish, who knows that the last ones are the first, hehehe, but I like to show what I do and I have already seen some pencil cases.
I don't like to leave things for the last minute or moment, but sometimes situations arise that change a lot of things. But the important thing is that I am here and my publication.
A pencil case is a very indispensable tool for everything, I have several, I keep documents, vaccination cards and more, but many associate it mostly with the school pencil case where students and teachers carry their pencils, colors, markers, pencil sharpeners and more.
My daughter is starting a new semester at the university, she is studying nursing so I made the pencil case for her.
I had the materials at home:
-Pink piece of fabric. -White ribbon. -Pink satin ribbon, 1 cm wide x 25 cm long. -Piece of etamine fabric. -Scissors, needle, embroidery thread and normal thread. -Pins. -White 20 cms. zipper. Other ribbons.
One of the situations presented is that I have no sewing machine so I sewed it all by hand. And the other situation that my eyesight even though I wear glasses is failing me, which tells me that I should change the glasses.
Let's start:
1.-Some time ago I made many pencil cases as an enterprise, I had my sister's sewing machine, so I had enough fabric of various colors, already cut for the pencil cases of 25 cms wide by 30 cms long.
2.- With the help of the pins I fastened with an edge of the fabric this to the zipper, that once I had it like that, I began to sew with small stitches similar to those of the sewing machine in the same color of the fabric: pink.
3.-Before continuing with the other part, sew the other side, I thought how to decorate it, so I used the ribbon, which has some holes where we pass the satin ribbons that is also pink, always and if it is by hand, pin everything, and then sew, here I used the white thread as the ribbon is white.
4.-Finish that, but I felt it was too simple, as it is for my daughter I decided to personalize it with the initial letter of her name N, it is called Nayarit, for this is the etamina fabric.
5.-Look for a nice letter N not too overloaded, for the time and for my sight. This must be calculated, count to see if I was right, set the fabric to that of the pencil case if with pins, then look in embroidery drum, you have to press and stretch the fabric my drum is very large, the small one broke, if I have to buy another.
6.- Start the embroidery, here we must count very well the spaces to embroider because if we make a mistake in one or two squares, we must undo the embroidery, start again.
7.- As I saw that my eyesight was not helping me, I went to look for a lamp with a magnifying glass, but it doesn't turn on, but with the magnifying glass I can see better and embroider.
8.-I'm glad that with the help of the lamp I advance faster.
9.-When embroidering in etamine, this fabric is placed, it is sewn to another fabric as an application, but here it was not going to be like that, you will see at the end.
10.- The letter N is ready, so I sew the other part of the zipper, I did the same process as before.
11.-Once the zipper is ready, turn the pencil case over, sew it on the sides, and then turn it over again.
12.-Now we are going to fray the etamine fabric, it is the good and the bad, because for what I want it can be frayed, but when it is used as applique you have to zic zac the fabric to prevent it from fraying.
13.-But to make it faster I cut the excess fabric as much as I can, then with a tweezers or other, we begin to pull the threads and fray.
14.-Once we have pulled or frayed all the fabric, we can see that the initial letter embroidered in cross stitch is left on the pencil case. I have already made it in flannel with the initial of my name Z and even with my cancer sign a little crab.
15.- And now I have finished my pencil case for my daughter, that she will not be able to lose, because there is no other pencil case like this, it is a unique and special design.
All the step by step in photos with my Sony camera.
Translation of the content with the Deepl application.
Images edited in PowerPoint.
I hope you like it and you can even make your own.
Thank you Lord I was able to finish.
Que bonita te ha quedado este trabajo realizado, muy bien trabajo, saludos
Gracias amiguita lo que se hace con amor y mas para los hijos queda bien
Con el apoyo de la familia.
También nos puedes apoyar en nuestro Trail de TopFiveFamily
Si desea delegar HP al proyecto de la Familia del Top Family puedes hacerlo desde aquí: Delegue 5 HP - Delegue 10 HP - Delegue 20 HP - Delegue 30 HP - Delegue 50 HP - Delegue 100 HP.
Gracias familia
!PIZZA
me das pizza ja ja ja
!PIZZA
$PIZZA slices delivered:
@sacra97(2/15) tipped @zhanavic69 (x2)
Eres siempre genial y creativa. Eres un motorcito que nunca para de crear y trabajar. Un gran abrazo mi querida @zhanavic69
Hola mi bella asi hay que mantener la mente activa ja ja pero tambien su descanso
Le quedó muy linda la CARTUCHERA para su hija. Le va a encantar. Me gustó mucho ver el PROCEDIMIENTO que realizo con el bordado. Es novedoso para mí la forma cómo coloco la letra en la tela. Interesante. Muchas gracias 🫂
Gracias amiga el bordado es un arte, me sirve de terapia de relax pero voy a necesitar lentes nuevos ja ja
Espero que sea pronto. Saludos.
Está muy bonita, me encanta el bordado!.
Tuve un tiempo que bordaba mucho, pero es algo bueno no se olvida lo hago mas que todo para regalar.
Hola amiga, si fue un poco tarde, el concurso cerró ese día a las 12m. Pero igual, nos hizo feliz tu participación y el delicado bordado. los hacks que nos mostraste son estupendos, es una excelente forma de bordar y nos queden prolijos en telas que no ayudan con cuadros. Excelente idea.
Ja ja ja, si lo se, pero ya que lo termine dije que no importa...lo que importa es la participacion y eso que lo tenia en mente pero como dije las situaciones se presentaron juntas nada malo, pero igual me quitaban tiempo, pero graciasssssssssssss
Así es querida, es lo más importante <3
Te quedo muy bonita y el bordado le dio un towue delicado y vitange
Un abrazo y suerte en el concurso querida amiga @zhanavic69
Hola mi amiga gracias por su comentario tan detallado y si no todo podia ser rosado debia buscar un color que resaltara que que no fuera tan oscuro ...
Las piezas con detalles bordados son siempre tan delicados y se notan preciosos, no se si es por el esmero implícito, pero es estupendo. Gran trabajo
Te quedo muy linda la cartuchera, y definitivamente el bordado le da el plus.
Suerte en el concurso y gracias por regalarnos este proceso creativo @zhanavic69 ✨
!DIY
Esta cartuchera está genial, muy útil y bonita. El color está bello.
Le quedo muy linda la cartuchera, su hija estará muy contenta, me gusto mucho el proceso como la elaboraste.
Hola mi bella, gracias bueno vaya tomando nota para que haga los suyos..
@zhanavic69
https://inleo.io/threads/view/hive-130560/re-leothreads-3b45yvc4d
que bonita!! me encanto la inicial bordada
¡Qué hermosa cartuchera, me recuerda a mi mamá, me encantó el bordado, está sinceramente muy lindo y bien hecho! Felicidades…
Que lindura, me gustó mucho los colores como los combinaste, excelente trabajo. Felicidades!
Muy bonito trabajo amiga Zhandra,una excelente herramienta para este regreso a clases, se nota que lo hiciste con cariño, como debe ser!
Te quedó demasiado linda esa cartuchera amiga, y el bordado también, te deseo una feliz semana, te mando un abrazo.