Hello, Ecency Family!
Growing your own food is one of the best ways to save money, eat healthy, and contribute to a greener planet. Today, I’ll show you an easy, space-saving, and cost-effective way to grow yams—using bags! This method is perfect for those with limited space or who want to maximize their yield in a controlled environment.
If you find this article helpful, don’t forget to upvote, follow, and comment for more gardening tips!
Why Grow Yams in Bags?
Planting yams in bags has several benefits:
✅ Space-Saving – Ideal for small gardens, patios, or balconies.
✅ Cost-Effective – No need for large farmland, just a few materials.
✅ Better Soil Control – Reduces pests and diseases compared to ground planting.
✅ Easier Harvesting – Simply cut open the bag and collect your yams!
✅ Higher Yield Per Space – Maximizes productivity in a limited area.
Materials Needed
Large grow bags (50–100 liters) or old sacks
Healthy yam setts (small yam tubers or yam cuttings)
Rich, loamy soil mixed with compost
Watering can
Mulch (dry leaves, straw, or grass)
Stakes or poles (for yam vines to climb)
Step-by-Step Guide to Planting Yams in Bags
- Prepare the Bag
Fill your grow bag with a mix of loamy soil and compost, leaving some space at the top for watering. Make sure the bag has drainage holes to prevent waterlogging.
- Select and Prepare Your Yam Setts
Choose healthy, disease-free yam tubers and cut them into setts (about the size of a fist). Let them dry for a day before planting to prevent rot.

- Plant the Yam
Plant the yam sett about 4-6 inches deep with the sprouting side facing up. Cover it lightly with soil.
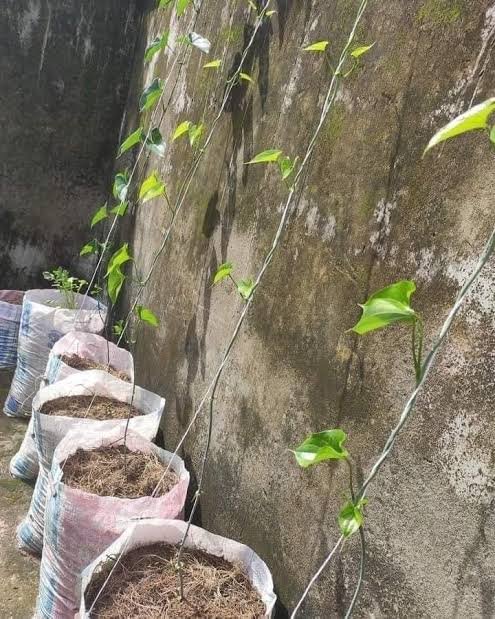
- Provide Support for the Vines
Yam vines love to climb! Place a stake or pole near the bag so the vine can grow upwards. This improves air circulation and prevents diseases.
- Water Regularly but Avoid Overwatering
Water your yam plants every 2-3 days, ensuring the soil remains moist but not soggy. Overwatering can lead to rot.
- Mulch for Moisture Retention
Add mulch around the plant to keep the soil moist, reduce weeds, and improve soil fertility.
- Monitor Growth and Add More Soil
As the yam plant grows, add more soil to cover the developing tubers. This encourages bigger yam production.
- Harvesting Your Yams
After 6-8 months, your yams will be ready to harvest. The leaves will start turning yellow, signaling maturity. Simply cut open the bag, shake off the soil, and enjoy your fresh, homegrown yams!
Cost-Effectiveness of This Method
✅ Low Startup Cost – You only need basic materials (bags, soil, yam setts).
✅ Reuses Waste Bags – Old sacks or recycled grow bags reduce costs.
✅ Saves Land Space – You don’t need large farmland.
✅ Higher Yield in Small Areas – More yams in less space means more value for your investment.
Try It and Share Your Results!
Now that you know how easy and cost-effective it is to grow yams in bags, why not give it a try? It’s an excellent way to grow food at home, reduce expenses, and enjoy organic produce.
Have you tried this method before? Let me know in the comments! Don’t forget to upvote, follow, and stay tuned for more gardening tips!
#gardening #yams #organicfarming #homesteading #sustainableliving #greenplanet #smallscaleagriculture #foodsecurity
@mattsanthonyit
@steempty
@tipu
@ecency
@alexis555
@samantha-w
Congratulations @investoedia! You have completed the following achievement on the Hive blockchain And have been rewarded with New badge(s)
Your next target is to reach 50 comments.
You can view your badges on your board and compare yourself to others in the Ranking
If you no longer want to receive notifications, reply to this comment with the word
STOP@tipu curate
Upvoted 👌 (Mana: 44/54) Liquid rewards.