Recuerda siempre llenarte de Amor por lo que hacemos, Paciencia para aprenderlo y Animo para hacerlo / Remember to always fill yourself with love for what we do, patience to learn it and encouragement to do it.

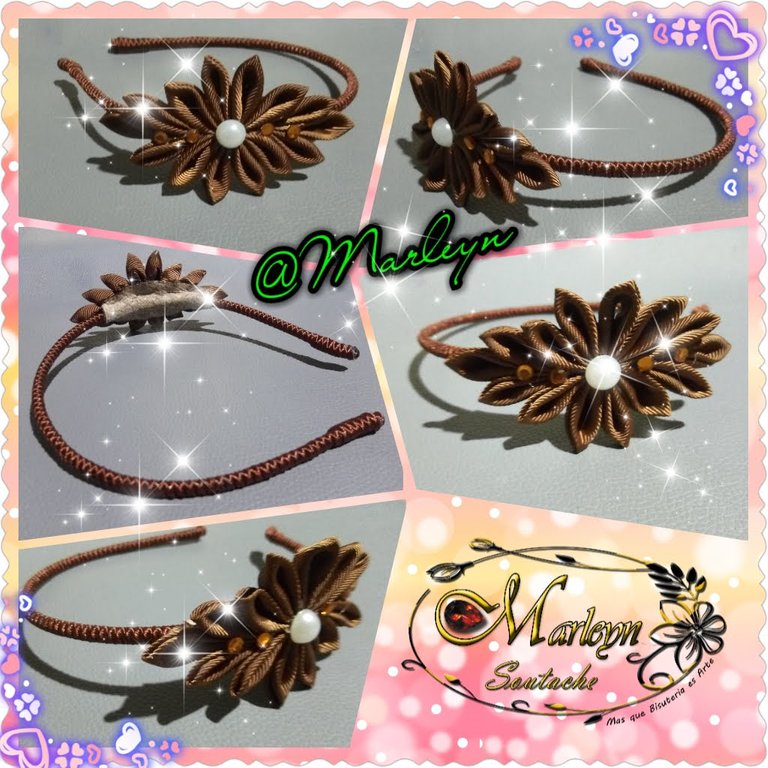
Feliz y bendecido nuevo día, espero de corazón todos estén bien con salud, energía y muchas ganas de aprender algo nuevo... Como saben me encanta mi trabajo y las manualidades este es como mi escape del día a día para esta publicación e realizado un sencillo cintillo o Diadema, he tratado de explicarlo de una manera muy detallada con la ayuda de una secuencia de imágenes para facilitar tu entendimiento, todos los materiales son de fácil acceso puedes encontrarlos en una mercería, Los colores son a su selección puedes realizarlo combinado o solo como sea tu preferencia, Comencemos:
Happy and blessed new day, I sincerely hope everyone is well with health, energy and eager to learn something new ... As you know I love my work and crafts this is like me escape from day to day for this publication and made a simple headband or headband, I have tried to explain it in a very detailed way with the help of a sequence of images to facilitate your understanding, all the materials are easily accessible you can find them in a haberdashery , The colors are your selection, you can do it combined or only as your preference, Let's start:

| Materiales | Materials |
|---|
| Cinta Razo 4 centímetros de ancho por 56 centímetros de ancho | Razo Ribbon 4 centimeters wide by 56 centimeters wide |
| Apliques redondo de 1 centímetro de diámetro para el centro | 1 centimeter diameter round appliques for the center |
| 4 Apliques pequeños de 0.5 milímetros de diámetro para las puntas | 4 Small 0.5 millimeter diameter inserts for the tips |
| Encendedor | Lighter |
| Tijera | Scissors |
| Pinza punta fina | Fine tip pliers |
| Base de Cintillo o Diadema metálica delgada | Thin metal headband or headband base |
| 5 metros Hilo para Soutache o cinta de 1.5 centímetros para forrar el cintillo o Diadema | 5 meters Thread for Soutache or 1.5 centimeter ribbon to line the headband or Headband |
| Amor por lo que hacemos, Paciencia para aprenderlo y Animo para hacerlo | Love for what we do, patience to learn it and encouragement to do it |
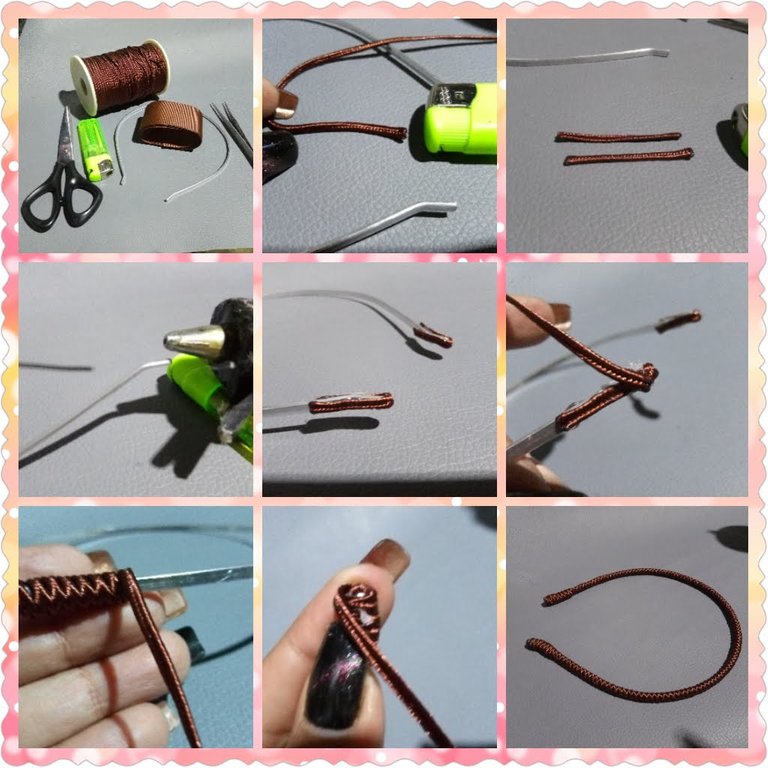
PASO 1: Cuando tenemos todos los materiales a la mano podemos comenzar, para empezar vamos a forrar el cintillo bien sea con la cinta de 1.5 centímetros que si ese es el caso vas a necesitar 2 metros aproximadamente o con el hilo de Soutache a mi particularmente me gusta mas con el hilo de Soutache por que es distinto y de esta manera juegas con las texturas de este se usa aproximadamente 3 metros, explicare el proceso con el hilo de soutache que fue el que realice aunque básicamente es el mismo proceso con la cinta, Comenzamos, corta 2 tiras de hilo de aproximadamente 3 centímetros cada una, quema las puntas con el encendedor para sellar, ahora con la pistola de silicon le colocaras unas gotas de silicon y pega las tiras en las puntas del cintillo, ahora sobre una de ellas como te muestro en la imagen 6, vas a pegar la punta del hilo y con cuidado vamos a comenzar a envolver el cintillo con el hilo poco a poco no te apresures verifica que no queden espacios vacíos y ve colocando silicon a medida que vas forrando para que no se suelte con el uso, cuando termines pegar la punta con el silicon y quemar un poco para sellar
STEP 1: When we have all the materials at hand we can begin, to begin we are going to cover the headband either with the 1.5 cm tape that if that is the case you will need approximately 2 meters or with the Soutache thread, I particularly like it better with the Soutache thread because it is different and in this way you play with the textures of this, it is used approximately 3 meters, I will explain the process with the soutache thread that It was the one I did, although it is basically the same process with the tape, We begin, cut 2 strips of thread of approximately 3 centimeters each, burn the ends with the lighter to seal, now with the silicone gun you will place a few drops of silicone and Glue the strips on the ends of the headband, now on one of them as I show you in image 6, you are going to glue the end of the thread and carefully we are going to start wrapping the headband with the thread little by little, do not rush verify that no space left The empty ones and go putting silicone as you are lining so that it does not come loose with use, when you finish stick the tip with the silicone and burn a little to seal
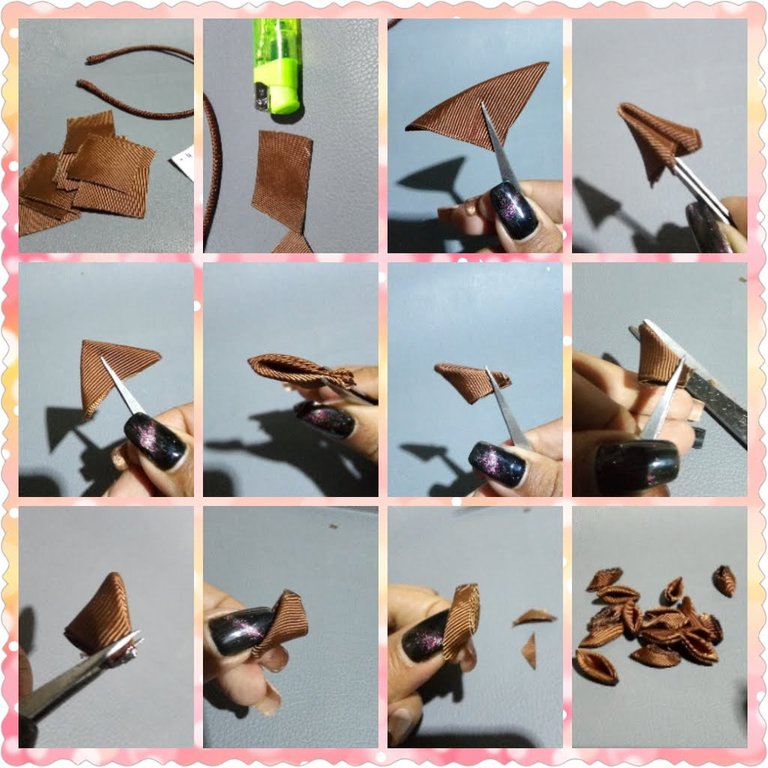
PASO 2: Cortar 14 cuadros de 4 centímetros por 4 centímetros, con el encendedor quemar las puntas y ahora vamos a comenzar a realizar los pétalos puedes ayudarte con la pinza punta fina si no tienes una así puedes utilizar la pinza de cejas es igual de efectiva, bueno ahora doblar el cuadro por la mitad como te muestro en la imagen 3 formando un triangulo, ahora coloca la pinza por la mitad y vuelve a doblar para formar un triangulo mas pequeño, agarrarlo con cuidado y saca la pinza ahora colocarla en el centro y forma un tercer triangulo mas pequeño, ahora saca la pinza y sostenerlo con la misma por la punta corta un poco las puntas y quemar con el encendedor, en la parte de abajo como queda muy alto cortar un poco y quemar con el encendedor, no te compliques es fácil solo armar 3 triángulos uno mas pequeño que el otro y solo es doblando a la mitad, Realiza este mismo proceso con los 14 cuadrados
STEP 2: Cut 14 squares of 4 centimeters by 4 centimeters, with the lighter burn the tips and now we are going to start making the petals, you can help yourself with the fine point tweezers if you don't have one so you can use the eyebrow tweezers it is just as effective, well now fold the box in half as I show you in image 3 forming a triangle, now place the tweezers in half and fold again to form a smaller triangle, grab it carefully and remove the tweezers now place it in the center and form a third smaller triangle, now take out the tweezers and hold it by the tip, cut the tips a little and burn with the lighter, at the bottom as it is very high cut a little and burn with the lighter, do not complicate yourself it is easy to just assemble 3 triangles one smaller than the other and it is only by folding in half, carry out this same process with the 14 squares
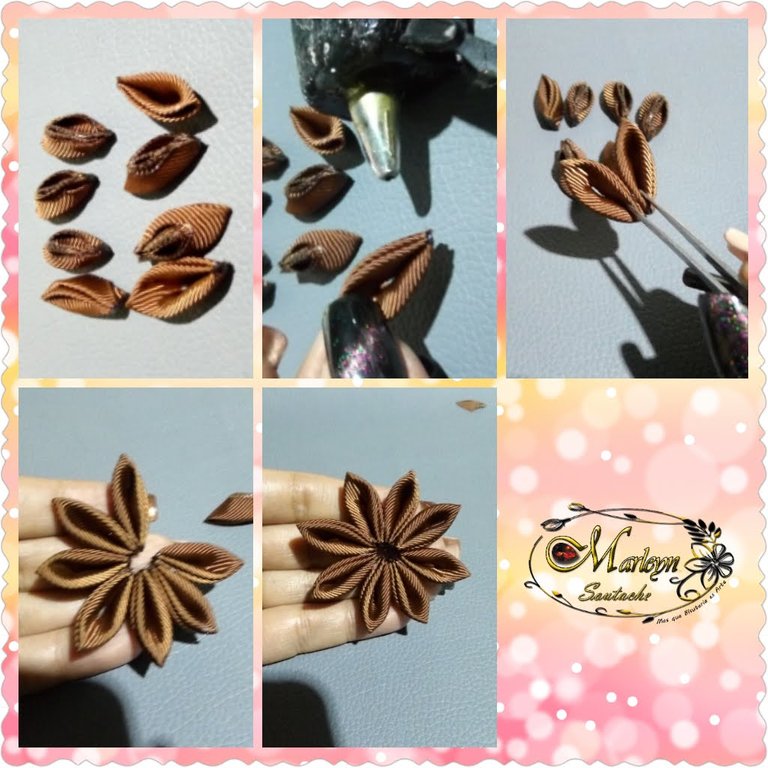
PASO 3: Al terminar los pétalos utilizaremos 8 pétalos para armar la flor central, ve colocando pequeñas gotas de silicon en las puntas de los pétalos de esta manera pegar unos con otros hasta formar la flor
STEP 3: At the end of the petals we will use 8 petals to assemble the central flower, go by placing small drops of silicone on the tips of the petals in this way, stick together until the flower is formed
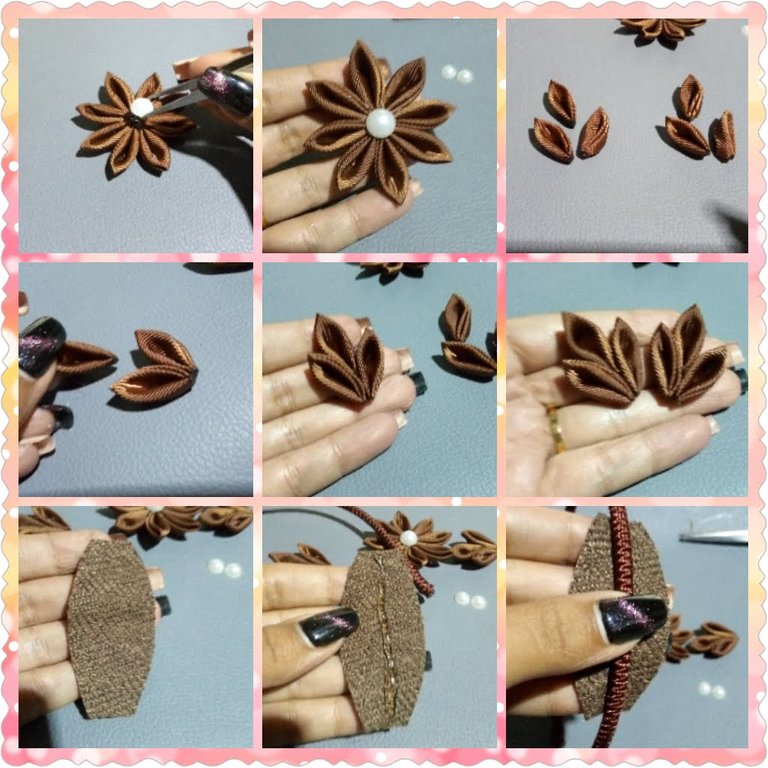
PASO 4:En el centro de la flor coloca un punto de silicon caliente y con ayuda de la pinza pegar el aplique grande, yo use una media perla para que fuese el centro , ahora continuamos formando la otra parte del cintillo, como ves en las imágenes 3, 4 y 5 Disculpa que esta vez no les coloque los números, vas a armar una pieza de 3 pétalos para cada punta de la flor, ahora cortar un trozo de tela de aproximadamente 6 centímetros de largo y 2.5 centímetros de ancho redondeando un poco los bordes, colocarle un na linea de silicon y pegar en el cintillo por la parte de abajo del mismo a 8 o 9 centímetros de alto contando desde la punta.
STEP 4: In the center of the flower, place a point of hot silicone and with the help of the tweezers, stick the large applique, I used a half pearl to be the center, now we continue forming the other part of the headband, as you can see in images 3, 4 and 5 Sorry that this time I do not put the numbers on them, you are going to assemble a piece of 3 petals for each end of the flower, now cut a piece of fabric of approximately 6 centimeters long and 2.5 centimeters wide, rounding the edges a little, place a line of silicone and stick on the headband from the bottom of it at 8 or 9 centimeters high counting from the tip.
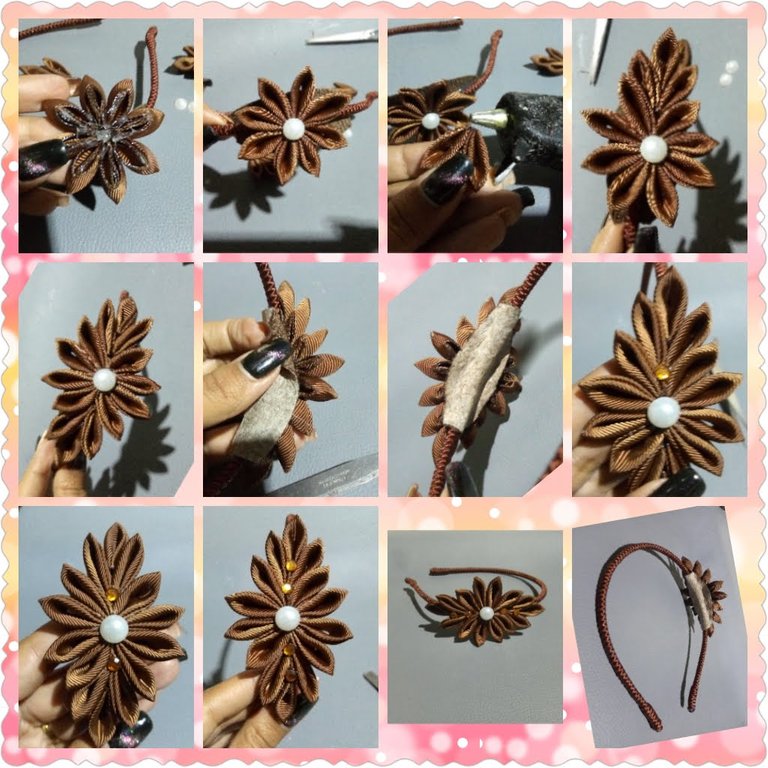
PASO 5: Ahora vamos a formar la parte de arriba, coloca suficiente silicon en la flor y vamos a pegarla en el centro de la tela que pegamos en el paso anterior, debes verificar que el cintillo quede entre dos pétalos ahora coloca un poco de silicon el la punta de los 3 pétalos y se pegara en ese espacio entre los pétalos de manera que el cintillo le quede justo por abajo, realiza este mismo proceso en el otro extremo de la flor, ahora coloca silicon por la parte de abajo de la tela y pegarla bien a la flor, luego pasa el encendedor para sellar, ahora en la parte superior en las puntas donde se pegaron los pétalos que se ven vamos a pegar los apliques pequeños con gotas de silicon muy pequeñas para no ensuciar nuestra pieza. De esta manera hemos finalizado espero les guste y me muestren su trabajo, Gracias de antemano por leerme
STEP 5: Now we are going to form the upper part, place enough silicon on the flower and we are going to paste it in the center of the fabric that we pasted in the previous step, you must verify that the headband is between two petals now place a little silicon on the tip of the 3 petals and it will stick in that space between the petals so that the headband is just below, carry out this same process at the other end of the flower, Now place silicone on the bottom of the fabric and glue it well to the flower, then pass the lighter to seal, now at the top at the tips where the petals that are seen were glued, we are going to glue the small appliques with drops of very small silicon so as not to dirty our piece. In this way we have finished I hope you like it and show me your work, Thanks in advance for reading me
Si tienes una duda escríbeme un comentario, estaré feliz de ayudarte con cualquier detalle, Espero que mis diseños les gusten tanto como a mí me gusta, aprendan con placer ...!

Nunca olvides que el Poder es Querer y si quieres Puedes...
Eres Luz eres Energía, TU PUEDES ... Que el universo infinito Conspire para que todo siempre sea mejor ... Se les quiere ...
Venezuela FE
Somos Seres Abundantes! Qué las energías del universo vibren en sintonía con las de cada uno de nosotros en armonía! Cuidemos nuestras palabras, acciones y pensamientos!
If you have a question, write me a comment, I will be happy to help you with any details, I hope you like my designs as much as I like, learn with pleasure ...!
Never forget that Power is Wanting and if you want you can ...
You are Light, you are Energy, YOU CAN ... May the infinite universe Conspire so that everything is always better ... They are loved ...
Venezuela FAITH
We are Abundant Beings! May the energies of the universe vibrate in tune with those of each of us in harmony! Let's take care of our words, actions and thoughts!
Autoría del texto y todas las imágenes: @Marleyn , La edición de las imágenes las realicé yo misma, Por favor no Utilices mis fotos sin mi autorización, edites ni re-publiques mi material ¿Deseas ponerte en contacto conmigo? Escríbeme:
Correo electronico: [email protected]
Discord Marleyn#7821
Twitter: @marleynleal1
Imstagran: @MarleynSoutache
Authorship of the text and all the images: @Marleyn, Editing of the images was done by myself, >Please do not use my photos without my authorization, edit or re-publish my material Do you want to >contact me? Write me:
Email: [email protected]
Discord Marleyn #7821
Twitter: @marleynleal1
Imstagran: @MarleynSoutache
Mi trabajo es mi pasión y cuando tu trabajo es tu pasión nada es imposible / My work is my passion and when your work is your passion nothing is impossible
Saludos, que minucioso la hechura de los pétalos, que genial como los tomas con la pinza. Gracias por compartir. Saludos.
!discovery 15
This post was shared and voted inside the discord by the curators team of discovery-it
Join our community! hive-193212
Discovery-it is also a Witness, vote for us here
Delegate to us for passive income. Check our 80% fee-back Program