Puedes leerlo aquí, o simplemente desplázate hacia abajo en la página.
Hello friends on #HIVE and, of course, my beloved #LMAC community, today I come with something different, a small tutorial to learn how to erase backgrounds in Gimp. I’ve been switching my programs to free software for a while now and, although I haven’t completely abandoned Photoshop, Gimp has been a substitute worth mentioning, allowing me to make quick edits and some photomanipulations with very good results.

One of the difficulties I’ve encountered in Gimp are the selection tools, they are not very good and the automatic ones like the magic wand fail quite a bit, just like the color range selection.
The pen becomes the most attractive tool to obtain neat results, although it can be a bit cumbersome and slow. That’s why I’ve opted for the use of layer masks and the old and reliable brush.
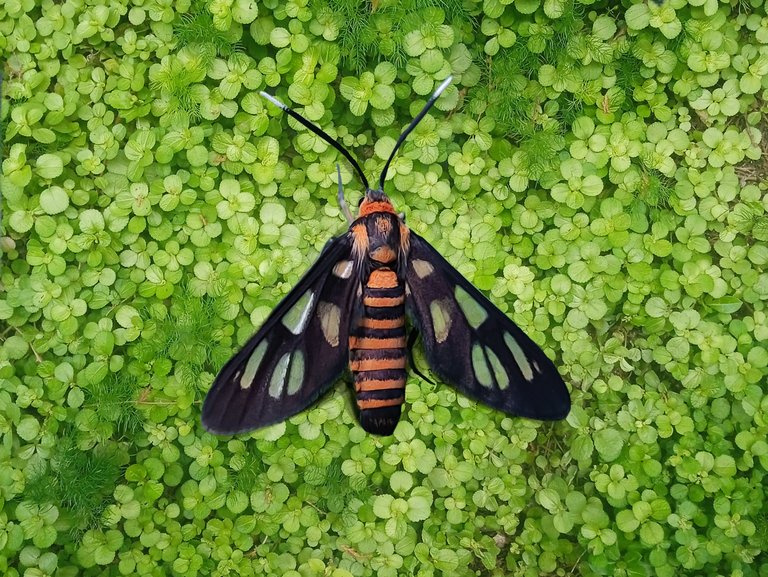
For this tutorial I will use two images, a beautiful butterfly captured by @akukamaruzzaman, and a photo taken by me.
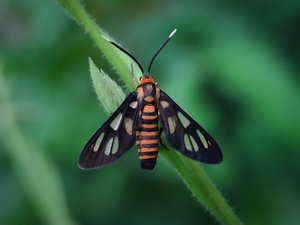
Contributed to the #LIL by @akukamaruzzaman.
Without further ado, I leave you with the steps:
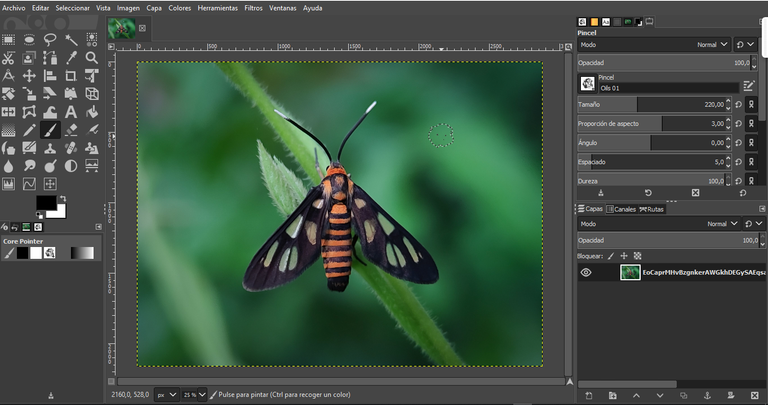
- We import our image into Gimp and assign our color profile if necessary.
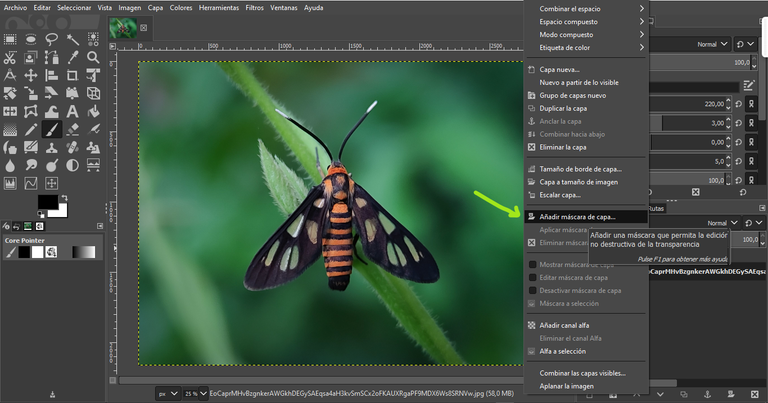
- We create a white color layer mask. Layer masks work very simply, the white color will show the image, the black will hide it.
- We select our brush. As a personal preference, I always choose a brush with irregular edges that allows me to reach difficult areas of the subject I want to isolate. The brush settings are very basic, the important thing is an opacity of 100% to paint completely black. With the X key we can invert the color from black to white, allowing us to erase with black and show with white.
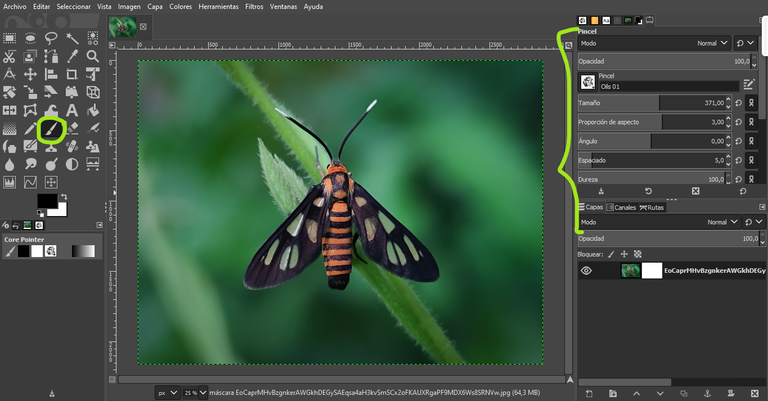
By holding down the Ctrl+Alt keys and the mouse wheel we can increase and decrease the brush size.
Holding the Shift key will allow us to draw straight lines that will speed up our workflow.

All that remains is patience and hard work to go with our brush hiding everything we don’t want to show.
I leave you with a video of the whole process.
I hope you find this little tutorial useful in your future projects. Feel free to comment and leave me your opinions and suggestions. I would like to know if you find this type of tutorials useful or if you enjoy the format. Greetings and thank you for reading this far.!
Borrando Fondos en Gimp: Un Tutorial Paso a Paso
Hola amigos en #HIVE y, por supuesto, mi querida comunidad de #LMAC, hoy vengo con algo distinto, un pequeño tutorial para aprender a borrar fondos en Gimp. Llevo ya un tiempo cambiando mis programas a software libre y, aunque no abandono del todo Photoshop, Gimp ha sido un sustituto al menos digno de mencionar, permitiéndome hacer ediciones rápidas y algunas fotomanipulaciones con muy buenos resultados.
Una de las dificultades que me he encontrado en Gimp son las herramientas de selección, no son muy buenas y las automáticas como la varita mágica falla bastante, al igual que la selección por gama de colores.
La pluma se vuelve la herramienta más atractiva para obtener resultados prolijos, aunque puede ser un poco engorrosa y lenta. Por eso me he decantado por el uso de máscaras de capas y el viejo y confiable pincel.
Para este tutorial usaré dos imágenes, una bella mariposa capturada por @akukamaruzzaman, y una foto tomada por mí.
Contributed to the #LIL by @akukamaruzzaman.
Sin más, les dejo con los pasos:
- Importamos nuestra imagen en Gimp y le asignamos nuestro perfil de color en caso de que sea necesario.
- Creamos una máscara de capa de color blanco. Las máscaras de capa funcionan de forma muy sencilla, el color blanco mostrará la imagen, el negro la ocultará.
- Seleccionamos nuestro pincel. Como gusto personal, siempre escojo un pincel de bordes irregulares que me permita llegar a zonas difíciles del sujeto que quiero aislar. Los ajustes del pincel son bien básicos, lo importante es una opacidad del 100% para que pinte completamente negro. Con la tecla de X podremos invertir el color de negro a blanco, permitiéndonos con el negro borrar y con el blanco mostrar.
Manteniendo presionadas las teclas Ctrl+Alt y la rueda del mouse podremos aumentar y disminuir el tamaño del pincel.
Mantener la tecla Shift nos permitirá trazar líneas rectas que acelerarán nuestro flujo de trabajo.
- Todo lo que queda es paciencia y laboriosidad para ir con nuestro pincel ocultando todo lo que no queremos que se muestre.
Los dejo con un video de todo el proceso.

Espero que les sea útil este pequeño tutorial en sus futuros proyectos. Siéntete libre de comentar y dejarme tus opiniones y sugerencias. Me gustaría saber si encuentran útil este tipo de tutoriales o si disfrutan del formato. Saludos y gracias por llegar hasta aquí leyendo.

Translated with DeepL.com (free version)
I apologize if there are any grammatical errors, English is not my native language, I have tried to be as careful as possible.
I regularly create images on Pixabay, which are free of copyright. Access my gallery by clicking here.
*All assets, illustrations and banners have been created by me and are original content, unless otherwise specified.
Music by Luca Francini from Pixabay
@tipu curate
Upvoted 👌 (Mana: 39/59) Liquid rewards.
Hola Ernesto, gracias por este tutorial que estoy segura le servirá a muchos. Nunca he trabajado con Gimp, Pero veo que le hace falta una herramienta de selección y recorte de los objetos igual que Photoshop, sería más rápido ese proceso. Como sea, está genial post! 👍
Hola, si gimp tiene esas herramientas, pero no funcionan nada bien, también se puede usar la pluma para hacer un recorrido y seleccionar, pero es extremadamente lento. Es lo que me ha complicado más migrar completamente a software libre. Aunque si tienes una tableta digitalizadora este proceso que muestro es bien rápido, Photoshop sigue siendo el líder aún, pero sus políticas se están volviendo abusivas con los clientes.
Oh wow. I use gimp all the time, but have not explored many of its potential uses. When I'm wide awake and relaxed I am going to study your stills and video. It would be wonderful to graduate and learn more. I have learned a lot from @quantumg. Nice to have more tips about this wonderful free-access program.
Thanks, @soyernesto
Thank you, GIMP is an excellent option with many features, and a large community behind it. Given the most recent news from Adobe, it’s necessary to have new alternatives up our sleeve, especially those that come hand-in-hand with open-source software. Thank you for reading and stopping by, warm regards.
Perfect! Thank you for this excellent tutorial.
It's easy to understand, quick and nothing is missing. I'm sure it will help a lot of people who are wondering how to do this and luckily stumble upon your post.
Thank you very much for the support, I am trying to understand Gimp in depth and I want to share my progress little by little with the community.