

| A bracelet with ballerinas and lark's knot in two models. | Una pulsera con balines y nudo alondra en dos modelos. |
|---|---|
My greetings to all the appreciated creators of #jewelry. What a pleasure to be back with the community and to be able to share the process of making this bracelet made with lark's knot and pellets. At first I made the navy blue one with silver beads and I thought it looked nice, but my friend Elsa was delighted when she saw it and I thought of making one for her, but dear Elsa is smaller, and this bracelet would look a little extravagant, so I made one with red thread and smaller gold beads and I want to see it to give her this little detail. Now I am going to give you the details of elaboration to make a bracelet you need. | Mis saludos para todos los apreciados creadores de #jewelry. Que gusto estar nuevamente con la comunidad y poder compartir el proceso de elaboración de esta pulsera hecha con nudo alondra y balines. En principio realicé la de color azul marino con balines plateados y me pareció que quedó linda, pero mi amiga Elsa cuando la vió quedó encantada y pensé en hacer una para ella, pero querida Elsa es más pequeña, y esta pulsera se le vería un poco extravagante, así que le hice una con hilo rojo y balines dorados más pequeños y ya quiero verla para darle este pequeño detalle. Ahora les voy dando los detalles de elaboración para hacer una pulsera se necesitan. |
The materials used are:
2.7 meters of thread.
40 pellets.
Los materiales usados son:
2,7 metros de hilo de preferencia.
40 balines.
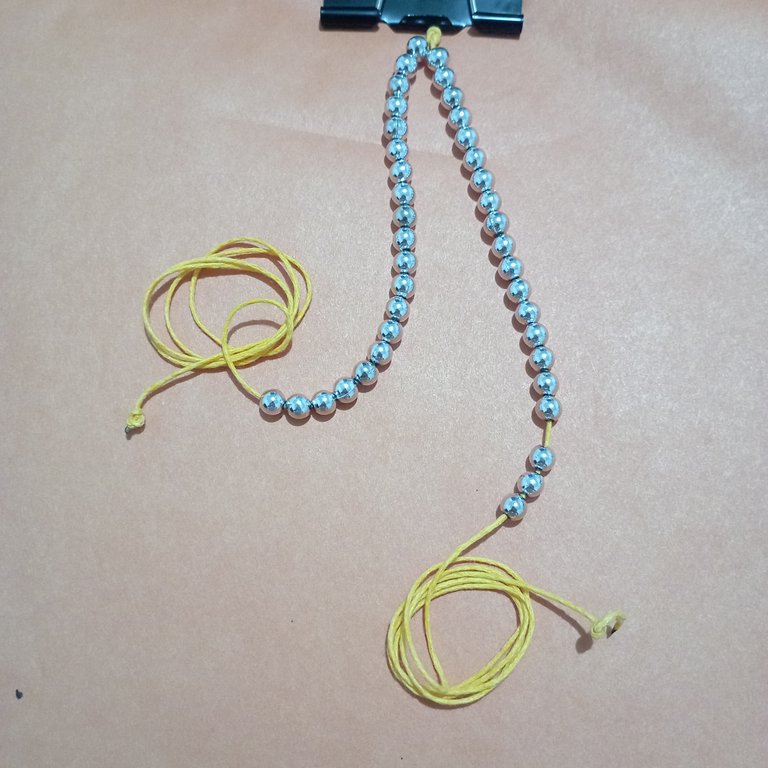
We cut two strands of 35 centimeters and introduce a ball and slide them to the ends making sure with a simple knot at each end so that they do not come off. In this design we will work with two central threads which are the yellow ones. Then we tie a knot at 7 centimeters to hold both threads. Now we introduce 20 beads in each thread and we secure with a simple provisional knot so that the balls do not come out; at the end we will get rid of these to make the closing. | Cortamos dos hilos de 35 centímetros e introducimos un balín y los deslizamos hasta los extremos asegurándonos con un nudo simple en cada punta para que no se salgan. En este diseño trabajaremos con dos hilos centrales que son los de color amarillo. Luego hacemos un nudo a 7 centímetros que sujeten ambos hilos. Ahora introducimos 20 cuentas en cada hilo y aseguramos con un nudo simple provisional para que no se salgan los balines; al final nos desharemos de éstos para hacer el cierre. |


With the two meter thread we tie a flat knot in the middle of the thread, leaving one meter on each side. With the thread on the right we make a turn taking one end behind the yellow thread and we tighten it speaking upwards, now we make the same knot taking the same thread towards the handsome side. Now we have the first lark knot on the right side. Repeat the movement on the left side. First taking the tying thread from the inside and backwards and then in the opposite direction. | Con el hilo de dos metros realizamos un nudo plano a la mitad del hilo, quedando un metro de cada lado. Con el hilo de la derecha hacemos un giro llevando una punta por detrás del hilo amarillo y lo apretamos hablando hacia arriba, ahora hacemos el mismo nudo tomando el mismo hilo hacia el lado apuesto. Ya tenemos el primer nudo alondra del lado derecho. Se repite el movimiento del lado izquierdo. Primero llevando el hilo de amarre de adentro y hacia atrás y luego en sentido contrario. |


Now we bring up one ball on each side of the center strands and cross the center strands. Repeat the two steps of the lark knot. First on the left side. Remember that there are two steps, first from the inside and behind the left central thread and then from the outside and behind the same thread. As you can see in the pictures. Let's repeat on the right side and tighten the tying threads. We bring up two more balls and continue to move forward until we have only two balls left. | Ahora subimos un balón de cada lado de los hilos centrales y cruzamos los hilos centrales. Repetimos los dos pasos del nudo alondra. Primero del lado izquierdo. Recordemos que son dos pasos, primero de adentro y por detrás del hilo central izquierdo y luego por fuera y por detrás del hilo mismo hilo. Tal como se puede ver en las imágenes. Repitamos del lado derecho y apretamos los hilos de amarre. Subimos dos balines más y seguimos avanzando hasta que nos queden sólo dos balines. |


When we reach the end we make two flat knots to adjust the weave, we cut a with the lighter we fix well so that the knots are untied. To close the bracelet we make a Franciscan knot. As I mentioned at the beginning, I made the same design with red thread and gold beads. I think the second option is more beautiful and delicate, of course it depends on how we are going to use them. I hope you like this design #jewelry friends. Bye bye. | Al llegar al final realizamos dos nudos planos para ajustar en tejido, cortamos un con el encendedor fijamos bien para que los se desaten. Para el cierre de la pulsera hacemos un nudo franciscano. Como les comenté al principio realicé el mismo diseño con hilo rojo y balines dorados. Creo que la segunda opción es más bonita y delicada, claro que depende que cómo vayamos a usarlas. Espero les guste este diseño amigos de #jewelry. Chao chao. |


Imágenes editadas en: itshot
Fotos tomadas con Redmi 10
Images edited in: itshot
Photos taken with Redmi 10

Gracias por el apoyo.
Mis buenos deseos para todos.
🙏
Ambas hermosas, me encantan las pulseras con balines se ven hermosas, y al ser dobles resaltan más, excelente tutorial amiga 😉
Gracias amiga....tu comentario es de gran estima.
Abrazos y bendiciones.
Thank you for sharing this post on HIVE!
Your content got selected by our fellow curator rezoanulvibes & you just received a little thank you upvote from us for your great work! Your post will be featured in one of our recurring compilations which are aiming to offer you a stage to widen your audience within the DIY scene of Hive. Stay creative & HIVE ON!
Please vote for our hive witness <3
Muy agradecida por el apoyo.
Les deseo mucho éxito.
Están hermosas, me encantan los colores 👍
Amiga muchas gracias.
Gracias también por pasar por mi blog.
Abrazos.
The rewards earned on this comment will go directly to the people( @belkyscabrera ) sharing the post on Twitter as long as they are registered with @poshtoken. Sign up at https://hiveposh.com.