ENGLISH VERSION (click here!)
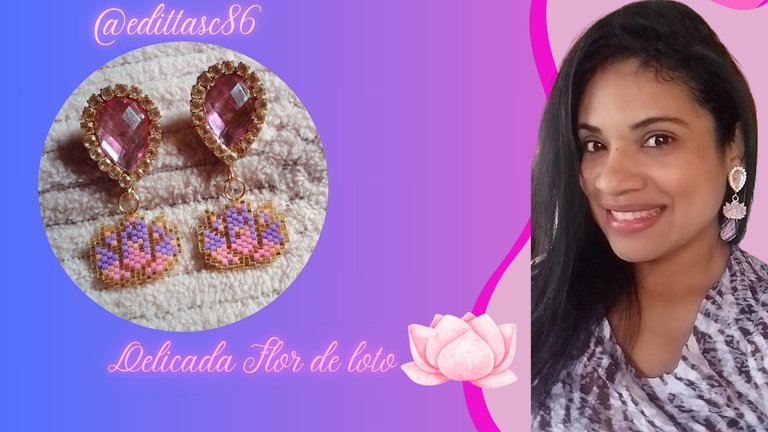
Greetings Jewelry friends, I hope you are very well, today I come to show you some nice earrings, where I used two techniques, a simple embroidery and weaving with miyuki beads.
Let's go to the elaboration of the earrings.
Delicate Lotus Flower.
It is interesting, the meaning of the lotus flower, which symbolizes the purity of body and soul, besides its ability to emerge in difficult environments such as the swamp, is associated with the processes that I lived the human being, and well no one escapes from living moments where the storm covers us, but always comes the calm, just as the lotus flower blooms in the midst of so much environmental hostility.
It was not a coincidence for me to make it in these moments where I live emotional processes...
Let's see how I did it:
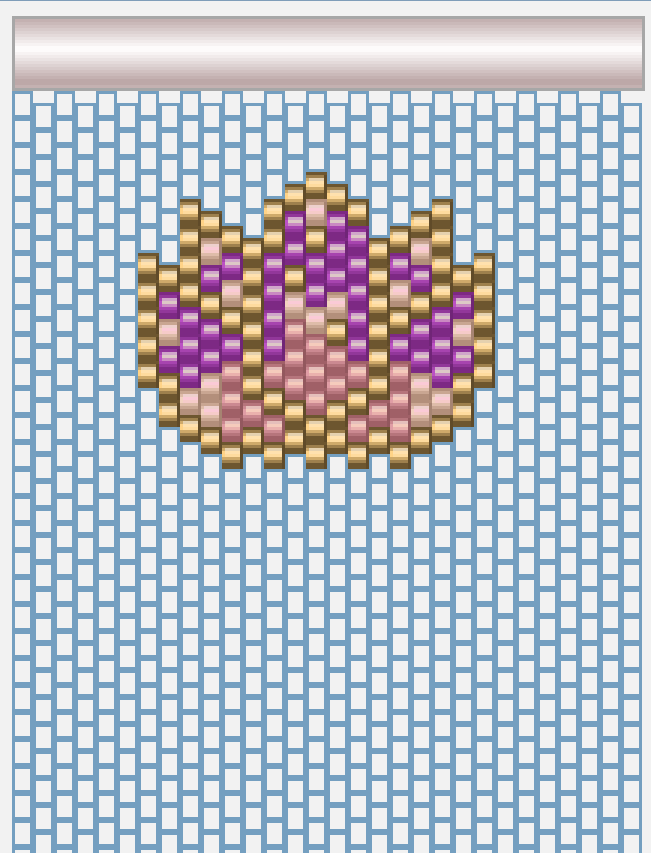
1- When I am going to make a weaving with beads, I make the pattern first with the application, Beadtool4, and here I show you how it turned out, I wanted to use delicate colors, and those I had on hand.
2- The technique I used to make them is the peyote, a few posts ago I had told you that the one I knew the most was the brickstitch, but I have been encouraged to practice it more, I have not yet mastered it completely, for me it is essential to have the pattern and scratch to know which one I'm placing, because I can easily get lost.
But I can say that it is a much simpler technique in terms of execution, but I need more practice 😅 I accept it.
Elaborating the lotus flower.
1- I cast on my big eye needle, 17 delicas, as I show in the picture, the following, is to place another delica on our needle, in this case golden color, we let pass the golden delica, and we pass the needle through the purple delica, when adjusting there is a small t as I call it.
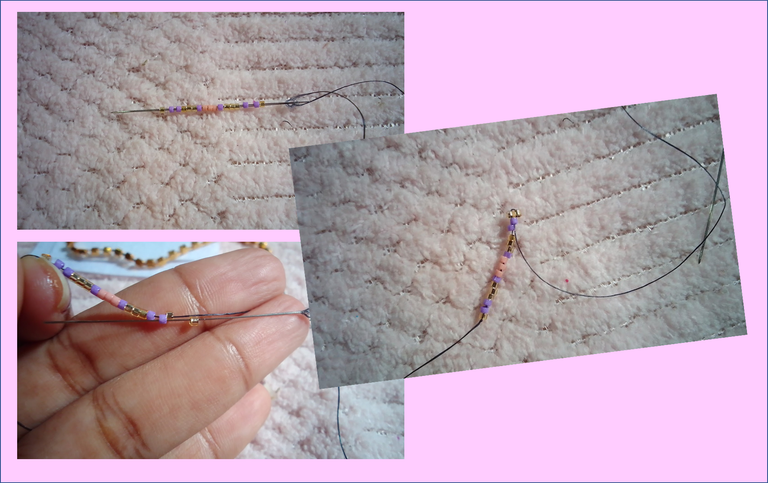
2- I continue placing a new delica on the needle, I let pass a delica and pass the needle through the next delica, we repeat the step and it will be like this:
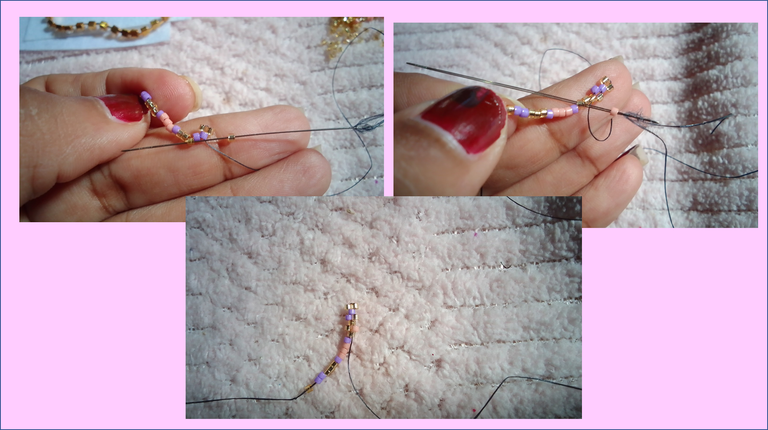
3- We repeat the previous step, until completing the row, and we continue with the weaving, I place another delica I let pass a delica and pass the needle through the next delica, basically what we will do is fill spaces, that's why I say, “I let pass a delica and pass through the next one”, because what we are doing is filling spaces. we repeat until finishing that row, and we give continuity to the next one.
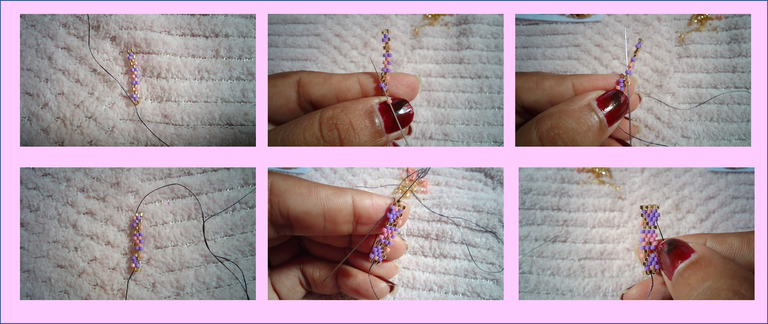
4- In this technique like the brick, we make increases and decreases, we need to continue with the weaving for it we must go out, by that delica as I show, then what we do is to go back through the previous delica, go down and then go back up between the delicas by the same delica, where we went back initially and then pass the needle through the delica where we must position ourselves to continue the weaving.
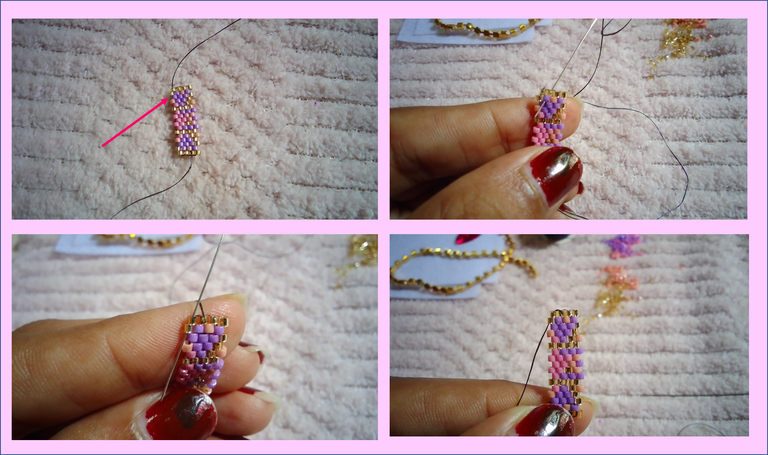
5- We continue weaving and this is the lotus flower, repeat all the above and make the other flower for the other tendril.
Let's go with the embroidery
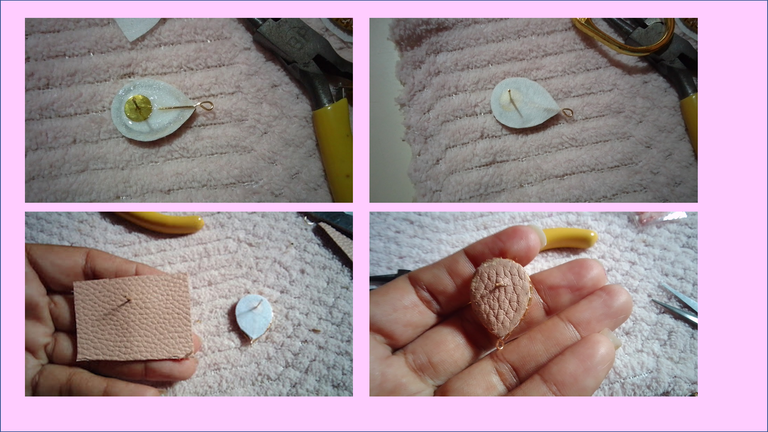
I wanted to make a nice detail for the pin of the tendril, so I used a flat drop-shaped stone, at first I had chosen a fuchsia color but then I changed it for a delicate pink, hence the name of the tendrils.
1- Use a fabric called pelon (here it is called pelon) and with the silicone glue, glue the drop on the fabric, wait for it to dry a little, and around it I glued a strip of strass strung, remove the excess once dry, trim the fabric.
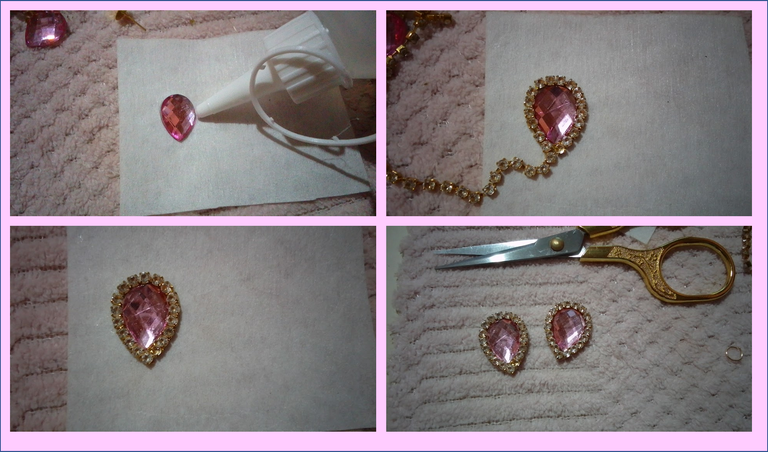
2- The next step was, glue the tendril pin and a hoop to assemble the pieces then, place pelon on top and when it was dry, glue a little piece of leather to finish the piece, when it was dry, trim the excess and pass around the piece, the tinder to seal. And that's how it looked:
We assembled the pieces:
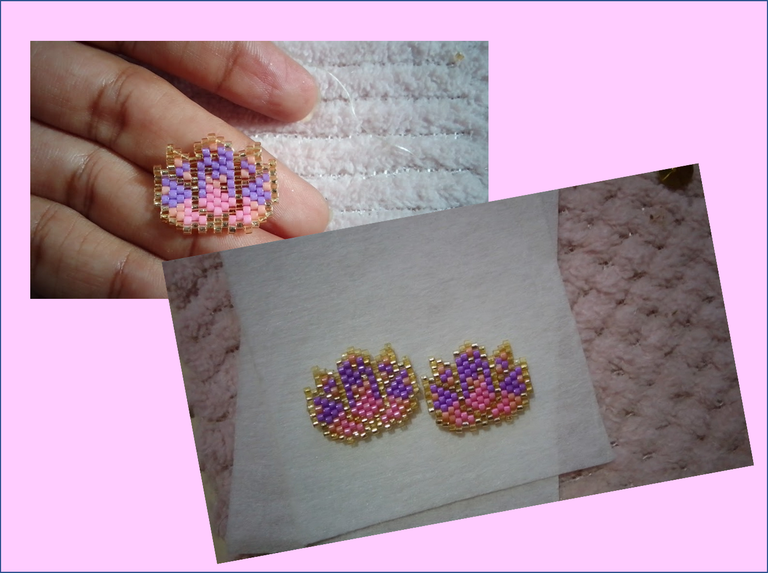
With a hoop, that I had placed on the flower, I attached it to the pin hoop and so was the assembled tendril, it's beautiful, I liked the final result. loved it 🌷 💕.
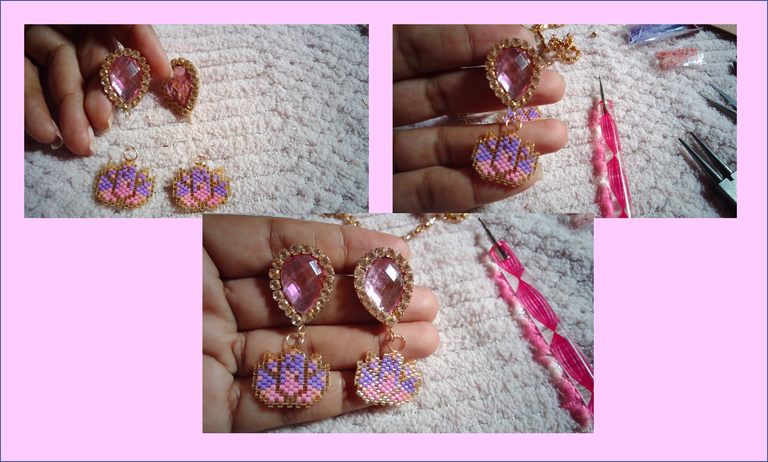
I love how it looks, they are beautiful tendrils: Delicate Lotus Flower.

I hope you liked it, Thank you all for your support 💕.

Saludos amigos de Jewelry, espero estén muy bien, hoy vengo a mostrarles unos lindos zarcillos, donde emplee dos técnicas, un bordado sencillo y tejido con cuentas miyuki.
Vamos a la elaboración de los zarcillos.
Delicada Flor de Loto.
Es interesante, el significado que tiene la flor de loto, que simboliza la pureza del cuerpo y del alma, además de que su capacidad para surgir en ambientes difíciles como el pantano, se asocia con los procesos que viví el ser humano, y bueno nadie escapa de vivir momentos donde la tempestad nos cubre, pero siempre viene la calma, así como la flor de loto florece en medio de tanta hostilidad ambiental.
No fue casualidad para mi hacerla en estos momentos donde vivo procesos emocionales...
Vamos a ver como lo hice:
1- Cuando voy a realizar un tejido con cuentas, realizo el patrón primero con la aplicación, Beadtool4, y aquí le muestro como quedo, quería utilizar colores delicados, y esos tenía a la mano.
2- La técnica que utilice para elaborarlos es el peyote, hace unos cuantos posts atrás le había comentado que la que más sabia era la brickstitch, pero me he animado a practicarla más, aun no la domino del todo, para mi es fundamental, tener el patrón y rayar para saber cuál estoy colocando, porque me puedo perder fácilmente.
Pero puedo decir que es una técnica bastante más sencilla en cuanto a ejecución, pero yo necesito más práctica 😅 lo acepto.
Elaborando la flor de loto.
1- Enfile en mi aguja big eye, 17 delicas, como muestro en la imagen, lo siguiente, es colocar otra delica en nuestra aguja, en este caso color dorado, dejamos pasar la delica dorada, y pasamos la aguja por la delica morada, al ajustar queda una pequeña t como yo le digo.
2- Sigo colocando una nueva delica en la aguja dejo pasar una delica y paso la aguja por la delica siguiente, repetimos el paso y va quedando así:
3- Repetimos el paso anterior, hasta completar la fila, y seguimos con el tejido, coloco otra delica dejo pasar una delica y paso la aguja por la delica siguiente, básicamente lo que haremos es rellenar espacios, por eso digo, "dejo pasar una delica y paso por la siguiente", porque lo que estamos haciendo es rellenar espacios. repetimos hasta terminar esa fila, y le damos continuidad a la siguiente.
4- En esta técnica al igual que la brick, hacemos aumentos y decrementos, necesitamos continuar con el tejido para ella debemos salir, por esa delica como muestro, entonces lo que hacemos es regresarnos por la delica anterior, bajar y luego volver a subir entre las delicas por la misma delica, donde nos devolvimos inicialmente y luego pasar la aguja por la delica donde debemos posicionarnos para seguir el tejido.
5- Seguimos el tejido y así queda la flor de loto, repetimos todo lo anterior y hacemos la otra flor para el otro zarcillo.
Vamos con el bordado
Quería hacer un detalle bonito para el pin del zarcillo, así que utilice una piedra en forma de gota plana, en un principio había escogido un color fucsia pero luego lo cambie por un rosita delicado, de ahí el nombre de los zarcillos.
1- Utilice una tela llamada pelón (aquí se le dice así) y con la pega silicona, pegue la gota en la tela, espere secara un poco, y alrededor le pegue una tira de strass engarzado, quite el exceso una vez que seco, recorte la tela.
2- El siguiente paso fue, pegar el pin del zarcillo y un aro para ensamblar las piezas luego, coloque pelón encima y cuando estuvo seco, pegue un pedacito de cuerina para terminar la pieza, cuando estuvo seco, recorte el exceso y pase alrededor de la pieza, el yesquero para sellar. Y así quedaron:
Ensamblamos las piezas:
Con un arito, que había colocado en la flor, lo uní al aro del pin y así quedo el zarcillo ensamblado, es hermoso, me gusto el resultado final. lo ame 🌷 💕
Me encanta como se ve, son unos hermosos zarcillos: Delicada Flor de Loto
Espero les haya gustado, Gracias a todos por su apoyo 💕
Recursos/Resources
| Portada, banner e imagen / Cover, banner and image | canva |
|---|---|
| fotos/ pictures | own photos, realme c11 device |

Excelente aplicación de la técnica 👍, una flor de lotto muy hermosa y los colores que tenias a la mano quedaron muy bien, es bueno poder ir probando y así vamos aprendiendo lo haces excelente 👌
Hola muchos gracias ❤️ me alegra les guste los zarcillos y como los elabore ✨
It turned out so beautiful, I love the color, well done dear friend.
I'm glad you liked ❤️ the result, they turned out beautiful 💕 thank you very much 💫
Ciertamente delicados y muy hermosos tus zarcillos.
Hola muchas gracias ❤️ me alegra le haya gustado
Keep up the good work
Quedaron hermosos ame la tecnica!!