WELCOME TO MY BLOG
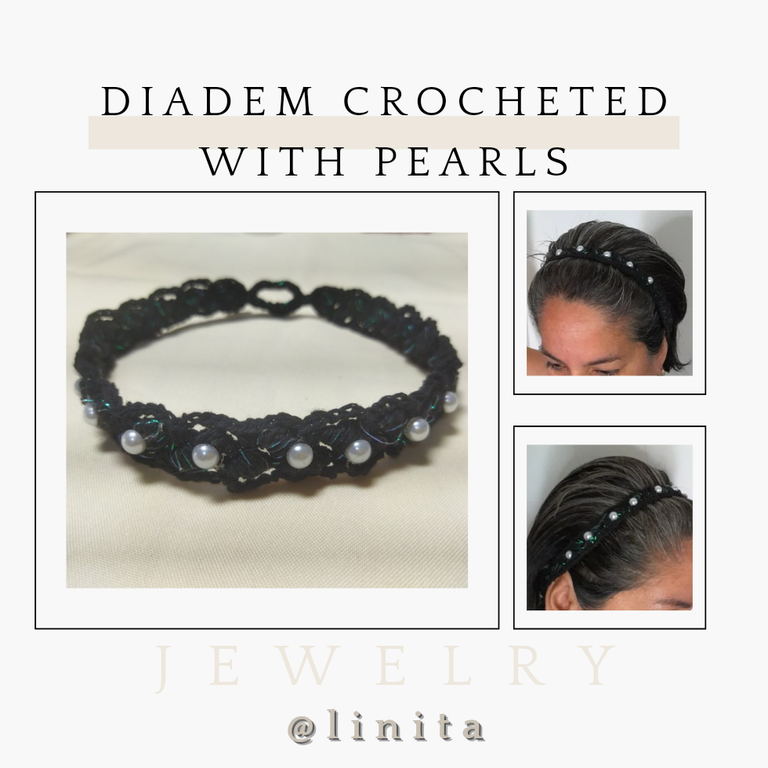
Hellooooo, hellooooooo! Greetings and my respects to the jewelry creators. On this occasion I share with you an easy project, quick to do, very beautiful and very useful, a crocheted headband, which we can use both to collect those hairs that bother us on our face when we do some activity with a lot of movement, or for example when we do exercises. I hope you like it. Let's get started.
BIENVENIDOS A MI BLOG
¡Holaaaa, holaaaaa! Saludos y mis respetos a los creadores de bisutería. En esta oportunidad les comparto un proyecto fácil, rápido de realizar, muy bonito y de gran utilidad, una diadema tejida a crochet, que podemos usar tanto para recoger esos cabellos que nos molestan en la cara cuando realizamos alguna actividad con mucho movimiento, como por ejemplo cuando realizamos ejercicios. Espero te guste. Comencemos.
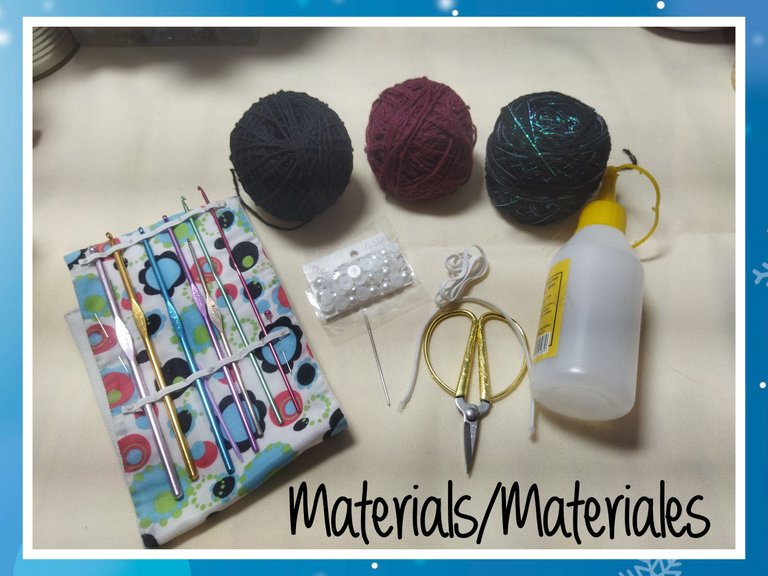
MATERIALS
- Cotton threads (black iridescent and black)
- 8 mm half pearls
- Crochet hook 2.5 mm
- Wool needle
- Thin elastic
- Scissors
- Liquid silicone
- Measuring tape
MATERIALES
- Hilos de algodón (negro tornasol y negro)
- Medias perlas de 8 mm
- Aguja de crochet 2,5 mm
- Aguja lanera
- Elástica delgada
- Tijera
- Silicón líquido
- Cinta métrica
STEP BY STEP // PASO A PASO
DIADEM
When we are going to make this type of accessory, we must consider the size of the head so as not to go overboard in the fabrication, which is why we must measure the circumference of the head with a tape measure.
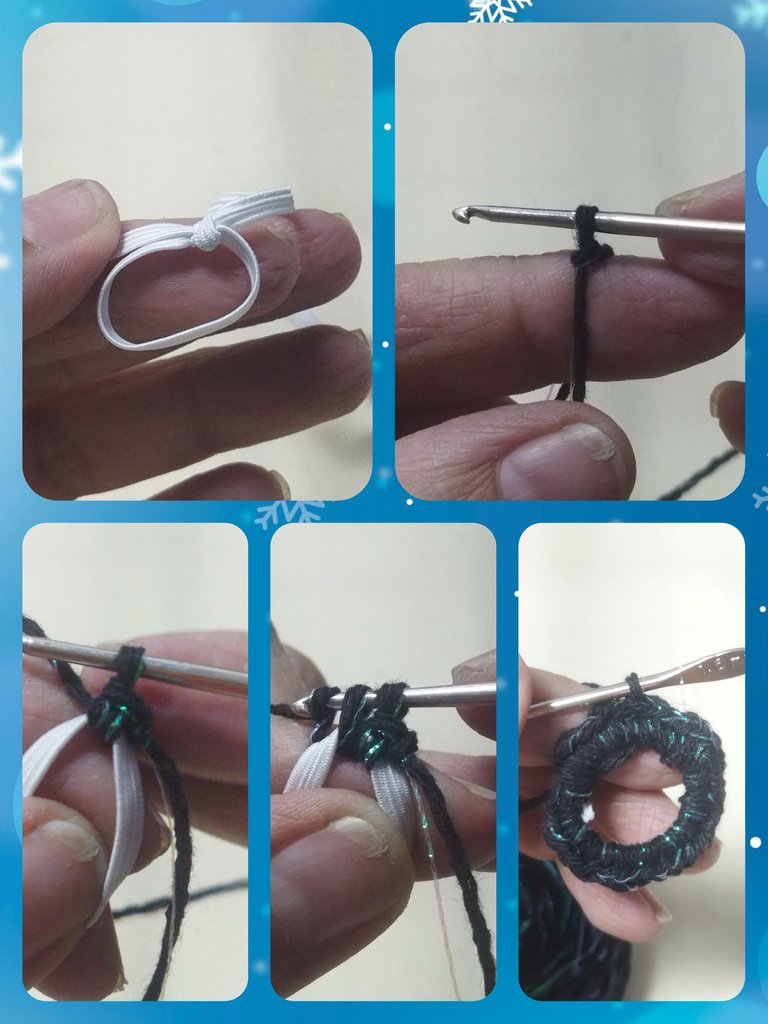
LAP 1
- To obtain an adjustable headband we will use thin elastic, approximately 3 mm.
- We make a ring 4 cm in diameter.
- With the black iridescent thread we make a slipped knot and begin to knit 30 single crochets in the elastic ring.
- We close with a slipped stitch.
DIADEMA
Cuando vamos a realizar este tipo de accesorio, debemos considerar el tamaño de la cabeza para no excedernos en la elaboración del tejido, es por ello que debemos medir con a cinta métrica la circunferencia de la cabeza.
VUELTA 1
- Para obtener una diadema ajustable utilizaremos elástica delgada, de aproximadamente 3 mm.
- Realizamos un anillo de 4 cm de diámetro.
- Con el hilo negro tornasol hacemos un nudo deslizado y comenzamos a tejer en el anillo elástico 30 puntos bajos.
- Cerramos con un punto deslizado.
LAP 2
- We make 6 chain stitches and insert in the second single crochet of the previous round to make an ear.
VUELTA 2
- Realizamos 6 puntos cadenas e insertamos en el segundo punto bajo de la vuelta anterior para realizar una oreja.
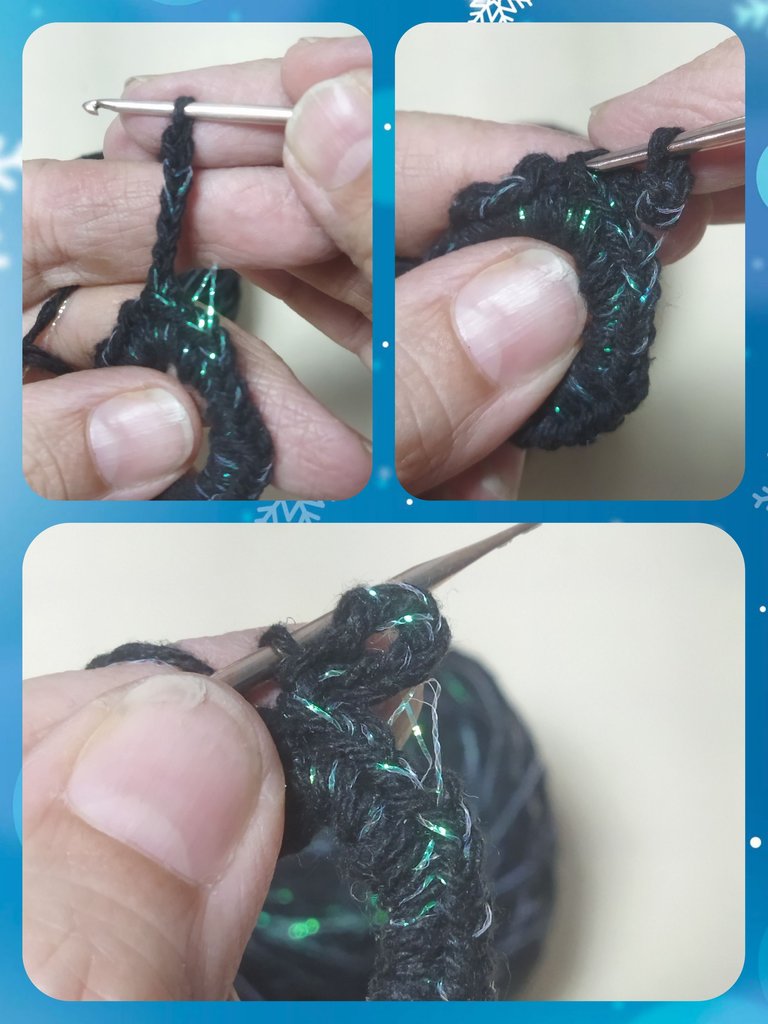
LAP 3
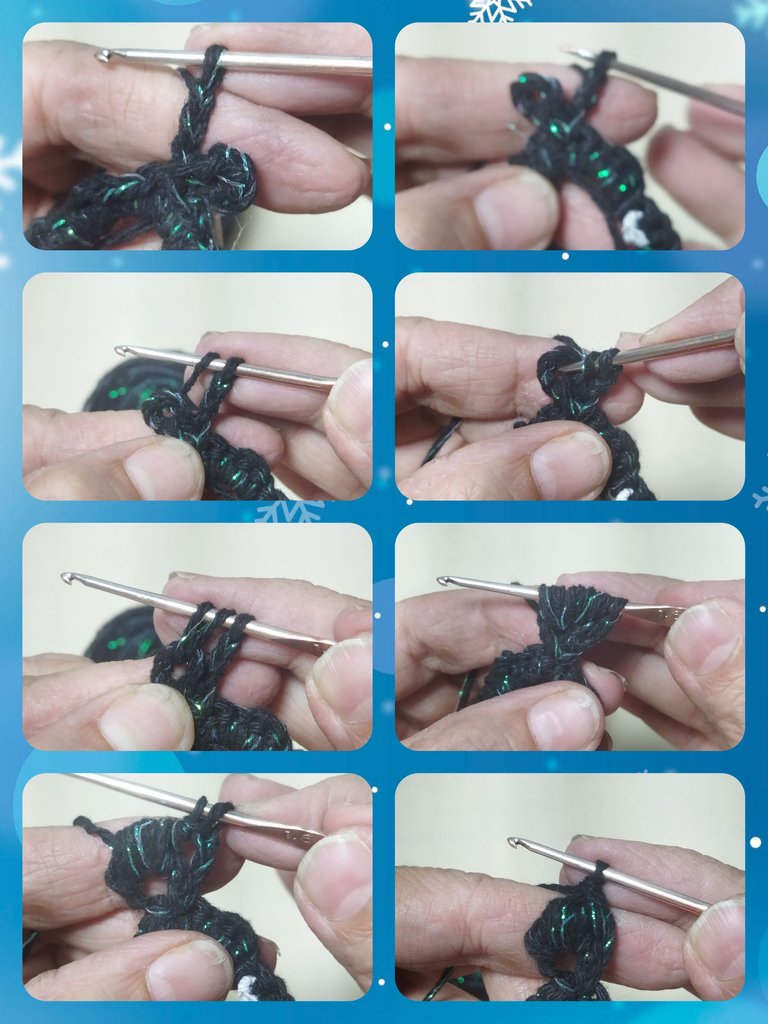
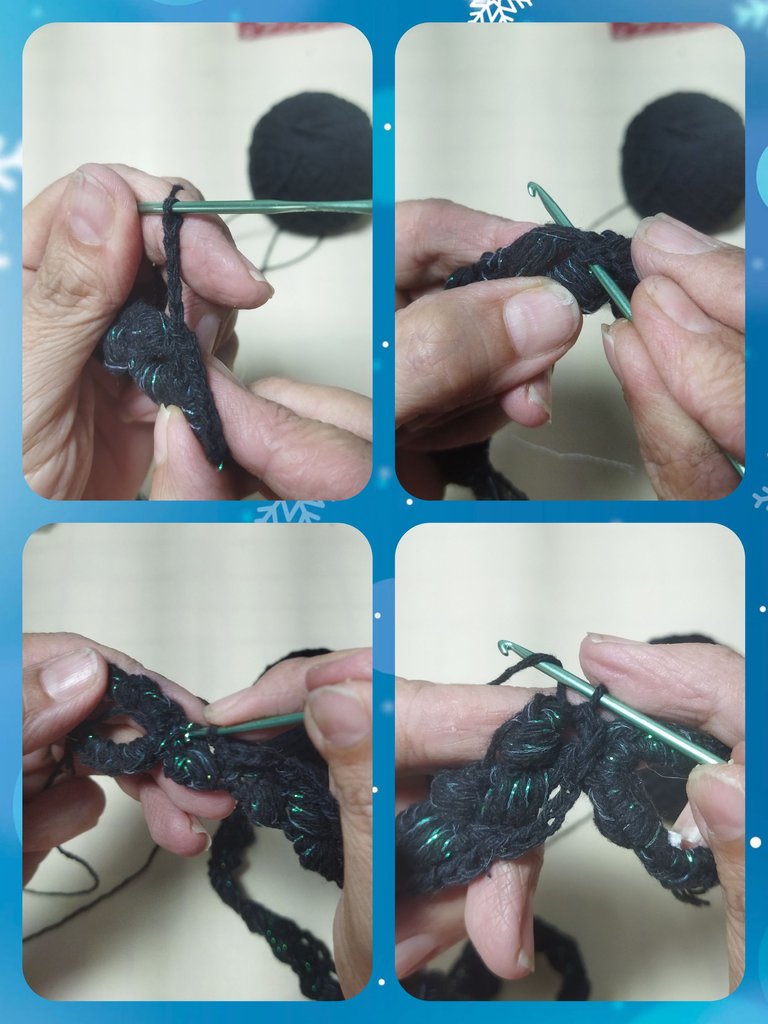
On this round we will perform the pop stitch, which consists of a series of 5 yarn overs joined with a slipped stitch.
- We begin by making 3 chain stitches, we turn the ring, we take a loop and insert the needle into the ear, we pull the thread at the height of the 3 chains, we take another loop and we insert it through the ear again, making sure that they are the same size.
We do this process 3 more times until we complete 5 loops, which means that we must count 10 loops on the needle, one that we do before passing the needle through the ear and the other when we extract the thread. - We close the stitch by making a yarn over all of them and we take out the thread through the penultimate yarn over and make a slipped stitch to close.
VUELTA 3
En esta vuelta realizaremos el punto pop, que consiste en una serie de 5 lazadas unidas con un punto deslizado.
- Comenzamos realizando 3 puntos cadena, giramos el anillo, tomamos una lazada e introducimos la aguja en la oreja, halamos hilo a la altura de las 3 cadenas, tomamos otra lazada y volvemos a introducir por la oreja procurando que queden del mismo tamaño.
Este proceso lo realizamos 3 veces más hasta completar 5 lazadas, lo que significa que en la aguja debemos contar 10 lazadas, una que realizamos antes de pasar la aguja por la oreja y la otra cuando extraemos el hilo. - Cerramos el punto pasando una lazada por todas y sacamos el hilo por la penúltima lazada y realizamos un punto deslizado para cerrar.
LAP 4
- We make 3 chain stitches and turn the fabric and in the space between the three chains and the previous pop stitch we introduce the needle with a yarn over and make another pop stitch in the same way as the previous one.
VUELTA 4
- Realizamos 3 puntos cadenas y giramos el tejido y en el espacio que hay entre las tres cadenas y el punto pop anterior introducimos la aguja con una lazada y realizamos otro punto pop de la misma forma del anterior.
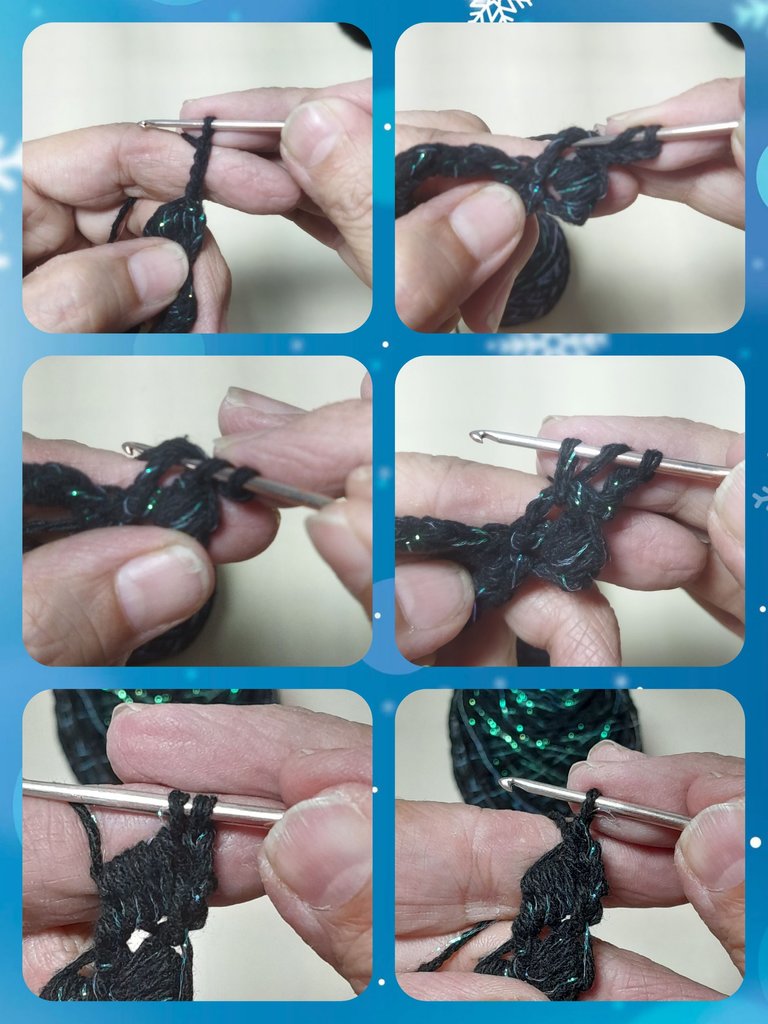
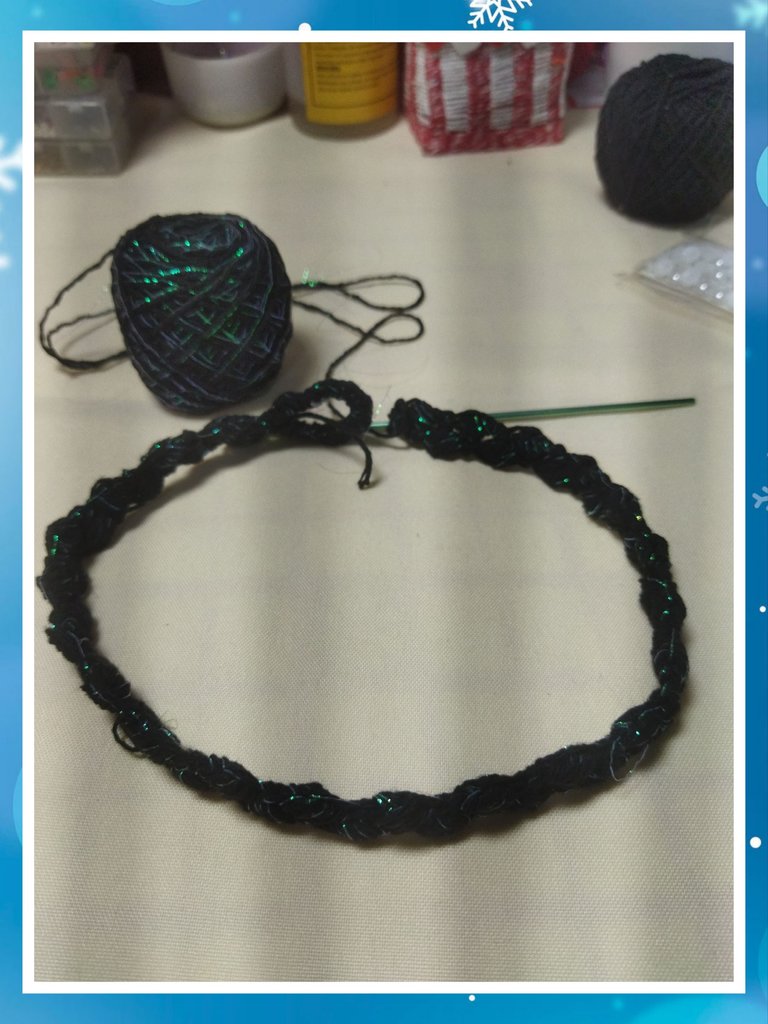
We repeat steps 3 and 4 until we obtain the measurement we took for the headband, in this case as it is for me, it measures 50 cm and I made 44 pop stitches to reach the measurement.
Repetimos los pasos 3 y 4 hasta obtener la medida que tomamos para la diadema, en este caso como es para mi, mide 50 cm y realicé 44 puntos pop para alcanzar la medida.
LAP 5
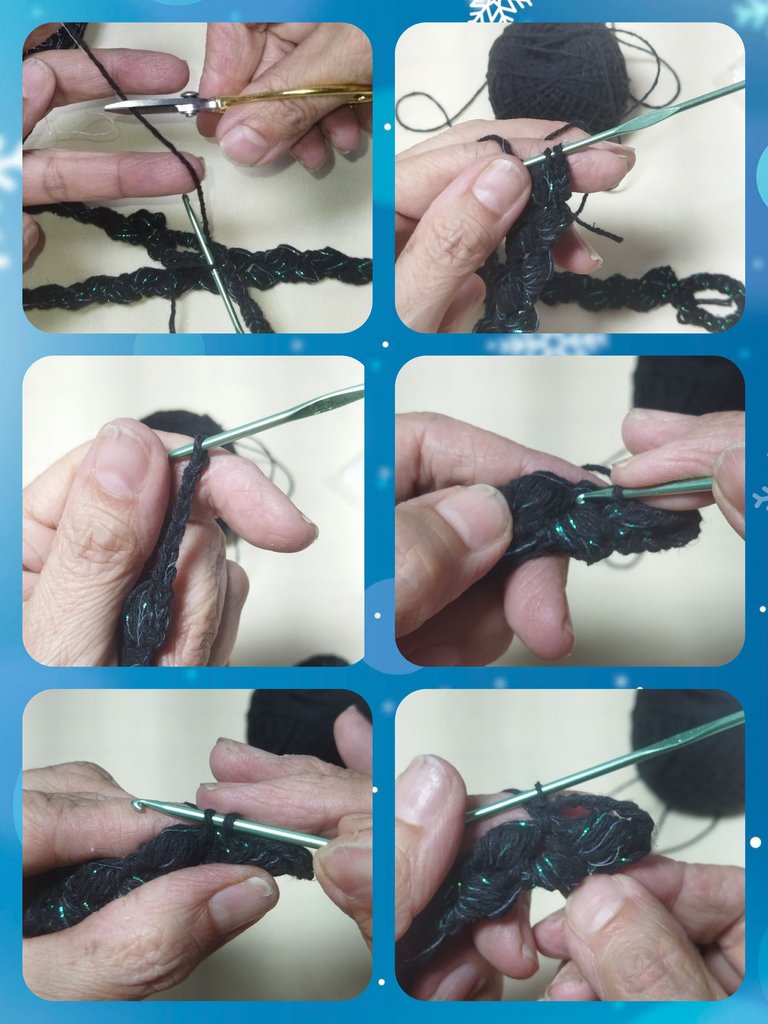
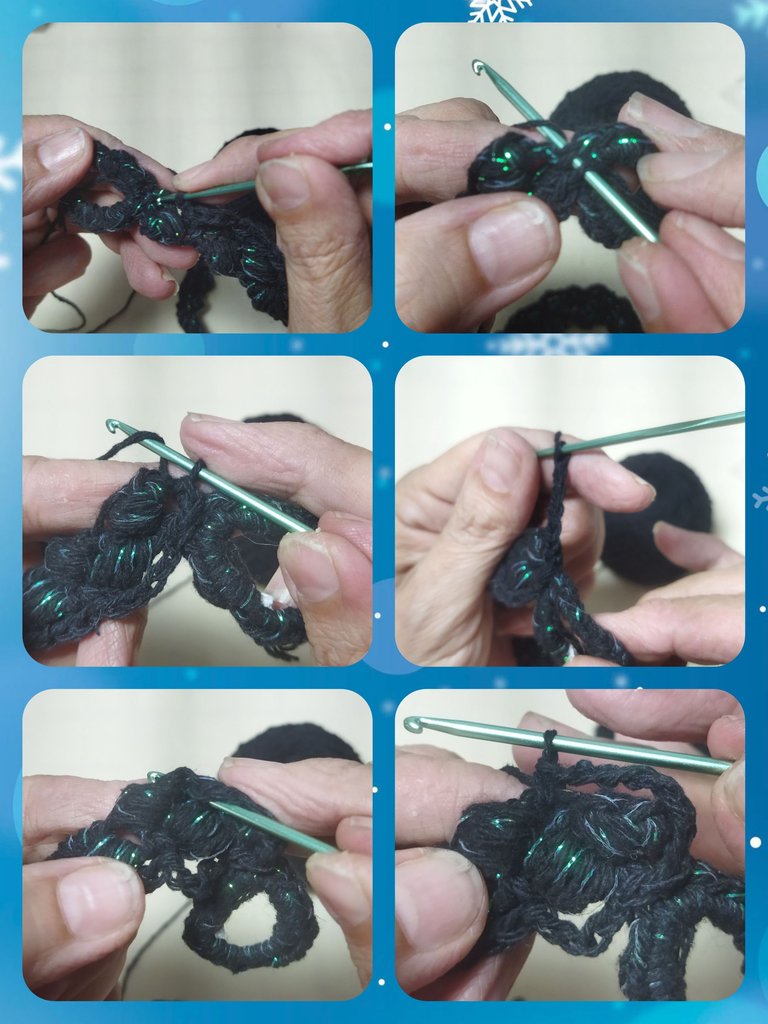
In this round we are going to change the thread and use the black one. To do this we are going to close the stitch of the previous round, that is, the closing of the last pop stitch, we will do it with the black thread.
- We cut the black litmus thread and continue weaving the black thread.
- We are going to make 6 chain stitches and we are going to insert it at the intersection between the pop points, forming a half arc and we close with a single crochet.
VUELTA 5
En esta vuelta vamos a realizar cambio de hilo y usaremos el negro. Para ello vamos a cerrar el punto de la vuelta anterior, es decir, el cierre del último punto pop, lo haremos con el hilo negro.
- Cortamos el hilo negro tornasol y continuamos tejiendo el el hilo negro.
- Vamos a realizar 6 puntos cadena y vamos a insertarlo en la intersección que hay entre los puntos pop, formando un medio arco y cerramos con un punto bajo.
- We form a chain again, this time with 5 points and we insert in the same way the union of the next two pop points and we repeat until we reach the end of the fabric.
Formamos nuevamente un cadena, esta vez de 5 puntos e insertamos de igual manera el la unión de los dos puntos pop siguientes y repetimos hasta llegar al final del tejido.
Ahora realizamos 3 puntos deslizados sobre el anillo para pasar al otro lado del tejido.
LAP 6
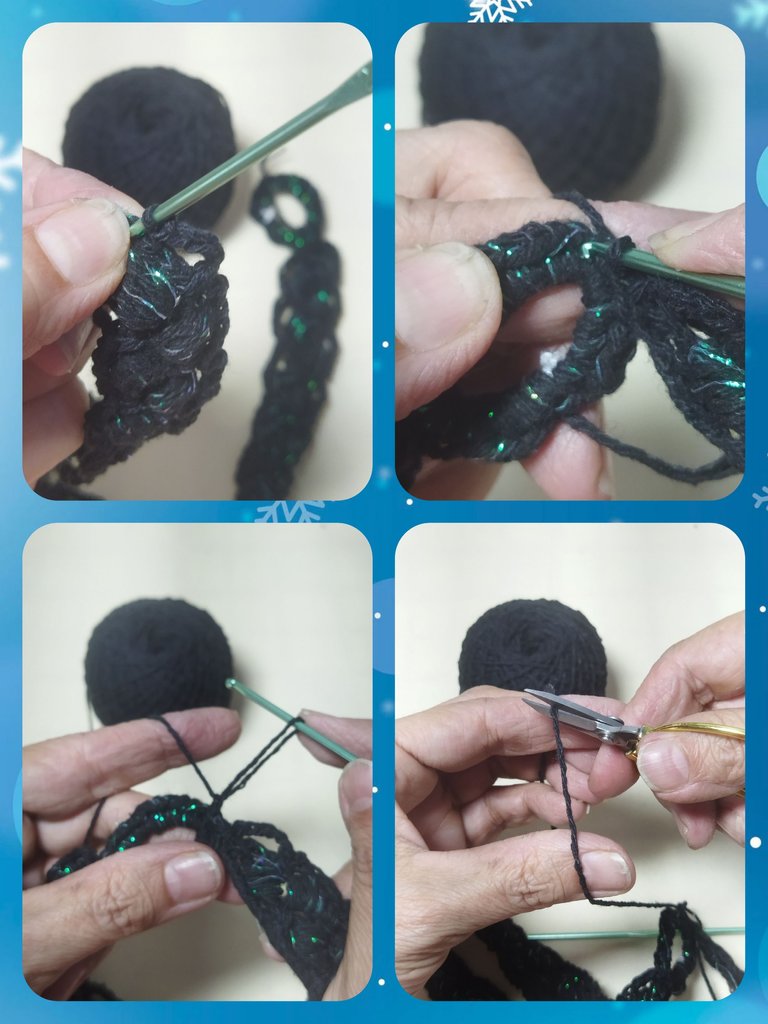
- In this round we are going to repeat step 5 until we reach the end.
- We close with a slipped stitch in the first chain that we make on round #5.
VUELTA 6
- En esta vuelta vamos a repetir el paso 5 hasta llegar a final.
- Cerramos con un punto deslizado en la primera cadena que realizamos an la vuelta #5.
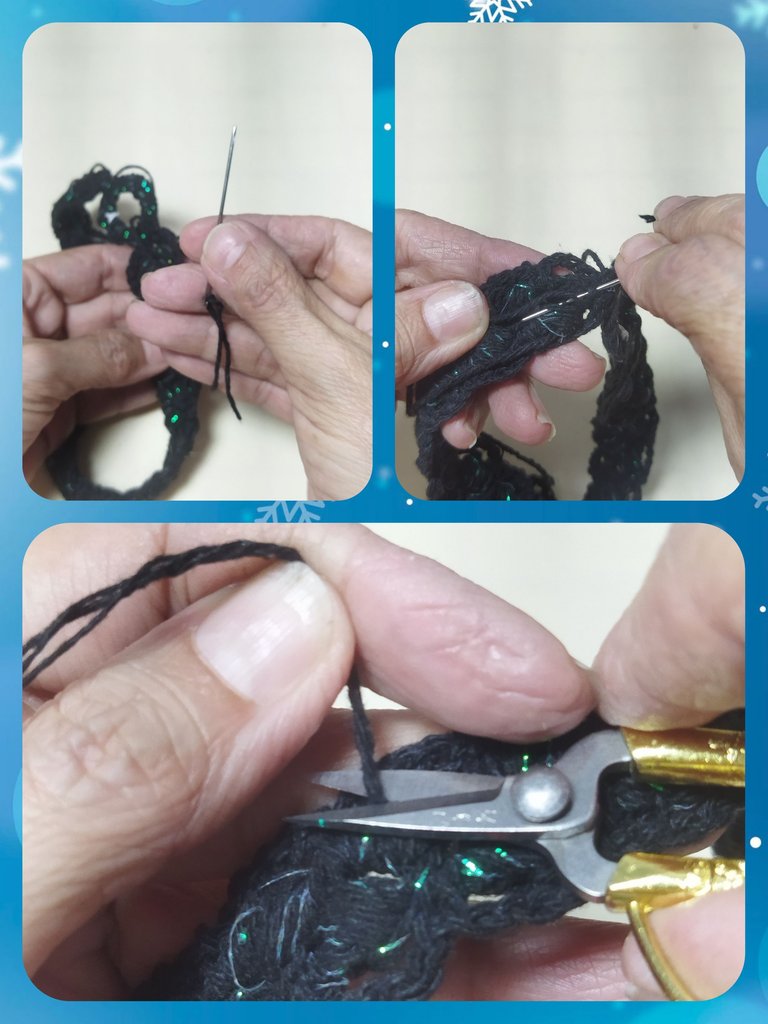
- Once the fabric is finished, we proceed to close the headband. We locate the center of the elastic ring, at the same height where we began the knitting and close by making two single crochets in the ring and finishing with a slip stitch.
- We cut the thread and with the wool needle we proceed to hide the excess between the fabric.
- Una vez terminado el tejido procedemos a cerrar la diadema. Ubicamos el centro del anillo elástico, a la misma altura donde comenzamos el tejido y cerramos realizando dos puntos bajos en el anillo y terminamos con un punto deslizado.
- Cortamos el hilo y con la aguja lanera procedemos a ocultar el sobrante entre el tejido.
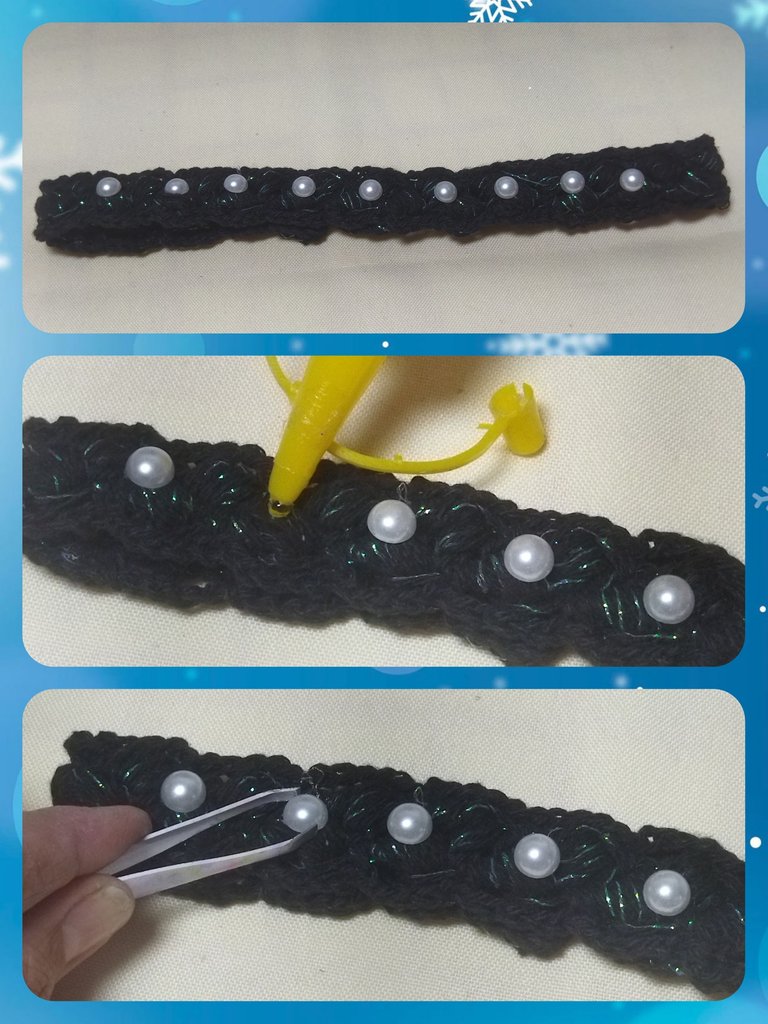
DECORATION WITH HALF PEARLS
To place the pearls we are going to fold the headband placing the ring in the center of the fabric.
Then we place the pearls that are at equal distances and glue them with liquid silicone or any other glue. We let it dry.
DECORACIÓN CON MEDIAS PERLAS
Para colocar las perlas vamos a doblar la diadema ubicando el anillo en el centro del tejido.
Luego colocamos las perlas que queden a igual distancia y pegamos con silicón líquido o cualquier otro pgamento. Dejamos secar.
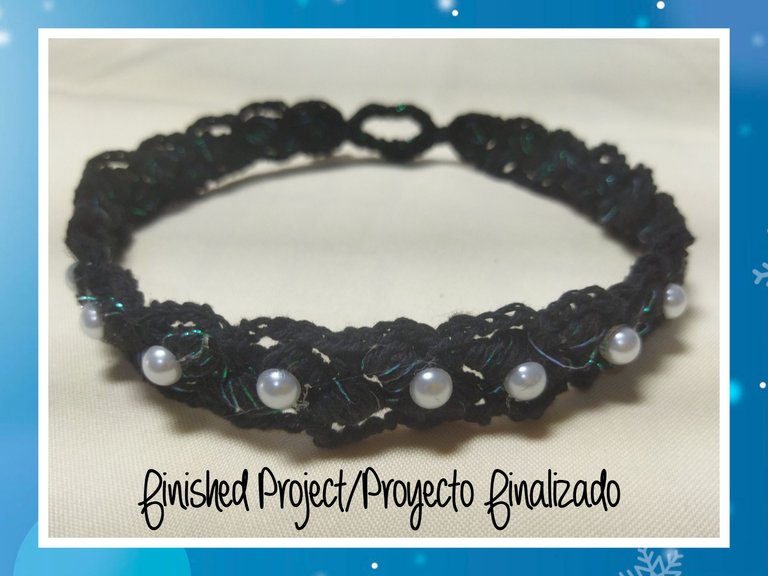
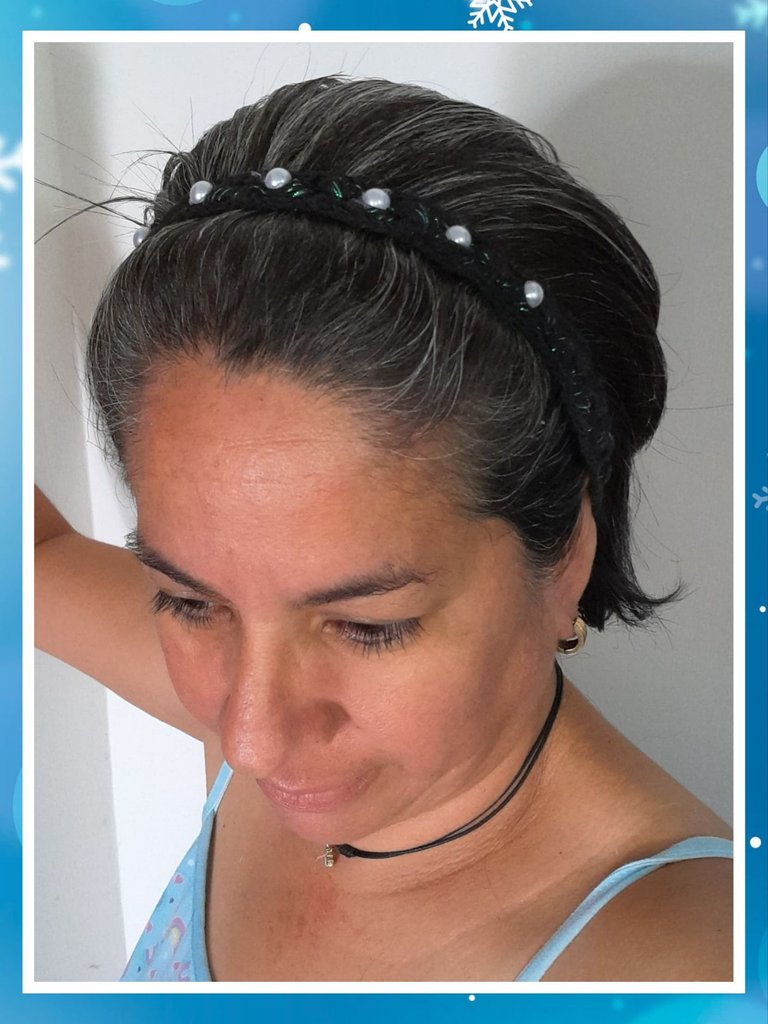
PROJECT COMPLETED
And in this way we now have a headband that I particularly love because it does not harm the scalp, it is very easy to put on and it looks very pretty. See you next time.
PROYECTO FINALIZADO
Y de esta forma ya tenemos una diadema que a mi particularmente me encanta porque no maltrata el cuero cabelludo, es muy fácil de poner y luce muy linda. Nos vemos en la próxima.
Wow this is beautiful. From the looks of the process, who would know this is how it would look at the end? It is really nice. This is skillful
Te quedo y te luce muy hermosa la diadema, me encanto la tonalidad del hilo que utilizaste y las perlas le quedan hermosas.
!DIY
Muchas gracias. Si, el hilo con tornasol hace la diferencia, también me encantó 🤭🤭.
You can query your personal balance by
!DIYSTATSThat was a fantastic creation 🤩, though it really requires a lot of work but it's worth it. I think this too will go well with a dress 😍
A nice headband, we love the color that goes with everything and the touch of the Pearls, they always give it style
Congratulations @linita! You have completed the following achievement on the Hive blockchain And have been rewarded with New badge(s)
Your next target is to reach 2250 replies.
You can view your badges on your board and compare yourself to others in the Ranking
If you no longer want to receive notifications, reply to this comment with the word
STOPCheck out our last posts:
Your level lowered and you are now a Red Fish!
Check out our last posts: