WELCOME TO MY BLOG
Hellooooo, hellooooooo! Greetings and my respects to the jewelry creators. Embroidery is one of the most delicate and beautiful craft techniques that exists and when pieces of jewelry are made with this technique the result is amazing.
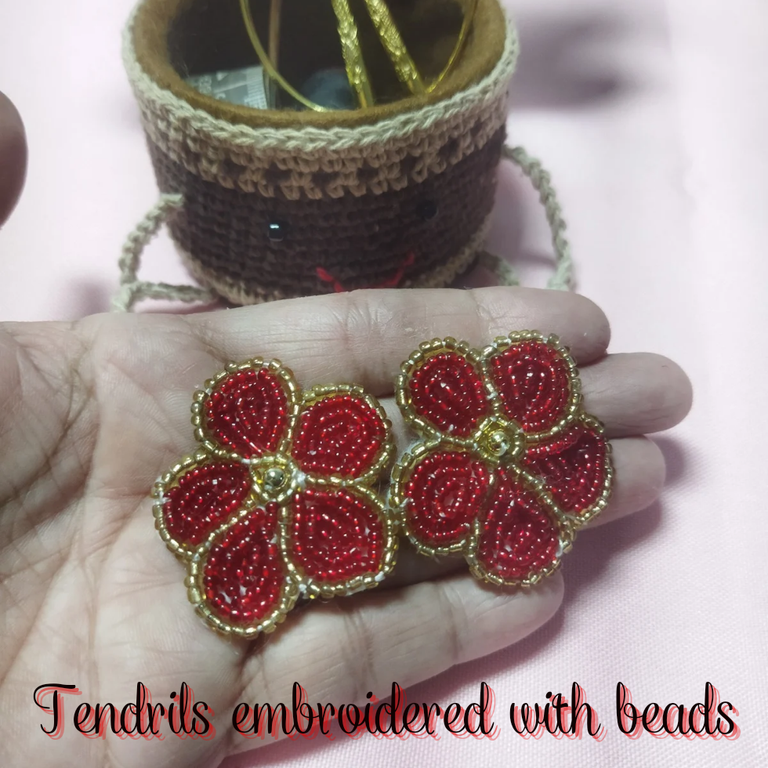
For some time now I have been practicing this technique on lingerie and some clothing items, resulting in a delicate and very striking garment. That is why I wanted to try to apply it to jewelry and I want to share with you this new project, flower tendrils embroidered with beads. I hope you like it.
BIENVENIDOS A MI BLOG
¡Holaaaa, holaaaaa! Saludos y mis respetos a los creadores de bisutería. El bordado es una de las técnicas artesanales más delicadas y bonitas que existe y cuando se elaboran piezas de bisutería con esta técnica el resultado es asombroso.
Desde hace un tiempo he venido practicando esta técnica en lencería y algunos prendas de vestir, teniendo como resultado una prenda delicada y muy llamativa. Es por ello que quise intentar aplicarlo a la bisutería y quiero compartirles este nuevo proyecto, zarcillos de flores bordadas con mostacillas. Espero les guste.
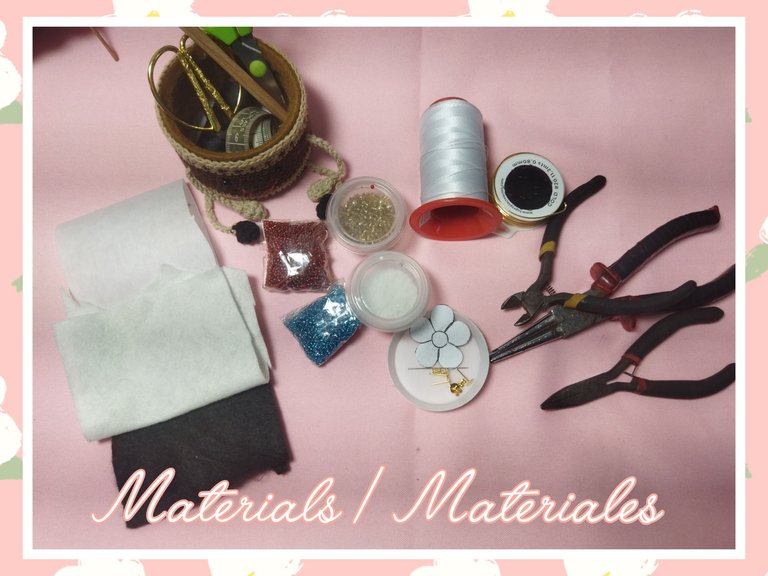
MATERIALS
- Gold and red beads.
- 6 mm pellets
- Fleece fabric
- White felt
- White upholstery thread
- Sewing needle #11
- Moles for tendrils
- Liquid silicone
- Scissors
- 4 cm flower mold
MATERIALES
- Mostacillas doradas y rojas.
- Balines de 6 mm
- Tela pellón
- Fieltro blanco
- Hilo blanco de tapicería
- Aguja de coser #11
- Topitos para zarcillos
- Silicón líquido
- Tijera
- Molde de flor de 4 cm
STEP BY STEP // PASO A PASO
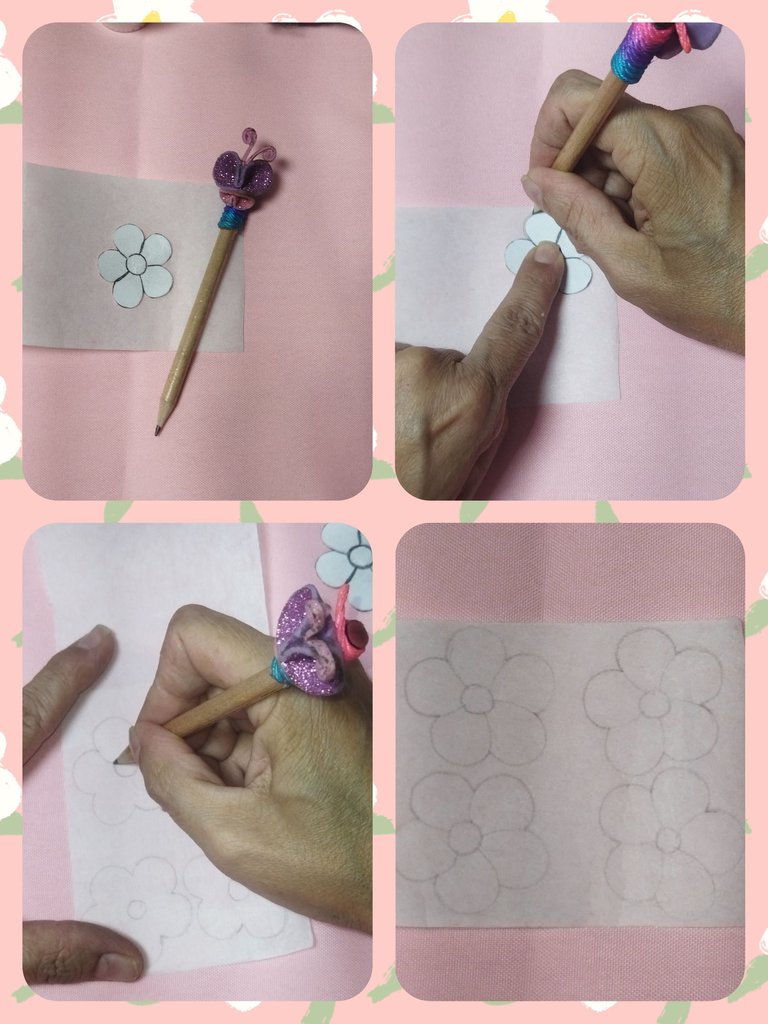
STEP #01
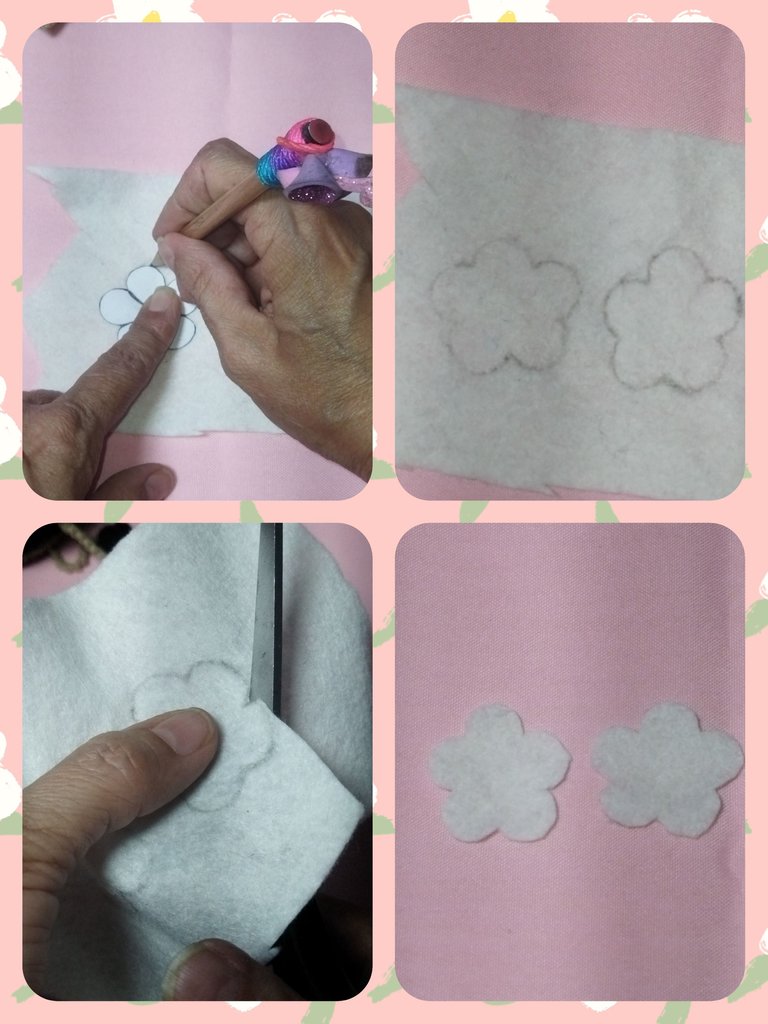
On the fleece fabric we are going to draw the two flowers that we will embroider. I will make medium-sized tendrils and the flower measurement is 4 cm in diameter.
PASO #01
En la tela pellón vamos a dibujar las dos flores que bordaremos. Yo realizaré uno zarcillos de tamaño medio y la medida de la flor es de 4 cm de diámetro.
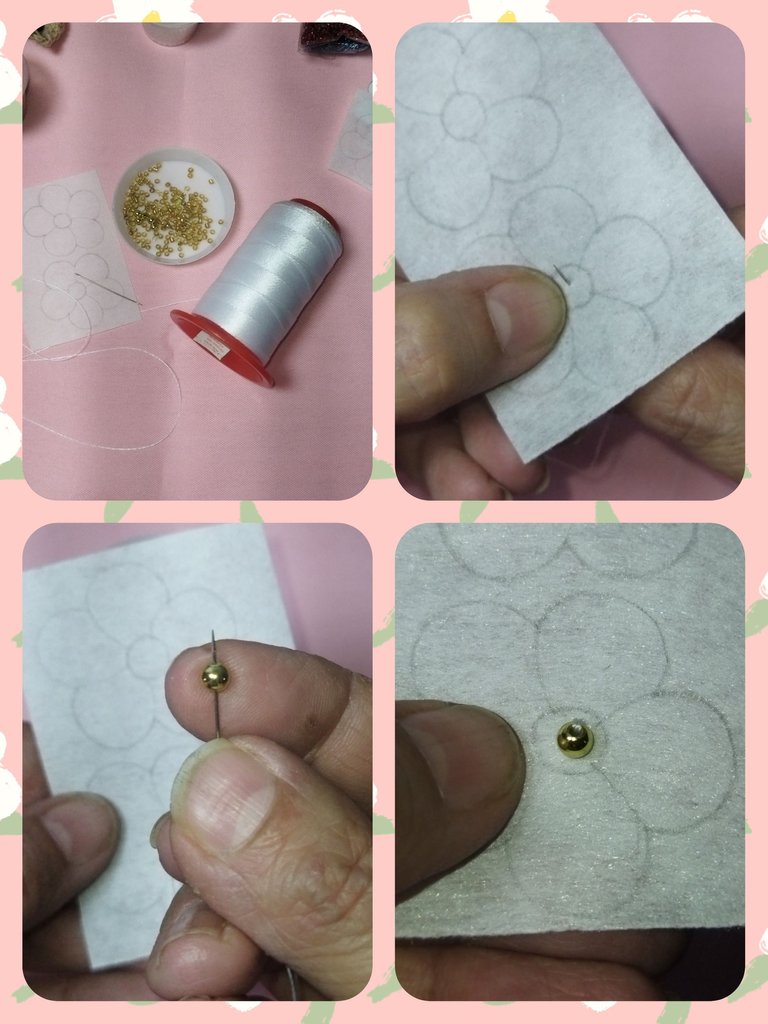
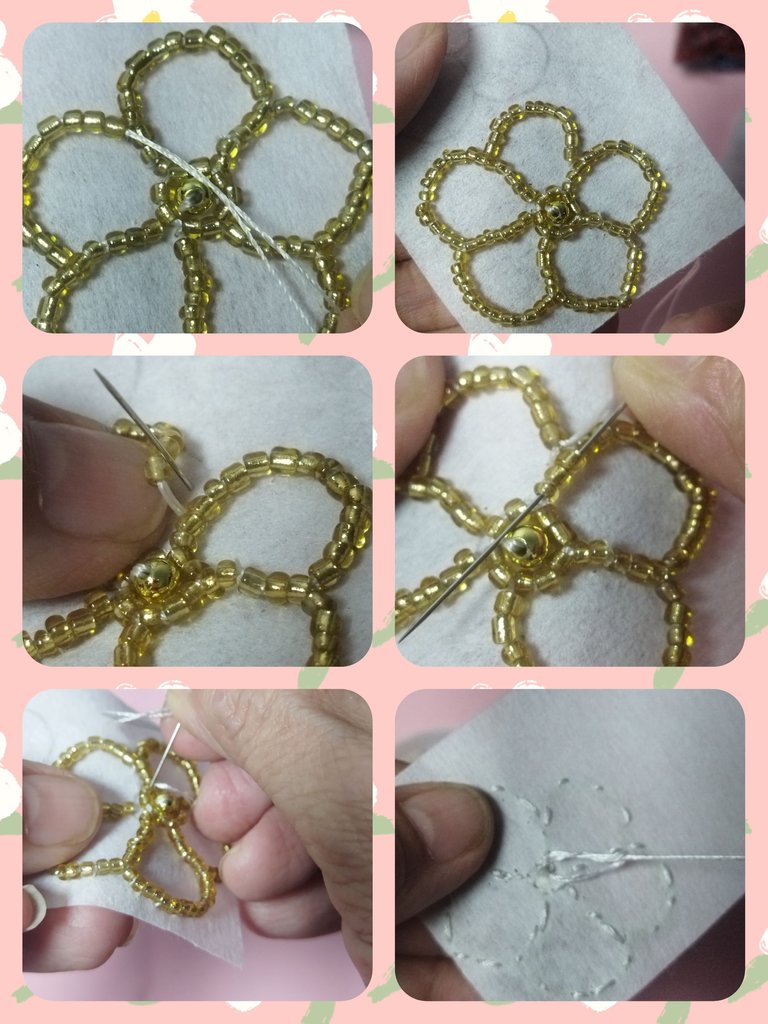
STEP #02
We take thread and needle and begin the embroidery in the center of the flower on the back of the drawing. We introduce the 6 cm pellet and insert it back into the fabric.
PASO #02
Tomamos hilo y aguja y comenzamos el bordado por el centro de la flor por el reverso del dibujo. Introducimos el balín de 6 cm e insertamos nuevamente a la tela.
STEP #03
We pass the needle to the front of the drawing and take two golden beads to begin to surround the ball with these, forming a circle around the ball. We pass the needle to the reverse side and then we take it out through the middle of the two beads, then we introduce the needle inside the second bead.
PASO #03
Pasamos la aguja al frente del dibujo y tomamos dos mostacillas doradas para comenzar a rodear el balín con éstas formando un círculo alrededor del balín. Pasamos la aguja al reverso y luego la sacamos por el medio de las dos mostacillas, seguidamente introducimos la aguja por dentro de la segunda mostacilla.
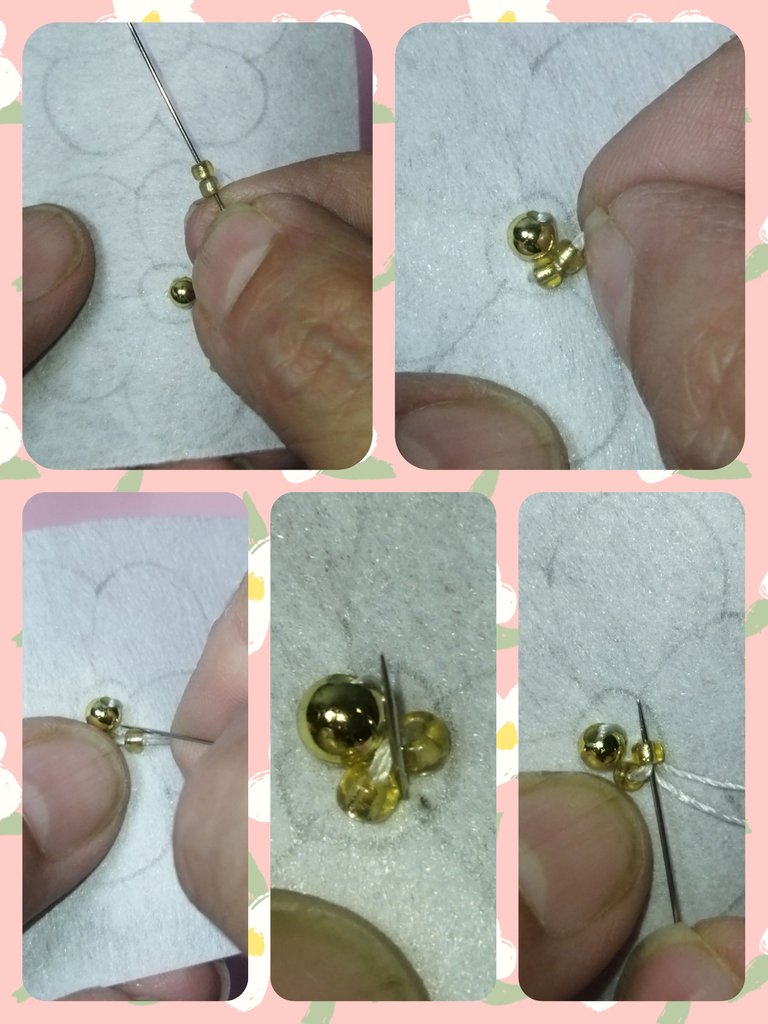
STEP #04
We pass the needle to the front again and take two more beads and repeat step #3 and so on until we surround the bead and cover the entire center of the flower.
PASO #04
Pasamos nuevamente la aguja al frente y tomamos dos mostacillas más y repetimos el paso #3 y así sucesivamente hasta rodear el balín y cubrir todo el centro de la flor.
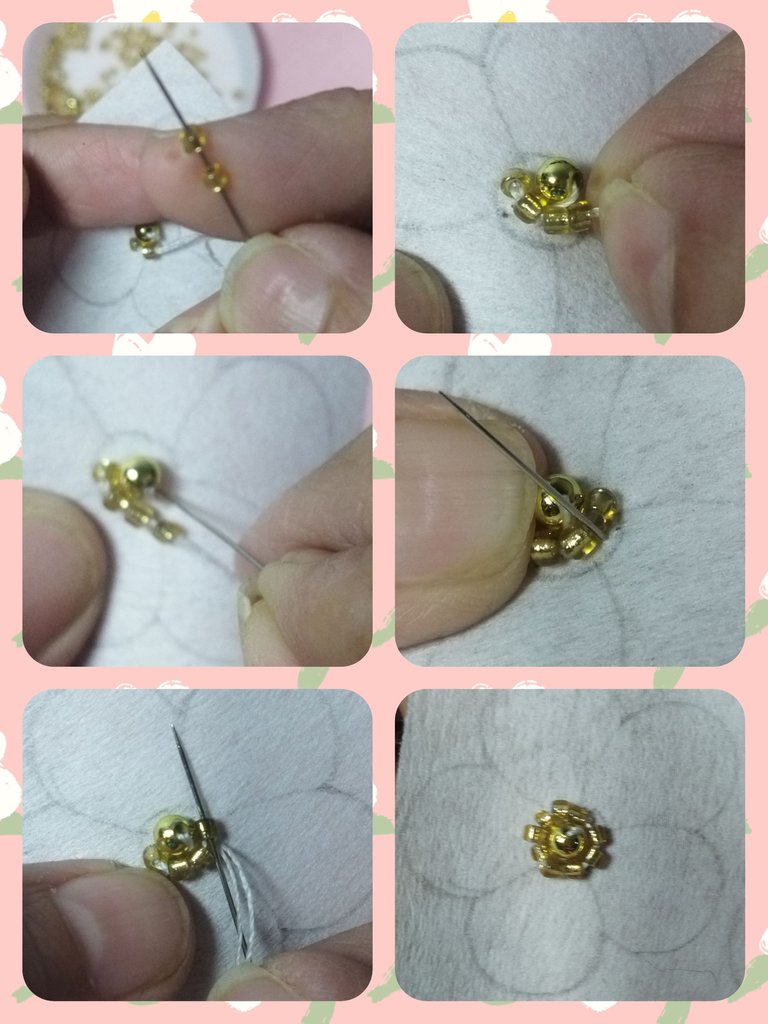
STEP #05
Now we are going to form the petals of the flower. We continue the embroidery with the golden beads but this time we are going to take 4 beads that we will shape around the petal.
We introduce the 4 beads. We pass the thread to the reverse side and take out the needle again between the third and fourth bead and pass it inside the fourth bead and continue the embroidery until the petal is finished.
PASO #05
Ahora vamos a formar los pétalos de la flor. Continuamos el bordado con las mostacillas doradas pero esta vez vamos a tomar 4 mostacillas que iremos moldeando alrededor del pétalo.
Introducimos las 4 mostacillas. pasamos el hilo al reverso y volvemos a sacar la aguja entre la tercera y cuarta mostacilla y la pasamos por dentro de la cuarta mostacilla y continuamos el bordadom hasta culminar el pétalo.
STEP #06
At the end of the petal, we pass the needle again to the front of the embroidery, specifically between the last and penultimate bead and insert the needle inside the following beads until we reach the height of the beginning of the next petal.
We take between 3 to 4 beads and continue the embroidery in the same way as in step #5 and repeat on all the petals of the design. At the end we pass the needle to the reverse side and finish the seam.
PASO #06
Al finalizar el pétalo, pasamos nuevamente la aguja al frente del bordado, específicamente entre la última y penúltima mostacilla e introducimos la aguja por dentro de las siguientes mostacillas hasta llegar a la altura del inicio del pétalo siguiente.
Tomamos entre 3 a 4 mostacillas y continuamos el bordado de la misma manera que en el paso #5 y repetimos en todos los pétalos del diseño. Al finalizar pasamos la aguja al reverso y hacemos el remate de la costura.
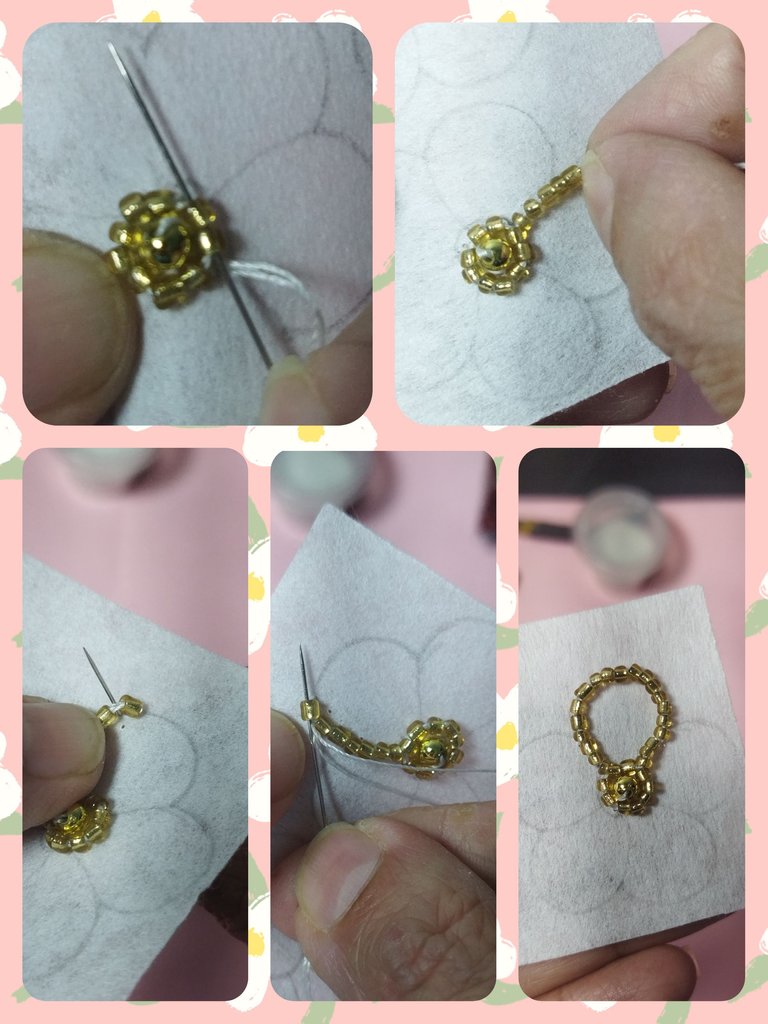
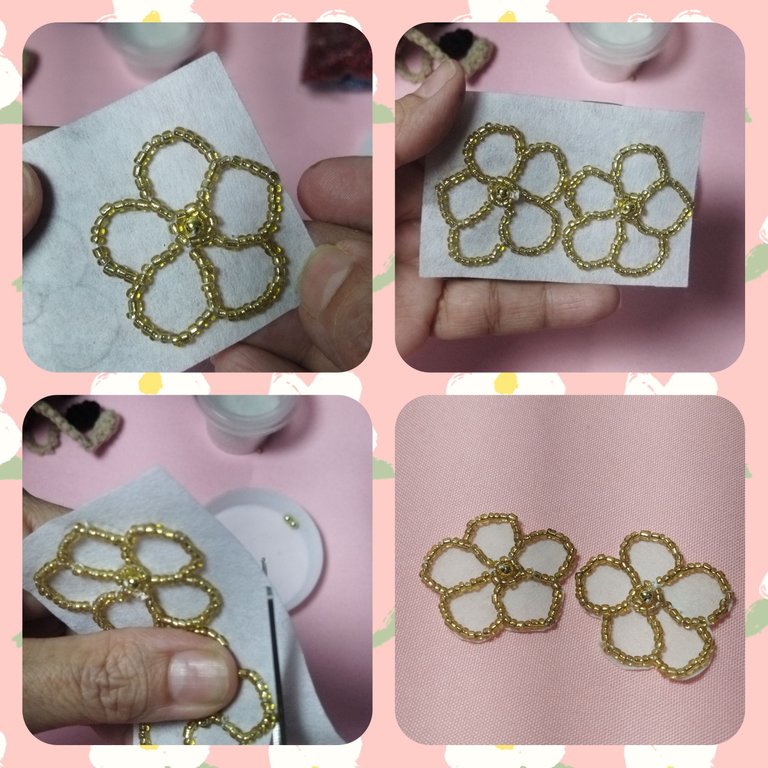
STEP #07
We repeat steps 1 to 6 on the other flower and cut each one flush with the embroidery, being very careful not to cut the thread.
PASO #07
Repetimos los pasos del 1 al 6 en la otra flor y recortamos cada una al ras del bordado con mucho cuidado de no cortar el hilo.
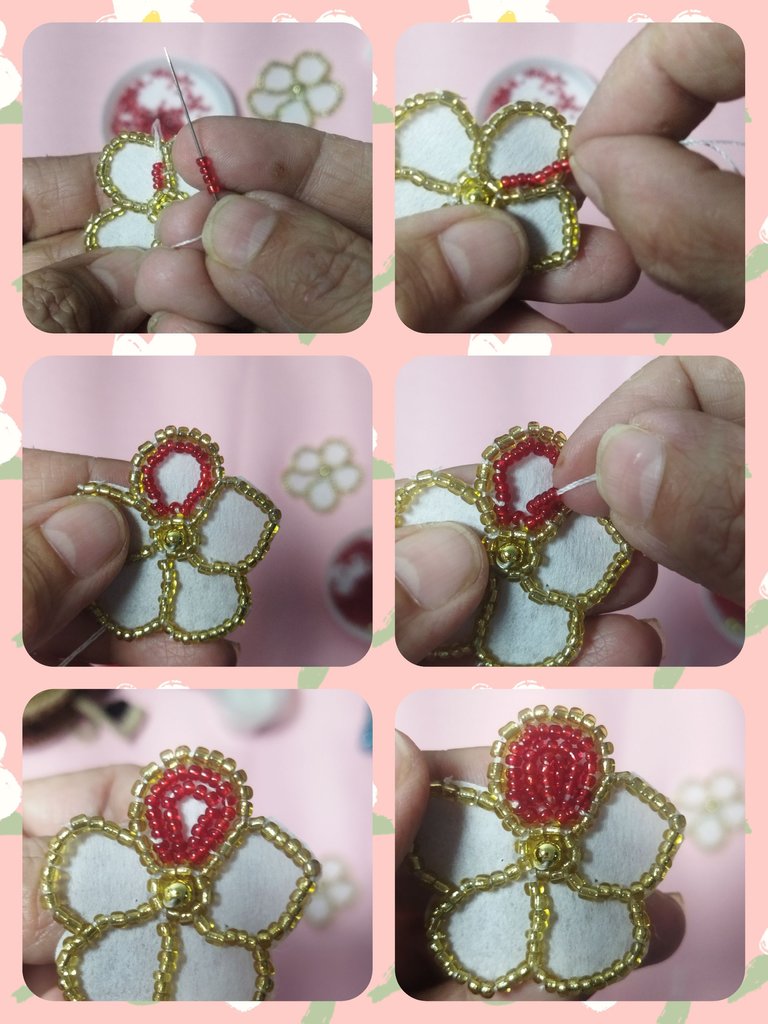
STEP #08
To fill the petals we are going to use red beads. The procedure is the same that we used to embroider the contours starting from the base of the center and continuing around the oval-shaped petal.
We take 4 beads and adjust them to the edge of the gold beads, we pass the needle to the back and take out through the middle of the third and fourth, then we insert the needle inside the last bead. We take 4 beads again and repeat the process until we cover the base or the entire petal.
PASO #08
Para rellenar los pétalos vamos a utilizar mostacillas rojas. El procedimiento es el mismo que usamos para bordar los contornos comenzando desde la base del centro y continuamos alrededor del pétalo de forma ovalada.
Tomamos 4 mostacillas y ajustamos al borde de las mostacillas doradas, pasamos la aguja al reverso y sacamos por el medio de la tercera y la cuarta, luego introducimos la aguja por dentro de la última mostacilla. Tomamos nuevamente 4 mostacillas y repetimos el proceso hasta cubrir la base o todo el pétalo.

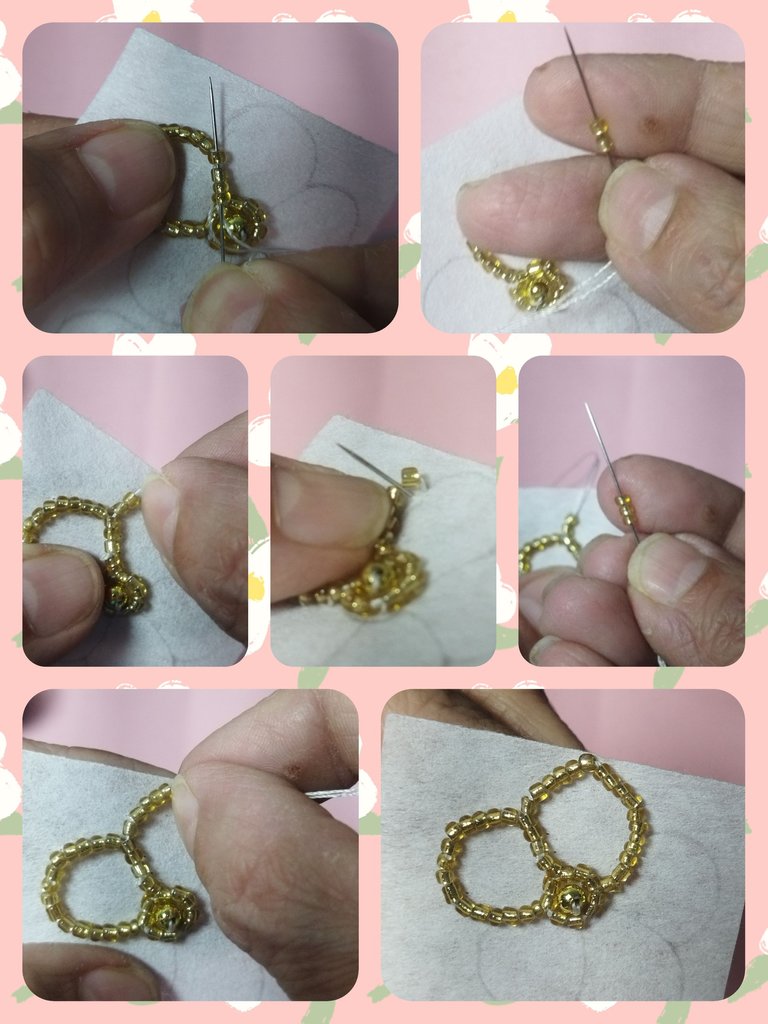
STEP #09
We carry out the previous step on each of the petals and when finished we pass the needle to the reverse side, making a double finish to prevent it from breaking.
PASO #09
Realizamos el paso anterior en cada uno de los pétalos y al terminar pasamos la aguja al reverso realizados doble remate para evitar que se rompa.
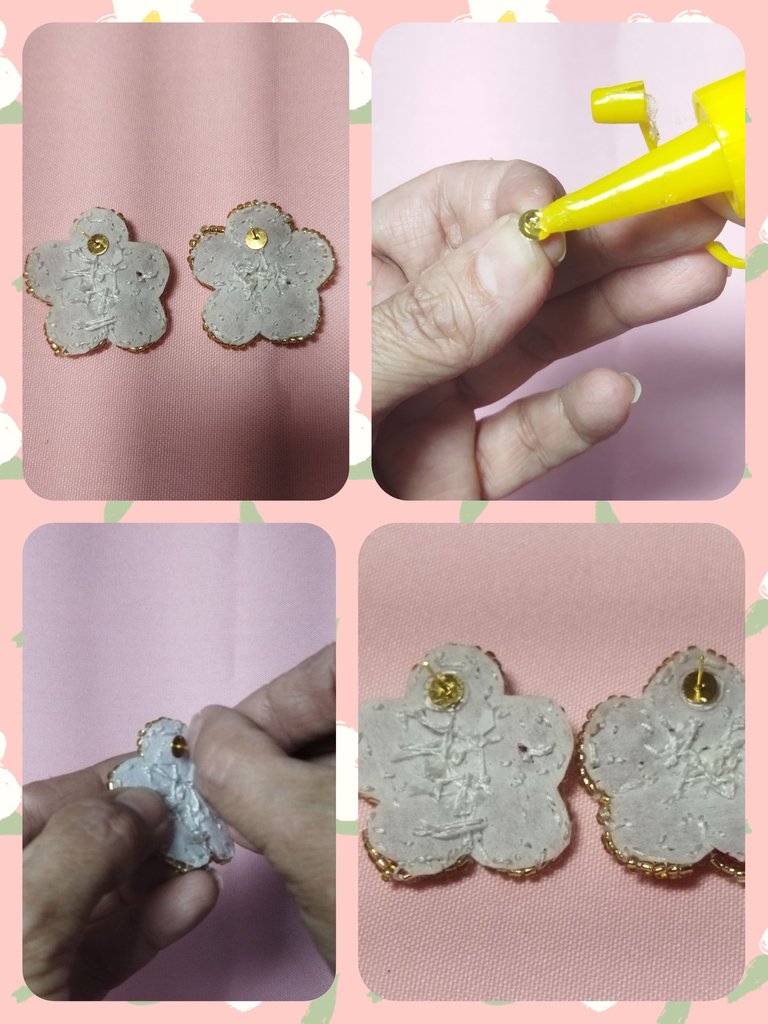
And this is how both embroidered flowers look.
Y así quedan ambas flores bordadas.

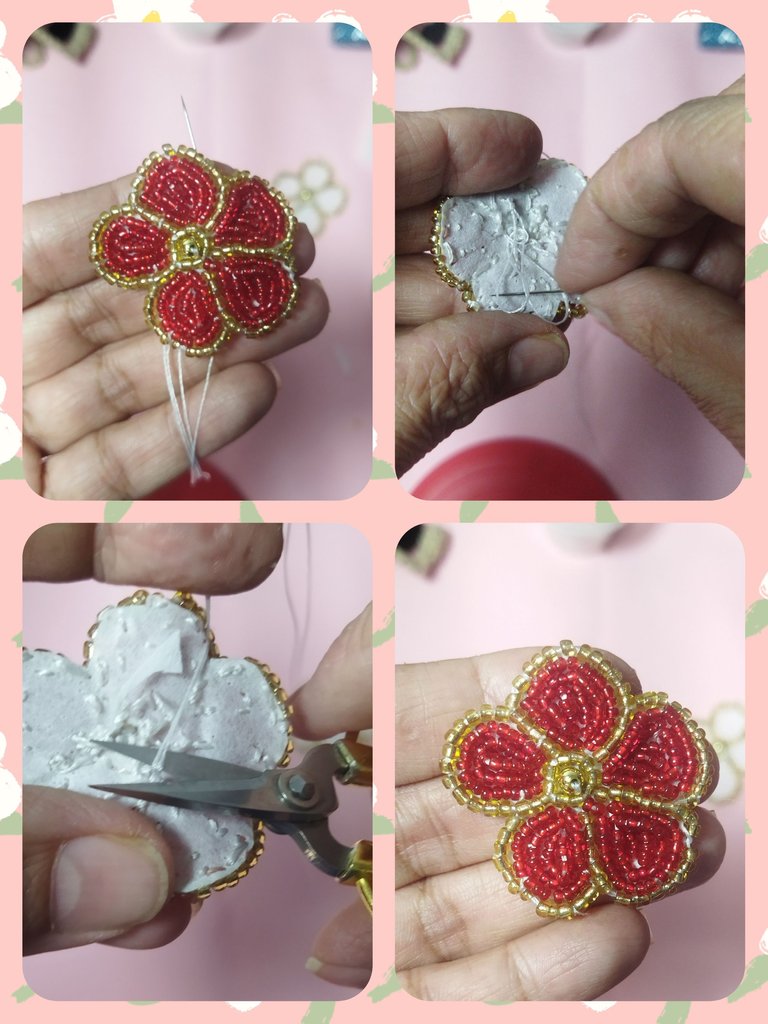
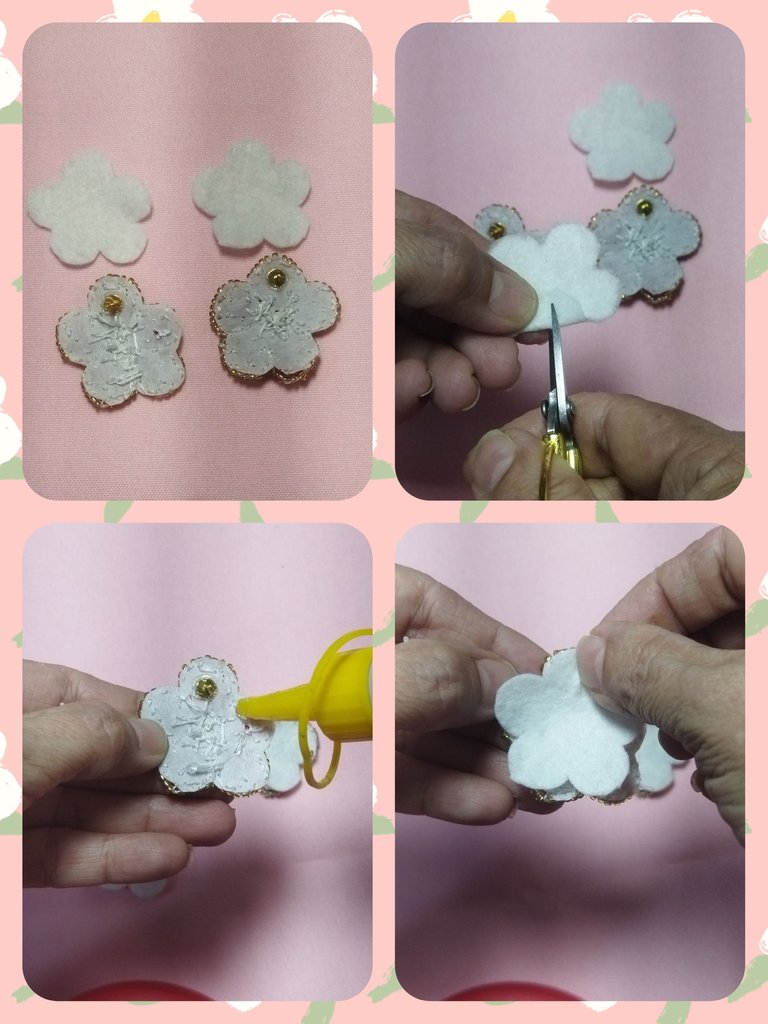
To cover the back of the flowers, we are going to draw on white felt or the color of your choice, two flowers equal to those in the design and cut them out.
Para cubrir el reverso de las flores, vamos a dibujar en el fieltro blanco o del color de tu preferencia, dos flores iguales a las del diseño y las recortamos.
We place the moles in the position where we want to place them and glue them with silicone or jewelry glue and let them dry.
Ubicamos los topitos en la posición donde queremos colocarlos y pegamos con silicón o pegamento para bisutería y dejamos secar.
Then we cover with the flowers that we made out of felt, we make a small cut at the height of the top of the tendril, we add glue and cover the back.
Luego cubrimos con las flores que realizamos en fieltro, hacemos un corte pequeño a la altura del topito del zarcillo, agregamos pegamento y tapamos la parte trasera.
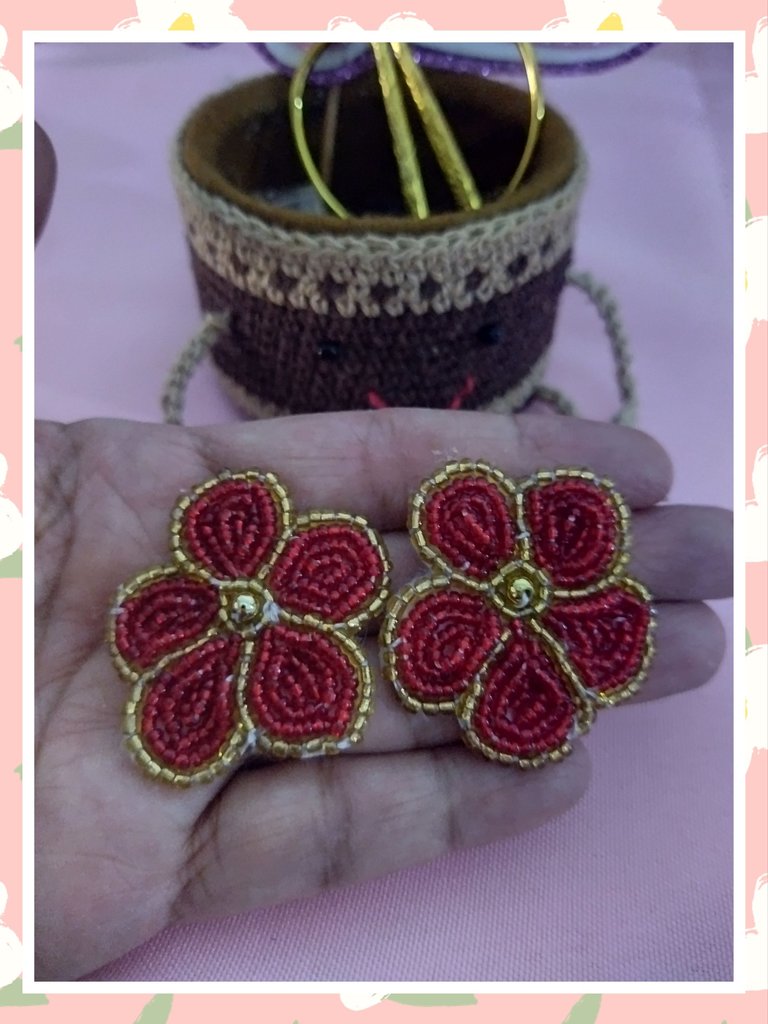
And we already have some embroidered tendrils, very pretty and delicate to always look beautiful. I hope you like it. See you next time.
Y ya tenemos unos zarcillos bordados, muy lindos y delicados para lucir siempre bellas. Espero les guste. Nos vemos en la próxima.

Bello. Eres una habilidosa en este arte de la bisuteria hermana. Todo te queda hermoso. Estas flores se ven super delicadas. 😍
Gracias manita ☺️☺️
Me fascino, que práctico y que preciso, la combinación de colores...felicidades mi quería amiga artista... gracias por compartir
Gracias 🫂🫂, me alegro que te guste
Wow, it looks like a lot of work went into this tendrils. The beads make it look really good
Lindos y elegantes areres. Felicidades y exito en tu post
Que bonitos han quedado ❤️🙆♀️
Te quedo espectacular 👌 amiga, amo esta técnica y se te da muy bien, hermoso acabado.