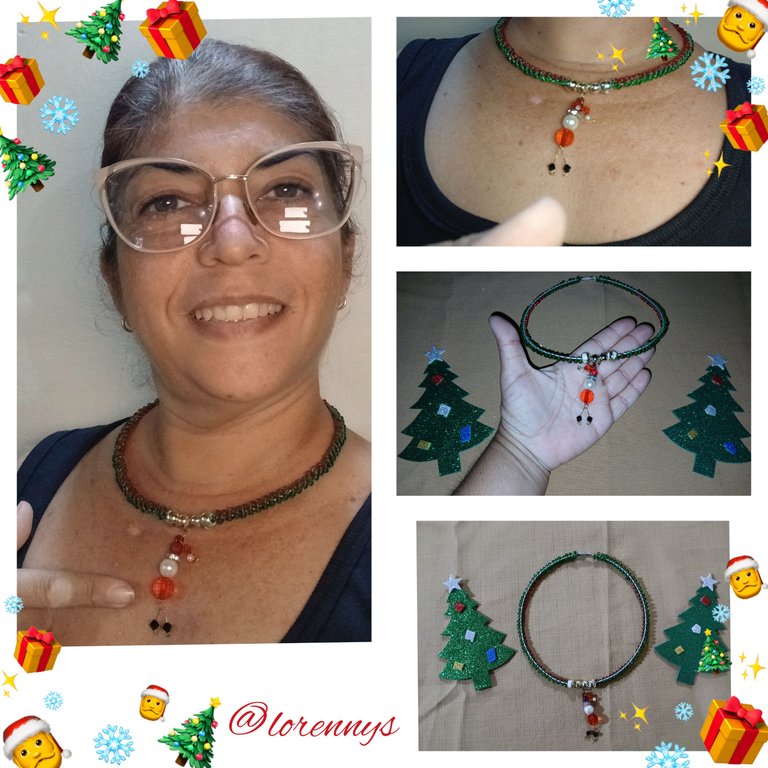
Feliz noche familia Hive y amigos creativos y artesanos de esta estupenda comunidad, de nuevo por aquí con ustedes para desearles salud y felicidad a todos. Mi tarea de hoy es una espectacular gargantilla temática navideña con dije de santa, santa tipo arlequín qué me encantó aquí se los dejo con su paso a paso espero lo disfruten.
English Version
Happy evening Hive family and creative friends and crafters of this great community, again here with you to wish you health and happiness to all. My task today is a spectacular Christmas themed necklace with Santa charm, Santa harlequin type which I loved here I leave you with its step by step I hope you enjoy it.
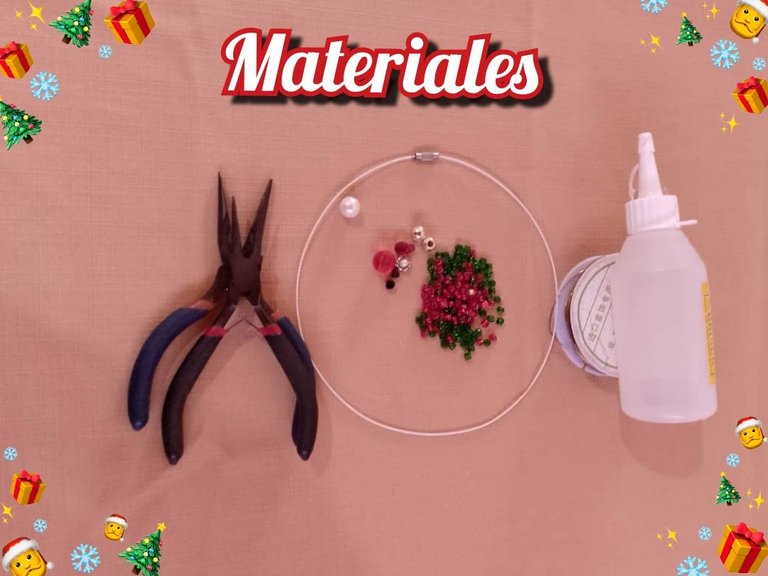
MATERIALES:
❄️Mostacillas verdes.
❄️Mostacillas rojas.
❄️Dos balines dorados número ocho.
❄️Dos balines dorados número seis.
❄️Dos cristales negros.
❄️Una piedra roja tafetada.
❄️Una perla blanca número ocho.
❄️Un separador pequeño.
❄️Una piedra roja en forma de lágrima.
❄️Un cristal rojo.
❄️Una perlita número uno.
❄️Alambre de bisutería calibre 5mm.
❄️Una guaya para gargantilla color blanco.
❄️Pinzas.
❄️Regla.
❄️Silicón.
❄️Alambre de bisutería color verde.
English Version
MATERIALS:
❄️Mostacillas green.
❄️Mostacillas red.
❄️Dos number eight gold pellets.
❄️Dos number six gold pellets.
❄️Dos black crystals.
❄️Una red taffeta stone.
❄️Una number eight white pearl.
❄️Un small spacer.
❄️Una red teardrop shaped stone.
❄️Un red crystal.
❄️Una number one pearlite.
❄️Alambre of costume jewelry caliber 5mm.
❄️Una guaya for choker white color.
❄️Pinzas.
❄️Regla.
❄️Silicón.
❄️Alambre of costume jewelry green color.
Paso a Paso
❄️Primer paso:
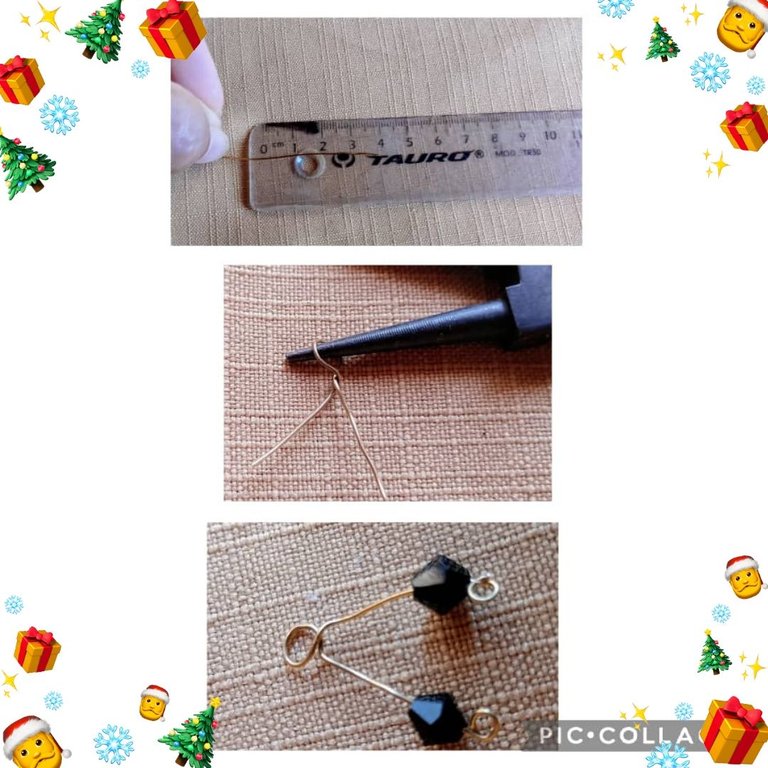
Voy a comenzar elaborando un dije con motivo de un Santa Claus; con la regla mido cinco centímetros del alambre de bisutería de Cinco milímetros y con la ayuda de la pinza punta redonda elaboro una argolla a la mitad del alambre. Ahora igualo las puntas y en cada lado pongo un cristal negro, en cada punta para evitar que se salgan los cristales con la pinza de punta redonda hago un anillo doble, así.
English Version
Step by Step
❄️Primer step:
I am going to start by making a pendant with a Santa Claus motif; with the ruler I measure five centimeters of the Five millimeter costume jewelry wire and with the help of the round tip pliers I make a ring in the middle of the wire. Now I equalize the ends and on each side I put a black crystal, on each end to prevent the crystals from coming off with the round nose pliers I make a double ring, like this.
❄️Segundo Paso:
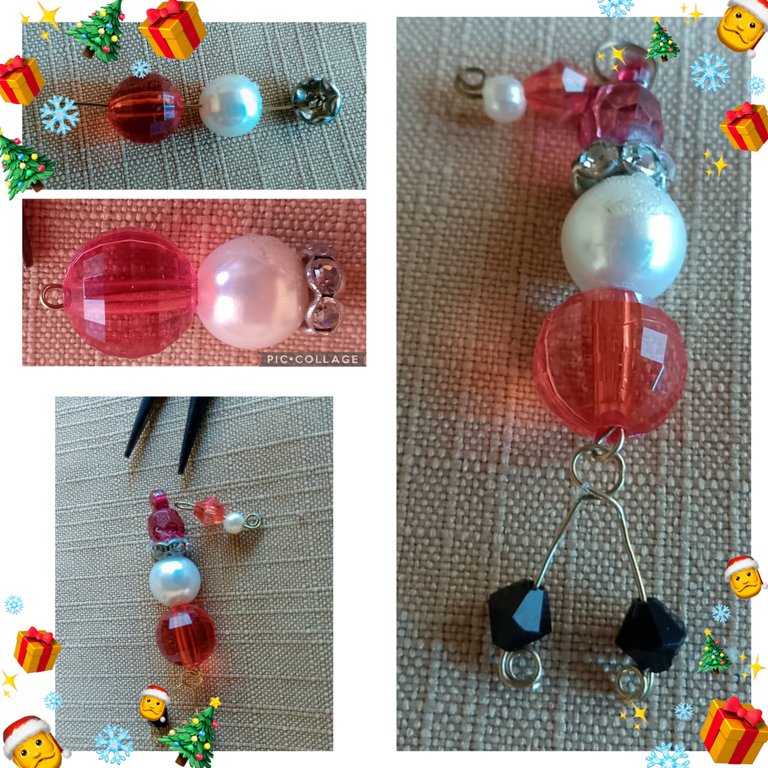
Corto un nuevo trozo de alambre de siete centímetros, coloco una grapa en uno de los extremos ahora inserto el separador, luego la perla blanca número ocho y la piedra roja tafetada; ahora pongo silicón en el separador y coloco la piedra roja parecida a una lágrima, está piedra tiene su propia argolla, en ella voy a insertar una forma imitando la punta del gorro de Santa, la hice colocando en un centímetro de alambre una perlita pequeña blanca, y un cristal rojo, la aseguro haciendo un anillo así.
English Version
❄️Segundo Step:
I cut a new seven centimeter piece of wire, I place a staple on one of the ends now I insert the separator, then the white pearl number eight and the red taffeta stone; now I put silicone on the separator and place the red stone similar to a teardrop, this stone has its own ring, in it I will insert a shape imitating the tip of Santa's hat, I made it by placing in a centimeter of wire a small white pearl, and a red crystal, I secure it making a ring like this.
❄️Tercer Paso:
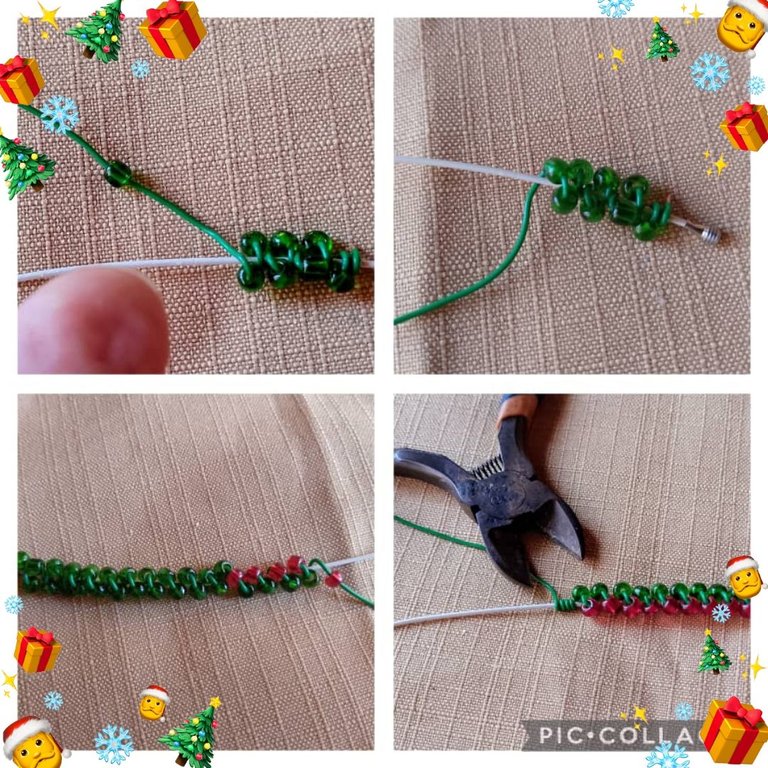
Voy a hacer la elaboración de la gargantilla; usando la guaya blanca tomo el alambre verde para bisutería y así como muestro entorcho dos vueltas pegadas al cierre , fijo bien y comienzo a insertar mostacillas primero pongo verdes solamente de esta manera introduzco una mostacilla y abrazo la guaya con una vuelta, luego pongo otra mostacilla y abrazo otra vez la guaya este paso lo realizo hasta tener una medida de Cinco centímetros. Sigo realizando el mismo procedimiento pero ahora inserto una mostacilla verde y una mostacilla roja hasta lograr una medida de catorce centímetros, aquí entorcho tres veces el alambre en la guaya y halo con firmeza para fijar y uso la pinza para cortar el excedente del alambre .
English Version
❄️Tercer Step:
I am going to make the elaboration of the choker; using the white guaya I take the green wire for costume jewelry and as well as I show I twist two turns attached to the clasp , I fix well and begin to insert beads first I put green only in this way I insert a bead and embrace the guaya with a turn, then I put another bead and embrace again the guaya this step I perform it until I have a measure of Five centimeters. I continue the same procedure but now I insert a green bead and a red bead until I get a measure of fourteen centimeters, here I twist three times the wire in the guaya and pull firmly to fix it and use the pliers to cut the excess wire.
❄️Cuarto paso:
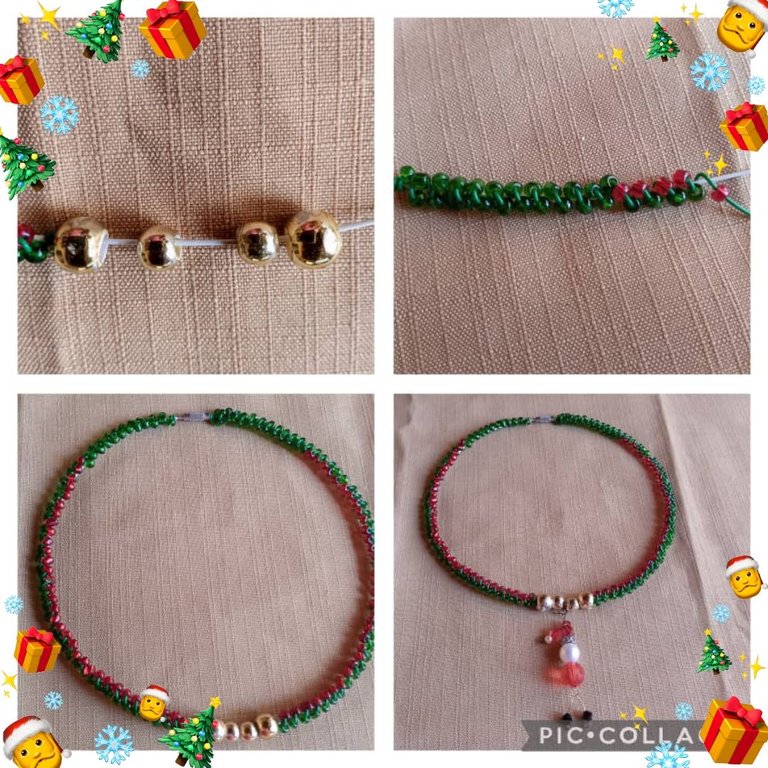
En este paso para que mi labor quede más prolija, sin detalle y con un toque más elegante coloco un balín dorado número ocho bien pegadito al corte, sigo y coloco dos balines número seis y otro balín número ocho, de nuevo con el alambre de bisutería color verde hago un triple entorche que oculto dentro del balín número ocho y comienzo a tejer el otro lado de la gargantilla, en este lado empiezo colocando una mostacilla roja y una verde hasta tener la misma medida anterior, para luego hacer los cinco centímetros de color verde, ahora fijo con tres entorche del alambre pegados al cierre para terminar. Ya he terminado la gargantilla, ahora pongo el dije de santa en el medio de los balines número seis así.
English Version
❄️Cuarto step:
In this step so that my work is neater, without detail and with a more elegant touch I place a golden ball number eight well glued to the cut, I continue and place two balls number six and another ball number eight, again with the green bijouterie wire I make a triple twist that I hide inside the ball number eight and I begin to weave the other side of the choker, on this side I start placing a red bead and a green one until I have the same measure as before, then I make the five centimeters of green color, now I fix it with three twist of the wire glued to the clasp to finish. I have already finished the choker, now I put the santa pendant in the middle of the number six balls like this.
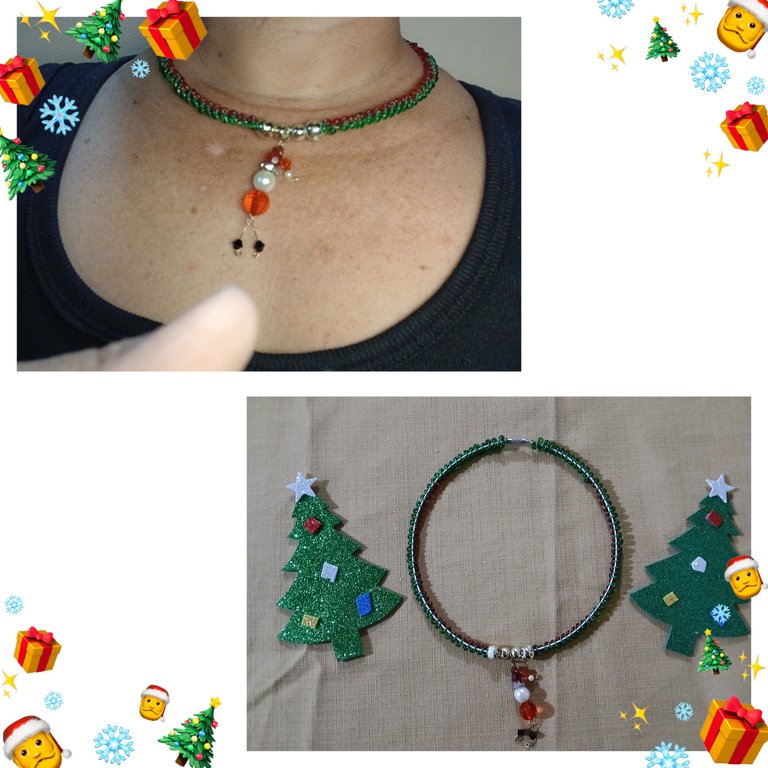
De esta manera ya he finalizado mi proyecto de hoy el cual espero sea de inspiración para otros.
English Version
This way I have finished today's project which I hope will be an inspiration for others.
Todas las imágenes son de mi propiedad, capturadas con mi Samsung A15.📸 Editadas con GridArt versión gratuita.
Imagen principal y Banner final editado con Canva versión libre.
🔁Deeptraductor fue utilizado para esta publicación.📶
English Version
All images are my own, captured with my Samsung A15.📸 Edited with GridArt free version.
Main image and final Banner edited with Canva free version.
🔁Deeptranslator was used for this publication.📶
Me gustó el tejido plano de la gargantilla luce diferente, y el dije espectacular, muy bonito además de navideño, 🥰
Gracias muñeca 😘 de mi vida tu buen comentario siempre es inspirador .
Una hermosa gargantilla, se siente el ambiente navideño, nos encanta que puedas traernos este contenido tan hermoso.
Te invitamos a participar en el concurso activo navideño 🎄
Muchas gracias por el apoyo, es alentador les agrade mi contenido.
Te quedó precioso este trabajo, me encantó, se ve tan tierno tan delicado, un detallito para lucir en esta Navidad.
Gracias por compartir en nuestra comunidad... 🥰
Que bueno que te haya gustado me alegra mucho
Saludos
Un accesorio que no puede faltar en éstas fechas decembrinas, es tan creativo y hermoso la semejanza que tiene con Santa, además de la delicadeza que le aporta la mostacilla al resto de la gargantilla que la hace una pieza única y original.
Era toda la intención que tenia de lo que quería reflejará esta pieza, gracias por la visita.
Para estas navidades está genial este accesorio amiga, te ha quedado muy bonito cada día mejorando tus habilidades de joyeria 😉
Gracias 🙂 amiga, estoy en el lugar correcto para aprender cada día más.