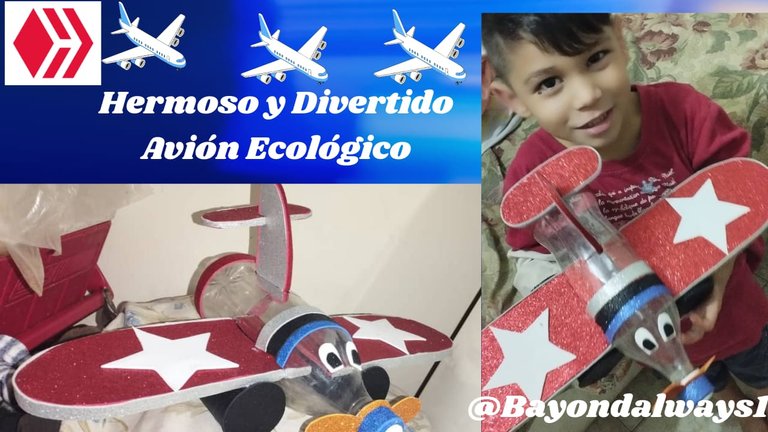
Feliz y bendecida tarde mis queridos amigos de @diyhub y la plataforma más maravillosa @hive, hoy retomando mis manualidades ya que estuve algo quebrantada de salud, pero aquí estamos nuevamente. En esta oportunidad les traigo una hermosa avión que elabore con materiales Reciclados ya saben que me encanta cuidar el ambiente y que mejor que dandole utilidad a las Materiales que tenemos por ahí que decimos que son basura y nos sirven de mucho.
Está avión es muy particular y sobre todo a los niños les va a encantar, ya que la hice fácil y muy divertida.
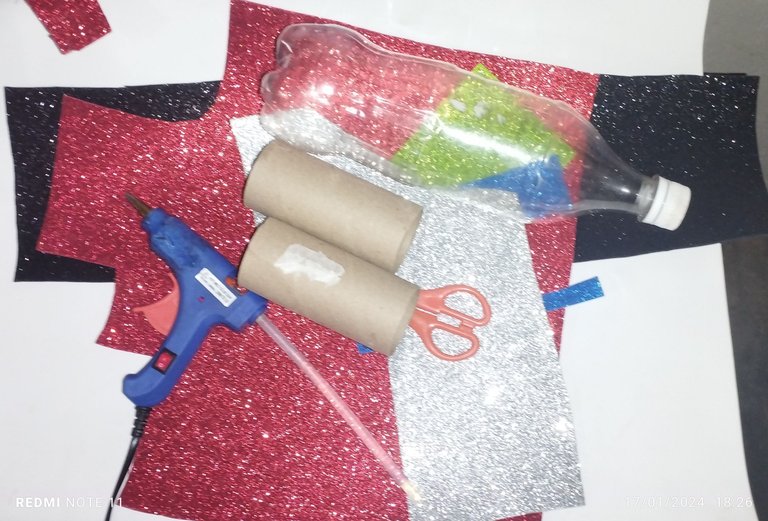
✈️ Los materiales que utilice fueron los siguientes:
✈️ MATERIALES:
✈️ 1 botella de refresco.
✈️ Cartón.
✈️ Rollos de papel higiénico.
✈️ Foami escarchado rojo, negro, plateado.
✈️ Recortes de foami. Naranja, blanco, azul.
✈️ Silicón caliente.
✈️ Tijera.
✈️Paso a Paso:
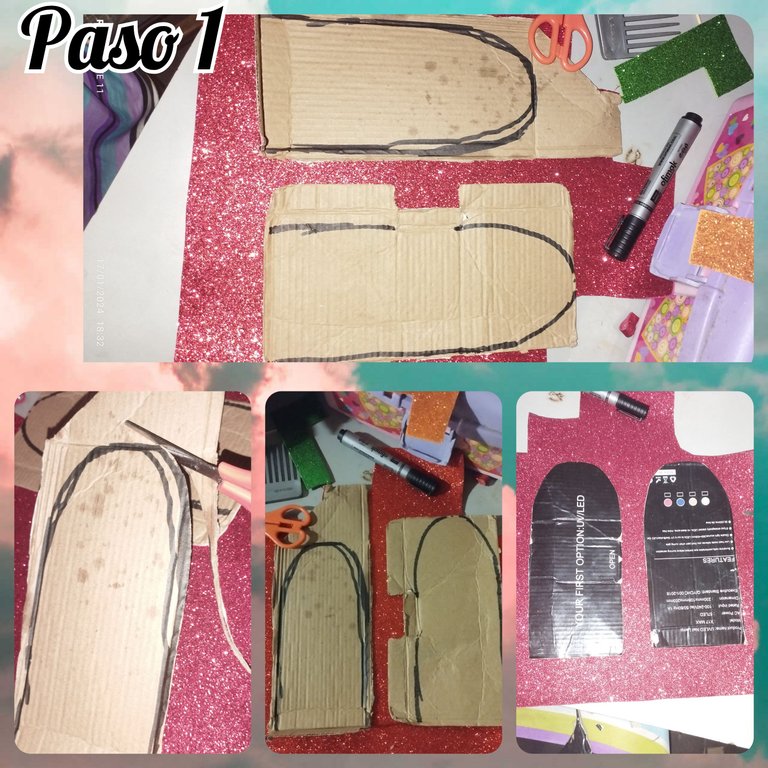
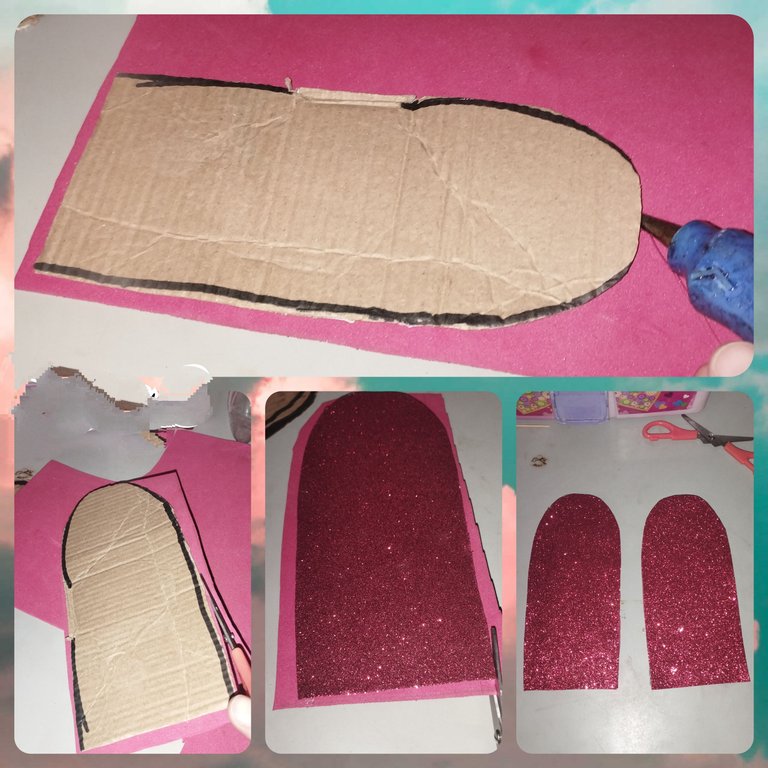
✈️Paso 1:
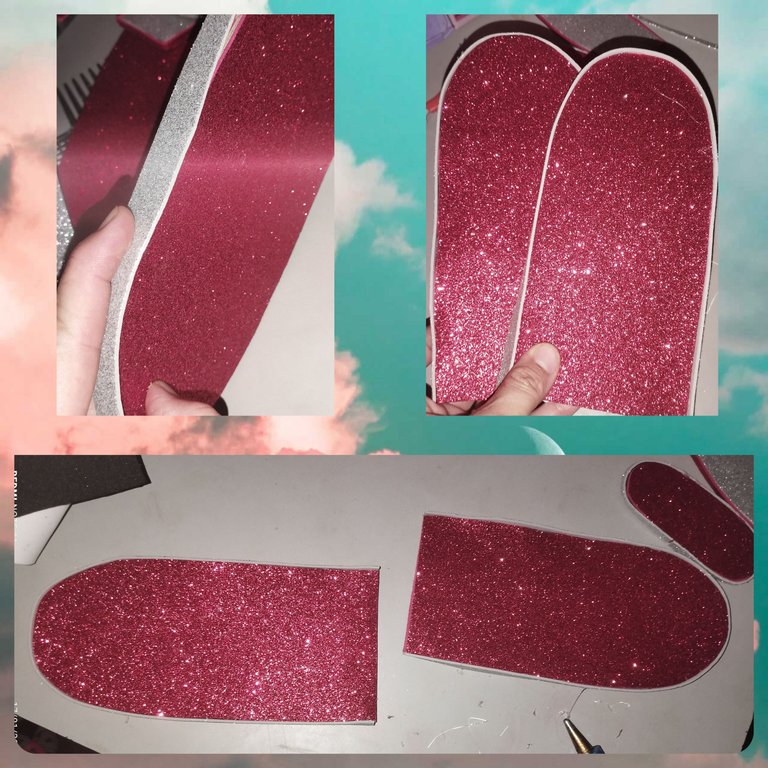
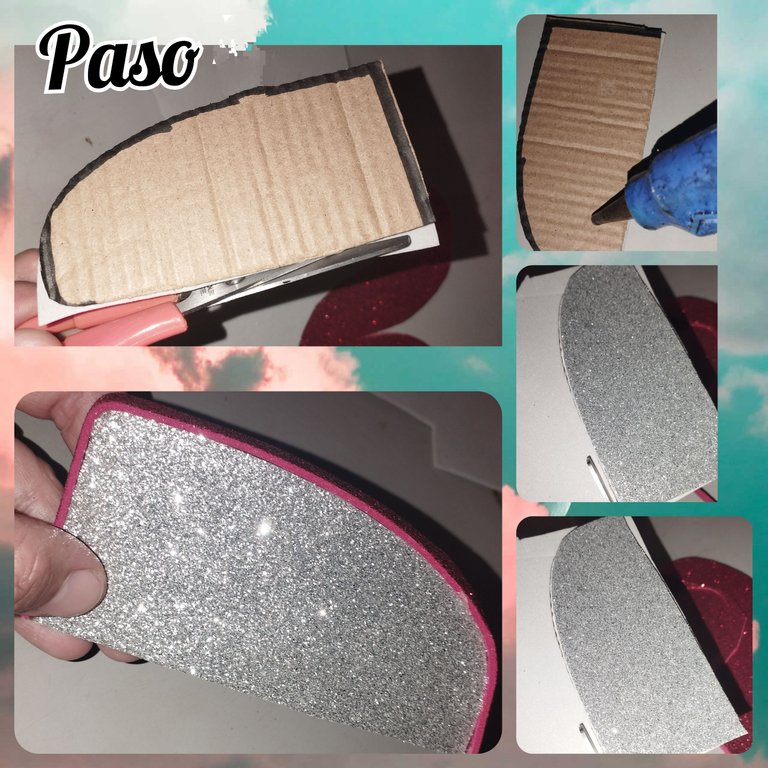
En el cartón vamos a dibujar la forma de un ala. En dos pedazos de cartón y luego la vamos a recortar, luego la vamos a pegar en el foami rojo. Yo lo hice rojo, recordando que los colores pueden ser los que sean de su agrado y gusto eso es depende de ustedes. Luego que tengamos los dos lados de las alas forrados con el foami vamos a cortar listones de foami plateado para colocarlos en la superficie y así tapar esos bordes.
✈️Paso 2:
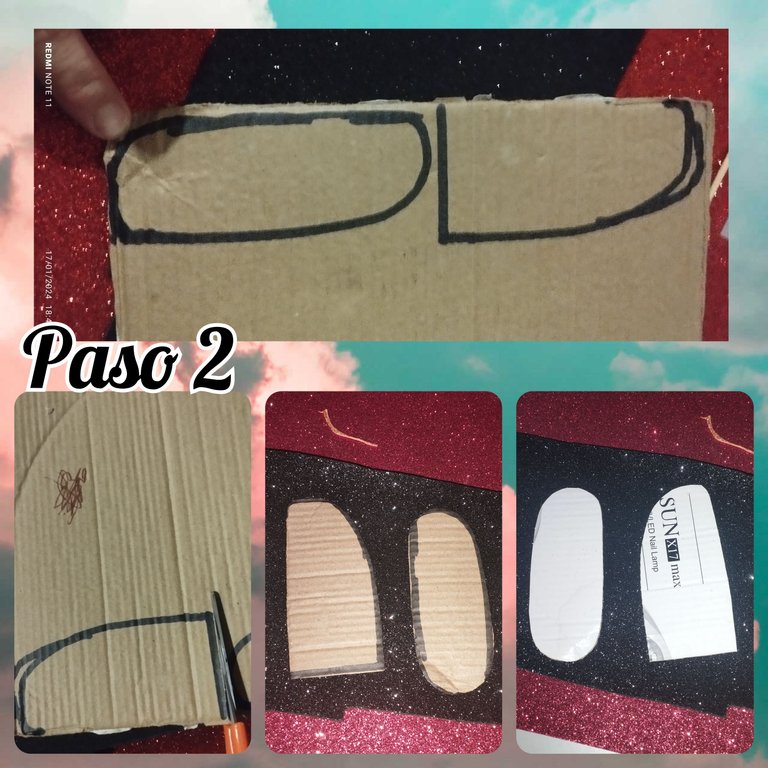
En un cartón vamos a cortar dos piezas que serán la cola de la avión será como un velero, también lo vamos a forrar de color rojo y habremos también el procedimiento de colocarle un listón plateado para tapar los bordes.
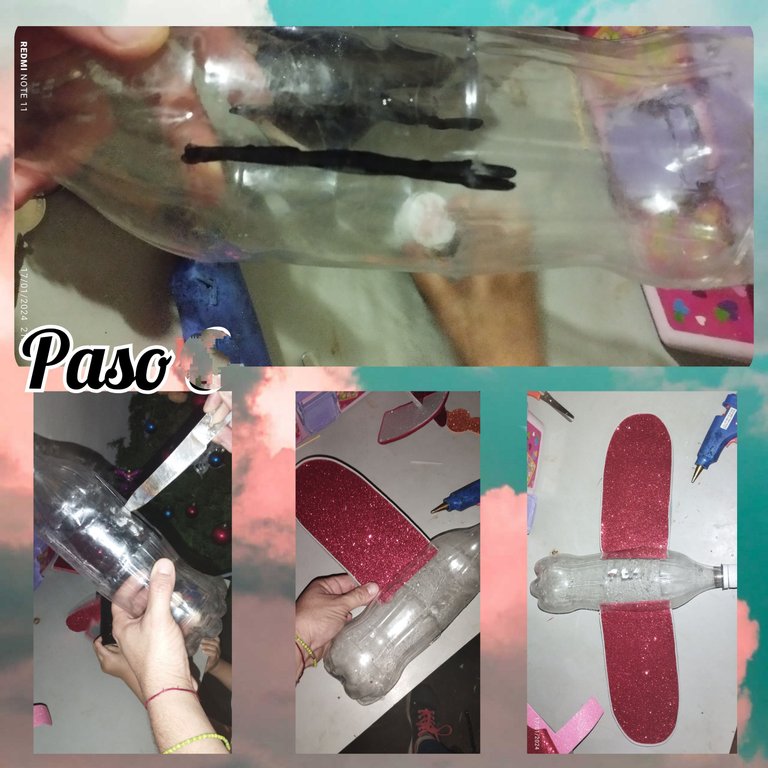
✈️Paso 3:
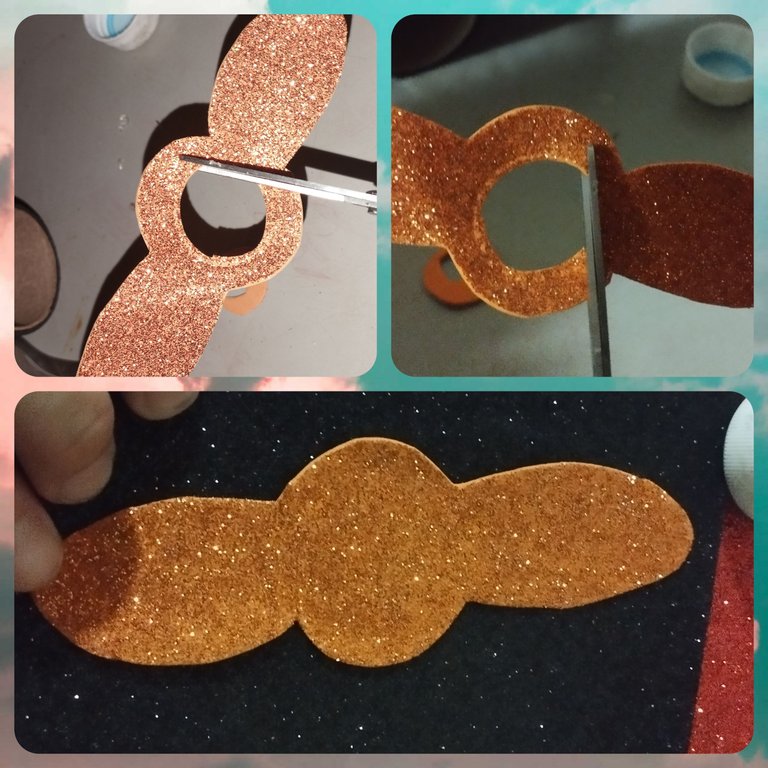
Ahora en este pedacito de foami hice está hélice para colocarla en la parte delantera de nuestro avión.Lo cortamos y reservamos para colocarlo en la tapa de la botella.
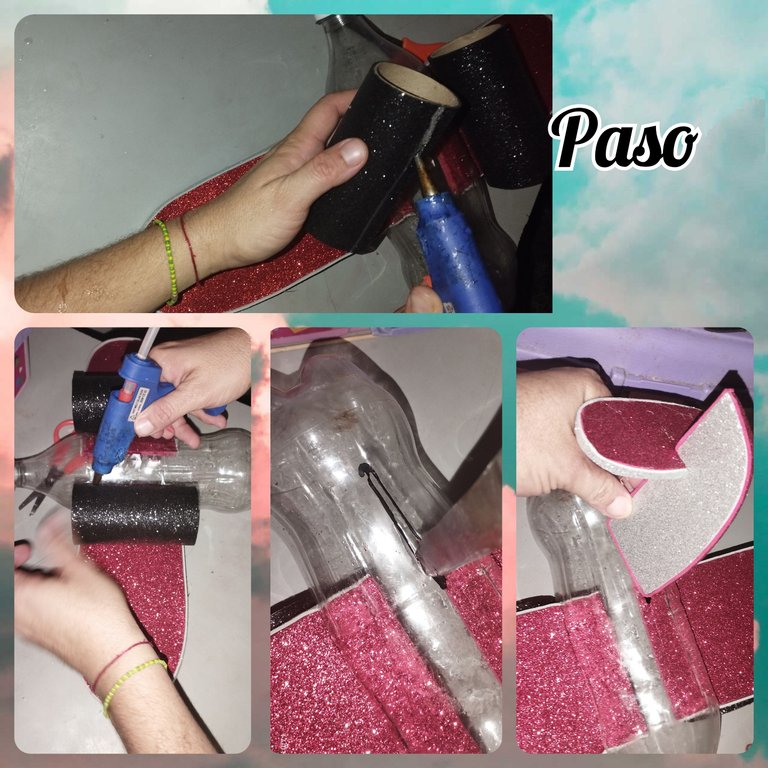
✈️Paso 4:
Marcaremos una línea en cada lado de la botella, y con un exacto, cúter o algún cuchillo caliente hacemos el orificio, es ahí donde pondremos las alas del avión si es necesario le colocamos silicón pero no creo yo no le coloque silicón y ellas se fijan con los rollos de papel se que le van. A colocar debajo de cada ala. Está si se fijan con el silicón para que no halla mucho movimiento y las alas estén más firmes y no se muevan mucho, también colocaremos la cola de la avión en la parte de atrás.
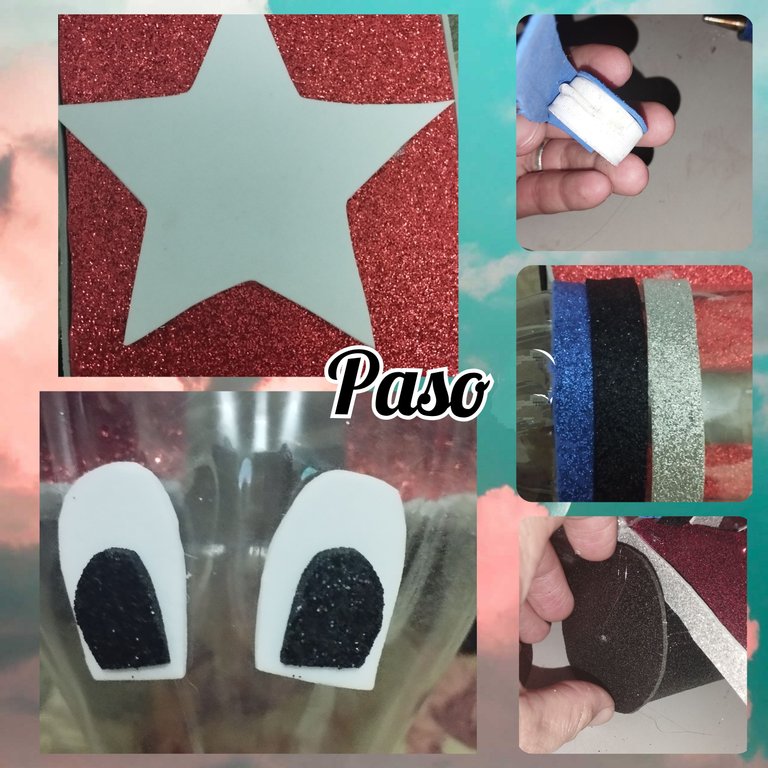
✈️Paso 5:
En esta última fase le colocamos los accesorios, le puse unas franjas de 1.50 centímetros de ancho cada una, los ojitos hechos con foami, y unas estrellas en las alas una de cada una, decore la tapa de la botella donde irá la hélice de nuestra avión y también le puse unas tapas a los rollos de papel lo cuales hacen la función de las ruedas.
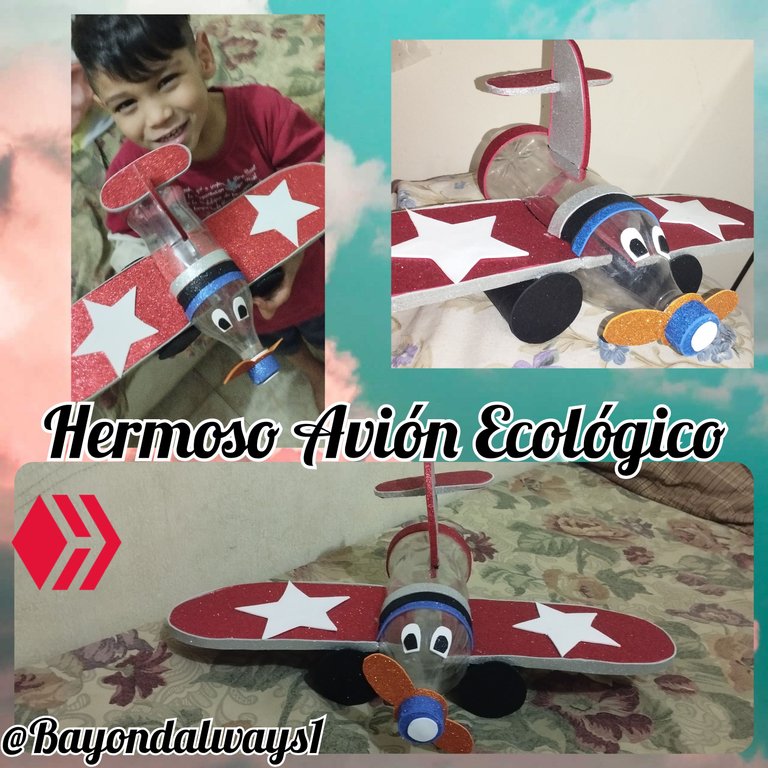
Ya tenemos nuestra avión Ecológica lista para nuestros niños la verdad que será muy divertido verlos jugar con ella.
Espero que les guste mi nueva creación y dándoles gracias por el apoyo y por motivarnos a seguir creando.
Saludos y hasta una nueva oportunidad.
Las imagenes me pertenecen, fueron tomadas de mi teléfono Redmi Note 11.
Las fotos fueron editadas en el programa Editor de Fotos Polish.
traductor: Deepl Traslator.
English
Happy and blessed afternoon my dear friends of @diyhub and the most wonderful platform @hive, today resuming my crafts since I was somewhat broken health, but here we are again. This time I bring you a beautiful airplane that I made with recycled materials and you know that I love taking care of the environment and what better than giving utility to the materials that we have out there that we say are garbage and we serve us a lot.
This airplane is very particular and especially the kids will love it, because I made it easy and fun.
✈️ The materials I used were the following:
✈️ MATERIALS:
✈️ 1 soda bottle.
✈️ Cardboard.
✈️ Toilet paper rolls.
✈️ Red, black, silver frosted foami.
✈️ Foami cutouts. Orange, white, blue.
✈️ Hot glue.
✈️ Scissors.
✈️Step by Step:
✈️Step 1:
On the cardboard we are going to draw the shape of a wing. On two pieces of cardboard and then we are going to cut it out, then we are going to glue it on the red foami. I did it red, remembering that the colors can be whatever you like and taste that is up to you. After we have the two sides of the wings lined with the foami we will cut silver foami strips to place them on the surface and cover those edges.
✈️Step 2:
In a cardboard we will cut two pieces that will be the tail of the plane will be like a sailboat, we are also going to line it with red color and we will also have the procedure of placing a silver ribbon to cover the edges.
✈️Step 3:
Now on this little piece of foami I made this propeller to place on the front of our plane.we cut it out and set it aside to place on the bottle cap.
✈️Step 4:
We will mark a line on each side of the bottle, and with an exact, cutter or a hot knife we make the hole, that is where we will put the wings of the plane if necessary we put silicone on it but I don't think I don't put silicone on it and they will be fixed I know how they work with the rolls of paper. To place under each wing. If they are fixed with silicone so that there is not much movement and the wings are firmer and do not move much, we will also place the tail of the plane in the back.
✈️Step 5:
In this last phase we placed the accessories, I added some stripes each 1.50 centimeters wide, the eyes made with foam, and some stars on the wings, one of each, I decorated the lid of the bottle where the propeller of our airplane and I also put some covers on the paper rolls which act as wheels.
We already have our Ecological airplane ready for our children, the truth is that it will be very fun to see them play with it.
I hope you like my new creation and thank you for your support and for motivating us to continue creating.
Greetings and until a new opportunity.
The images belong to me, they were taken from my Redmi Note 11 phone.
The photos were edited in the Polish Photo Editor program.
translator: Deepl Traslator.
Hermoso avión amiga muy divertido y genial para los niños de la casa muy ingeniosa al realizarlo felicitaciones éxitos y bendiciones para ti.
Amén, gracias amiga .. gracias por el apoyo y por pasar por aquí , saludos!
Que bonito y creativa avioneta, muy bien paso a paso, lo hace ver muy fácil, hermoso tu bebé Dios me los bendiga siempre.🤗
Mira qué bonito te quedo, me encanto el resultado, un lindo y creativo avión, para los pequeños de la casa, buen trabajo amiga, saludos.
Gracias por el apoyo.. amen amén, Muchas gracias 🤗❤️❤️❤️
Congratulations @bayondalways1! You have completed the following achievement on the Hive blockchain And have been rewarded with New badge(s)
Your next target is to reach 800 replies.
You can view your badges on your board and compare yourself to others in the Ranking
If you no longer want to receive notifications, reply to this comment with the word
STOPThank You ❤️❤️❤️🤗
Awesome job @bayondalways1! Keep pushing yourself and you'll reach your Hive goals before you know it.
Asombroso, está muy bonito y ese pequeño se ve muy contento con el
This diy is on an engineering level.
Wow,this is so cool.
Excelente idea amiga para hacerle a los más pequeños de la casa. Me encatna
Gracias amiga, siii hay que divertir a los más pequeños
Woooow ese avión me recuerda mucho a la niñez, te quedó muy brutaaal amigaaa 🤘🏻🤘🏻
Hola amigo, si la idea es esa que recordemos lo maravilloso que fue nuestra niñez sin tanta tecnología 🤗, saludos !
WOW! Impressive! Kids will be happy to get this. Nice work! Keep it up!