WELCOME TO MY BLOG
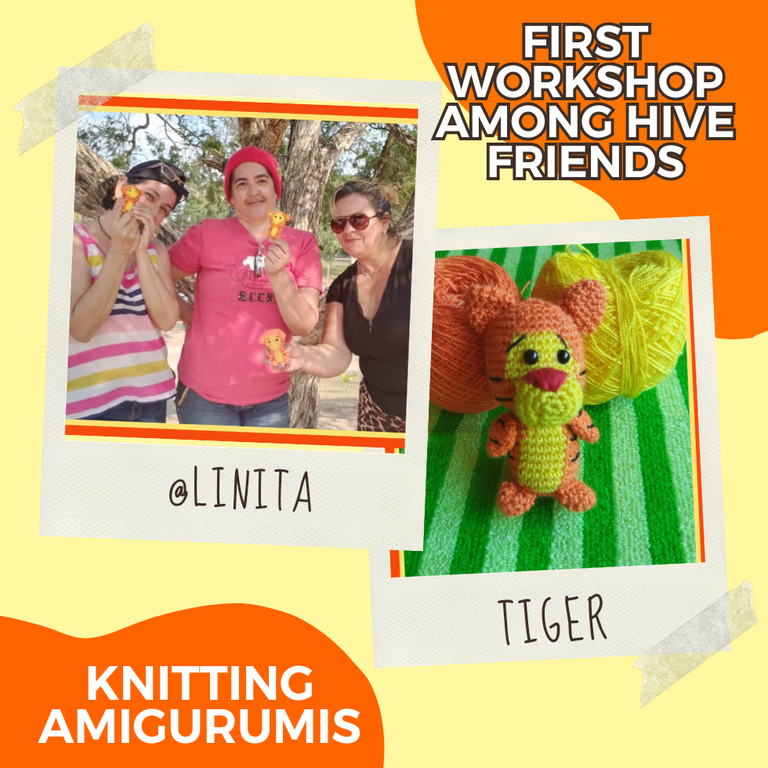
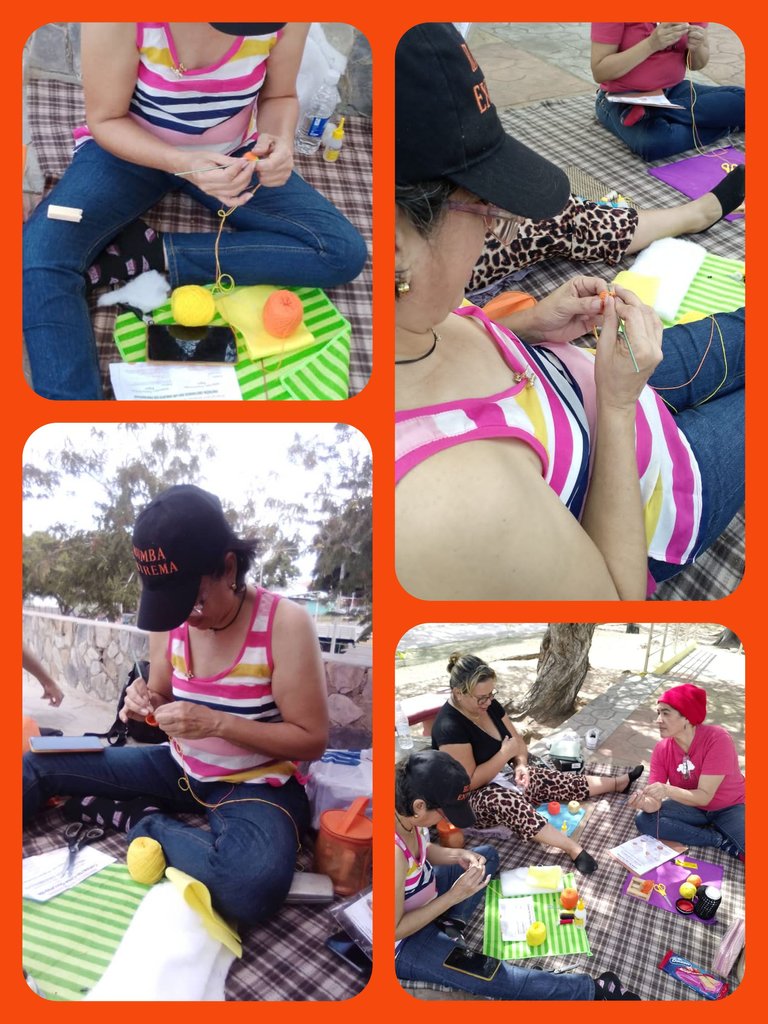
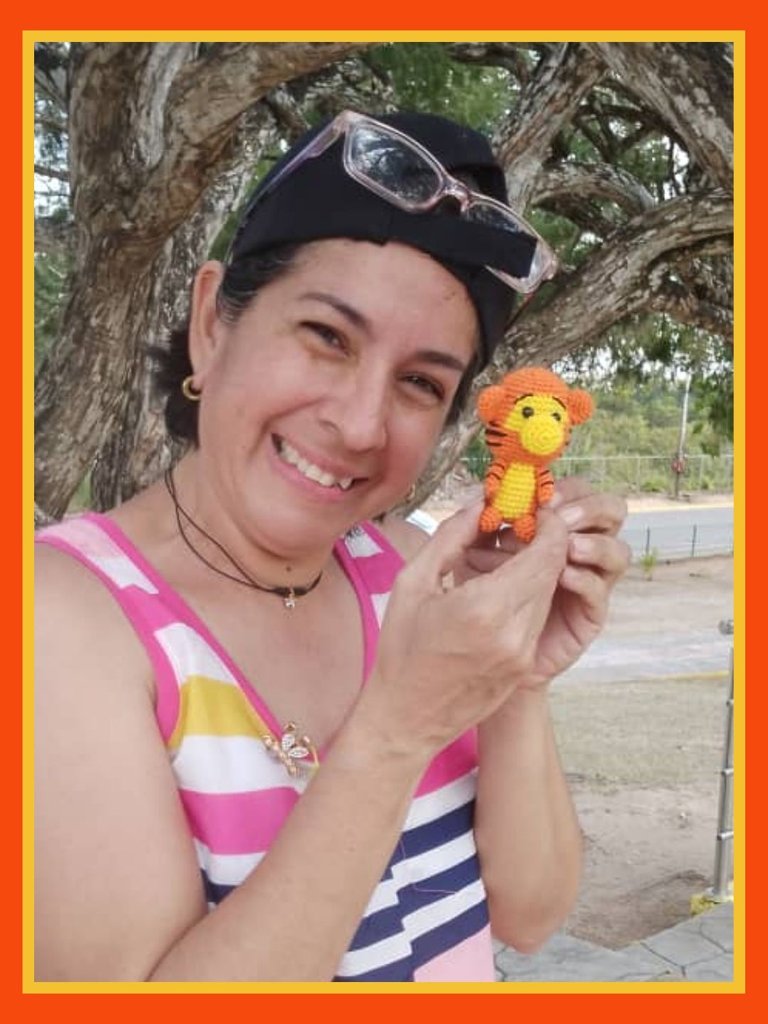
Hellooooo, hellooooooo! Greetings my dear DiyHub creatives. We have had @katiuskamata visiting our city for a few days now. In our first meeting with her, where we shared a good time getting to know each other and talking, @creacioneslelys and I planned 3 workshops, in which each of us would be the facilitator and we would share knowledge.
This is how we arrived at our First Workshop, taught by @creacioneslelys, who taught us some crochet techniques for creating amigurumis. Days before the meeting, she gave us a list of materials and the pattern that we would use to create our first group amigurumi.
It is a real pleasure for me to share with you each step of the process for creating Tiger Amigurumis and some anecdotes during this first meeting. So, without further ado, let's get started.
BIENVENIDOS A MI BLOG
¡Holaaaa, holaaaaa! Saludos mis estimados creativos de DiyHub. Hace ya algunos días que tenemos de visita en nuestra ciudad a @katiuskamata. En nuestro primer encuentro con ella, donde compartimos un buen rato conociéndonos y conversando,@creacioneslelys y yo hicimos una planificación de 3 talleres, en las que cada una sería la facilitadora y compartiríamos saberes.
Así es como llegamos a nuestro Primer Taller, impartido por @creacioneslelys, quien nos enseñó algunos técnicas de tejido a crochet para la creación de amigurumis. Días antes del encuentro, nos facilitó una lista de materiales y el patrón que utilizaríamos para crear nuestro primer amigurumis grupal.
Es un verdadero gusto para mi compartir con ustedes cada paso del proceso para la creación de Tiger Amigurumis y algunas anécdotas durante este primer encuentro. Así que, sin más, comencemos.

MATERIALS
- Acrylic crochet threads (orange, yellow)
- Red and black sewing threads
- 1.6 mm crochet hook
- 6mm eyes
- Stuffed
- Wool needle
- Scissors.
- Yellow felt.
- Sewing pins
- Glue
- Tiger pattern
MATERIALES
- Hilos crochet acrílico (naranja, amarillo)
- Hilos de coser rojo y negro
- Aguja de crochet de 1,6 mm
- Ojos de 6 mm
- Relleno
- Aguja lanera
- Tijera.
- Fieltro amarillo.
- Alfileres de costura
- Pegamento
- Patrón de Tiger
STEP BY STEP // PASO A PASO
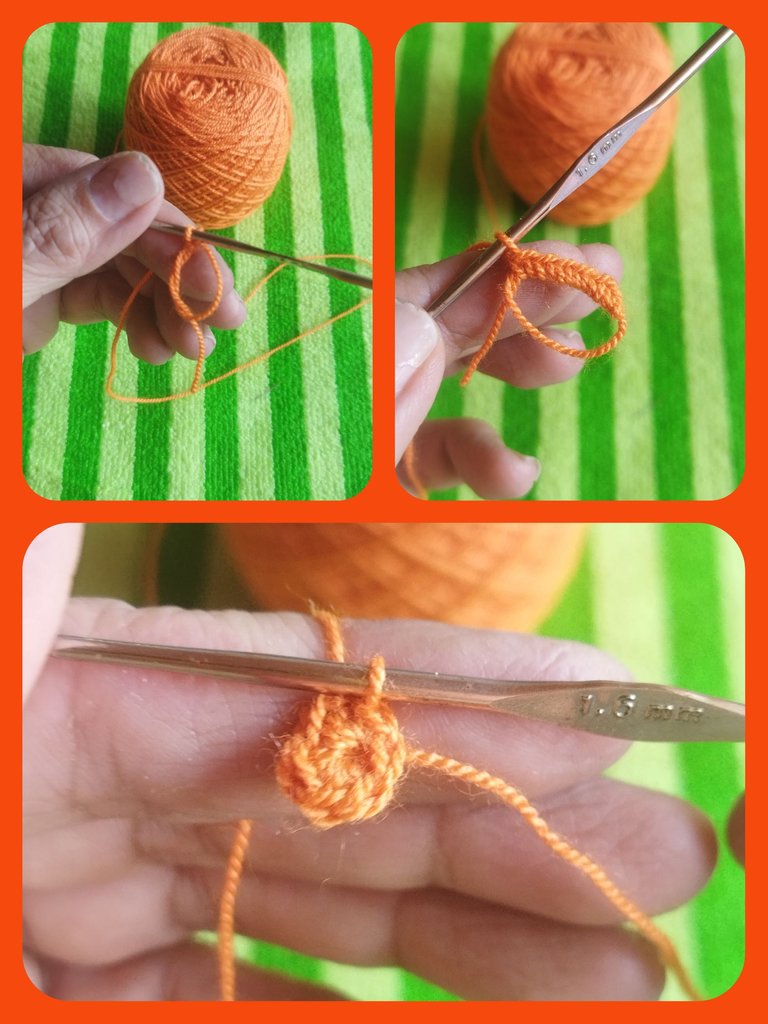
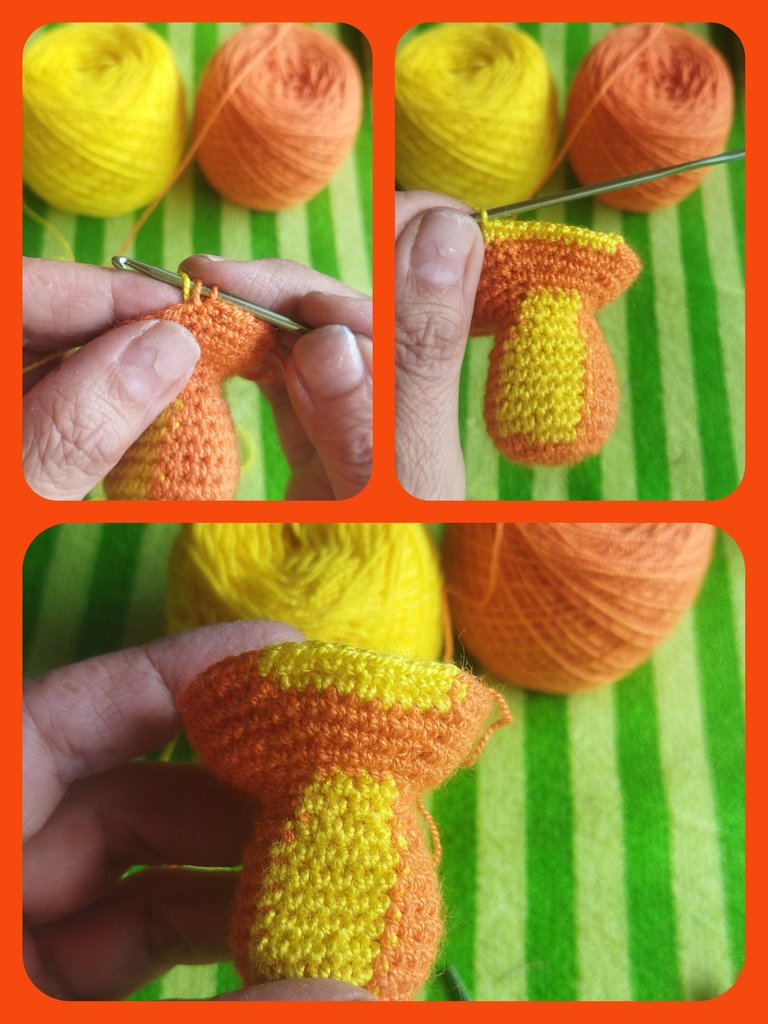
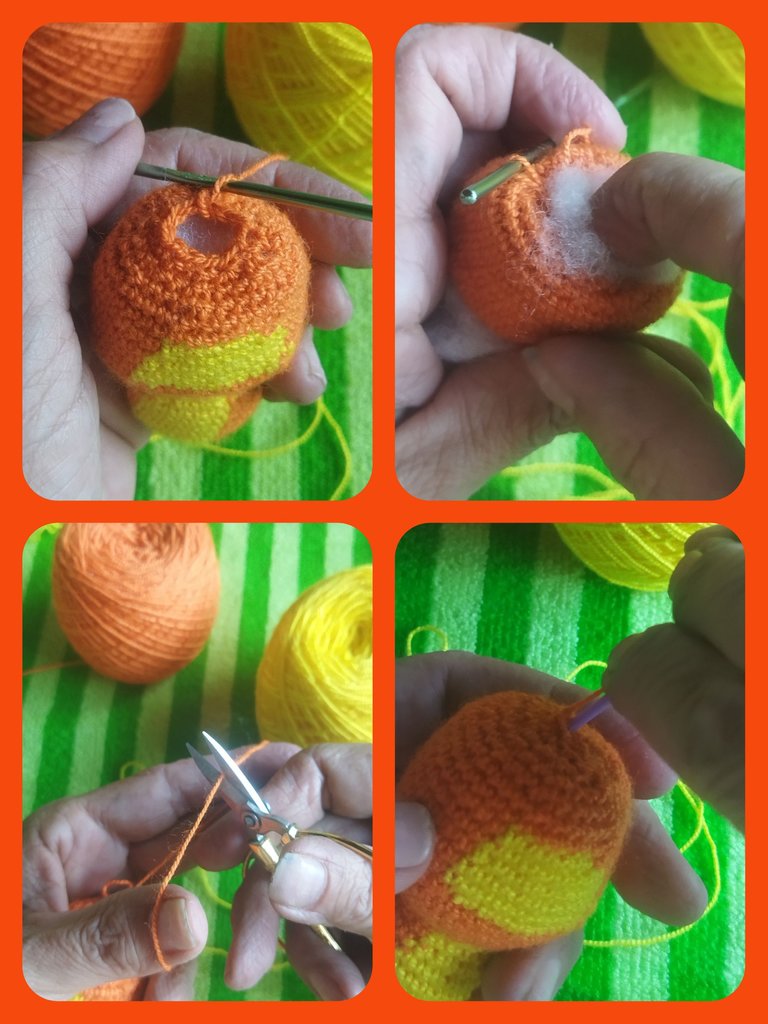
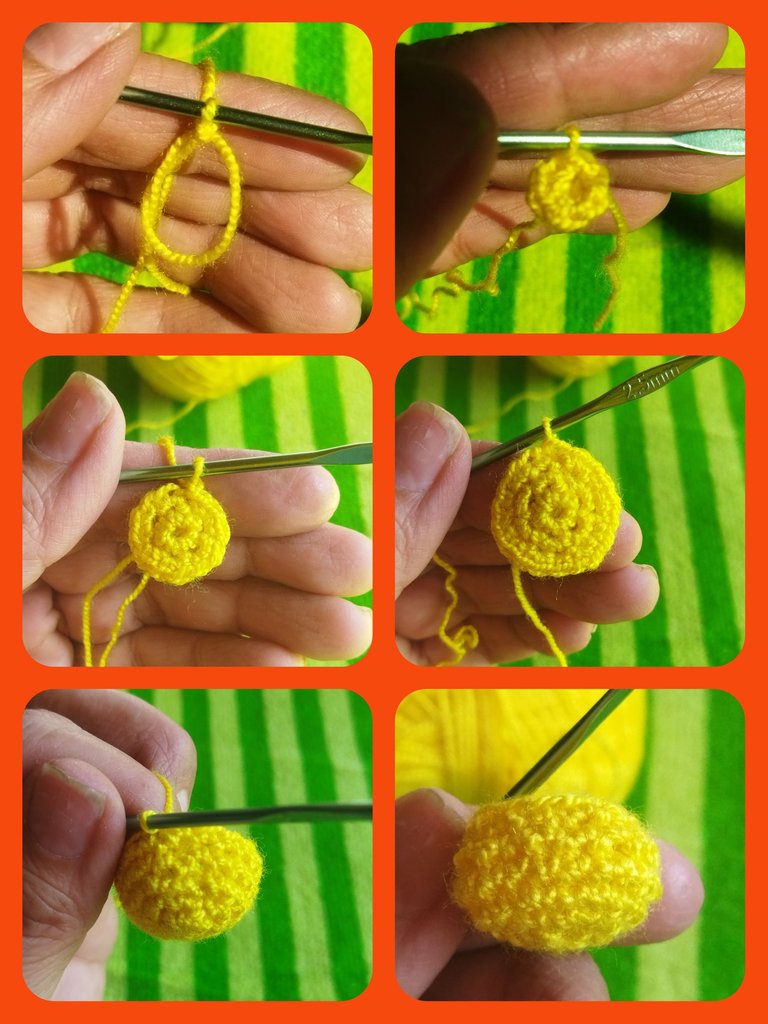
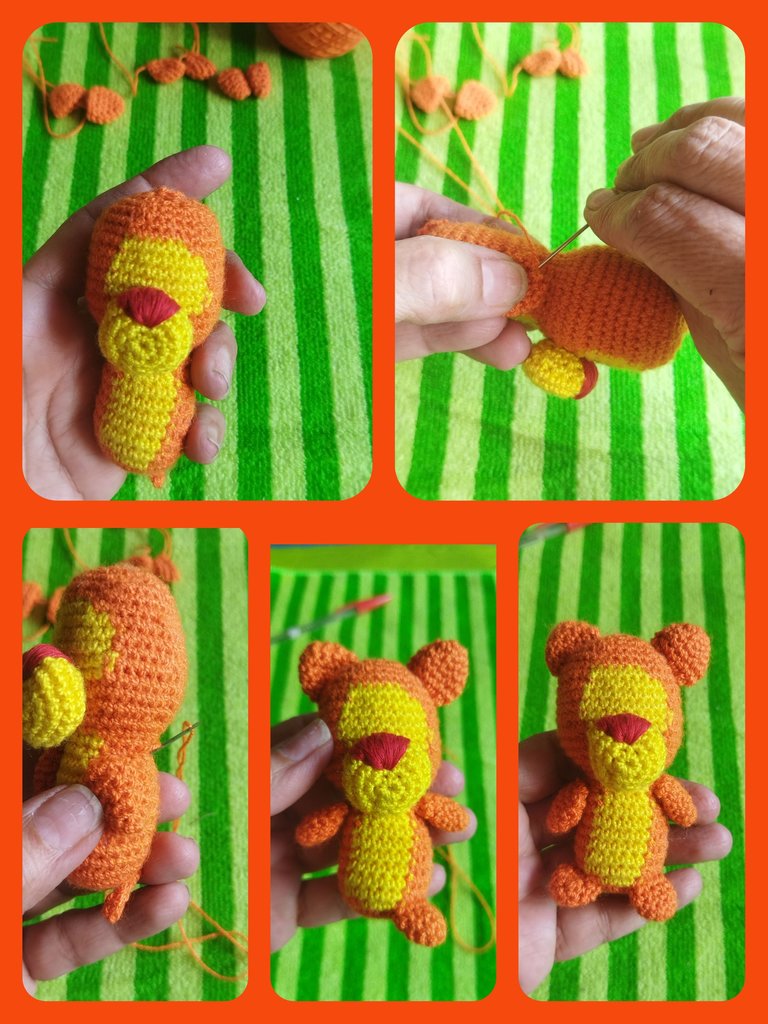
BODY
Following the instructions of the pattern provided by @creacioneslelys, we begin the fabric by making the body.
LAP 1
- We begin by making a magic ring and 6 single crochets with the orange thread.
- We close the ring.
CUERPO
Siguiendo las indicaciones del patrón suministrado por @creacioneslelys, comenzamos el tejido realizando el cuerpo.
VUELTA 1
- Comenzamos realizando un anillo mágico y 6 puntos bajos con el hilo naranja.
- Cerramos el anillo.
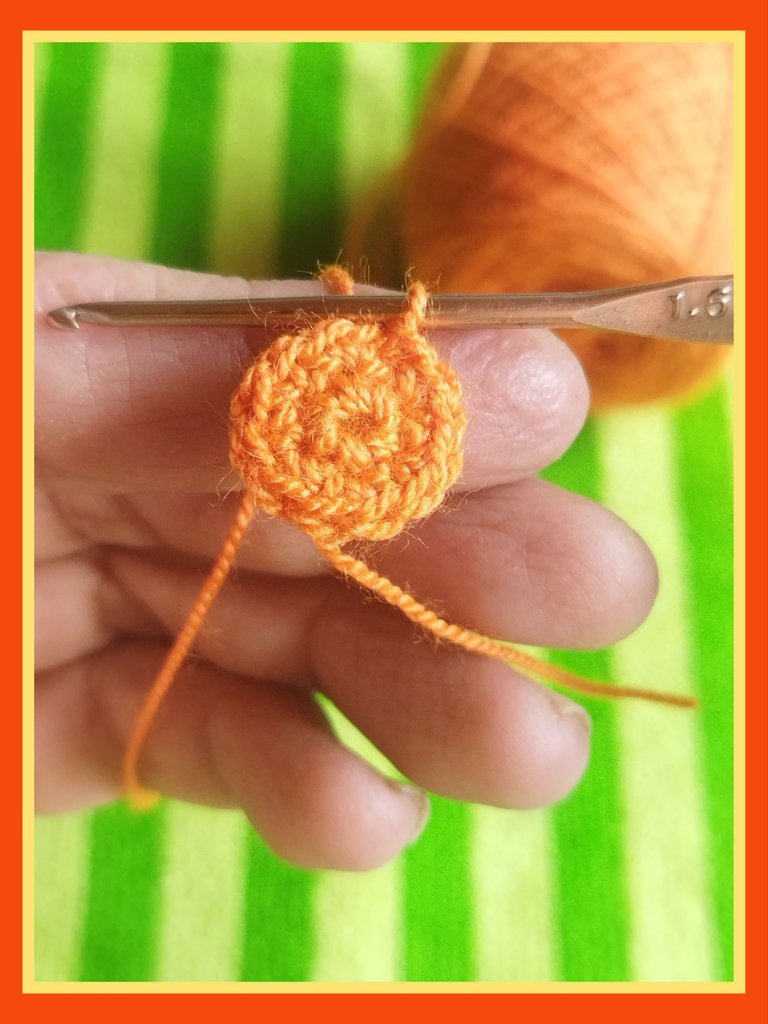
LAP 2
- We make an increase in each single crochet of the previous round for a total of 12 single crochets.
VUELTA 2
- Realizamos un aumento en cada punto bajo de la vuelta anterior para un total de 12 puntos bajos.
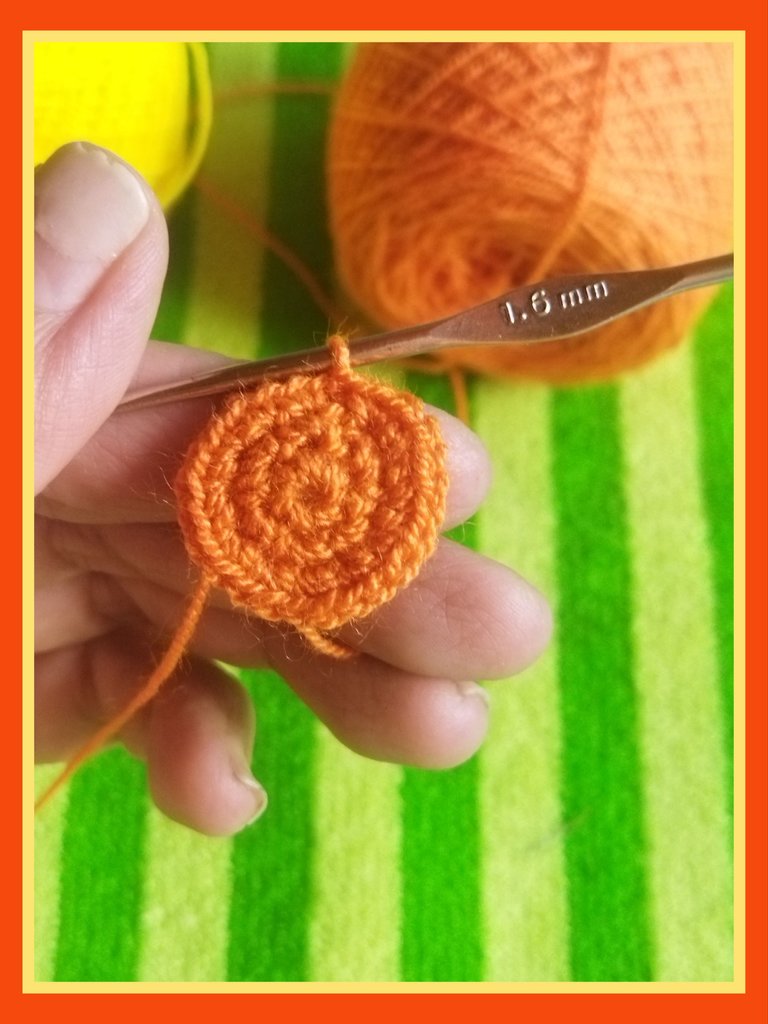
LAP 3
Again we make an increase in each stitch of the previous round for a total of 24 single crochets.
VUELTA 3
Nuevamente realizamos un aumento en cada punto de la vuelta anterior para un total de 24 puntos bajos.
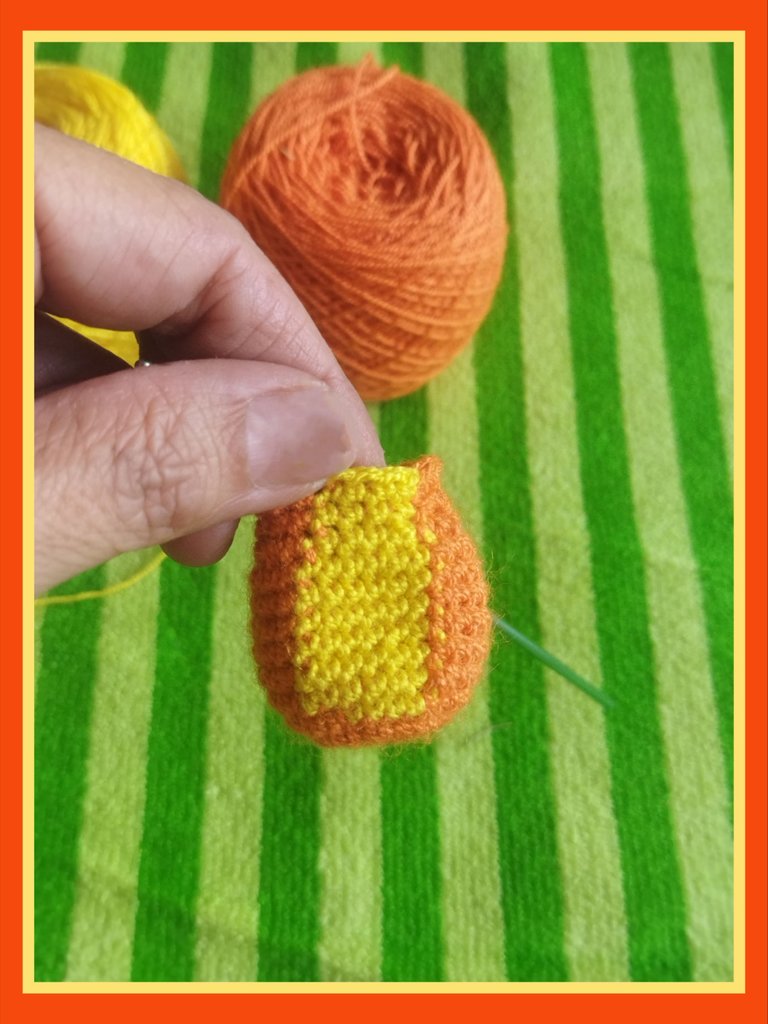
LAP 4
In this round we are going to knit by interspersing threads. A technique that I had never applied and that @creacioneslelys very patiently explained to us how to take the threads and change them as we knit.
We make 10 single crochets, and to close the last stitch we take the strand of yellow thread and make the closure and, in turn, change the thread.
Now with the yellow thread, we make 4 single crochets and when we reach point 4 we close with the orange thread, resuming the knitting again with this color.
We make 10 single crochets in orange, for a total of 24 single crochets throughout the round.
VUELTA 4
En esta vuelta vamos a tejer intercalando hilos. Una técnica que nunca había aplicado y que @creacioneslelys muy pacientemente nos explicó como tomar los hilos e ir cambiando a medida que vamos tejiendo.
Realizamos 10 puntos bajos, y para cerrar el último punto tomamos la hebra de hilo amarillo y realizamos el cierra y, a su vez, el cambio de hilo.
Ahora ya con el hilo amarillo, realizamos 4 puntos bajos y al llegar al punto 4 cerramos con el hilo naranja, retomando nuevamente el tejido con este color.
Realizamos 10 puntos bajos en naranja, para un total de 24 puntos bajos en toda la vuelta.

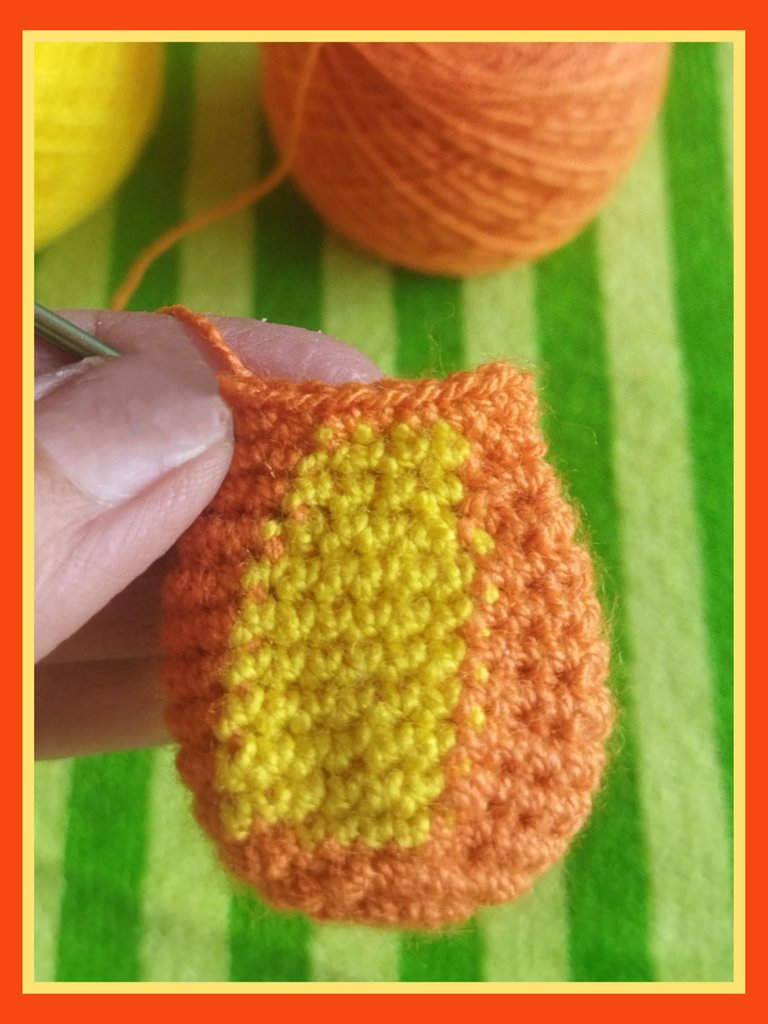
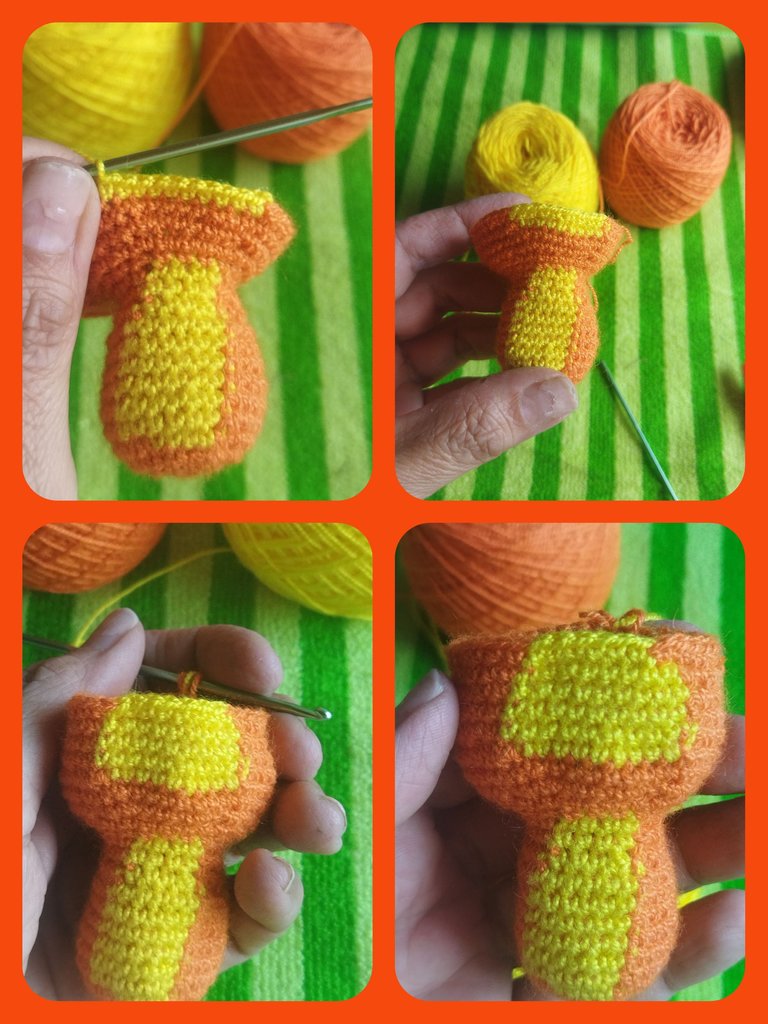
FROM ROUND 5 TO ROUND 10
We make 9 single crochets in orange, then we close the last stitch with yellow and make 6 single crochets in yellow. We close with the orange thread and knit 9 single crochets to finish the round with 24 single crochets.
We repeat until lap number 10.
DESDE LA VUELTA 5 A LA VUELTA 10
Realizamos 9 puntos bajos en naranja, luego cerramos el último punto con amarillo y realizamos 6 puntos bajos en amarillo. Cerramos con el hilo naranja y tejemos 9 puntos bajos para terminar la vuelta con 24 puntos bajos.
Repetimos hasta la vuelta número 10.
LAP 11
On this round we begin to make decreases. Another tip that I learned is that to make the decreases, we take only one of the strands from the point where we made the decrease, this way the fabric is less pressed.
- We make a single crochet and a decrease and repeat it twice, we change to the yellow thread and make a decrease, two single crochets and another decrease. We change the thread and close the round with two single crochets and a decrease that we are going to repeat two more times. At the end we will have a total of 18 single crochets.
LAP 12
In this round we will make 7 single crochets, we change to the yellow thread and make 4 single crochets, we close with the orange thread and make 7 more single crochets, for a total of 18 stitches.
En esta vuelta podemos cortar el hilo amarillo y continuar solo con el naranja.
VUELTA 11
En esta vuelta comenzamos a realizar disminuciones. Otro tip más que aprendí es que para hacer las disminuciones, tomamos sólo una de las hebras del punto donde realizamos la disminución, de esta forma el tejido queda menos prensado.
- Realizamos un punto bajo y una disminución y repetimos dos veces, cambiamos al hilo amarillo y realizamos una disminución,dos puntos bajos y otra disminución. Hacemos cambio de hilo y cerramos la vuelta con dos puntos bajos y una disminución que vamos a repetir dos veces más. Al finalizar tendremos un total de 18 puntos bajos.
VUELTA 12
En esta vuelta realizaremos 7 puntos bajos, cambiamos al hilo amarillo y realizamos 4 puntos bajos, cerramos con el hilo naranja y realizamos 7 puntos bajos más, para un total de 18 puntos.
En esta vuelta podemos cortar el hilo amarillo y continuar solo con el naranja.
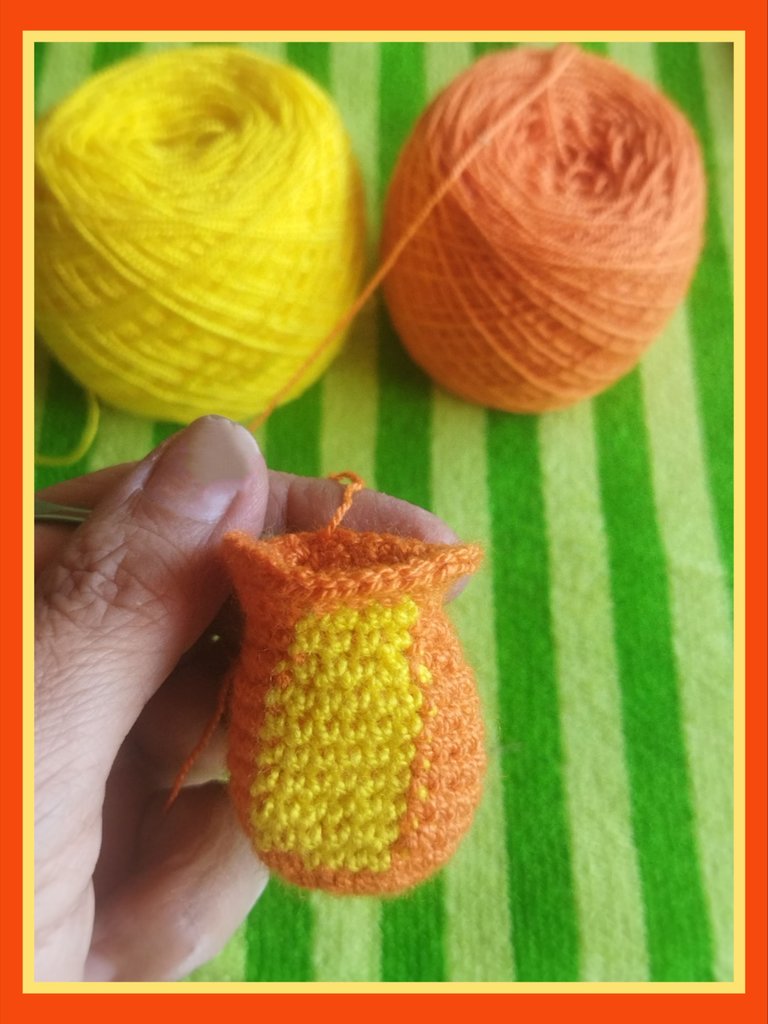
LAP 13
And we finish the body by making a single crochet in each stitch of the previous round for a total of 18 stitches.
VUELTA 13
Y finalizamos el cuerpo realizando un punto bajo en cada punto de la vuelta anterior para un total de 18 puntos.
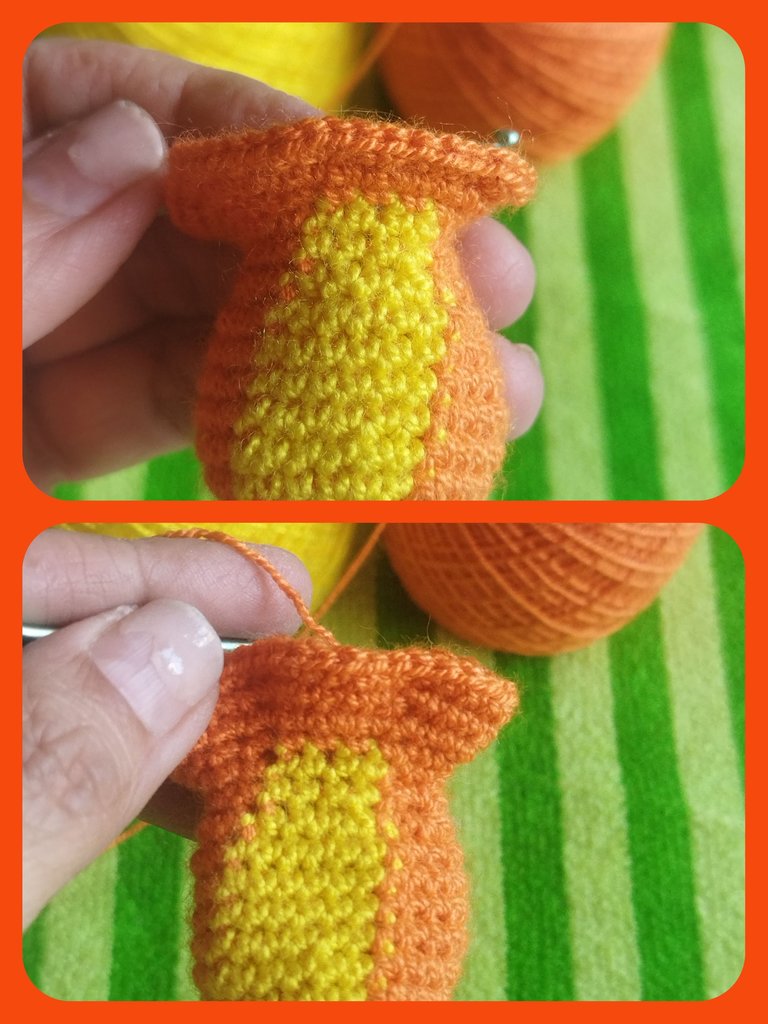
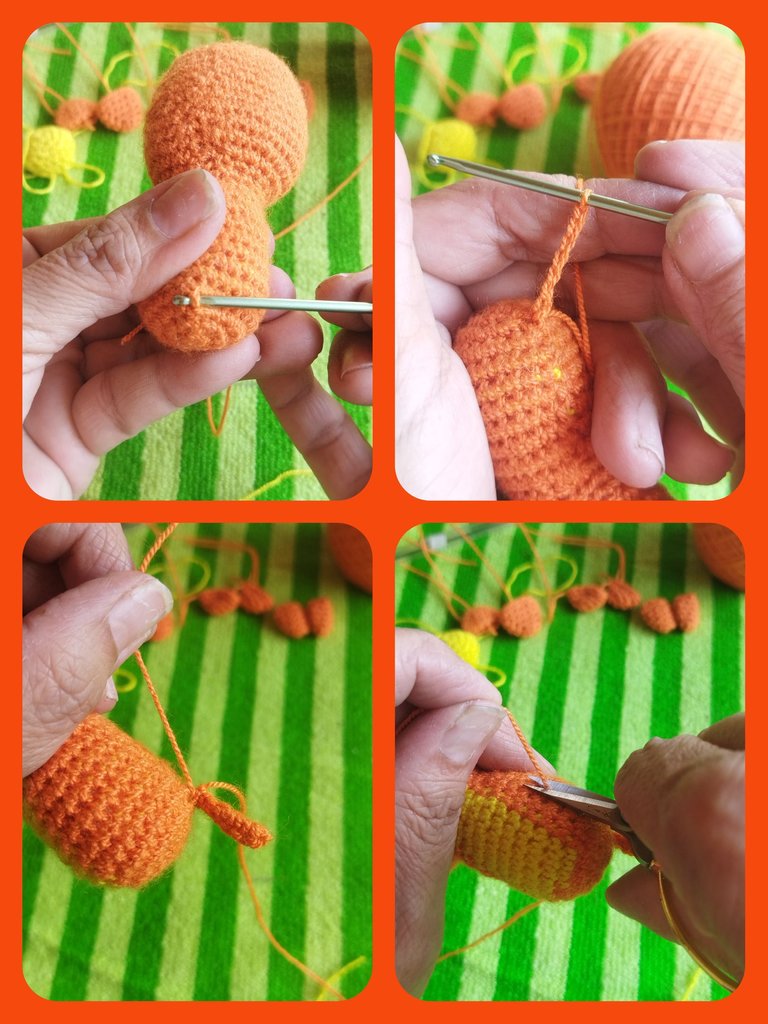
HEAD
LAP 14
We continue with the head but we are going to do it continuously, that is, we knit without cutting the thread, close to the body.
- We are going to make an increase in each stitch of the previous round for a total of 36 single crochets.
CABEZA
VUELTA 14
Continuamos con la cabeza pero vamos a hacerlo de forma continua, es decir, tejemos sin hacer corte de hilo, pegado al cuerpo.
- Vamos a realizar un aumento en cada punto de la vuelta anterior para un total de 36 puntos bajos.
LAP 15
- We make 5 single crochets and one increase. We repeat 5 times for a total of 42 points.
VUELTA 15
- Realizamos 5 puntos bajos y un aumento. Repetimos 5 veces para un total de 42 puntos.
LAP 16 AND 17
We make 17 single crochets, we take the strand of yellow thread again and make 11 single crochets, changes the thread and we knit 14 single crochets for a total of 42 stitches.
We repeat on lap 17.
VUELTA 16 Y VUELTA 17
Realizamos 17 puntos bajos, tomamos nuevamente la hebra de hilo amarillo y realizamos 11 puntos bajos, cambios de hilo y tejemos 14 puntos bajos para un total de 42 puntos.
Repetimos en la vuelta 17.
LAP 18
- We will make 5 single crochets and a decrease. We repeat twice. We make two single crochets and change the thread, we make three single crochets and a decrease, five single crochets and a decrease and we change the thread again. We make 5 single crochets and a decrease and repeat twice for a total of 36 stitches.
LAP 19
- We make 14 single crochets, change the thread and knit 10 single crochets, again we change the thread and finish with 12 single crochets for a total of 36 stitches.
LAP 20 and 21
- We make fifteen single crochets, change the thread and knit 8 single crochets, change the threads and close with 13 single crochets for a total of 36 stitches. We repeat on lap 21.
LAP 22
With this round we finish forming the tiger's face and continue knitting only with the orange thread.
- We make 15 single crochets, change color and knit 6 single crochets, change color and close with 12 single crochets.
VUELTA 18
- Realizaremos 5 puntos bajos y una disminución. Repetimos dos veces. Realizamos dos puntos bajos y hacemos cambio de hilo, realizamos tres puntos bajos y una disminución, cinco puntos bajos y una disminución y nuevamente cambiamos de hilo. Hacemos 5 puntos bajos y una disminución y repetimos dos veces para un total de 36 puntos.
VUELTA 19
- Realizamos 14 puntos bajos, cambiamos de hilo y tejemos 10 puntos bajos, nuevamente hacemos cambio de hilo y finalizamos con 12 puntos bajos para un total de 36 puntos.
VUELTA 20 y 21
- Realizamos 15 puntos bajos, cambiamos de hilo y tejemos 8 puntos bajos, cambiamos de hilos y cerramos con 13 puntos bajos para un total de 36 puntos. Repetimos en la vuelta 21.
VUELTA 22
Con esta vuelta terminamos de formar la cara del tiger y continuamos el tejido sólo con el hilo naranja.
- Realizamos 15 puntos bajos, cambiamos de color y tejemos 6 puntos bajos, cambio de color y cerramos con 12 puntos bajos.
LAP 23
- We make 36 single crochets.
VUELTA 23
- Realizamos 36 puntos bajos.
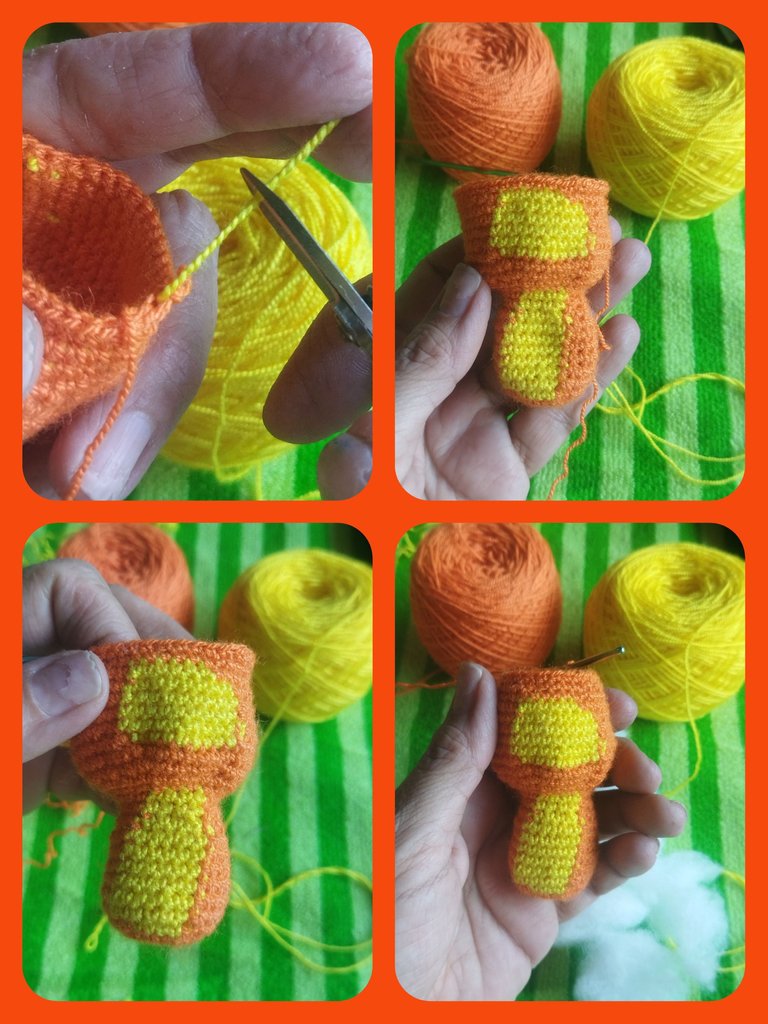
LAP 24
We make 4 single crochets and a decrease and repeat 6 times for a total of 30 stitches at the end of the round.
At this point of the knitting we take the opportunity to fill our amigurumis so that the work does not become difficult as we close the head.
VUELTA 24
Realizamos 4 puntos bajos y una disminución y repetimos 6 veces para un total de 30 puntos al final de la vuelta.
En este punto del tejido aprovechamos para rellenar nuestro amigurumis para que no se nos dificulte la labor a medida que vayamos cerrando la cabeza.
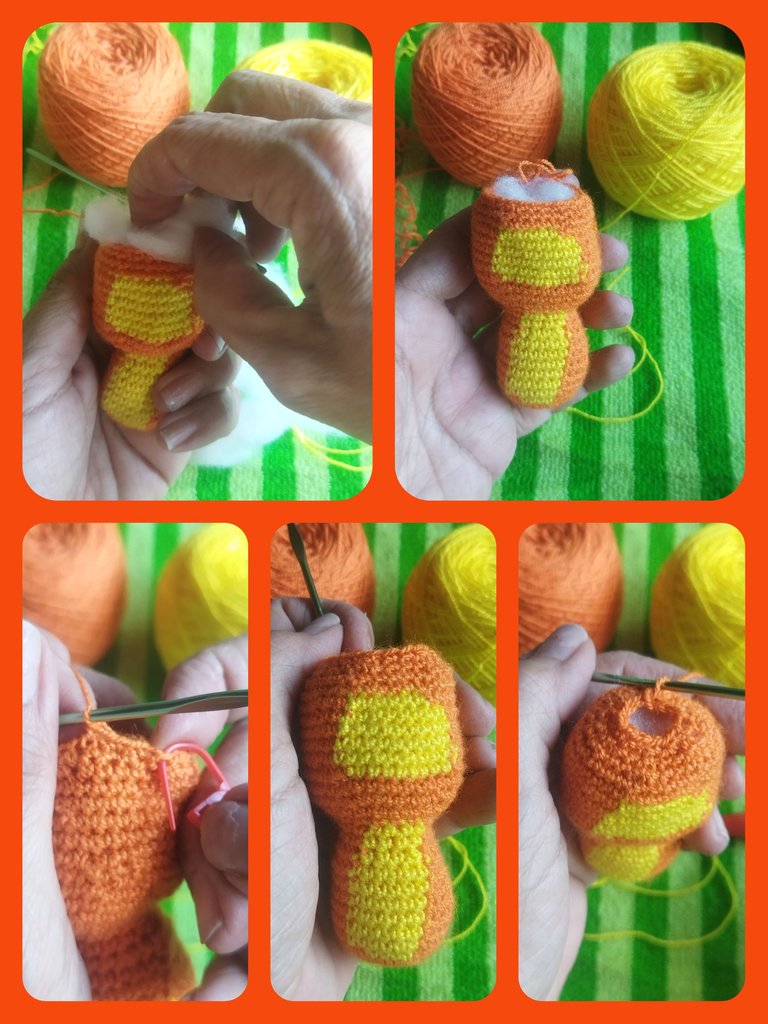
We fill it so that there is no bulge and it is tight. We continue weaving.
LAP 25
- We make 3 single crochets and a decrease and repeat 6 times for a total of 24 stitches at the end of the round.
LAP 26
- We make 2 single crochets and a decrease and repeat 6 times for a total of 18 stitches at the end of the round.
LAP 27
- We finish filling and proceed to close the head by making 6 decreases.
Rellenamos de manera que no quede abultamiento y quede bien apretado. Continuamos tejiendo.
VUELTA 25
- Realizamos 3 puntos bajos y una disminución y repetimos 6 veces para un total de 24 puntos al final de la vuelta.
VUELTA 26
- Realizamos 2 puntos bajos y una disminución y repetimos 6 veces para un total de 18 puntos al final de la vuelta.
VUELTA 27
- Terminamos de rellenar y procedemos a realizar el cierre de la cabeza realizando 6 disminuciones.
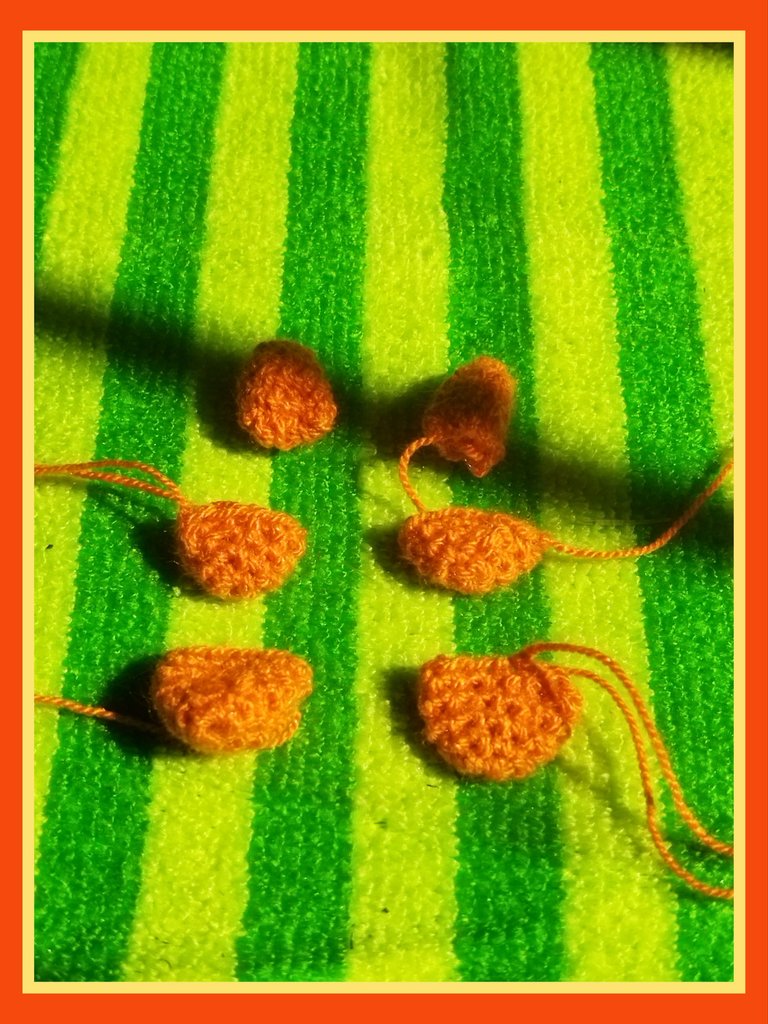
TAIL, ARMS, LEGS, EARS AND MUZZLE
TAIL
To make the tail we are going to count 4 turns from the beginning of the body at the back. We introduce the orange thread between the stitch and weave a chain of 7 stitches. Then we knit single crochets from the second stitch of the chain and close with a slipped stitch. We cut the thread or hide it with the wool needle.
COLA, BRAZOS, PIERNAS, OREJAS Y HOCICO
COLA
Para realizar la cola vamos a contar 4 vueltas desde el inicio del cuerpo por la parte trasera. Introducimos el hilo naranja entre el punto y tejemos una cadena de 7 puntos. Luego tejemos puntos bajos a partir del segundo punto de la cadena y cerramos con un punto deslizado. Cortamos el hilo u escondemos con la aguja lanera.
ARMS
For the arms we start with a magic ring and 6 single crochets. We close the ring.
We make 6 single crochets in each point of the previous round.
Then we fold and close both sides with the wool needle.
We make the pair and leave a long thread to then sew to the body.
BRAZOS
Para los brazos iniciamos con un anillo mágico y 6 puntos bajos. Cerramos el anillo.
Realizamos 6 puntos bajos en cada punto de la vuelta anterior.
Luego doblamos y cerramos ambos lados con la aguja lanera.
Realizamos el par y dejamos una hebra larga para luego coser al cuerpo.
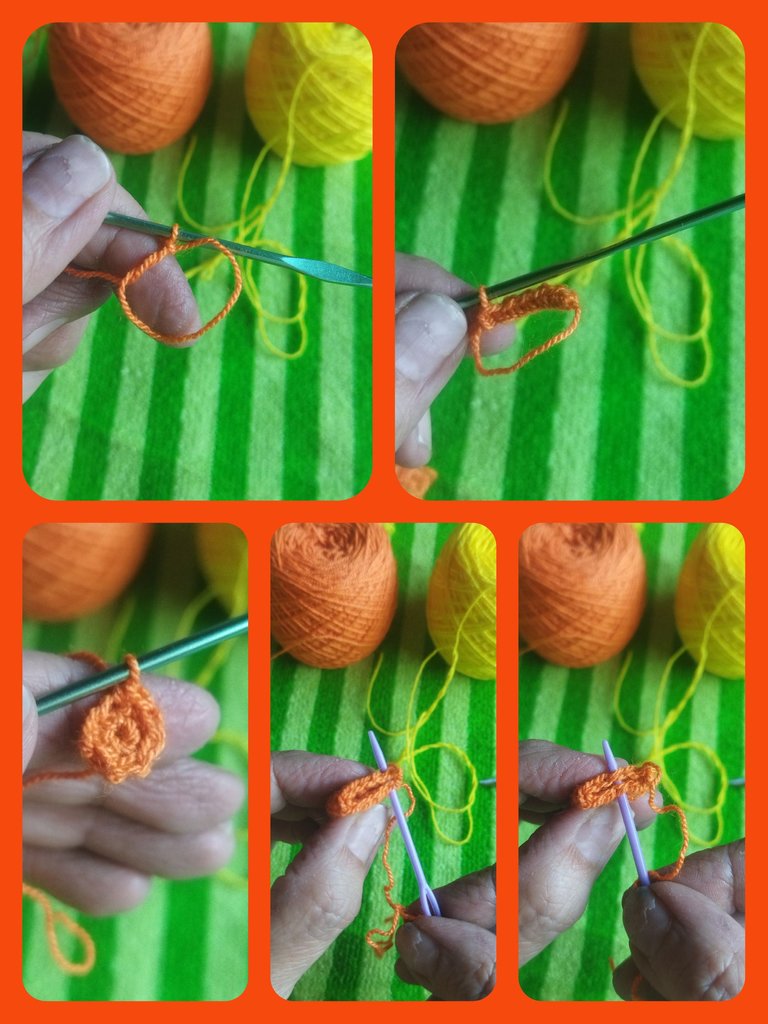
LEGS
We start with a magic ring and 6 single crochets. We close the ring.
We make 1 single crochet and 1 increase and repeat 3 times for a total of 9 stitches.
Then we make two rounds of 9 points each. We close with a slipped stitch and leave a thread.
We make the pair.
PIERNAS
Iniciamos con un anillo mágico y 6 puntos bajos. Cerramos el anillo.
Realizamos 1 punto bajo y 1 aumento y repetimos 3 veces para un total de 9 puntos.
Luego realizamos dos vueltas de 9 puntos cada una. Cerramos con un punto deslizado y dejamos una hebra.
Realizamos el par.
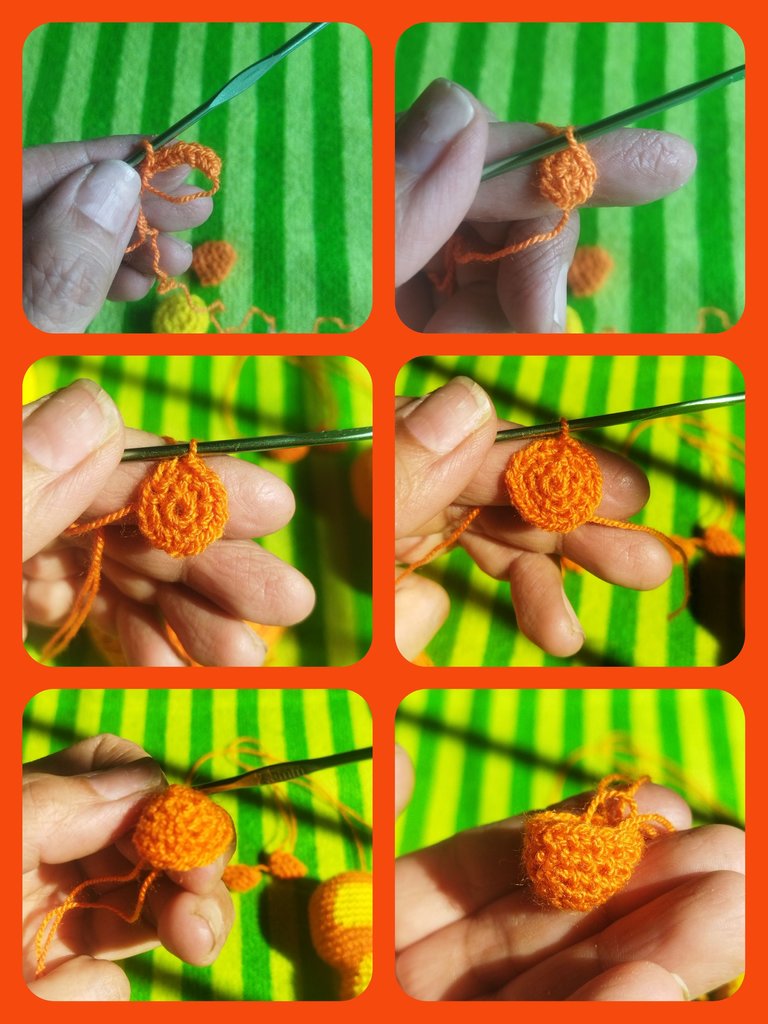
EARS
We start with a magic ring and 6 single crochets. We close the ring.
We make 1 single crochet and 1 increase and repeat 3 times for a total of 9 stitches.
Then we make two single crochets and 1 increase. We repeat 3 times for a total of 12 points.
We make 2 more rounds of 12 single crochets each. We close with a slipped stitch and leave a thread.
We make the pair.
OREJAS
Iniciamos con un anillo mágico y 6 puntos bajos. Cerramos el anillo.
Realizamos 1 punto bajo y 1 aumento y repetimos 3 veces para un total de 9 puntos.
Luego realizamos dos puntos bajos y 1 aumento. Repetimos 3 veces para un total de 12 puntos.
Realizamos 2 vueltas más de 12 puntos bajos cada una. Cerramos con un punto deslizado y dejamos una hebra.
Realizamos el par.
SNOUT
We start with a magic ring and 6 single crochets. We close the ring.
We make 6 increases for a total of 12 stitches.
Then we make 1 single crochet and 1 increase. We repeat 3 times for a total of 15 points.
We make 1 round of 15 single crochets.
On the next round we will make 1 single crochet and 1 decrease and we repeat 3 times for a total of 12 stitches.
We close with a slipped stitch and leave a thread.
HOCICO
Iniciamos con un anillo mágico y 6 puntos bajos. Cerramos el anillo.
Realizamos 6 aumentos para un total de 12 puntos.
Luego realizamos 1 punto bajo y 1 aumento. Repetimos 3 veces para un total de 15 puntos.
Realizamos 1 vueltas de 15 puntos bajos.
En la siguiente vuelta realizaremos 1 punto bajo y 1 disminución y repetimos 3 veces para un total de 12 puntos.
Cerramos con un punto deslizado y dejamos una hebra.
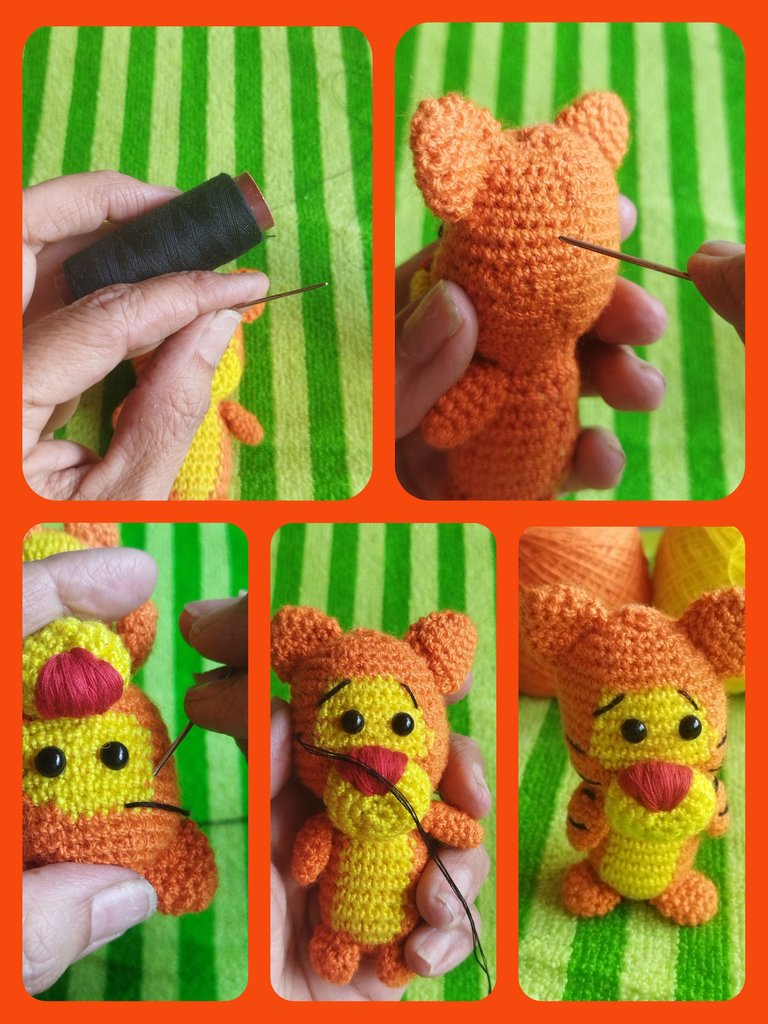
With red sewing thread we are going to make the nose. We take several strands of red thread and with the wool needle we form a kind of "V".
Con hilo de coser rojo vamos a realizar la naríz. Tomamos varias hebras de hilo rojo y con la aguja lanera formamos una especie de "V".
JOIN THE PIECES
Once the pieces are finished, we proceed to sew them to the body with the threads that we left in each one and the wool needle.
We start with the snout. With a sewing pin we fix it to the head and sew.
UNIR LAS PIEZAS
Una vez terminadas las piezas, procedemos a coser al cuerpo con las hebras que dejamos en cada una y la aguja lanera.
Comenzamos con el hocico. Con un alfiler de costura lo fijamos a la cabeza y cosemos.
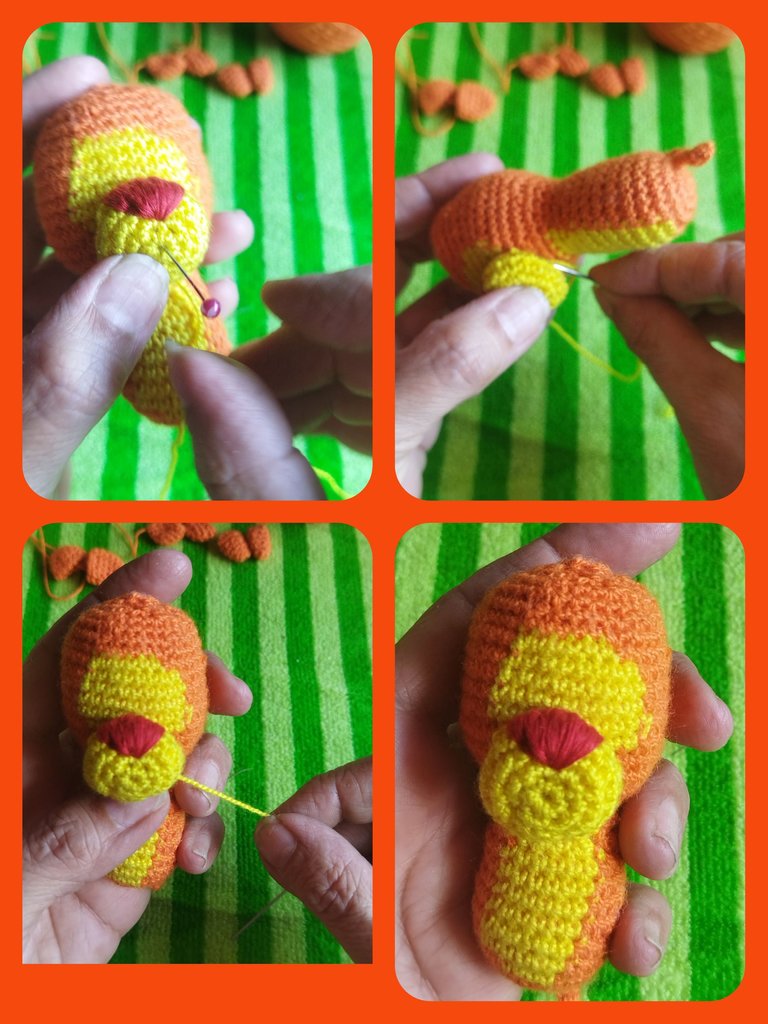
We continue with the arms, legs and ears.
Seguimos con los brazos, las piernas y las orejas.
TIGER STRIPES
To finish and give the tiger tiger to our amigurumis, with black sewing thread we will make the stripes forming 3 strands of thread and with the wool needle we will make the stripes and stripes around the body.
RAYAS DE TIGER
Para finalizar y darle el tigre de tigre a nuestro amigurumis, con hilo de coser negro realizaremos las rayas formando 3 hebras de hilo y con la aguja lanera realizamos las celas y las rayas alrededor de cuerpo.
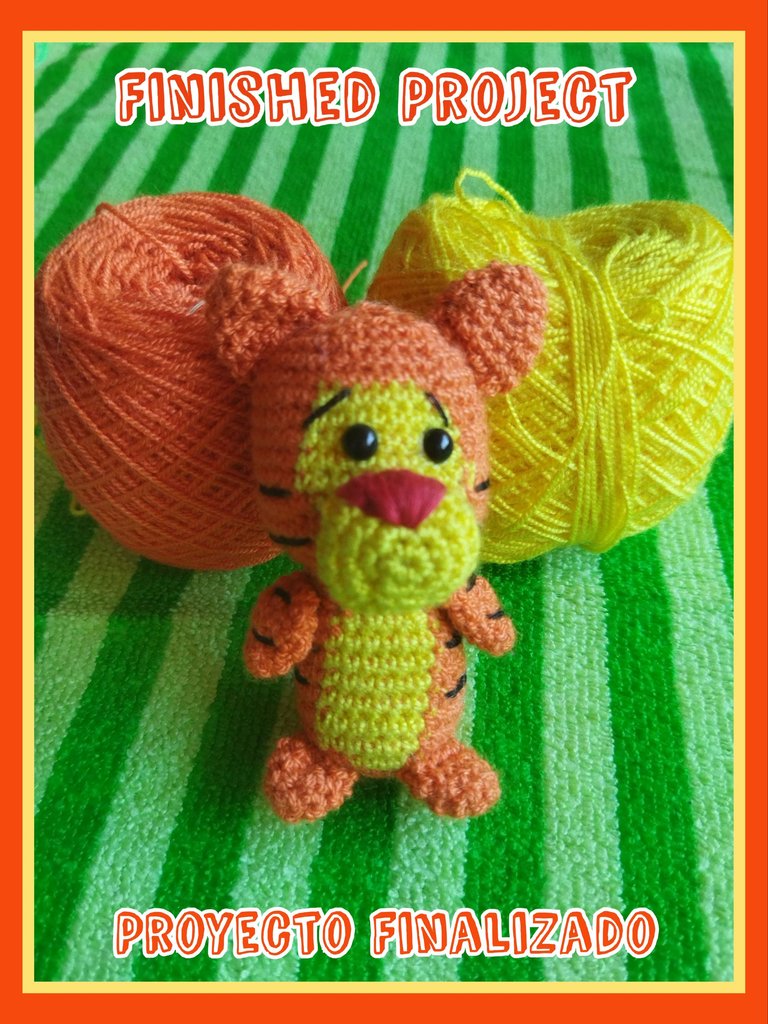
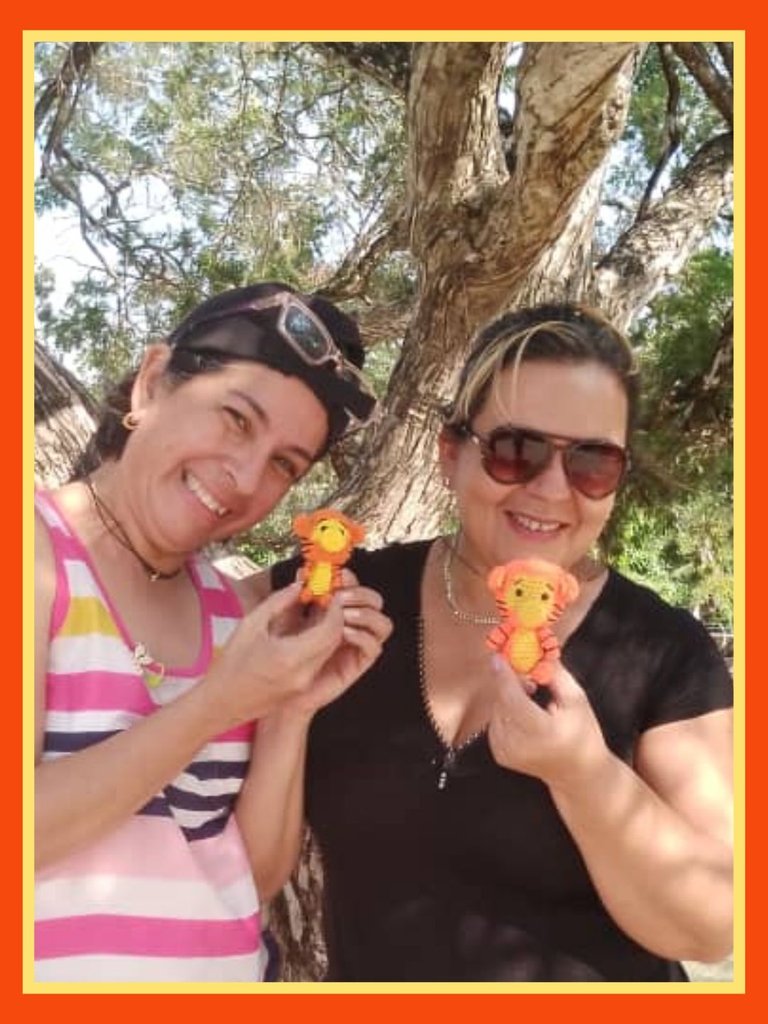
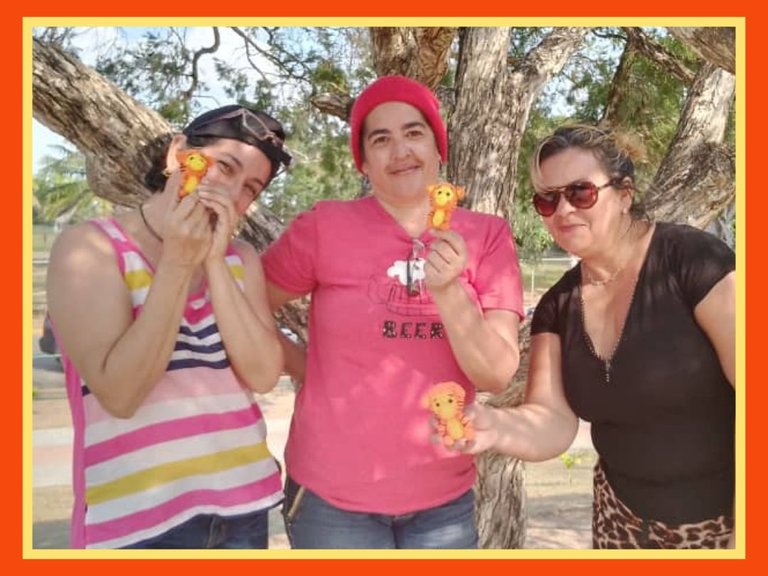
PROJECT COMPLETED
And here is my finished amigurumis. After a few undone and redone laps and with the very good tutoring of @creacioneslelys.
PROYECTO FINALIZADO
Y aquí está mi amigurumis finalizado. Después de unas cuantas vueltas desechas y vueltas a hacer y con la muy buena tutoría de @creacioneslelys.
A few hours dedicated to this activity, where we not only share knowledge, but we enjoy laughter, anecdotes and also continuous position changes due to the discomfort of the place but which we undoubtedly enjoyed a lot.
I take this opportunity to thank @creacioneslelys for her teaching and help and @katiuskamata for her pleasant company.
Unas cuantas horas dedicadas a esta actividad, en donde no sólo compartimos conocimientos, sino que disfrutamos entre risas, anécdotas y además de cambios de posición continuos debido a la incomodidad del sitio pero que sin duda disfrutamos mucho.
Aprovecho la ocasión para agradecer a @creacioneslelys por su enseñanza y ayuda y a @katiuskamata por su agradable compañía.
This meet up looks fun for sure
And I love your works
Those are really cute tigers and I like them
Este taller me inspiró para empezar a tejer de nuevo, quedó muy hermoso tu tiggers, espero que sigan tejiendo juntas por mucho más tiempo, no solo hilos sino su amistad.
En compañía es muy divertido, el tiempo se pasa volando aunque también nos saltamos los puntos 🤣🤣🤣, pero ha sido una muy buena experiencia.
Bueno que te puedo decir si sola nos saltamos los puntos en compañía es más divertido, jeje lo bueno es la conexión de hermandad que se nutre.
Que hermosos sus amigurumis de Tigger 😍 me encanta su reunión! Y están en mi lugar favorito de la ciudad! 😊
Sería lindo tejer con ustedes en el parque y compartir truquitos de como hacemos nuestros amigurumis 😁🤗
Es una idea genial, pero te cuento que aunque tejer respirando aire fresco y en un ambiente diferente al acostumbrado es reconfortante, es un poco incómodo tiradas en el cemento 🤭🤭 sería cuestión de organizarlo en un sitio más cómodo. Mis glúteos lo agradecerían 🤣🤣🤣. Aún estoy magullada 🤣🤣🤣
jajaja... eso lo puedo imaginar, ya que siempre hay que estar correctamente sentado para tejer y no quedar magulladas jajaja....
Hola hermana 🙋🏾♀️ te repito una vez más el Tiger te quedó hermoso. Muy a pesar de estar trabajando al aire libre sin muchas comodidades los Amigurumi quedaron preciosos. Ambas, @katiuskamata y tú son muy buenas participantes. Me quedaron las ganas de planificar un nuevo encuentro ☺️ muchas gracias por siempre colaborar con estas iniciativas 💗🤗💗
Fue un gusto y si planifican algún otro encuentro, les digo, aún me queda una semana por acá...saludos se les quiere, @criacioneslelys y @linita
Gracias a ti 😁😁, muy buena actividad aunque yo quedé como si en vez del parque hubiéramos estado en la playa 🤭🤭
Jajajaja. Bueno, a ver qué Amigurumi podemos tejer mientras nos damos un chapuzón y nos inventamos una viaje a la 🏖️ playa. Al menos para yo también venir bronceada 😃
Ese tiger ha quedado muy bonito, esa es la ventaja de conocer a otros hivers y que ademas compartan nuestros gustos podemos aprender mas entre todos
Me parece un bonito trabajo, quedó lindo el diseño.
This is beautiful ❤️
Wonderful meetup amongst hive folks
The meeting was very enjoyable and productive too 😁. Greetings.
Well-done linita and friends
Thank you ☺️
That is a fruitful meet up. Bravo
Yes, we are very happy with the planning of the workshops. Hoping to plan these activities more often. Greetings.
!discovery 50
This post was shared and voted inside the discord by the curators team of discovery-it
Join our Community and follow our Curation Trail
Discovery-it is also a Witness, vote for us here
Delegate to us for passive income. Check our 80% fee-back Program