WELCOME TO MY BLOG
Hellooooo, hellooooooo! Greetings my dear DiyHub creatives. Transforming elements that we consider disposable is one of the activities that I enjoy most in the recycling process. Many times we throw away objects that we can give a second chance. Cardboard is one of them. We have all had boxes at home that we carried with some artifact and then we threw them away without taking into account that with them we can make many decorations to decorate our house.
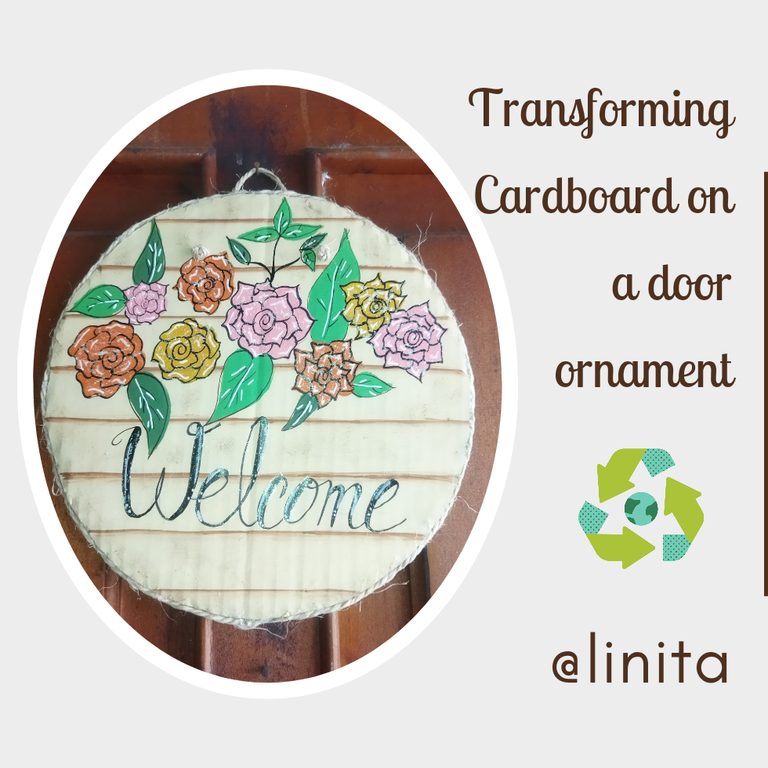
Today I want to show you a very easy and quick idea to do. We are going to transform a section of a cardboard box into a nice decoration to welcome all the people who visit my home. So without further ado, let's get started.
Note: The boxes I will be using in the upcoming projects are courtesy of @katisukamata who very generously shared her recycling materials.
BIENVENIDOS A MI BLOG
¡Holaaaa, holaaaaa! Saludos mis estimados creativos de DiyHub. Transformar elementos que consideramos desechables es una de las actividades que m{as disfruto en el proceso de reciclaje. Muchas veces desechamos objetos que podemos darle una segunda oportunidad. El cartón es uno de ellos. Todos hemos tenido en casa cajas que llevamos con algún artefacto y luego las botamos sin tomar en cuenta que con ella podemos realizar muchos adornos para decorar nuestra casa.
Hoy les quiero mostrar una idea muy fácil y rápida de hacer. Vamos a transformar un tramo de una caja de cartón en un lindo adorno para recibir a todas las personas que visitan mi hogar. Así que sin más que decir, comencemos.
Nota: Las cajas que estaré utilizando en los próximos proyectos son cortesía de @katisukamata que muy generosamente compartió sus materiales de reciclaje.
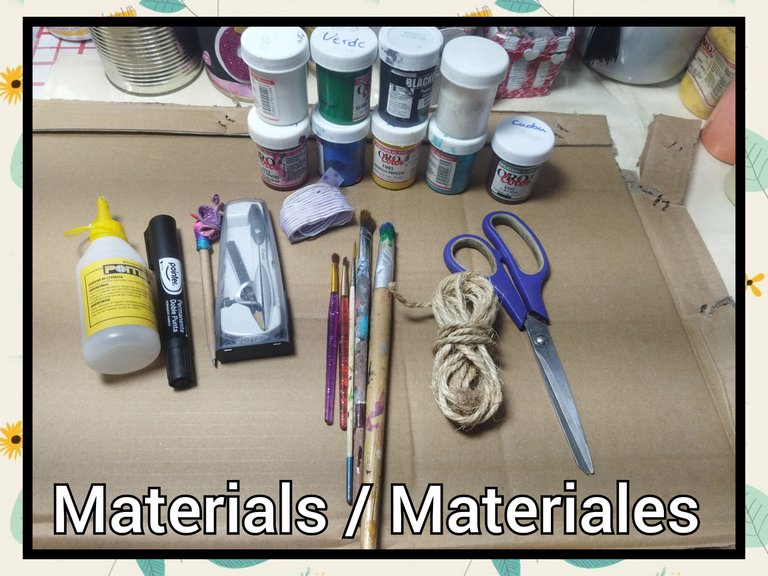
MATERIALS
- Carton box
- Cold paints in various colors
- Black acrylic marker
- Silicone
- Brushes (flat, angular, round, liner)
- Graphite pencil
- Compass
- Scissors
- Mecatillo or cabulla
- Frosted gel
MATERIALES
- Caja de cartón
- Pinturas al frío colores variados
- Marcador acrílico negro
- Silicón
- Pinceles (plano, angular, redondo, liner)
- Lápiz de grafito
- Compás
- Tijera
- Mecatillo o cabulla
- Gel escarchado
STEP BY STEP // PASO A PASO
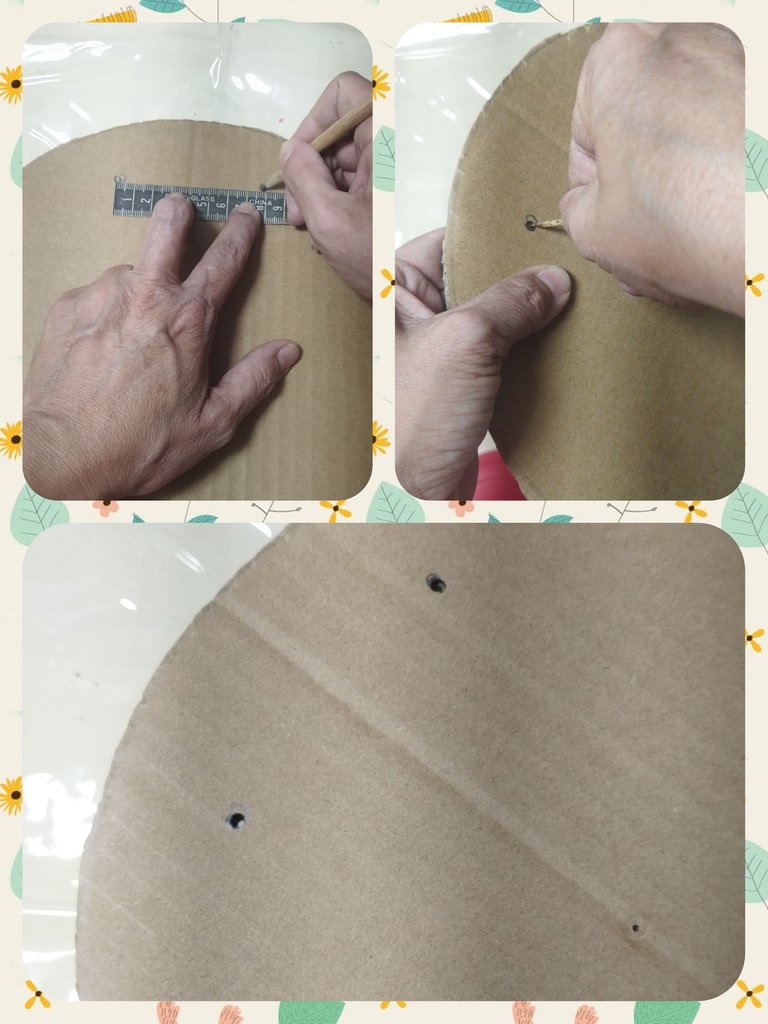
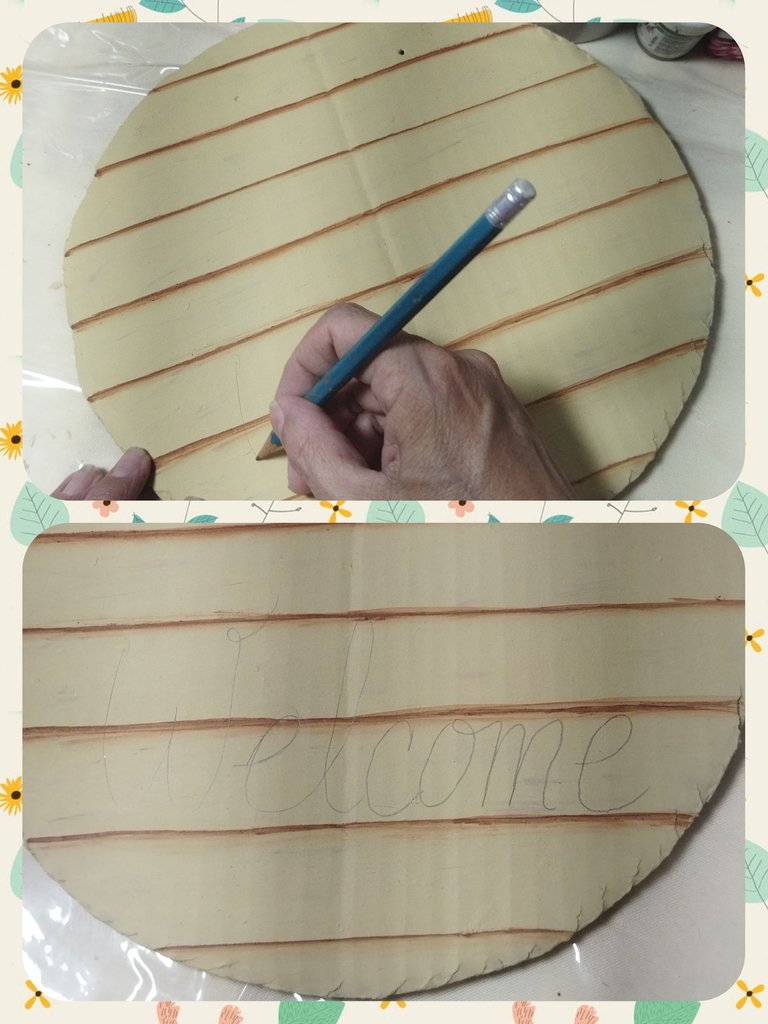
We are going to draw a circle with the compass or any circular object, on the largest part of the cardboard, that covers the entire smooth area.
Vamos a trazar con el compás o con cualquier objeto circular, en la parte más grande del cartón, un círculo que abarque toda la zona lisa.
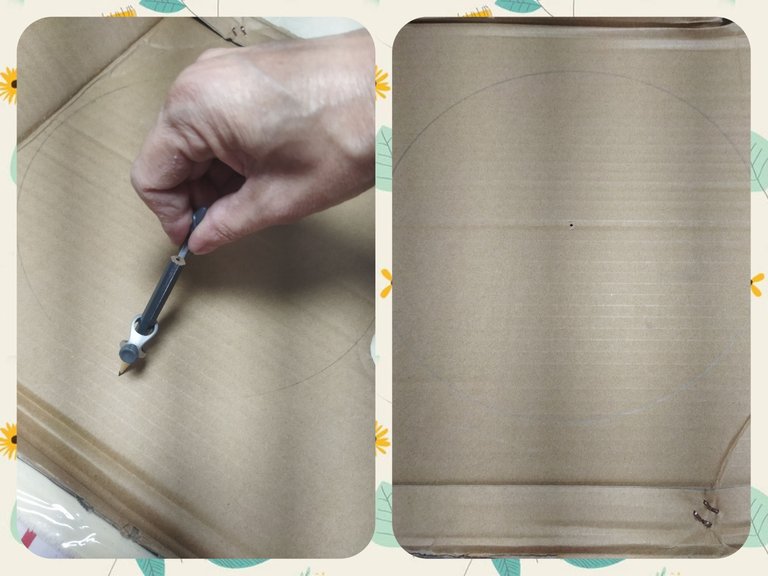
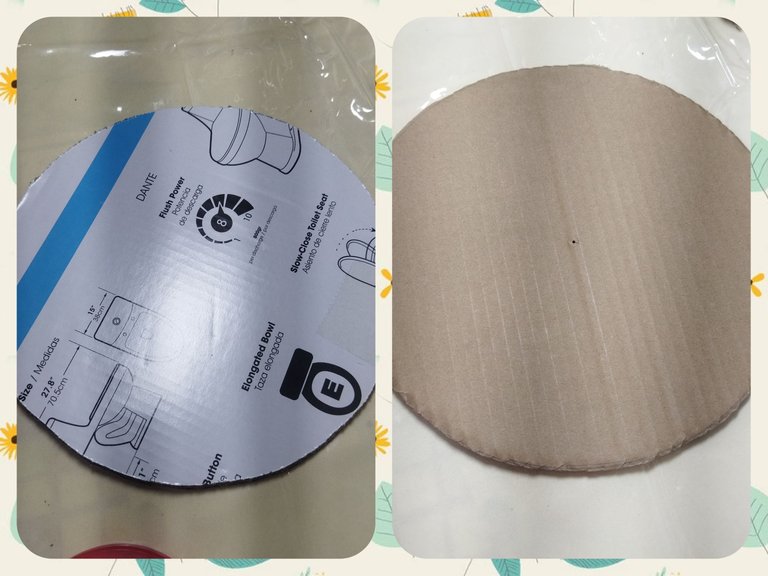
Then with scissors or a cutter, we cut out the circular shape.
Luego con la tijera o con un cortador, recortamos la forma circular.
With a sharp object we will make two holes in one of the sides to place the pendant. These should be approximately 8 cm apart.
Con un objeto punzante haremos dos hoyos en uno de los costados para colocar el colgante. Éstos deben tener 8 cm aproximadamente de separación.
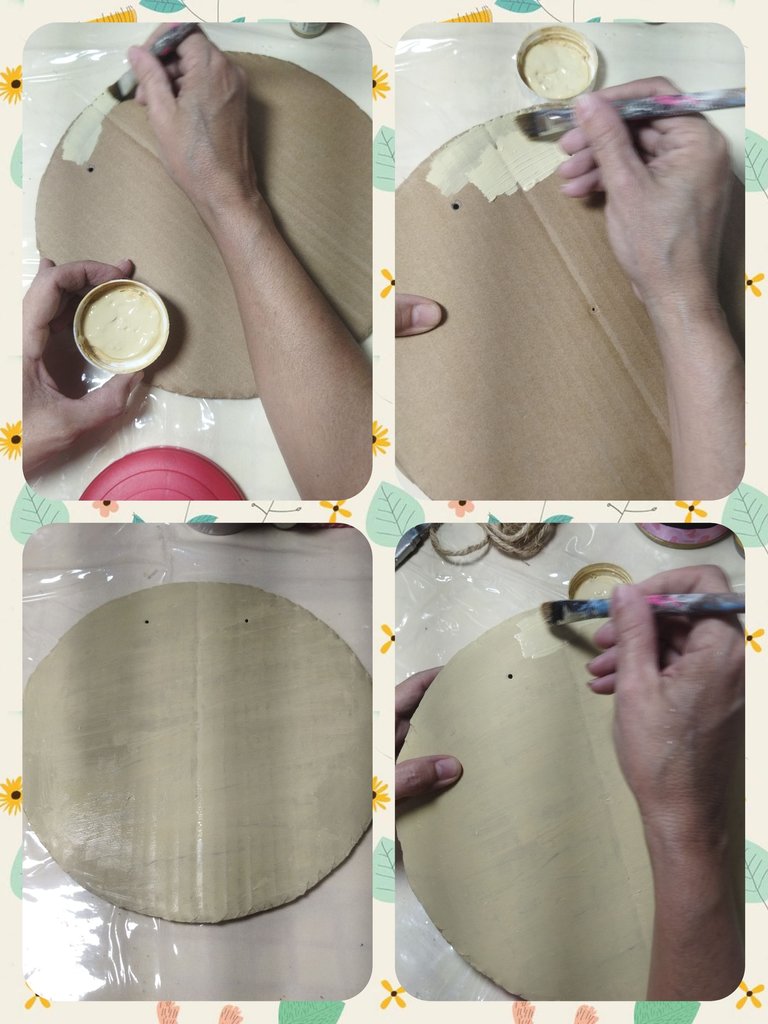
With the flat brush and cold vanilla paint we apply a layer of paint for the base of the drawing. We let it dry very well. Then we apply another coat of paint.
Con el pincel plano y pintura al frío color vainilla aplicamos una capa de pintura para la base del dibujo. Dejamos secar muy bien. Luego aplicamos otra capa de pintura.
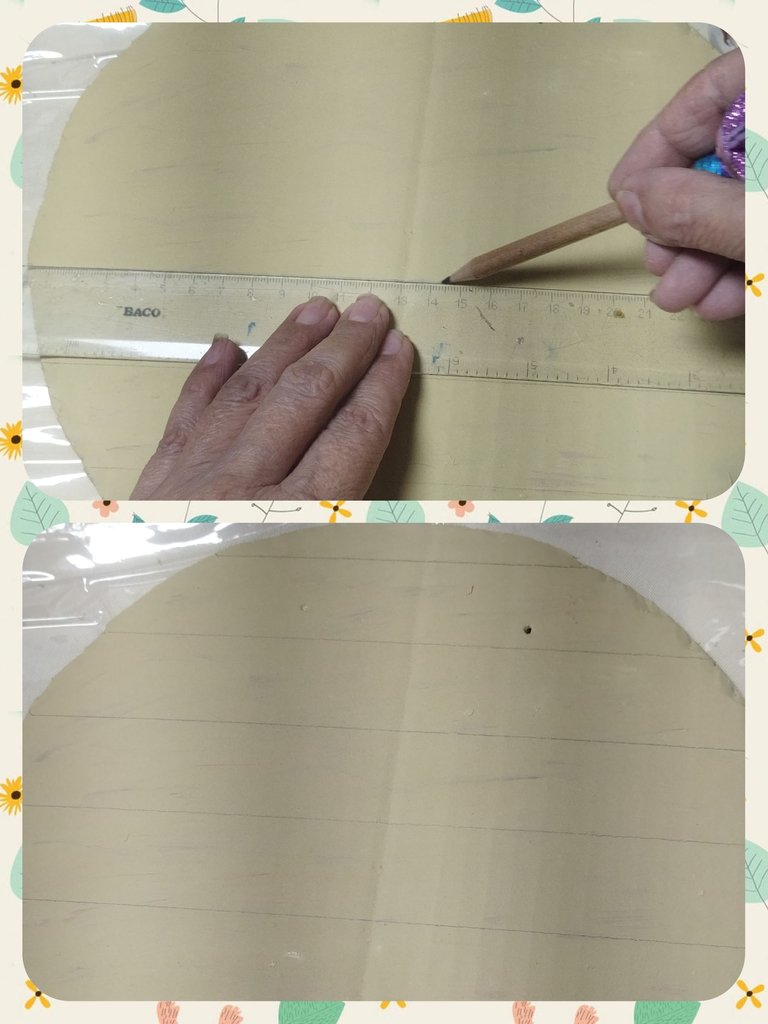
With a ruler we draw horizontal lines with cm separation between the lines.
Con una regla trazamos líneas horizontales con cm de separación entre líneas.
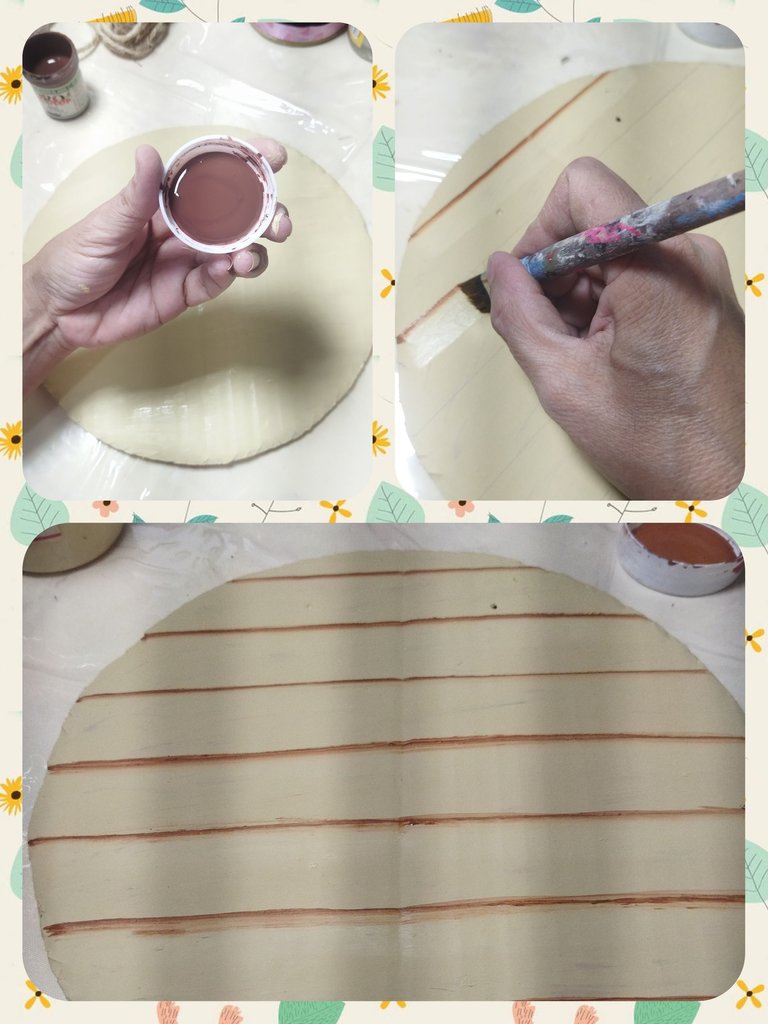
With the angular brush and cold brown paint, we will carry out the shading technique that consists of refilling the brush with water, removing the excess on a cloth and then reloading the brush in point, only at the point and depending on the size of the outline we want, We eliminate the excess and trace on the drawing.
We will carry out this process on all lines.
Con el pincel angular y pintura al frío marrón, realizaremos la técnica de sombreado que consiste en recargar el pincel en agua, eliminar el exceso en un paño y luego recargar el pincel en puntura, sólo en punta y dependiendo el tamaño del trazado que queremos, eliminamos el exceso y trazamos en el dibujo.
Este proceso lo realizaremos en todas las líneas.
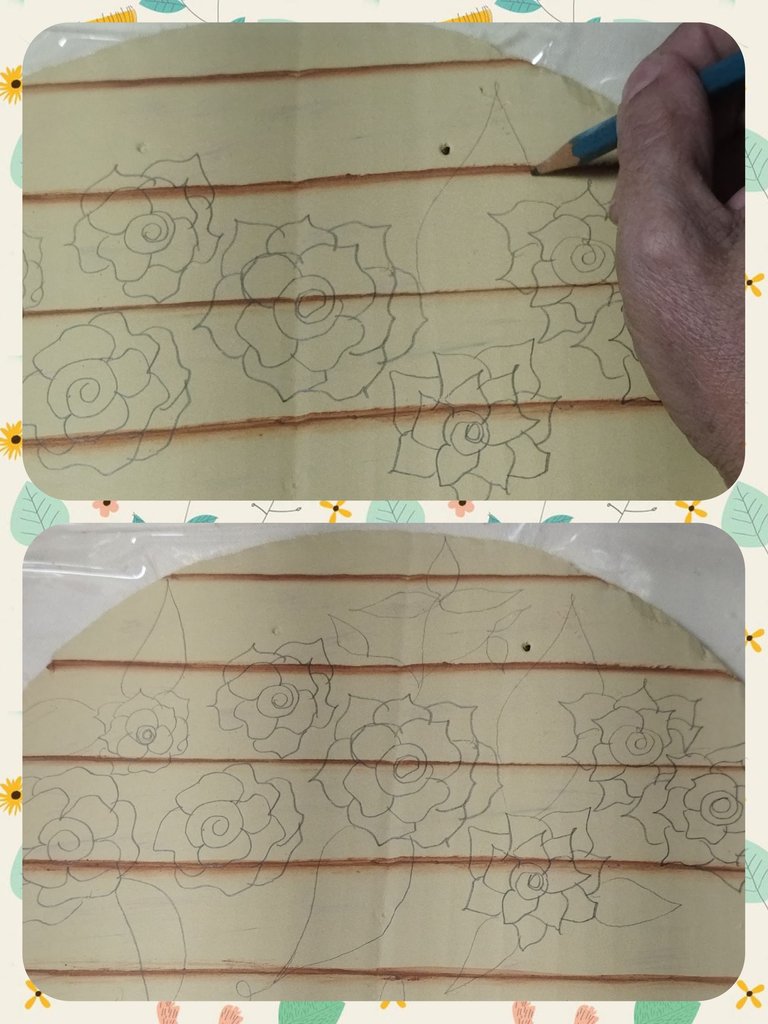
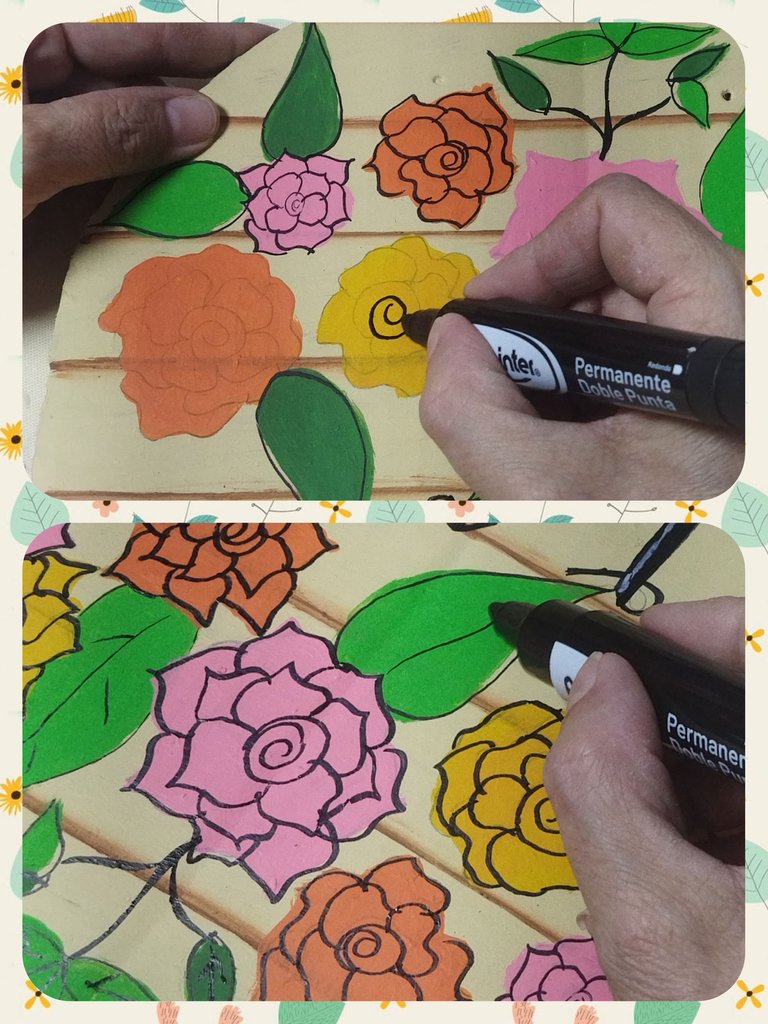
With the graph pencil we begin to design the drawing. I started by writing the word Welcome to occupy the space and not cover it with the rest of the design.
Con el lápiz de grafico comenzamos a diseñar el dibujo. Comencé escribiendo la palabra Welcome para ocupar el espacio y no taparlo con el resto del diseño.
Then draw roses and leaves around the rest of the circle.
Luego dibuje rosas y hojas por el resto del círculo.
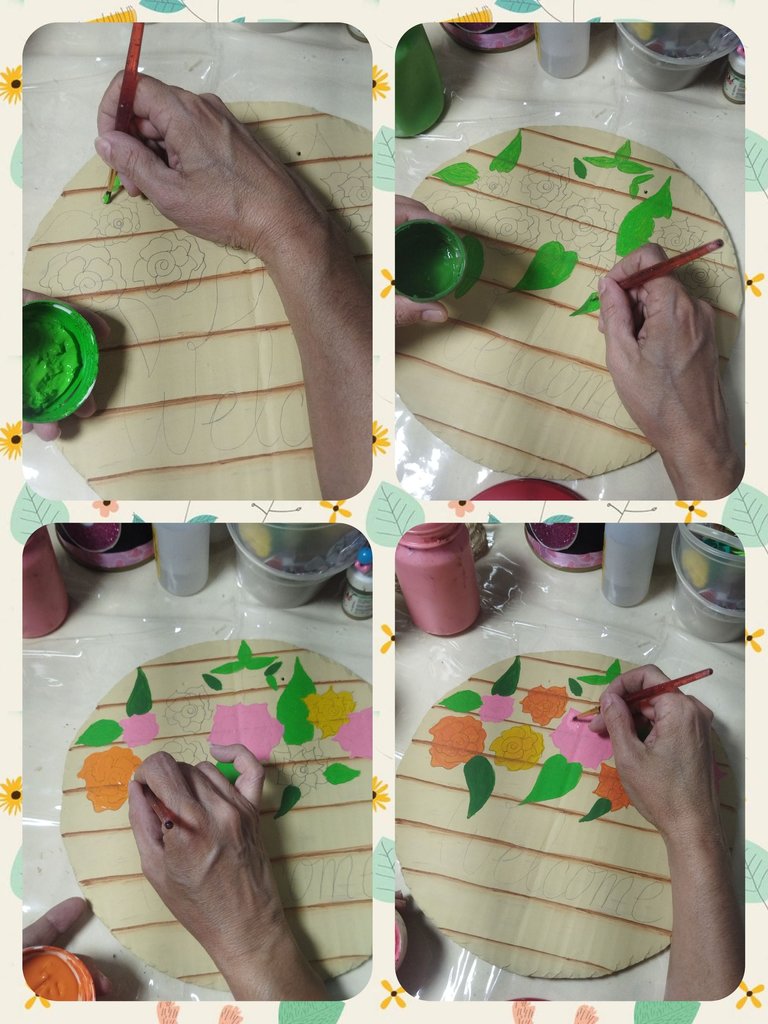
With a round brush and apple green and forest green paints I painted the leaves.
And with pink, yellow and orange paints, I painted the flowers.
Con un pincel redondo y pinturas verde manzana y verde bosque pinté las hojas.
Y con pinturas rosada, amarilla y naranja, pinté las flores.
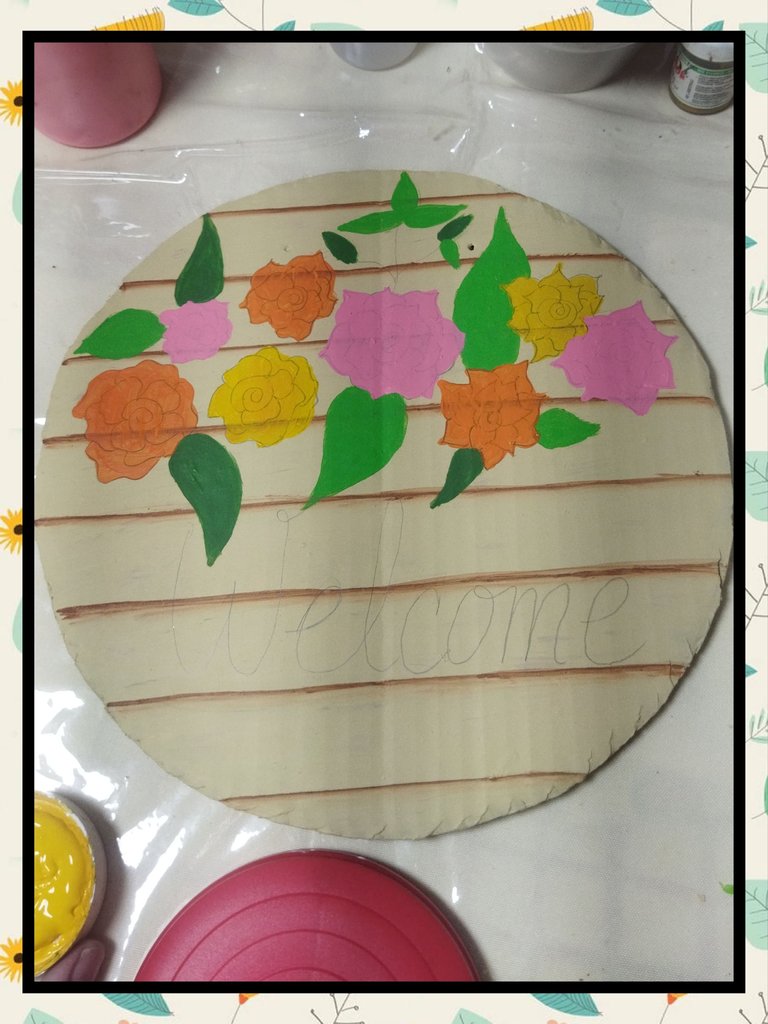
Up to this point, we already have the design of the ornament. Now we are going to make the details to highlight it.
Hasta aquí, ya tenemos el diseño del adorno. Ahora vamos a realizar los detalles para resaltarlo.
With the black acrylic marker we are going to draw the outlines of the leaves.
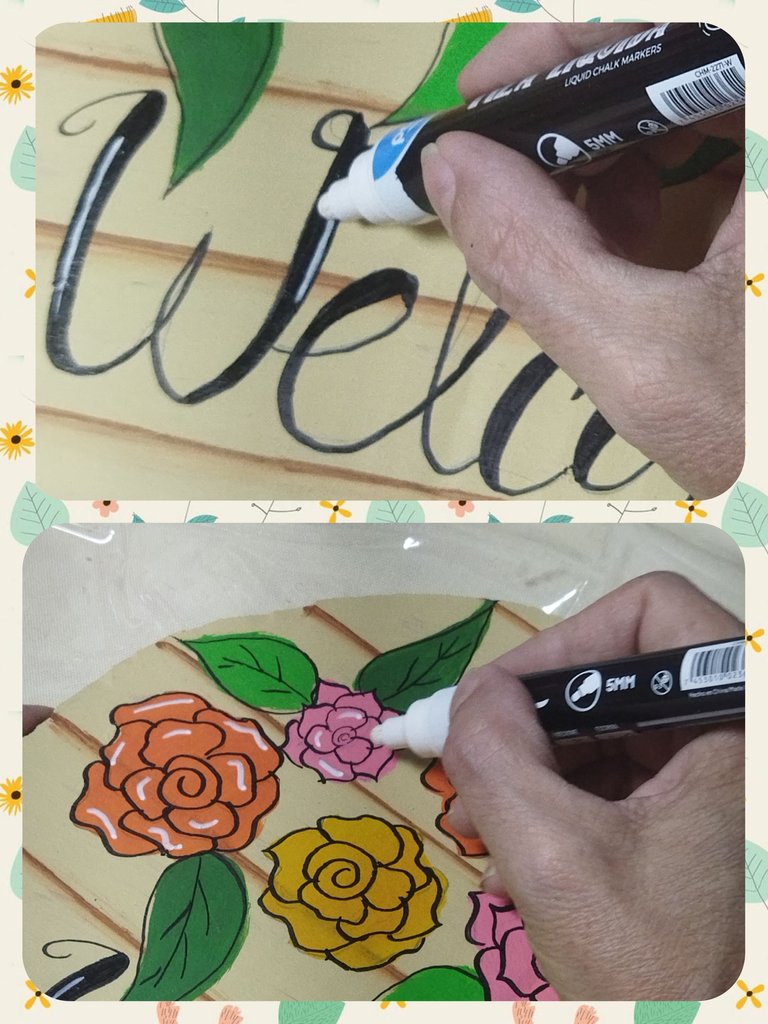
Then we apply the lettering technique to the word Welcome, making thick strokes on the part of the lines of the letters.
Con el marcador acrílico negro vamos a dibujar los contornos de las hojas.
Luego aplicamos la técnica de lettering en la palabra Welcome, haciendo trazos gruesos en el parte de las líneas de las letras.

We carry out the same procedure with the roses and the rest of the leaves.
Realizamos el mismo procedimiento con las rosas y el resto de las hojas.
And with the white chalk effects marker, we make lights to highlight the design.
Y con el marcador de efectos tiza blanco, realizamos luces para resaltar el diseño.
Once the design is finished, we proceed to cover the edge of the cardboard with the mecatillo or cabulla, for this we use the silicone gun for a quick process.
Ya terminado el diseño procedemos a cubrir el borde del cartón con el mecatillo o cabulla, para ello utilizamos la pistola de silicón para un rápido proceso.
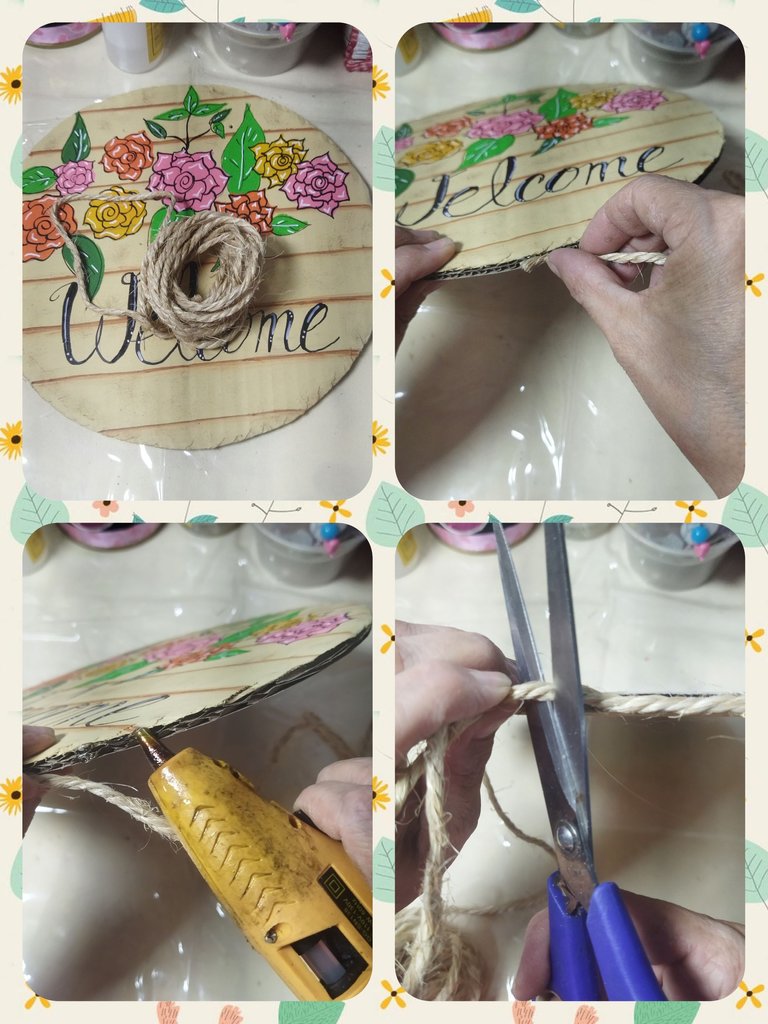
We take cm of rope and make the pendant, introducing from back to front and we tie a knot.
Tomamos cm de mecatillo y realizamos el colgante, introduciendo de atrás hacia delante y realizamos un nudo.
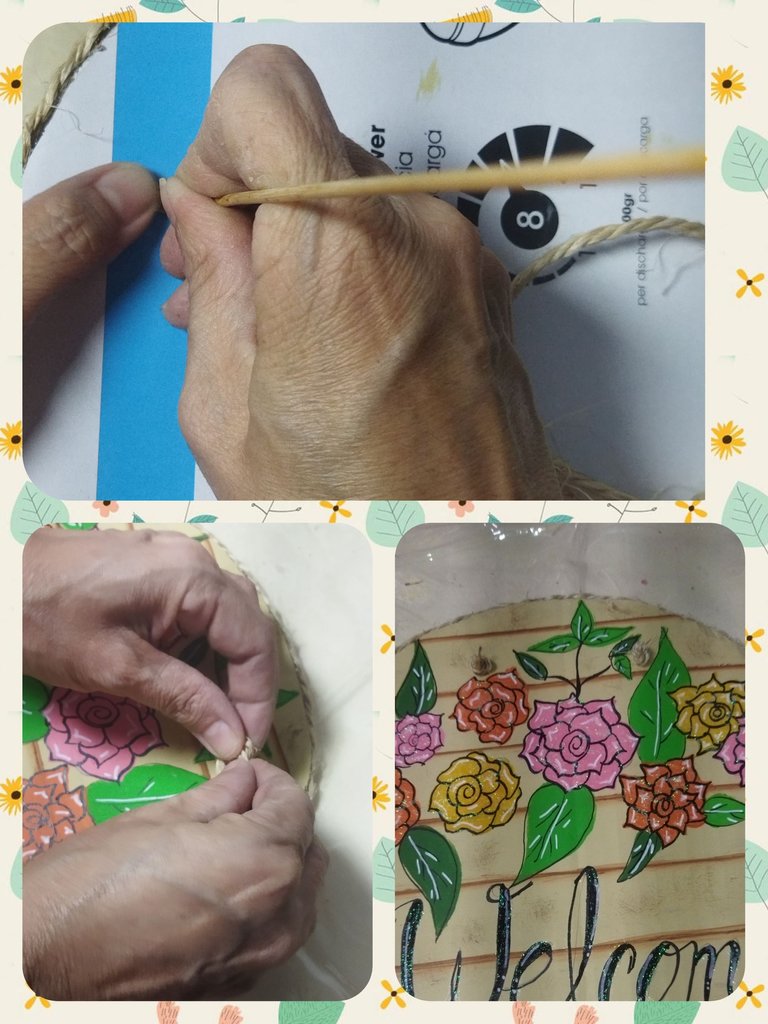
And finally, with the frosted gel we give shine to the roses by applying a layer of gel.
Y para finalizar, con el gel escarchado le damos brillo a las rosas aplicando una capa de gel.

And I already have a new Welcome decoration to welcome the people who visit me. Recycling and transforming is a way to decorate our house and at the same time we give waste a second chance. I hope you liked it. See you next time.
Y ya tengo nuevo adorno de Bienvenido para recibir a las personas que me visitan. Reciclando y transformando es una forma de decorar nuestra casa y a la vez damos una segunda oportunidad a los desechos. Espero te haya gustado. Nos vemos en la próxima.

Hola hermana 🙋🏾♀️
Se ve muy bonito este adorno de bienvenida ☑️
Me encanta ver cómo haces uso del cartón reciclándolo y convirtiéndolo en un bello objeto decorativo. Viendo el tutorial recordé que tengo un marcador blanco de tiza y aún no lo he usado 🤣
Muchas gracias por compartir 😊
Te quedó hermoso, me encantaron las flores y sus colores. Gracias por compartir @linita
Gracias a ti por la donación 🤭🤭
What a beautiful way to create a warm atmosphere for visitors. Lovely work.
!discovery 45
This post was shared and voted inside the discord by the curators team of discovery-it
Join our Community and follow our Curation Trail
Discovery-it is also a Witness, vote for us here
Delegate to us for passive income. Check our 80% fee-back Program
Esta hermoso, quien dice que no se puede crear cositas lindas con el cartón.