WELCOME TO MY BLOG
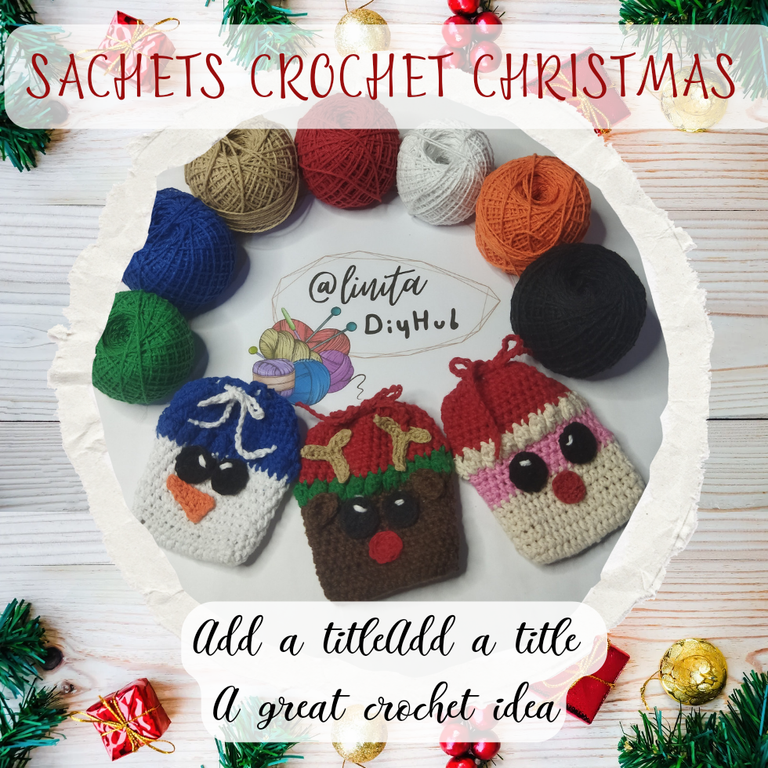
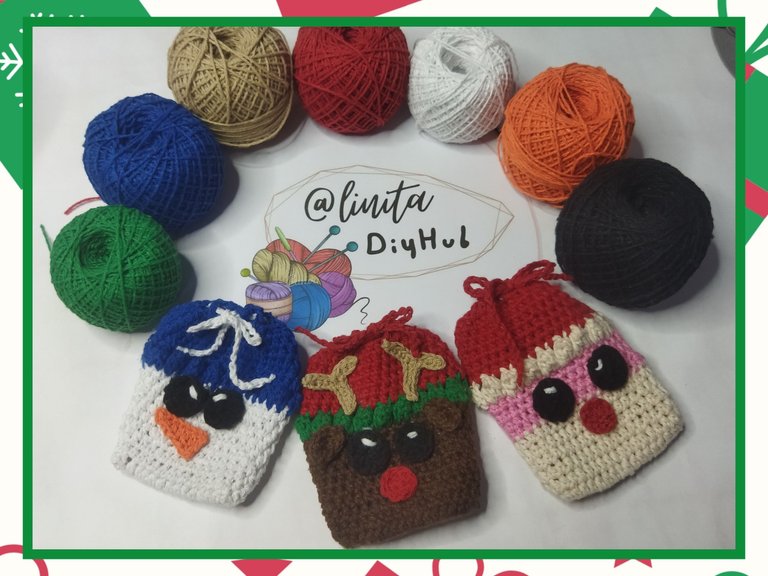
Hellooooo, hellooooooo! Greetings my dear DiyHub creatives. We end the Christmas festivities with the celebration of Three Kings Day. At home we usually give something to each family member, usually candy or some inexpensive gift. On this occasion I prepared some woven bags that will not only be used to put the sweets, but can later be used as a purse, to store some clothing, among other things. Let's start with the step by step of its preparation.
BIENVENIDOS A MI BLOG
¡Holaaaa, holaaaaa! Saludos mis estimados creativos de DiyHub. Finalizamos las festividades navideñas con la celebración de Día de Reyes. En casa acostumbramos a obsequiar un detalle a cada miembro de la familia, por lo general son dulces o algún obsequio de bajo costo. En esta oportunidad preparé unos saquitos tejidos que no sólo servirán para meter los dulces, sino que después puede ser utilizado para monedero, guardar alguna prenda, entre otras cosas. Comencemos con el paso a paso de su elaboración.
MATERIALS
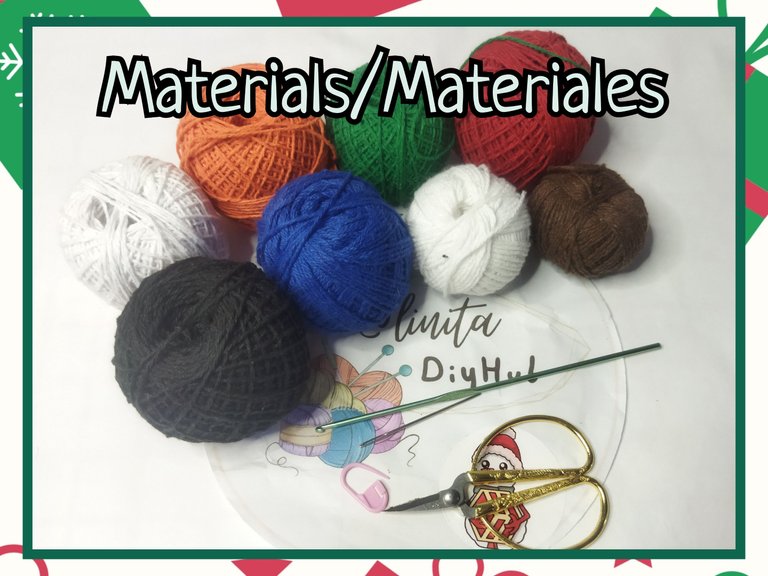
- 1 mm cotton threads (white, red, brown, blue, black, orange and green)
- 2.5 mm knitting needle
- Wool needle
- Scissors
- Silicone gun
MATERIALES
- Hilos de algodón de 1 mm (blanco, rojo, marrón, azul, negro, naranja y verde)
- Aguja para tejer de 2,5 mm
- Aguja lanera
- Tijera
- Pistola de silicón
STEP BY STEP // PASO A PASO
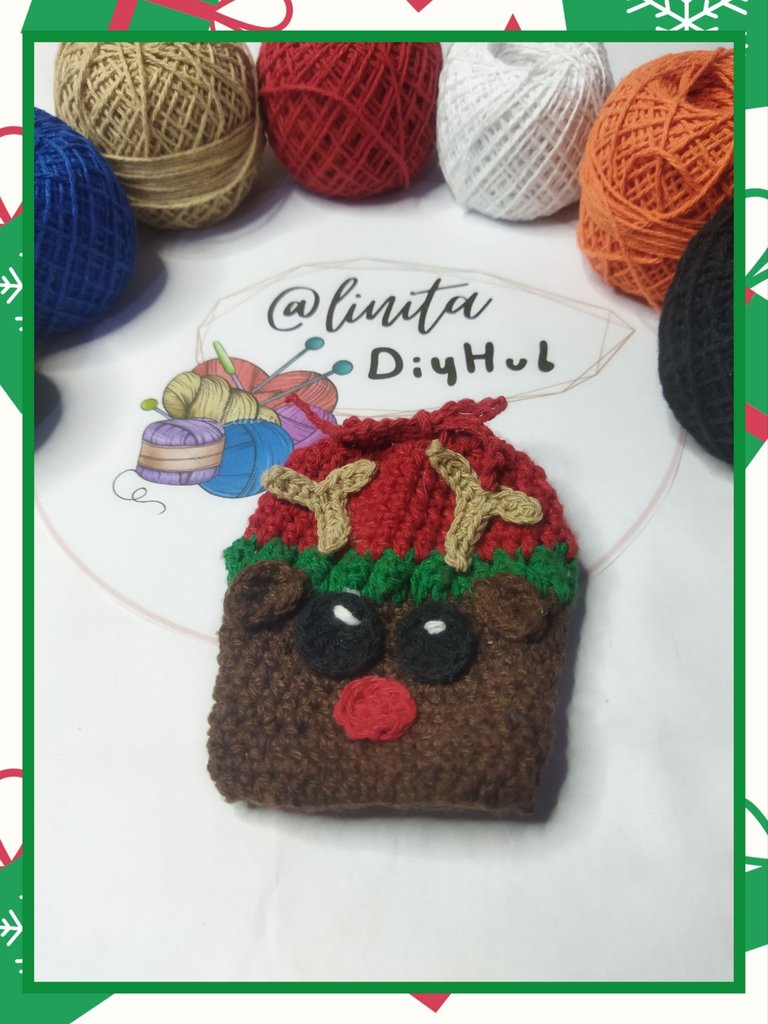
REINDEER
LAP Nº 1
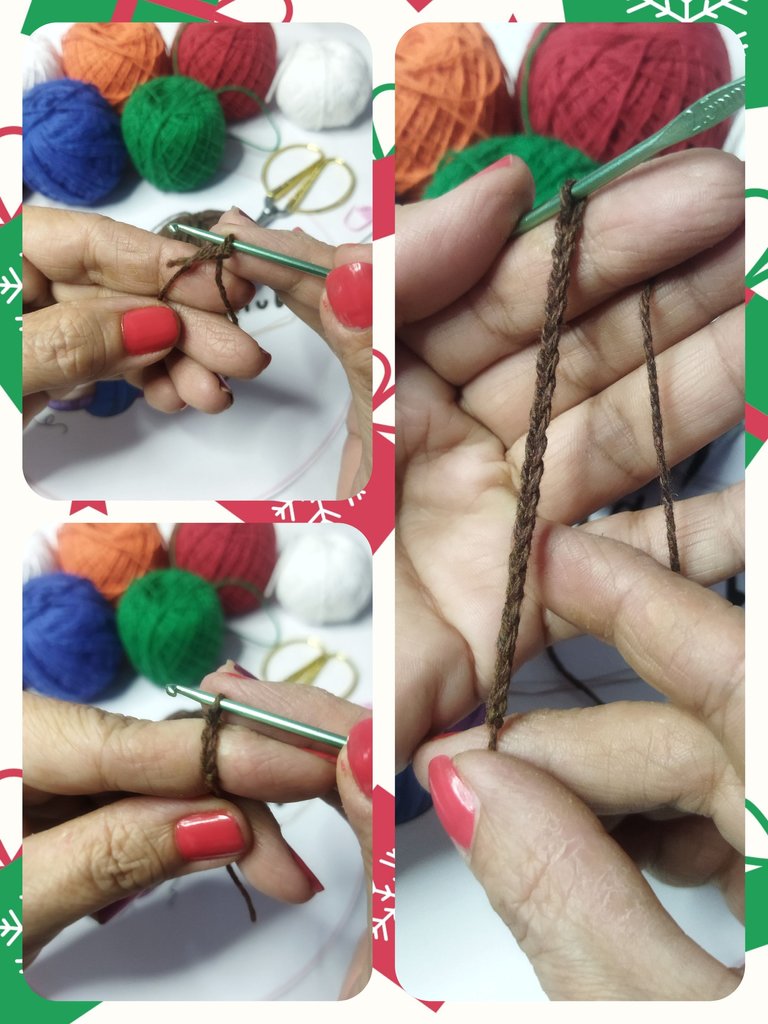
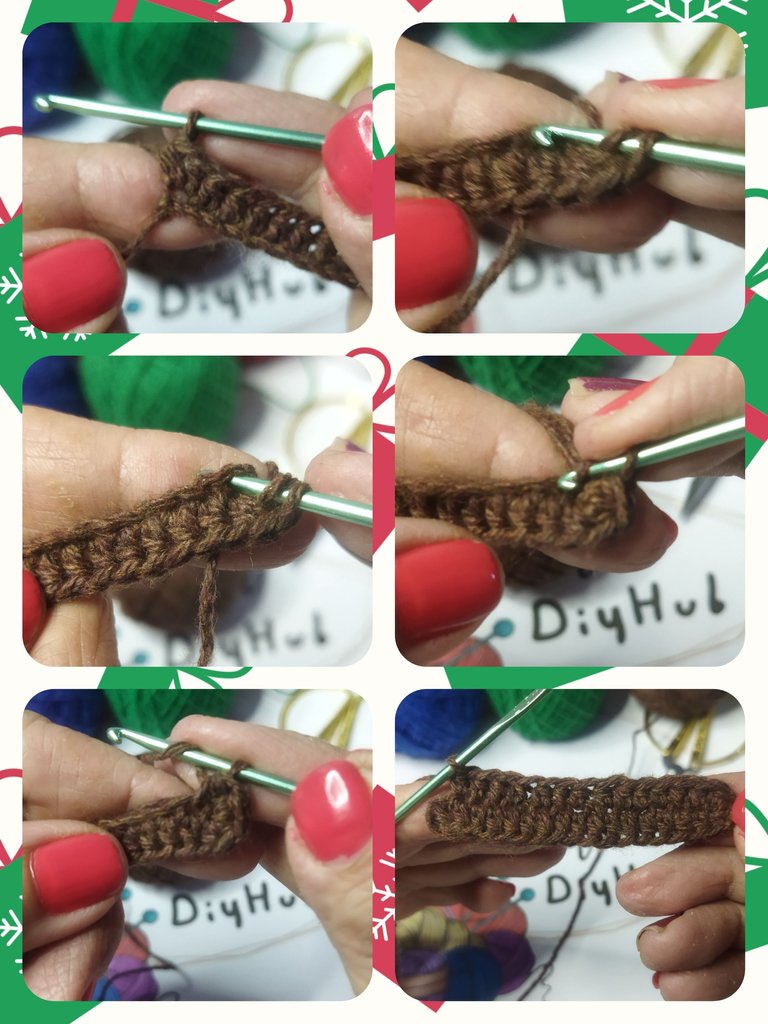
To make the reindeer-shaped bag, we will start by knitting the base with brown thread.
We make a sliding knot to start a chain of 20 points.
RENO
VUELTA Nº 1
Para realizar el saquito en forma de Reno, comenzaremos tejiendo la base con hilo marrón.
Realizamos un nudo corredizo para iniciar una cadena de 20 puntos.
LAP Nº 2
In the second round we will make half double crochets in each of the links of the chain, starting at the second link, for a total of 18 half double crochets.
VUELTA Nº 2
En la segunda vuelta realizaremos puntos medio altos en cada uno de los eslabones de la cadena, comenzando en el segundo eslabón, para un total de 18 puntos medio alto.
LAP Nº 2
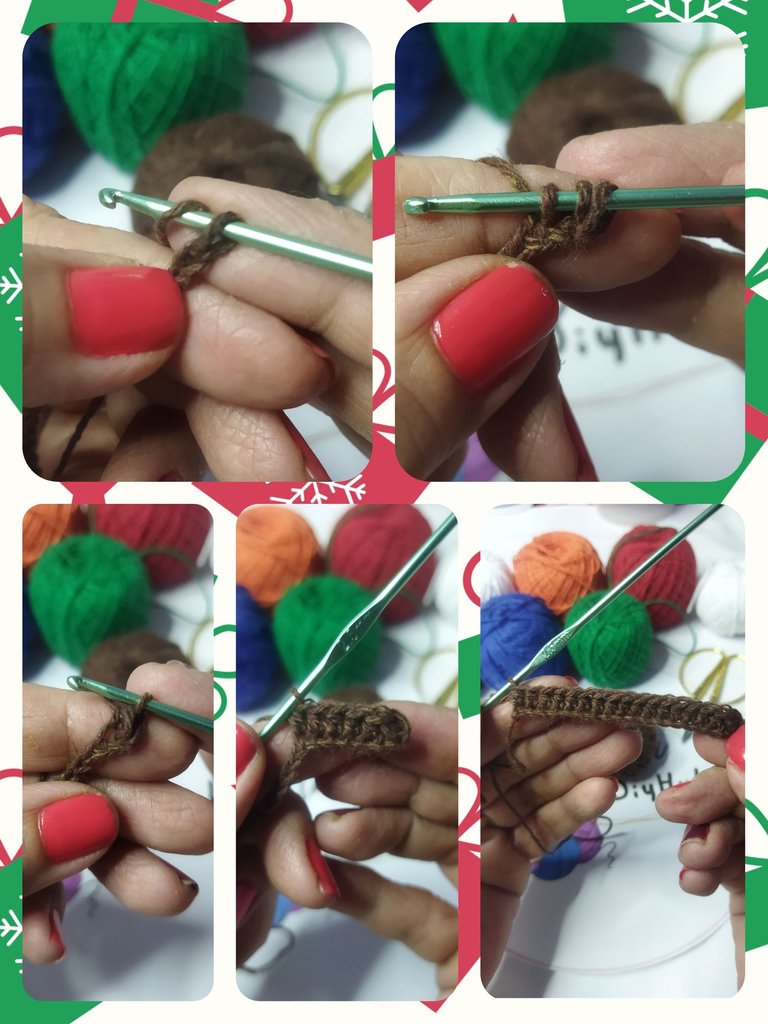
At the end of the last link, at that same point we make another half double crochet. That is, we make two half-double stitches in the last link.
And we continue knitting in the same way, with half-high stitches until the end of the round.
VUELTA Nº 2
Al finalizar el último eslabón, en ese mismo punto realizamos otro punto medio alto. es decir, realizamos dos puntos medio alto en el último eslabón.
Y continuamos el tejido de igual manera, con puntos medio alto hasta finalizar la vuelta.
LAP Nº 2
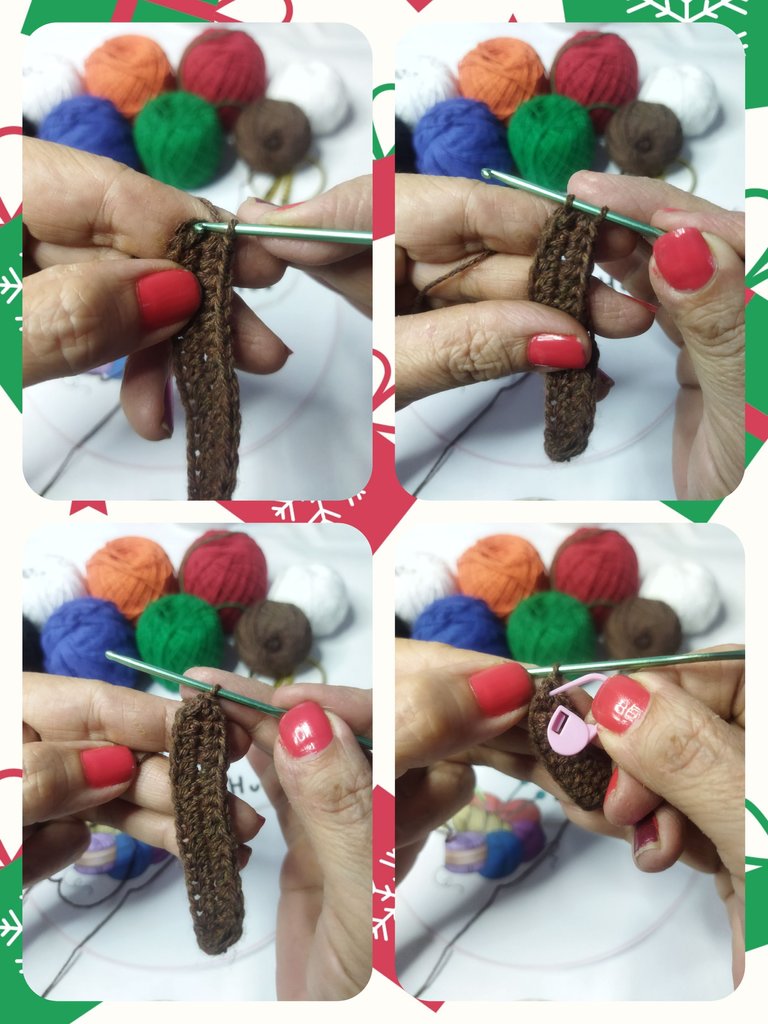
We close the round by making a single crochet at the beginning of the round and place a stitch marker to indicate the end of the next rounds.
VUELTA Nº 2
Cerramos la vuelta realizando un punto bajo en el inicio de la vuelta y colocamos un marcador de puntos para indicar el final de las próximas vueltas.
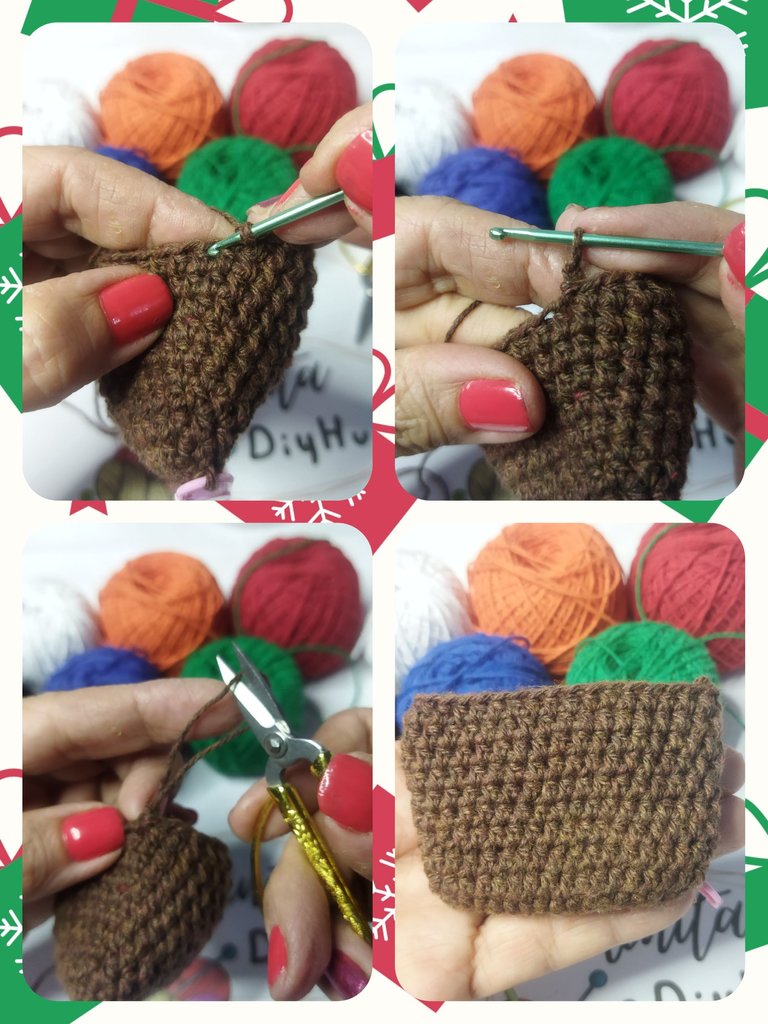
LAP Nº 3
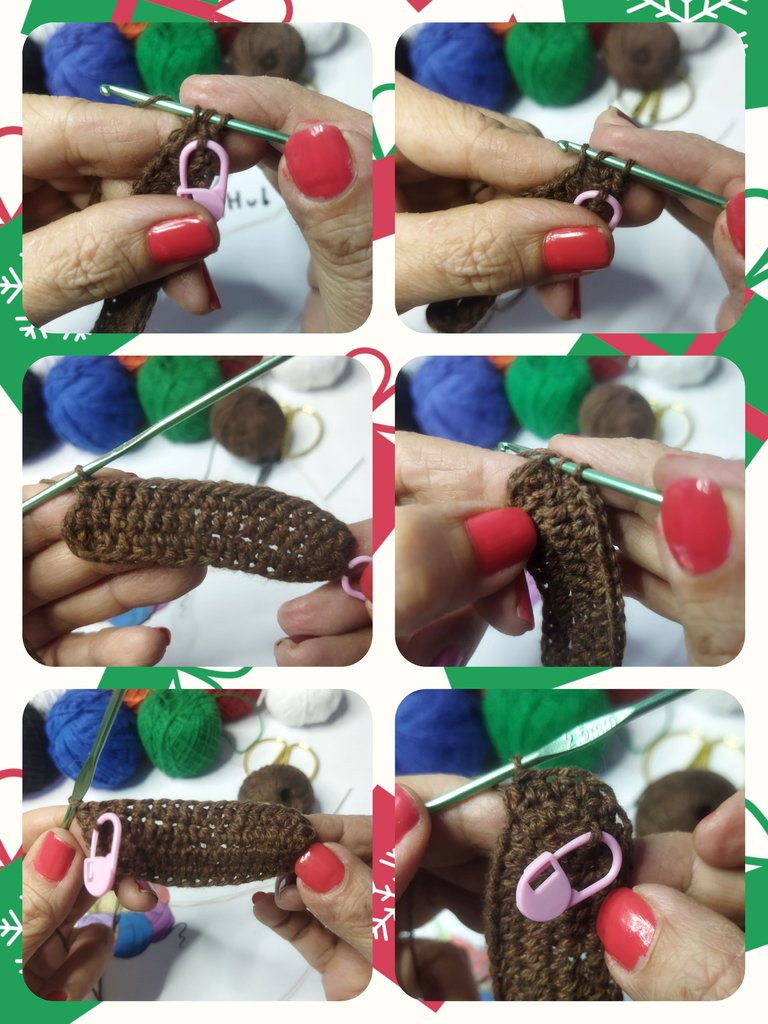
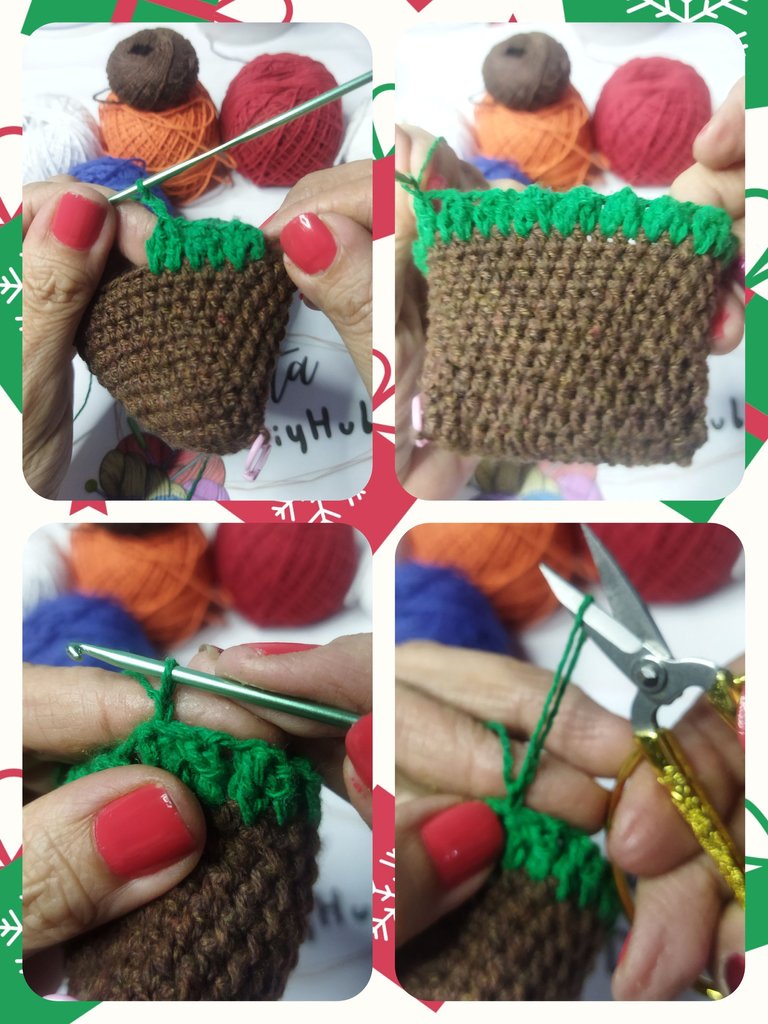
From the third round we will knit continuously, making 1 half-double stitch in each point of the previous round until we reach round No. 10. At the end we make a slip stitch, then a chain stitch and pull the thread and cut .
VUELTA Nº 3 a VUELTA Nº 10
A partir de la tercera vuelta realizaremos el tejido en forma continua, realizando 1 punto medio alto en cada punto de la vuelta anterior hasta llegar a la vuelta Nº 10. Al finalizar realizamos un punto deslizado, luego un punto cadena y halamos el hilo y cortamos.
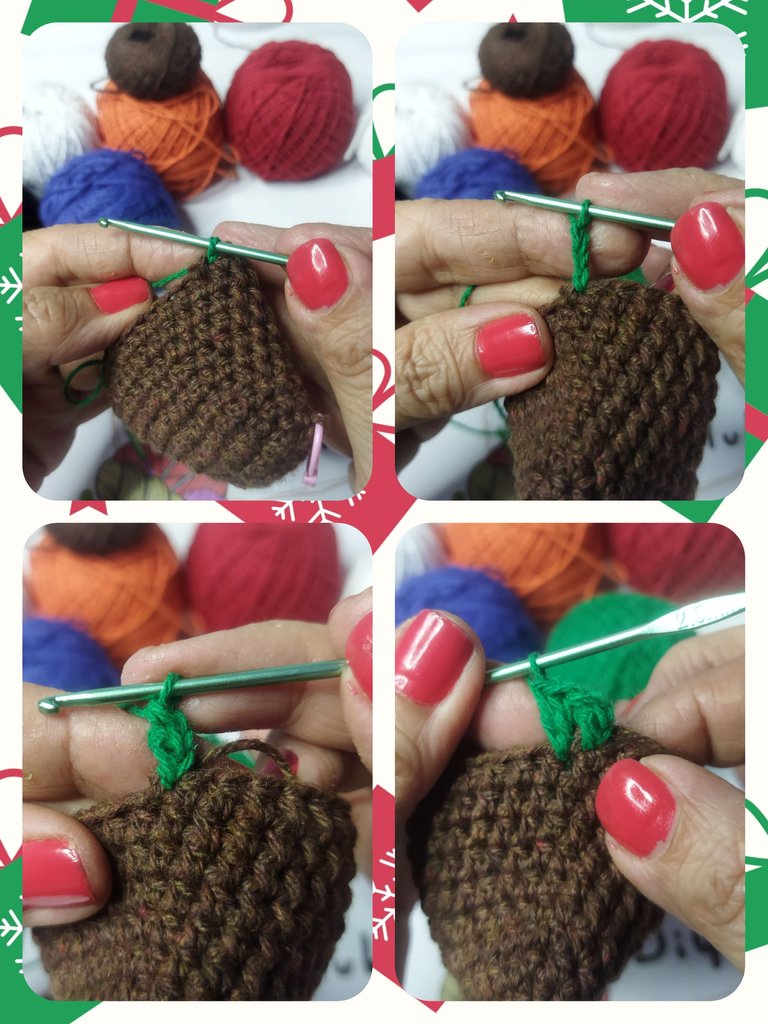
LAP Nº 11
We begin by making 3 chain stitches to replace the first double crochet and in that same point we make a double crochet. Then in the next stitch of the previous round we make two double crochets. Once we have the 4 double crochets, we take out the needle and insert it through the first double crochet and take the yarn over from the last double crochet and take it out through the first stitch, thus making the popcorn.
VUELTA Nº 11
Para la vuelta Nº11 vamos a utilizar hilo verde. Realizaremos el punto popcorn.
Comenzamos realizando 3 puntos cadena en sustitución del primer punto alto y en ese mismo punto realizamos un punto alto. Seguidamente en el siguiente punto de la vuelta anterior realizamos dos puntos altos. Una vez que tenemos los 4 puntos altos sacamos la aguja y la introducimos por en primer punto alto y tomamos la lazada del último punto alto y la sacamos por el primer punto, realizando asi el popcorn.
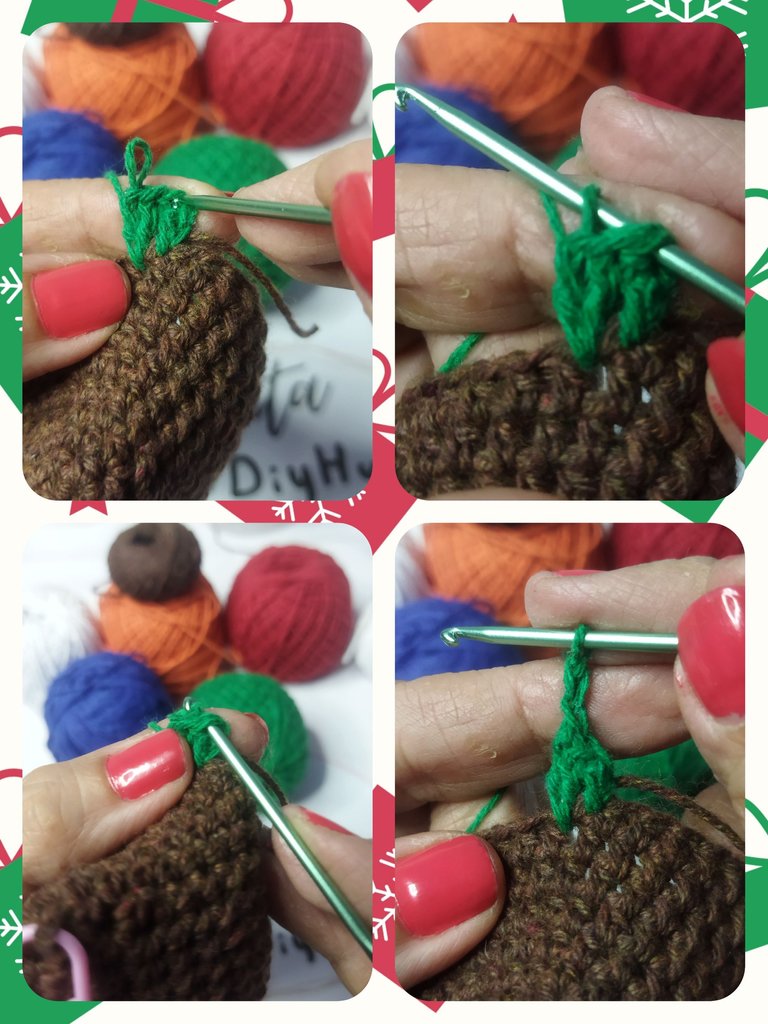
LAP Nº 11
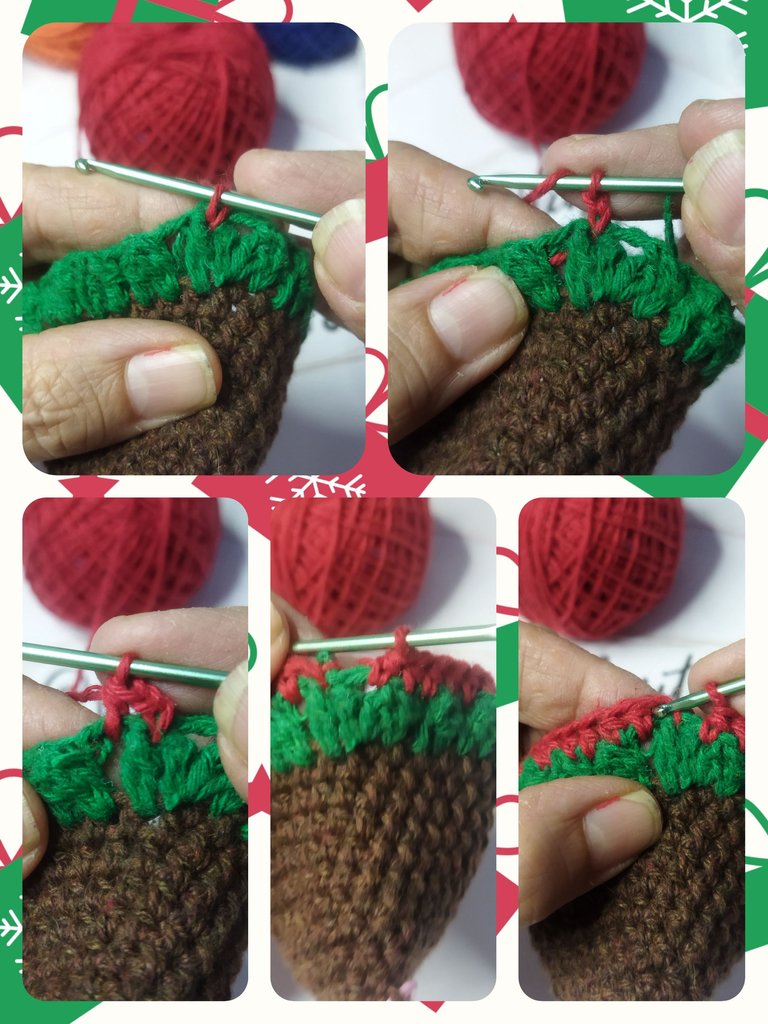
Next we knit two chain stitches and repeat the process again. Two double crochets in a single point, then two double crochets in the continuous stitch and we close to form the popcorn stitch, and so on until finishing the round.
VUELTA Nº 11
Seguidamente tejemos dos puntos cadena y repetimos el proceso nuevamente. Dos puntos altos en un solo punto, luego dos puntos altos en el punto continuo y cerramos para formar el punto popcorn, y asi sucesivamente hasta terminar la vuelta.
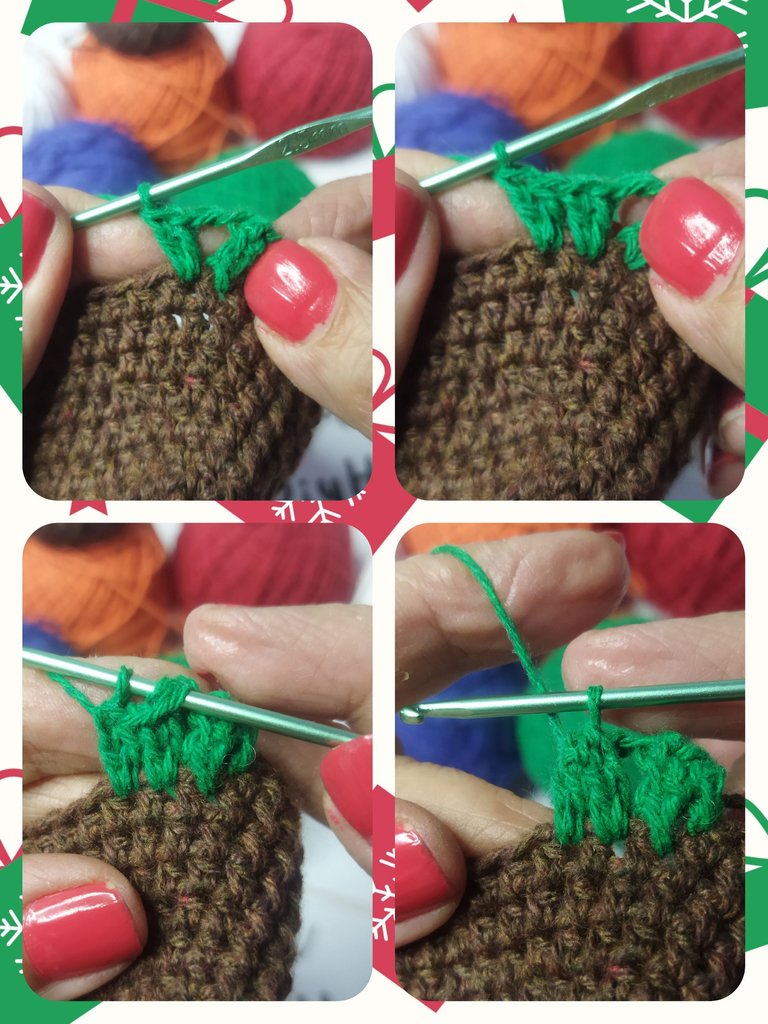
LAP Nº 11
We close with a slipped stitch at the beginning of the round, raise a chain stitch, pull the thread and cut.
VUELTA Nº 11
Cerramos con un punto deslizado en el inicio de la vuelta, subimos un punto cadena, halamos el hilo y cortamos.
LAP Nº 12
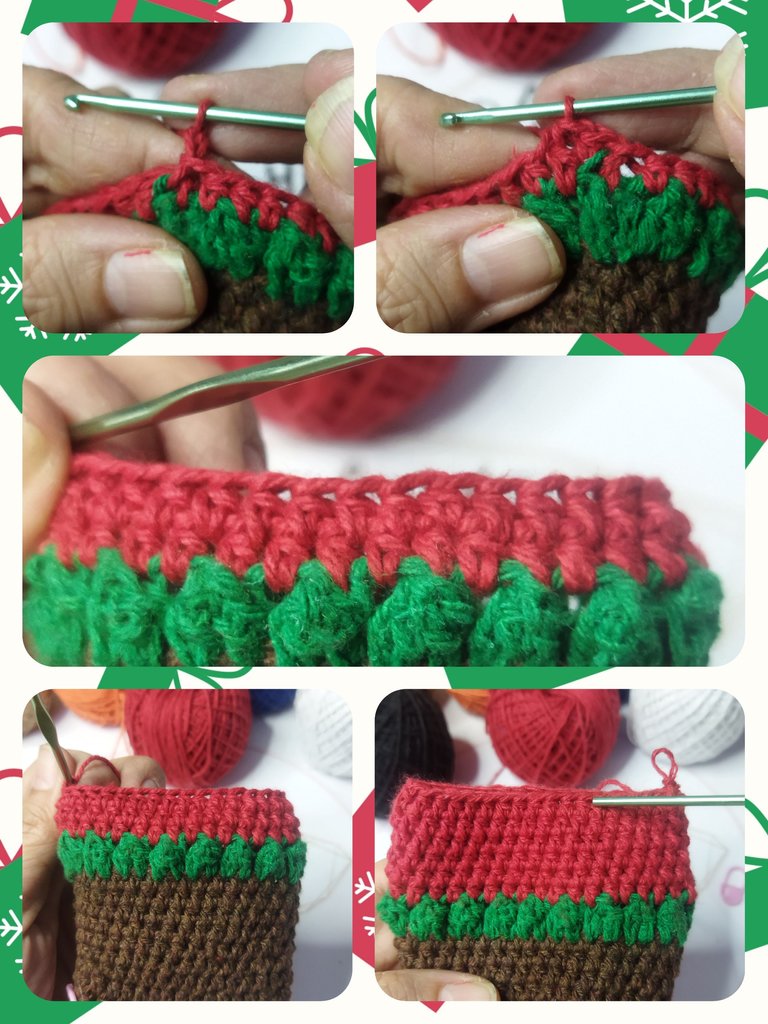
We start round No. 12 with the red thread. At the closing point of the previous round we lift 1 chain and at that same point we make a half-double stitch.
Next we knit another half double crochet in the space between the two popcorns and 1 half double crochet at the beginning of the next popcorn.
Basically this round consists of half double stitches in a row, one at the beginning of each popcorn and the other in the space between each popcorn.
VUELTA Nº 12
Iniciamos la vuelta Nº 12 con el hilo rojo. En el punto de cierre de la vuelta anterior levantamos 1 cadena y en ese mismo punto realizamos un punto medio alto.
Seguidamente tejemos otro punto medio alto en el espacio que hay entre los dos popcorn y 1 punto medio alto en el inicio del popcorn siguiente.
Básicamente esta vuelta consta de puntos medio alto seguidos, uno al inicio de cada popcorn y el otro en el espacio entre cada popcorn.
LAP Nº 13 to LAP Nº 17
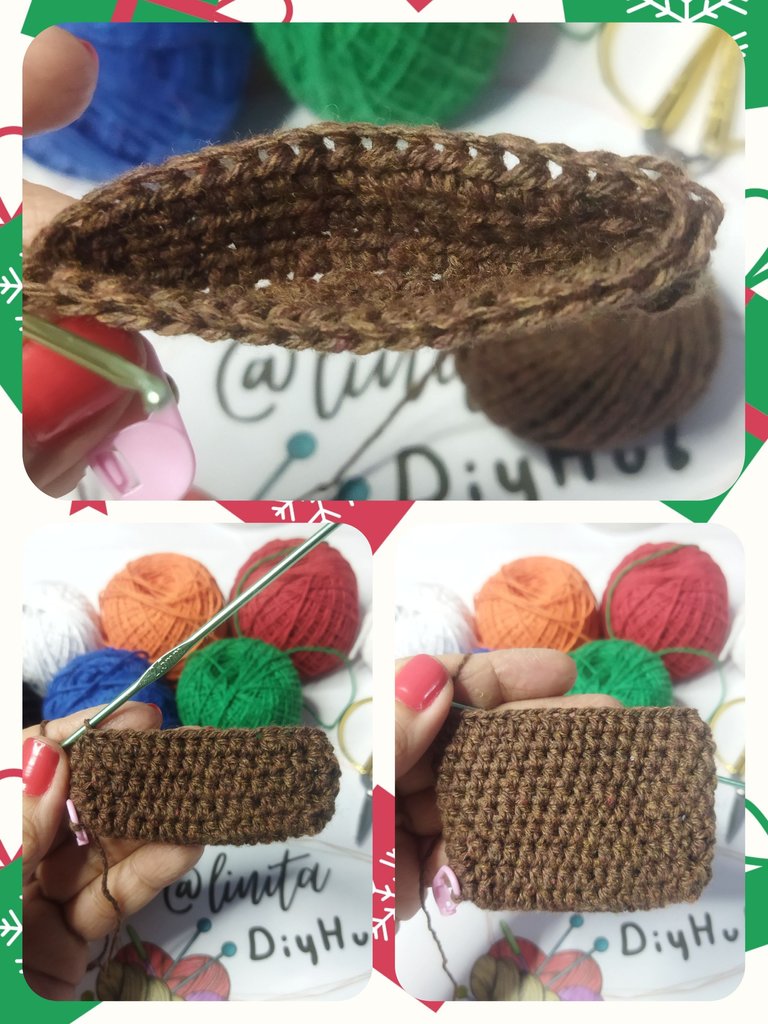
From round No. 13 to No. 17, we will make a half double crochet in each point of the previous round. Finishing with a slipped stitch.
VUELTA Nº 13 a la VUELTA Nº 17
Desde la vuelta Nº 13 a la Nº 17, realizaremos punto medio alto en cada punto de la vuelta anterior. Finalizando con un punto deslizado.
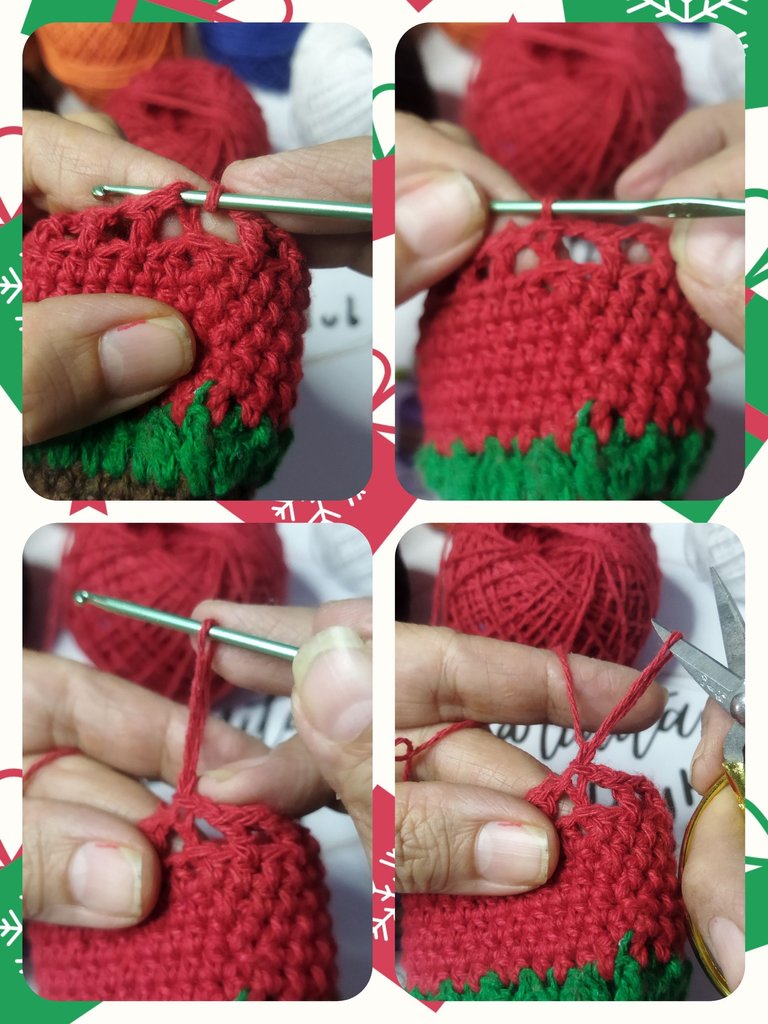
LAP Nº 18
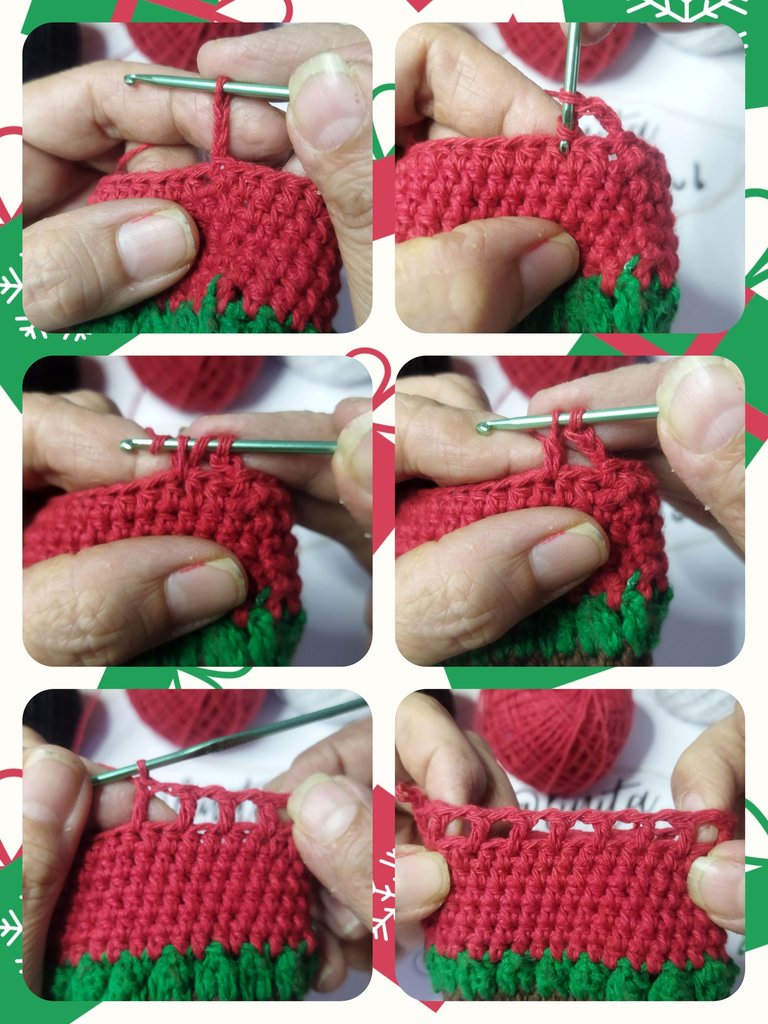
On this round we are going to make 3 chain stitches to start and we are going to skip a stitch from the previous round to make a double crochet in the next one.
We make a chain and a double crochet in the next one, leaving a stitch in the middle.
We close the round with a slipped stitch in the second stitch of the starting chain. We lift a chain, pull the thread and cut.
VUELTA Nº 18
En esta vuelta vamos a realizar 3 puntos cadena para iniciar y vamos a saltar un punto de la vuelta anterior para en el siguiente realizar un punto alto.
Realizamos una cadena y un punto alto en el siguiente, dejando un punto por el medio.
Cerramos la vuelta con un punto deslizado en el segundo punto de la cadena de inicio. Levantamos una cadena, halamos el hilo y cortamos.
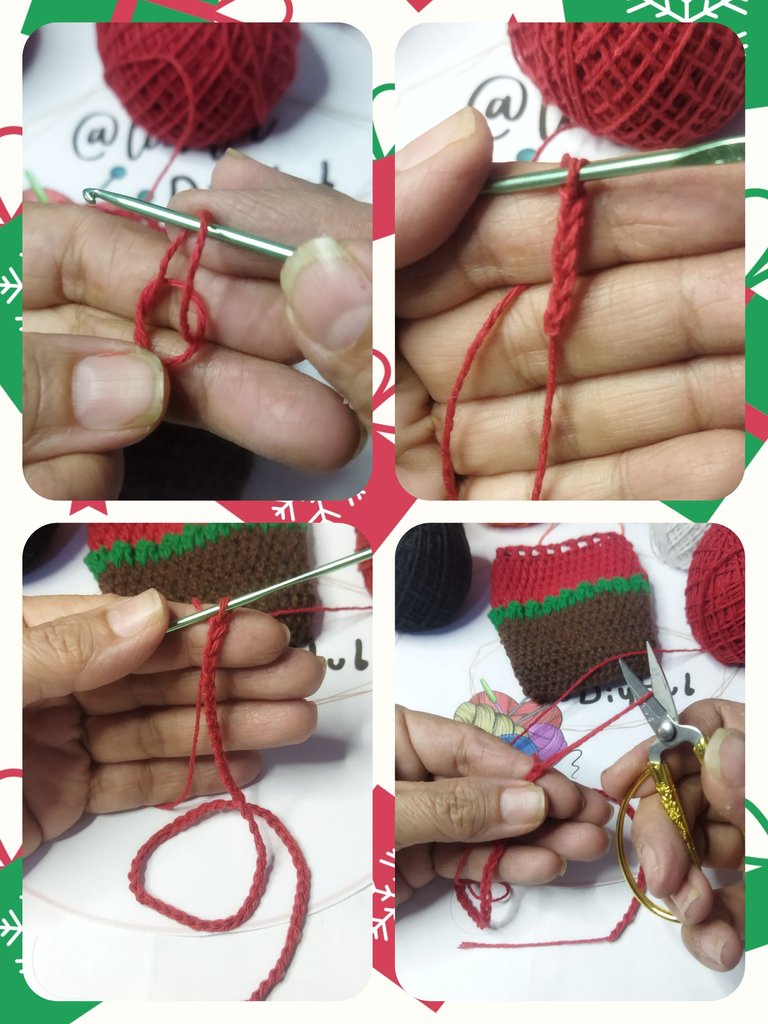
Braid
To make the braid to adjust the bag we will work a chain of 65 stitches. We cut the thread and adjust the knot.
Trenza
Para realizar la trenza para ajustar el saquito trabajaremos una cadena de 65 puntos. Cortamos el hilo y ajustamos el nudo.
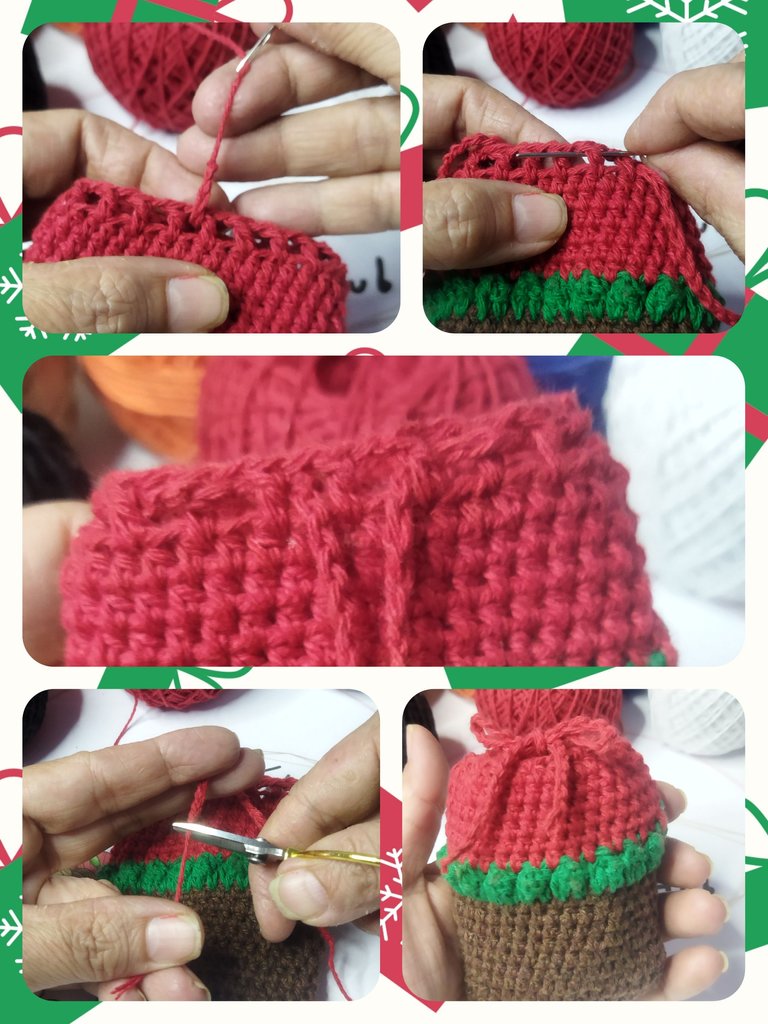
Then with the wool needle we introduce the braid through the holes of the bag to tie it. Finishing the base of the bag with which we will make the Santa bag and the snowman bag.
Luego con la aguja lanera introducimos la trenza por los huecos del saquito para amarrarlo. Finalizando la base del saco con el que realizaremos el saquito de santa y el de muñeco de nieve.
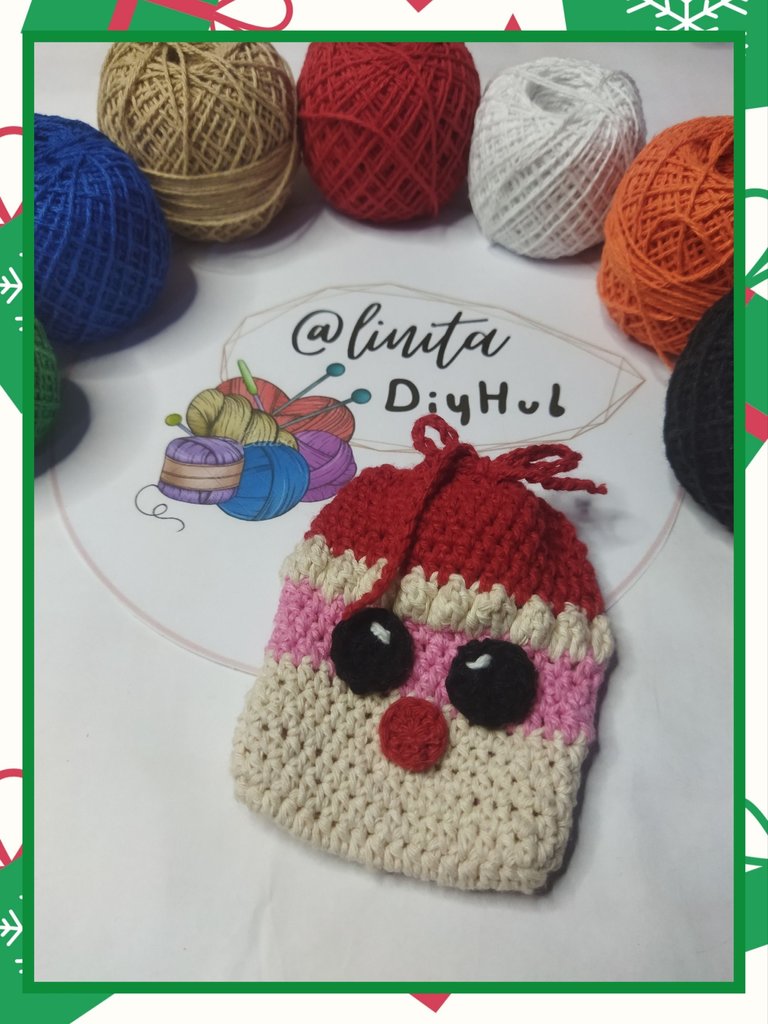
SANTA AND SNOWMAN BAG
For the Santa bag we follow the steps of the reindeer bag. Until round No. 6 we are going to use white thread. From round No. 7 to round No. 10 we will do it with the pink thread. Round No. 11 with white thread again. And from Lap No. 12 to the end with the red thread.
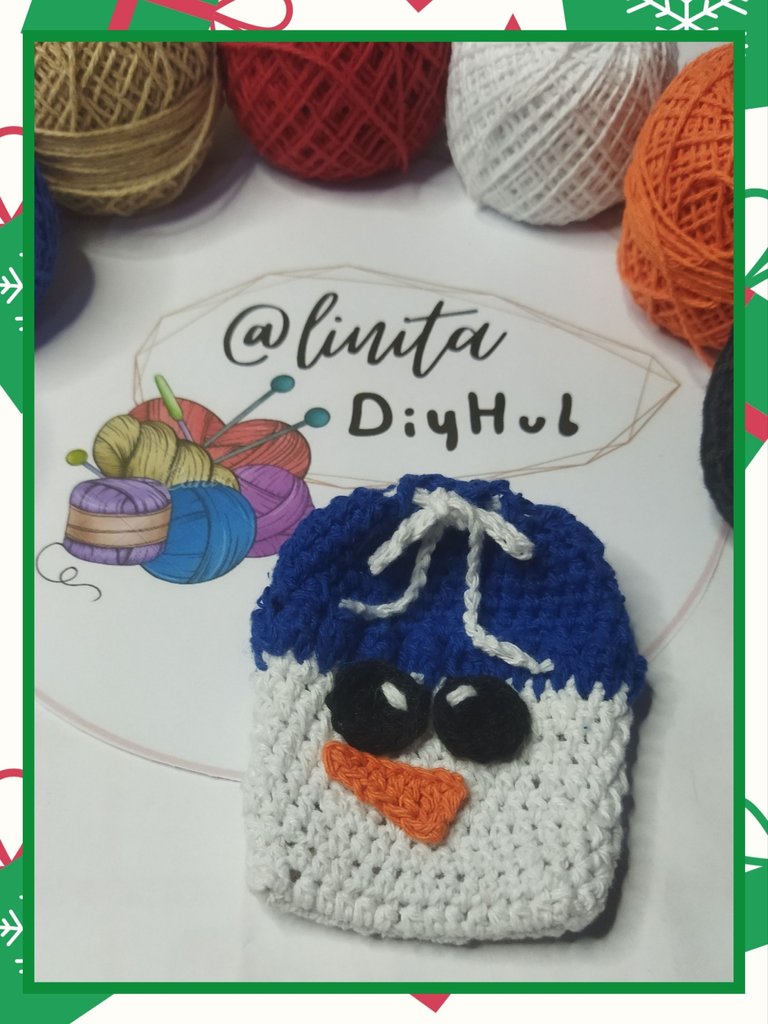
For the snowman bag we will make from round No. 1 to No. 10 with white thread. From round No. 11 to the end with the blue thread.
SAQUITO DE SANTA Y MUÑECO DE NIEVE
Para el saquito de santa seguimos los pasos del saquito de reno. Hasta la vuelta Nº 6 vamos a utilizar hilo color blanco. Desde la vuelta Nº 7 hasta la vuelta Nº 10 la haremos con el hilo rosado. La vuelta Nº 11 con hilo blanco nuevamente. Y desde la Vuelta Nº12 hasta el final con el hilo rojo.
Para el saquito de muñeco de nieve realizaremos desde la vuelta Nº 1 hasta la Nº 10 con hilo color blanco. Desde la vuelta Nº 11 hasta el final con el hilo azul.

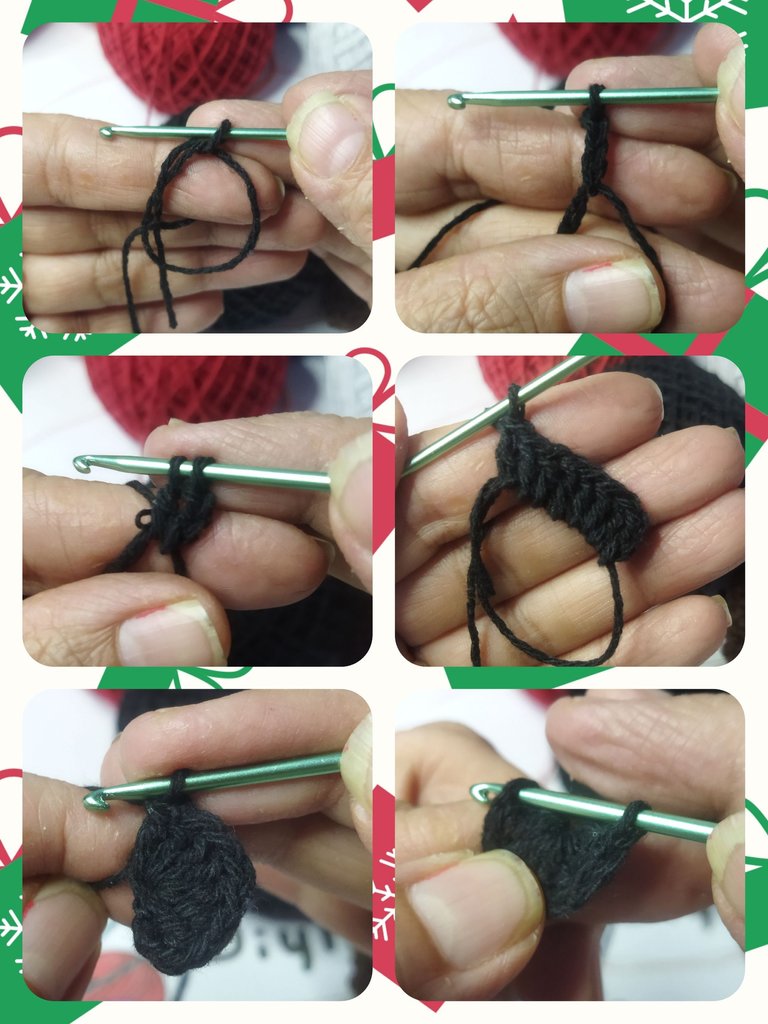
EYES
To enhance the eyes of the 3 bags we are going to work 8 double crochets in a magic ring, starting with 3 chain stitches replacing the first double crochet followed by the remaining 7 double crochets.
We close the magic ring and join the circle with a slipped stitch at the beginning of the chain.
OJOS
Para realzar los ojos de los 3 saquitos vamos a trabajar 8 puntos altos en un anillo mágico, iniciando con 3 puntos cadenas en sustitución del primer punto alto seguidamente los 7 puntos altos restantes.
Cerramos el anillo mágico y unimos el círculo con un punto deslizado en el inicio de la cadena.
We make a chain, pull the thread and cut. Then with the wool needle we take the thread along the back of the fabric and tie a knot.
Realizamos una cadena, halamos el hilo y cortamos. Luego con la aguja lanera llevamos la hebra por el reverso del tejido y realizamos un nudo.
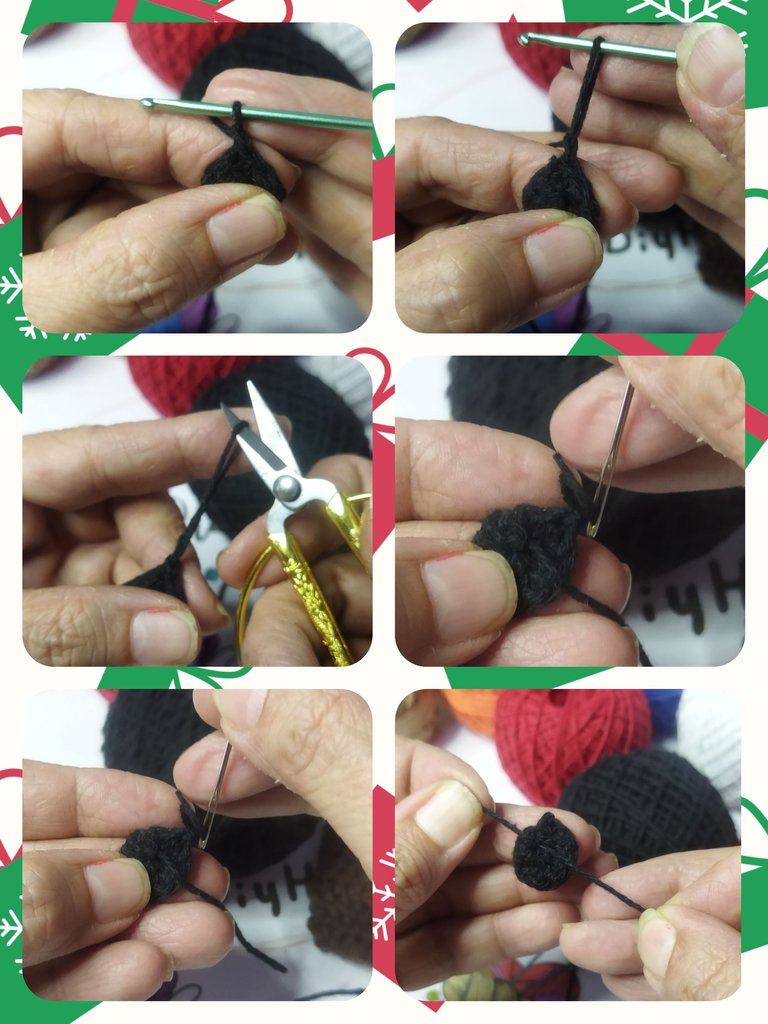
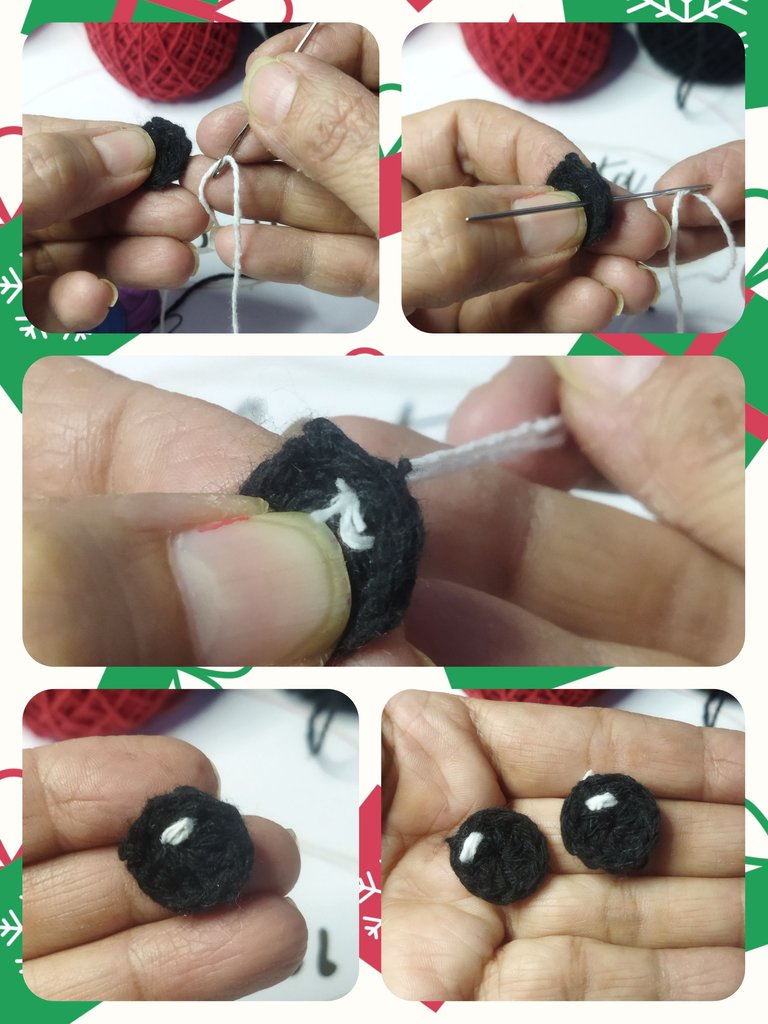
To highlight the eye, with the wool needle and the white thread we make two simple points in the eye.
Para resaltar el ojo con la aguja lanera y el hilo blanco realizamos dos puntas sencillas en el ojo.
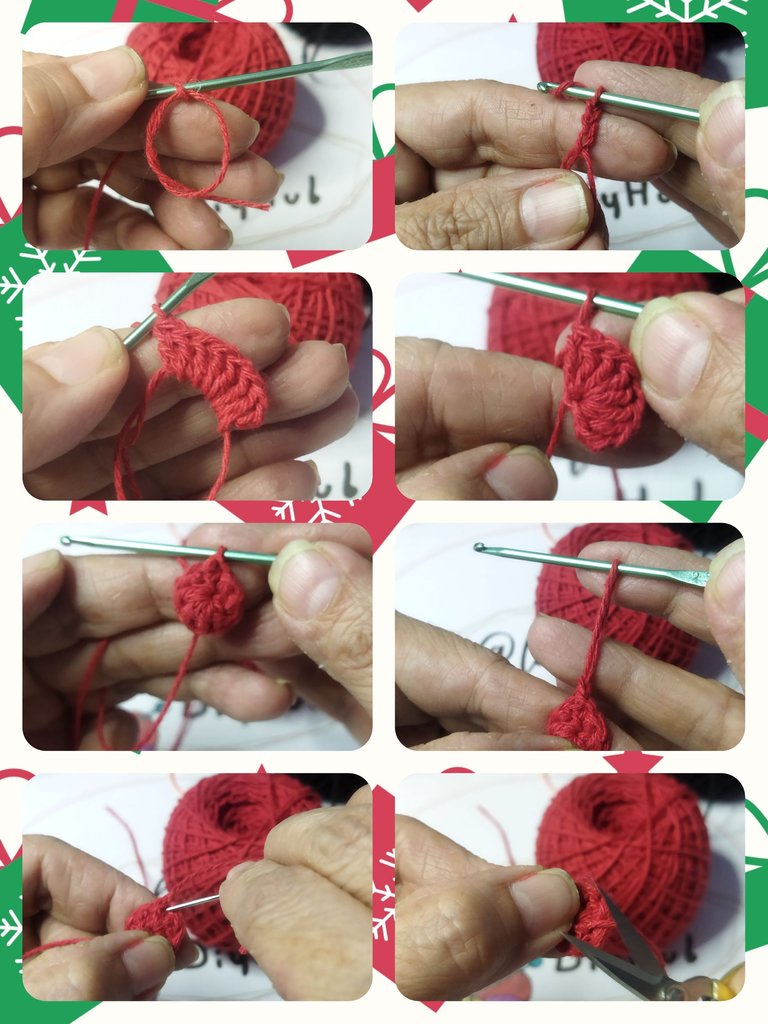
MOUTH
For the mouth we are going to use the red thread and repeat the same procedure for the eyes. We are going to do two. One for the Reindeer and one for Santa.
BOCA
Para la boca vamos a utilizar el hilo rojo y repetimos el mismo procedimiento de los ojos. Vamos a realizar dos. Uno para el Reno y otro para el Santa.
*REINDEER EARS
To make the Reindeer ears we are going to use the brown thread. We knit 8 chain stitches. Then in the second stitch we make 1 single crochet, followed by another single crochet in the next stitch. Then 1 half double crochet, then 1 double crochet, another half double crochet and we close with a single crochet.
We turn the fabric and make 1 single crochet, 1 double crochet, 1 half double crochet, two single crochets and we close with a slipped stitch.
We make two identical pieces.
*OREJAS DEL RENO
Para realizar las orejas del Reno vamos a utilizar el hilo marrón. Tejemos 8 puntos cadena. Luego en el segundo punto realizamos 1 punto bajo, seguido de otro punto bajo en el siguiente punto. Luego 1 punto medio alto, luego 1 punto alto, otro medio punto alto y cerramos con un punto bajo.
Giramos el tejido y realizamos 1 punto bajo, 1 punto alto, 1 puntos medio alto, dos punto bajo y cerramos con un punto deslizado.
Realizamos dos piezas iguales.
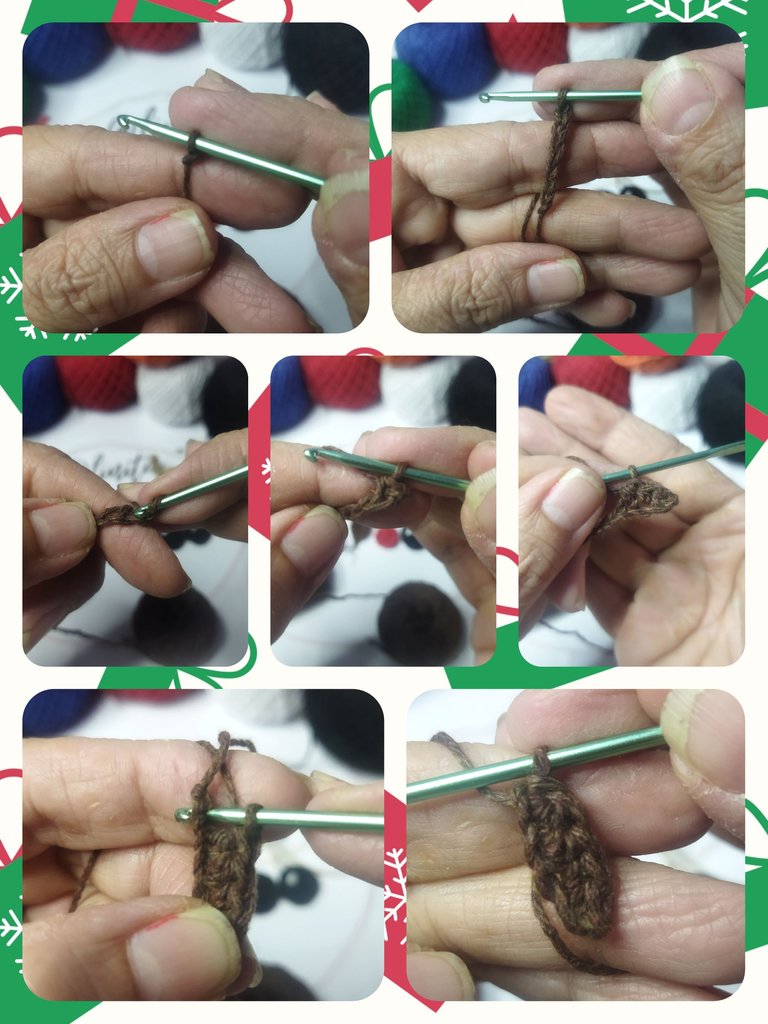
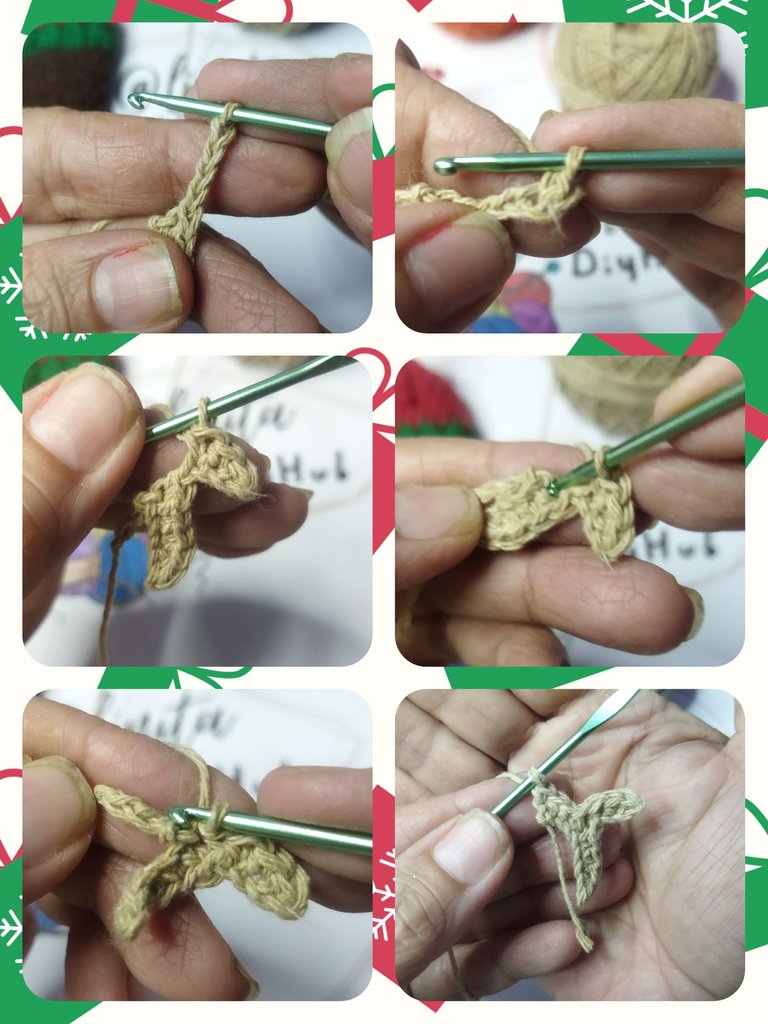
REINDEER ANTLERS
For the horns we will use khaki or light brown thread. We start with a chain of 9 stitches. Then in the first 5 stitches we are going to knit 1 single crochet in each one.
CUERNOS DE RENO
Para los cuernos utilizaremos el hilo caqui o marrón claro. Comenzamos con una cadena de 9 puntos. Luego en los primeros 5 puntos vamos a tejer 1 punto bajo en cada uno.
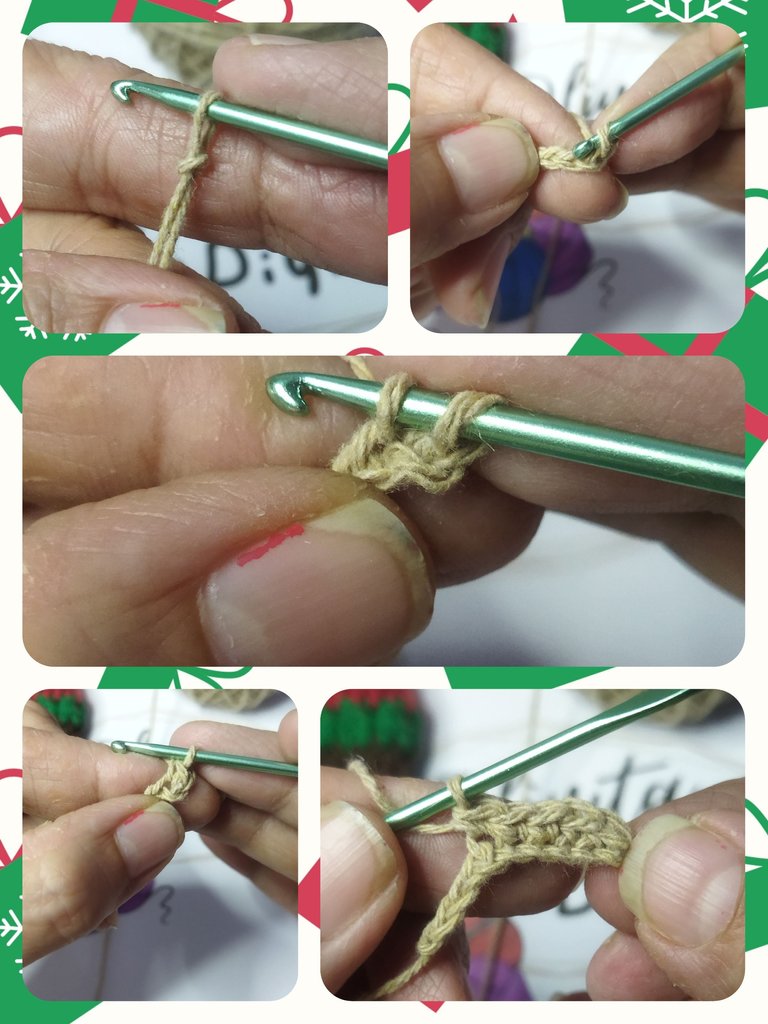
Next we make a chain of 4 stitches and we return making 3 single stitches starting from the second chain.
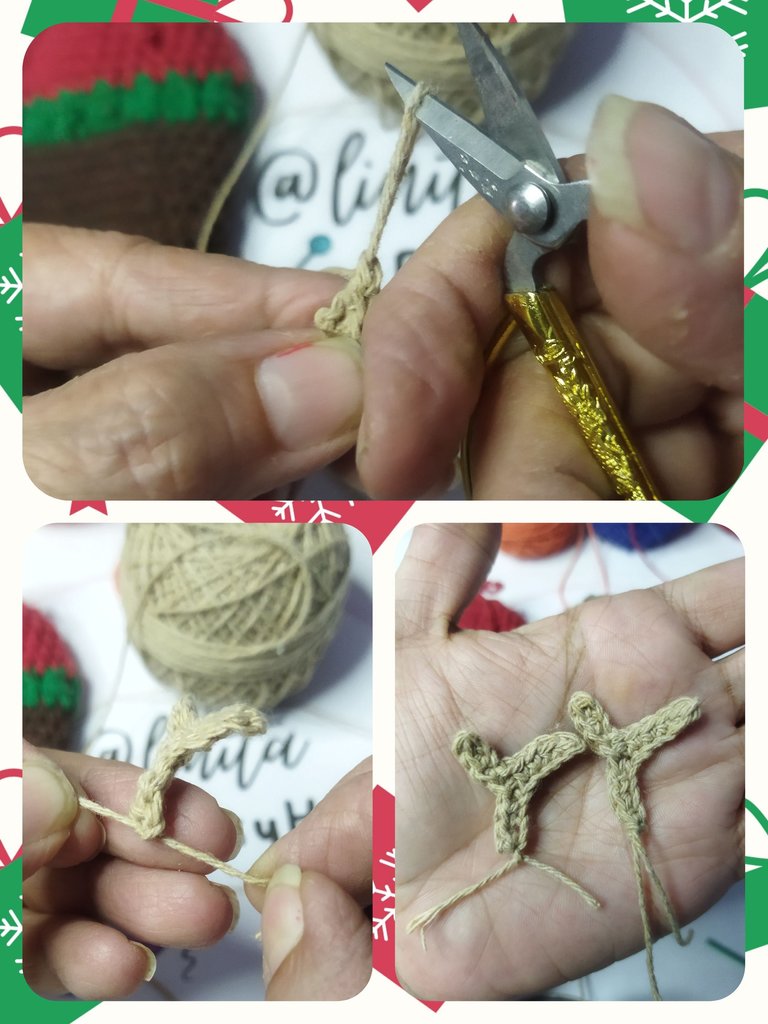
At the intersection of the single crochets we make a slipped stitch and finish the rest of the chain with 3 single crochets. We close with a slipped stitch in the last chain. We cut the thread and tie a knot with both strands and cut the remaining one.
We made two of this piece.
Seguidamente realizamos una cadena de 4 puntos y nos regresamos realizando 3 puntos bajo a partir de la segunda cadena.
En la intersección de los puntos bajos realizamos un punto deslizado y terminamos el resto de la cadena con 3 puntos bajos. Cerramos con un punto deslizado en la última cadena. Cortamos el hilo y realizamos un nudo con ambas hebras y cortamos el restante.
De esta pieza realizamos dos.
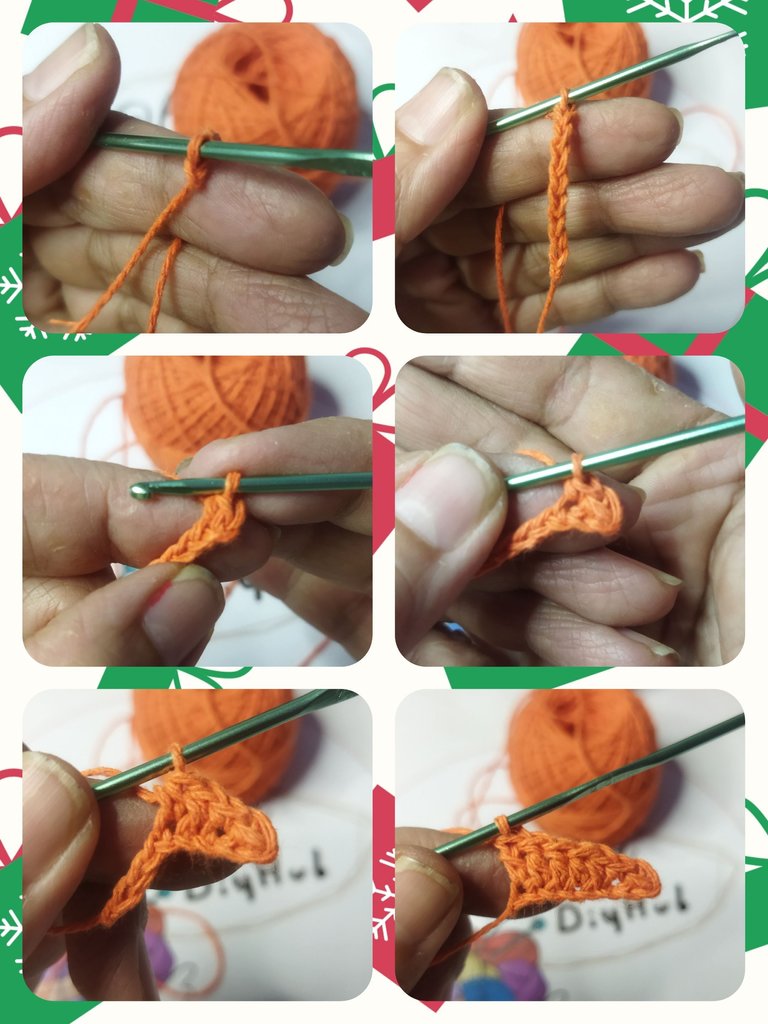
SNOWMAN CARROT
For the carrot we are going to use the orange thread. We start with a chain of 8 stitches. ·In the second link we are going to make a single crochet and another single crochet in the next one. Followed by two half double crochets, one in each stitch. Then we make two double crochets. We make a double stitch, cut the thread and with the wool needle we hide on the back of the fabric. We cut off the excess.
ZANAHORIA DEL MUÑECO DE NIEVE
Para la zanahoria vamos a utilizar el hilo naranja. Comenzamos con un cadena de 8 puntos. ·En el segundo eslabón vamos a realizar un punto bajo y otro punto bajo en el siguiente. Seguido de dos puntos medio alto, uno en cada punto. Luego realizamos dos puntos altos. Realizamos un punto alto, cortamos el hilo y con la aguja lanera escondemos por el reverso del tejido. Cortamos el exceso.
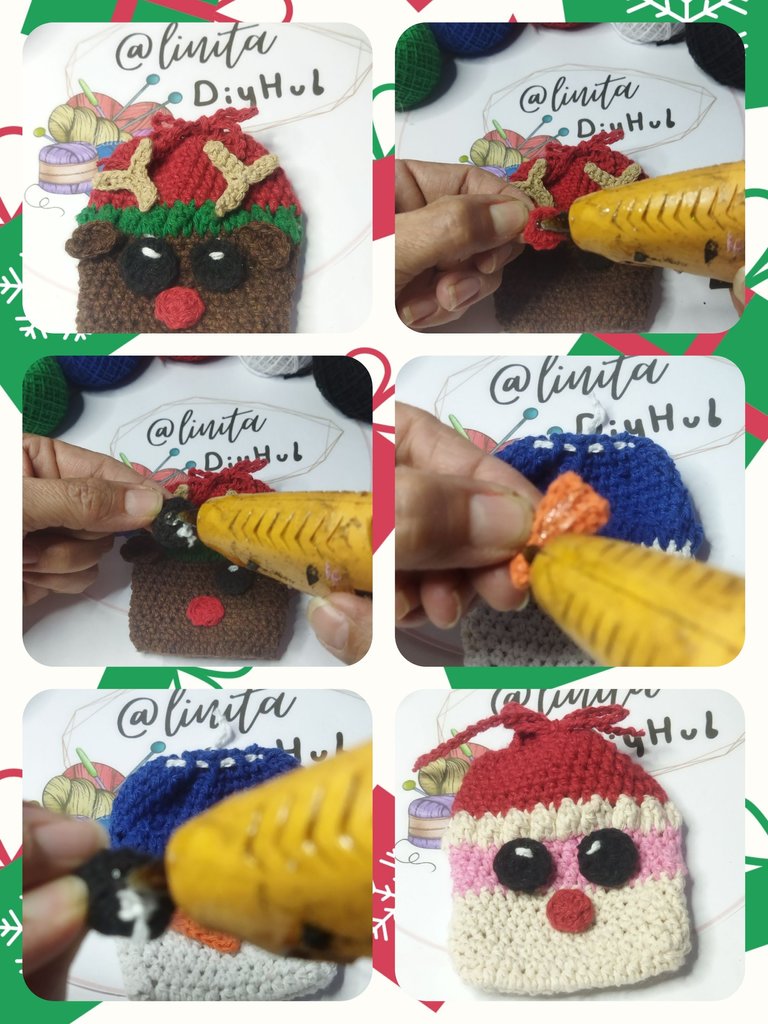
PASTING DETAILS
To complete each of the bags, we place each piece on it, the eyes, the antlers, the ears and the mouth in the case of the reindeer bag and glue with the silicone gun.
In the same way we carry out the process with the two remaining bags.
PEGADO DE DETALLES
Para completar cada uno de los saquitos, situamos cada pieza sobre el mismo, los ojos los cuernos, las oreja y la boca en el caso del saquito de reno y pegamos con la pistola de silicón.
De la misma manera realizamos el proceso con los dos saquitos restantes.
PROJECT COMPLETED
And so we now have these delicate and very pretty crochet bags to give to our family and friends. I hope you like it. See you next time.
PROYECTO FINALIZADO
Y así ya tenemos estos saquitos a crochet, delicados y muy bonitos para obsequiar a nuestros familiares y amigos. Espero te gusten. Nos vemos en la próxima.
Quedaron hermosos los saquitos, el de gorro azul es mi favorito.
Feliz año!
Holaaaa, feliz año para ti también. Me alegro que te hayan gustado. Mi favorito es el Reno. Saludos.
Quedaron preciosos, felicidades 🥰
Le quedaron super lindos 😍🎄
Mi favorito es el reno ❤️🦌
Hermoso trabajo 😊👍
Holaa, feliz año. Un gusto leerte. El reno también es mi favorito.
Muy hermoso te quedaron .. siempre he querido aprender a tejer 🥺, saludos bella
Holaaaa, aún estás a tiempo. Ahora es mucho más fácil aprender con la cantidad de tutoriales que conseguimos en internet. Yo aprendí con revistas pero necesité mucha asesoría hasta que aprendí el nombre de los puntos. Me alegro que te hayan gustado. Saludos.
Lo tomaré en cuanta, saludos bella.
Estan hermosos
Muchas gracias 😌