Español
Saludos amigos creadores 🙋🌻🎄.
Siempre es gratificante aprender algo nuevo, por lo que ultimamente he optado por aventurarme en la práctica de diversas técnicas para manualidades.
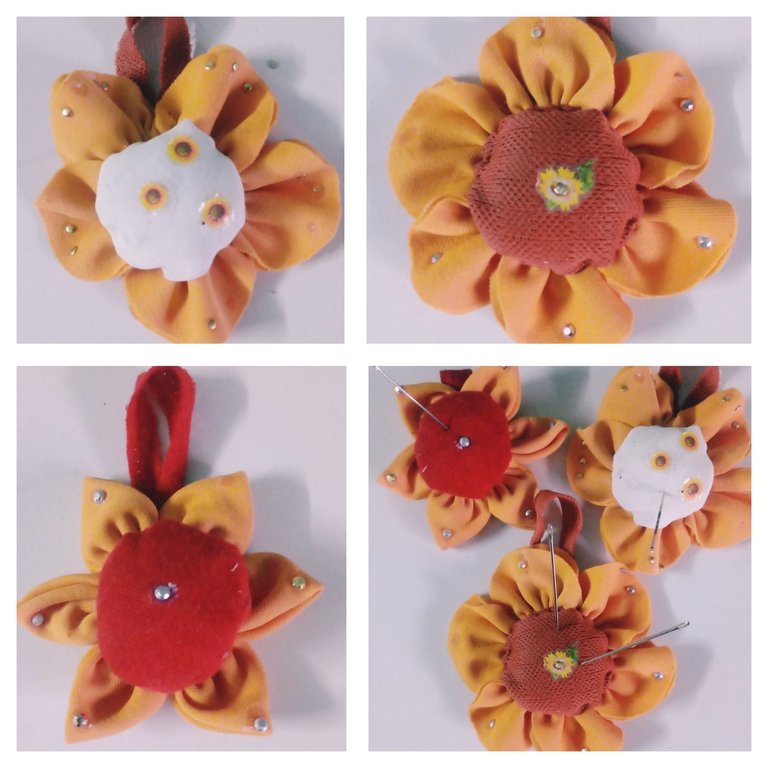
Hoy, quiero compartir con ustedes en forma de tutorial, los alfileteros de flores que confeccioné, asesorada por mi madre para obsequiar en esta navidad. Alfileteros, amigos, que podemos realizar reciclando , dándole utilidad y vida a prendas, telas, no utilizadas.¡Comencémos!
🌻Materiales🌻
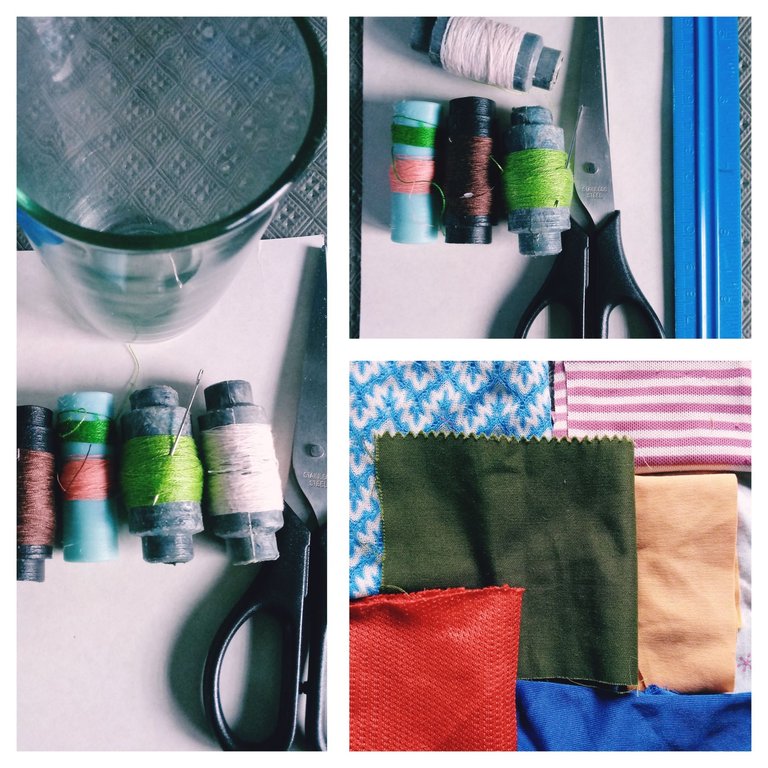
.Retazos de tela recicladas
.Cartulina ó cartón
.Lapicero
.Vaso ó objeto circular
.Tijera
.Pegamento
.Hilos
.Aguja
.Piedresitas brillantes
🌻Modo de confección🌻
Diversas formas de alfileteros podemos confeccionar, y más en esta fecha inspiradora. Yo escogí realizarlos en forma de girasoles, flores que me cautivan por su belleza natural.
Pasos
1-Colocar el vaso sobre la cartulina o el objeto circular, y con ayuda de un lapicero marcar por todo su borde, permitiéndonos obtener después de cortado, un pequeño círculo de cartulina.
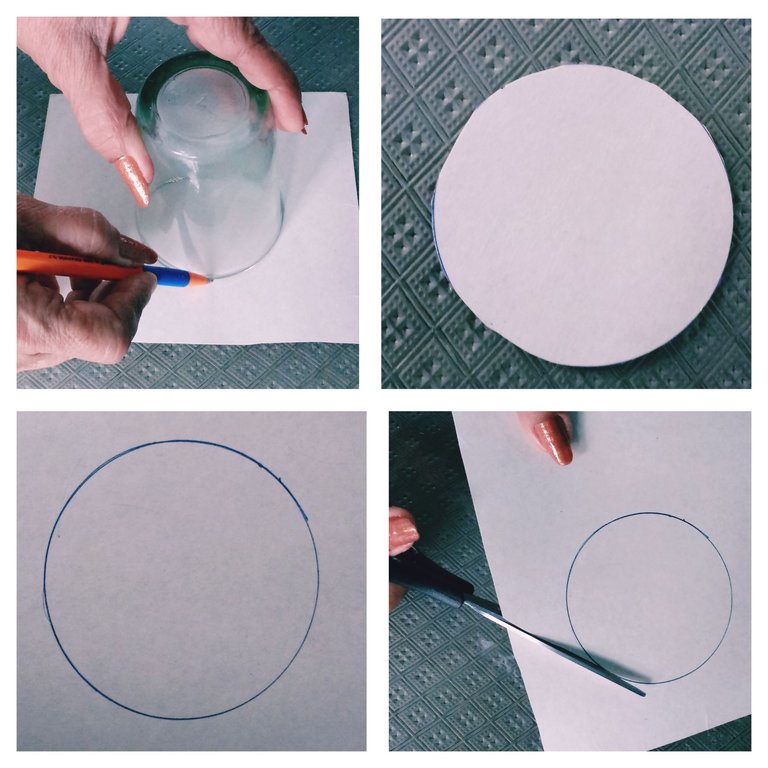
Este paso lo realizamos para obtener nuestra guía a emplear en las telas.
2-Utilizando el círculo de cartulina y el lapicero marcamos siete círculos sobre la tela. Seis de una misma tonalidad para los pétalos,( estos varían según la cantidad de petalos que queramos), y el otro con tono diferente para su centro. Luego, cortamos por esta guía trazada utilizando la tijera, obteniéndo los siete círculos bien conformados.
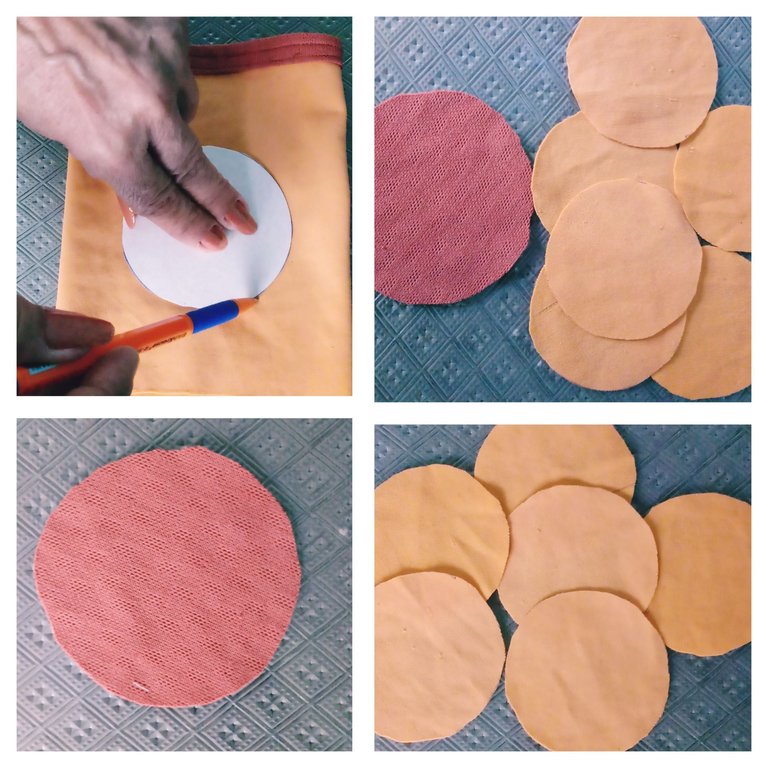
3-Doblamos los seis círculos de una misma tonalidad, alisamos ayudándonos de la plancha, y luego, tomando una hebra de hilo larga en nuestra aguja, comenzamos a ir ensamblado los seis círculos de nuestros pétalos. Los que quedarán bien confeccionados después de realizarles pliegues al alar el hilo y amarrarlos.
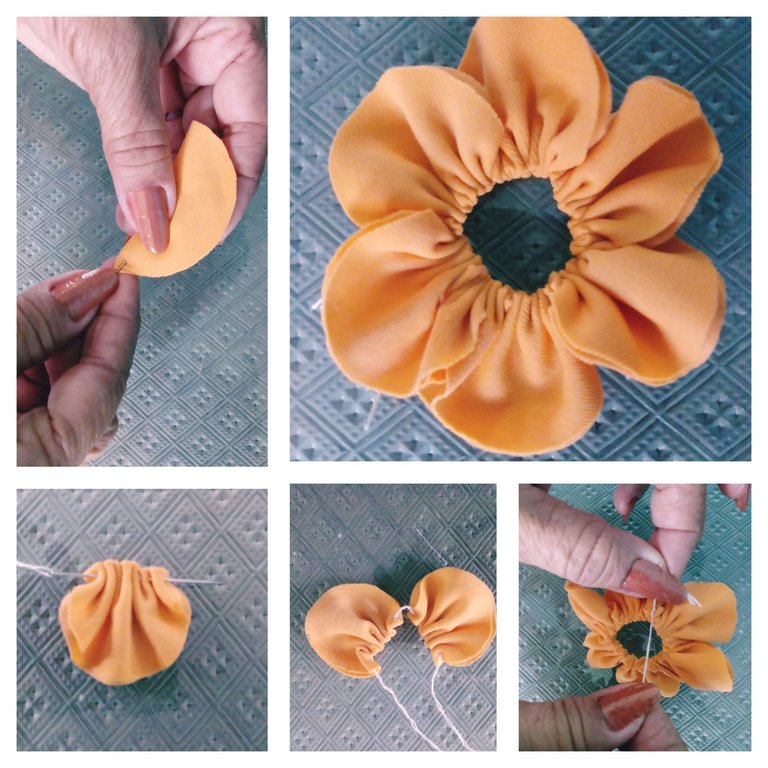
Ya tenemos confeccionado nuestros pétalos, ahora pasamos realizar nuestro centro, donde irán enganchadas nuestras agujas y alfileres.
4-Tomamos el círculo de tela de tonalidad diferente y utilizando la aguja, pasamos una hebra de hilo por todo su borde, la que una vez alando nos permite conformar un capullo al que rellenaremos utilizando pedacitos de algodón, lana, ó tiritas de tela, luego cocemos cerrándolo, obteniendo nuestro centro de flor listo.
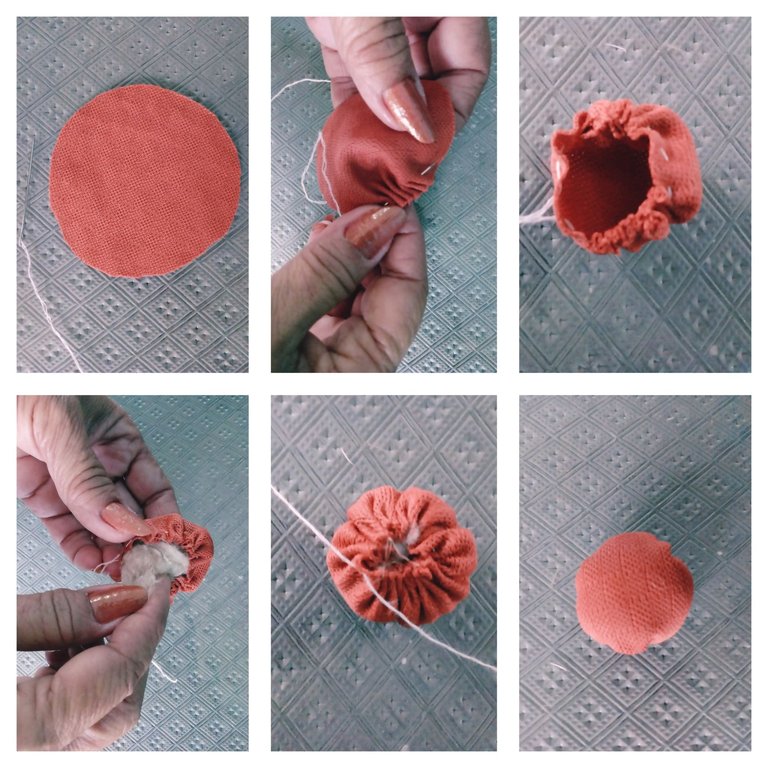
5-Unificamos nuestro centro y pétalos del alfiletero, utilizando aguja e hilos y le cocemos un delgado listón de tela en forma de asa para su colgado.
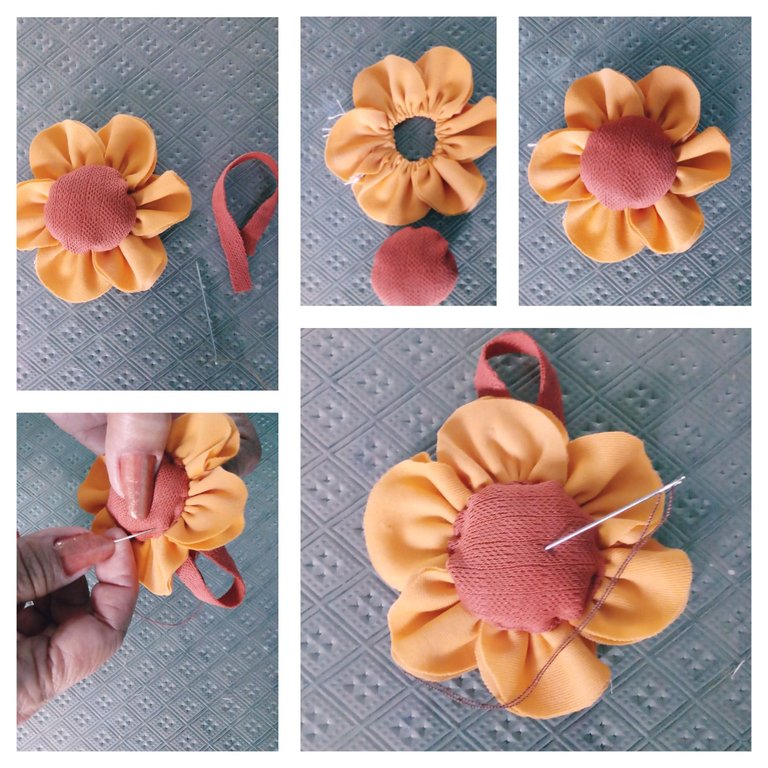
6- Cómo en la navidad todo es reluciente , quise que los alfileteros de flores también lo fuesen, por lo que les adherí para decorarlos pequeñas piedresitas brillantes.
Amigos, los alfileteros de flores , es una confección sencilla, útil, hermosa, que nos permite siempre tener al alcance estos pequeños alfileres y agujas que tienden a extraviarse.
Los exhorto a que se animen a confeccionarlos, les aseguro que disfrutarán el proceso de creación y serán muy gustados,si optan por obsequiarlos. Además que por su estructura de flor, podemos utilizarlos como colgantes de nuestros arbolitos de navidad.
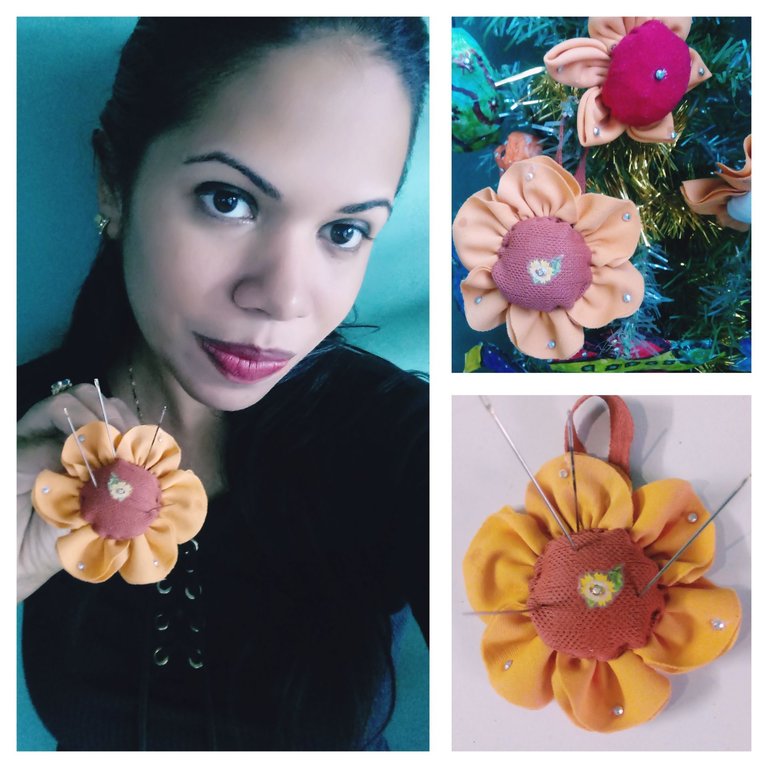
Bendecidos y excelentes días🙋🌻🎄.
Confecciones y fotografías propias.
English
Greetings fellow creators 🙋🌻🎄.
It is always rewarding to learn something new, so lately I have chosen to venture into the practice of various techniques for crafts.
Today, I want to share with you in the form of a tutorial, the flower pincushions that I made, advised by my mother to give this Christmas. Pincushions, friends, that we can make by recycling, giving utility and life to garments, fabrics, unused.Let's get started!

🌻Material🌻
.Recycled fabric scraps
.Cardboard or cardboard
.Pen holder
.Glass or circular object
.Scissor
.Glue
.Threads
.Needle
.Shiny pebbles

🌻Mode of preparation🌻
We can make various shapes of pincushions, and more on this inspiring date. I chose to make them in the form of sunflowers, flowers that captivate me for their natural beauty.
Steps
1-Place the glass on the cardboard or the circular object, and with the help of a pencil mark all over its edge, allowing us to obtain after cutting, a small circle of cardboard.

We did this step to get our guide to use in the fabrics.
2-Using the cardboard circle and the pencil we marked seven circles on the fabric. Six of the same shade for the petals, (these vary according to the number of petals we want), and the other with a different tone for its center. Then, we cut through this traced guide using the scissors, obtaining the seven well-shaped circles.

3-We fold the six circles of the same shade, smooth them using the iron and then taking a long thread strand on our needle, we begin to assemble the six circles of our petals. The ones that will be well made after making folds when the thread is winged and tied.

We have already made our petals, now we are going to make our center, where our needles and pins will be hooked.
4-We take the circle of fabric of a different shade and using the needle, we pass a strand of thread along its entire edge, which once winged allows us to form a cocoon to which we will fill using bits of cotton, wool, or fabric plasters, then we cook closing it, obtaining our ready flower center.

5-We unify our center and petals of the pincushion, using needle and threads and we cook a thin ribbon of fabric in the form of a handle for its hanging.

6- Since everything is shiny at Christmas, I wanted the flower pincushions to be shiny too, so I attached little shiny stones to decorate them.
Friends, the flower pincushions, is a simple, useful, beautiful confection, which allows us to always have at hand these small pins and needles that tend to get lost.
I urge you to be encouraged to make them, I assure you that you will enjoy the creation process and they will be very liked, if you choose to give them as a gift. In addition, due to their flower structure, we can use them as pendants of our Christmas trees.

Blessed and excellent days🙋🌻🎄.
Own clothing and photographs.
Hi Mary! Thanks for sharing your creativity again in the community. Beyond how beautiful those Christmas-themed pincushions turned out, today I applaud the quality of your post and the care you take in taking and sharing the photos. I can tell you work with great care in the presentation, and that makes you stand out as a Hiver. Bravo! Have a great day!...
Thank you very much. It is always a pleasure to interact in this community of creators, which allows us to learn about various personalized techniques. Wonderful and blessed days my friend.🙋🌈🌻
Que hermosos te quedaron esos alfileteros 😍🌻
Muchas gracias.Bendiciones🙋🌈🌻
Están bien bonitos. Estupenda idea para usar pequeños retazos. 🙋
Muchas gracias.Excelente y bendecida semana.🙋🌈
What a beautiful design! It is charming, stylish, and lovely. Good to see each step of making this. Nice work! Thanks!
Thank you very much.Greetings🙋🌻