Español
Saludos amigos creadores🙋⛄🌼.
En estos días he disfrutado cada una de sus manualidades expuestas,¡ me resultan brillantes y creativas!.
Hoy, integrándome a ustedes e inspirada en la navidad, les traigo la confección en forma de tutorial mi diadema navideña personalizada, la que se encuentra decorada por flores y pequeños muñecos de nieve.
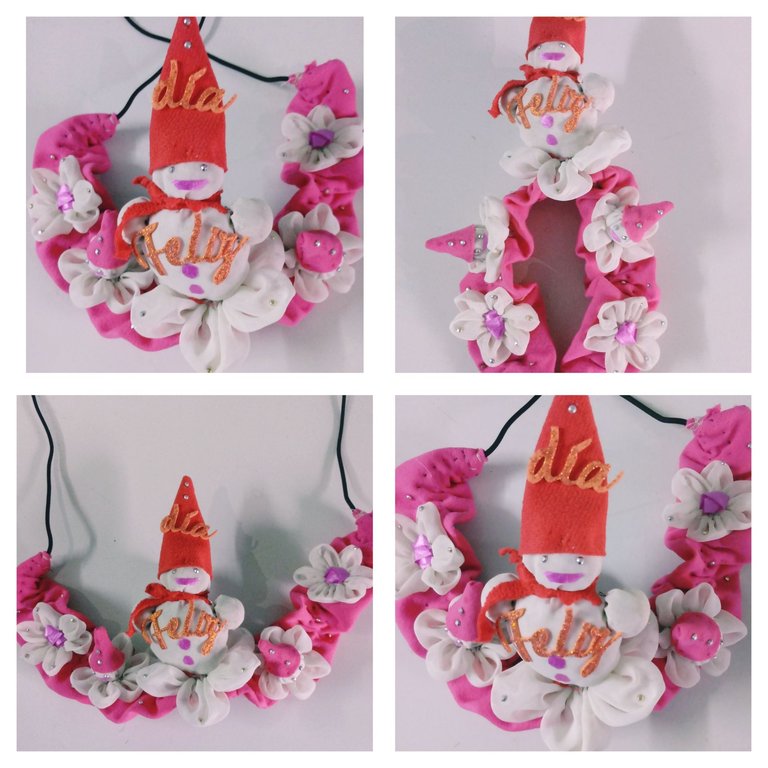
Esta confección cómo en las anteriores expuestas con tela, estaré asesorada por mi madre, mi maestra de costura, quién ha logrado que me aventure en nuevas técnicas creativas.
Los invito a que me acompañen a su paso a paso, espero que les guste y que les sirva de utilidad para sus futuras manualidades.
¡Comencémos!
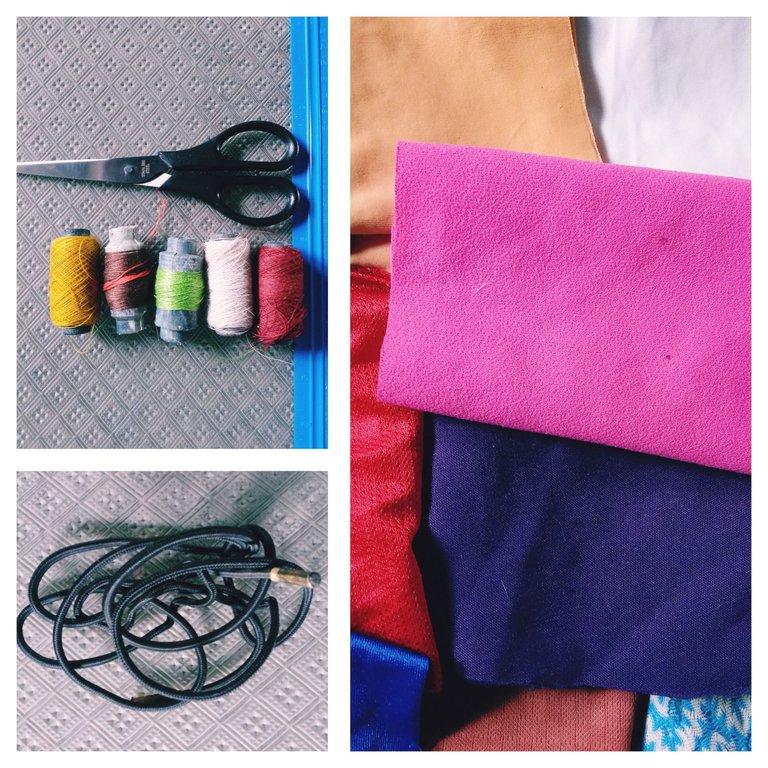
Materiales
.Retazos de tela
.Tijera
.Vaso
.Lapicero
.Hilos
.Aguja
.Pegamento
.Piedras pequeñas brillantes
.Cordon
Modo de confección
Esta diadema la vamos a realizar en dos momentos, uno, creando nuestra corona conformando un cintillo de tela , y el otro, confeccionando los decorativos que portará y lucirá.
Pasos para la corona
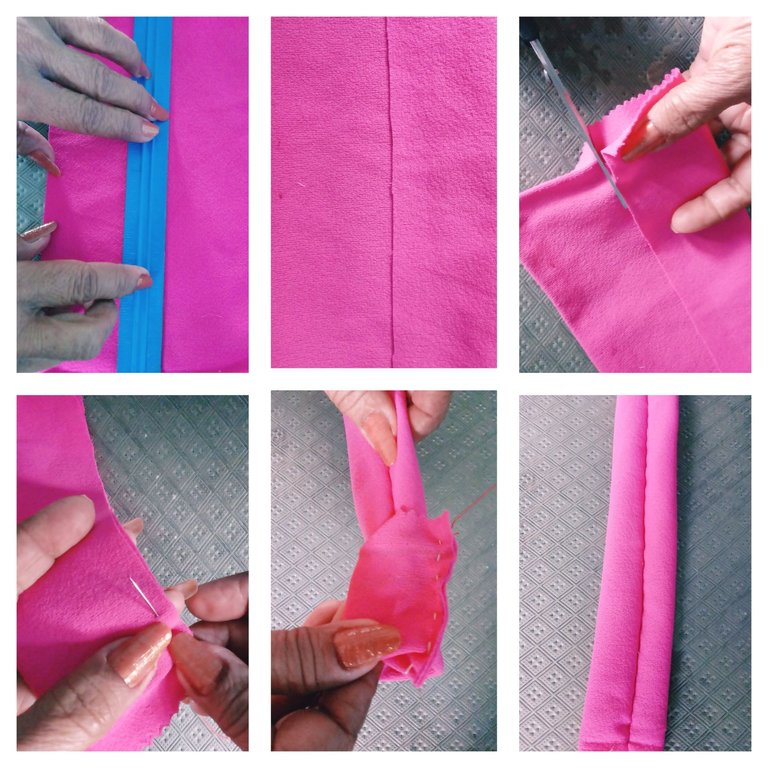
1-Tomar un retazo de tela, del color deseado, y colocarlo encima de la mesa, sercionarnos que este bien estirado.
2-Usando una regla, medir y marcar 60 centímetros de largo, y de ancho 12 centímetros.
3-Utilizando la tijera cortar por la guía marcada, y doblar a la mitad por el ancho.
4-Cosemos, utilizando la aguja e hilo por todo el borde y luego, viramos la tela , permitiéndonos obtener un listón de tela doble.
5-Relizamos dos costuras paralelas a un centímetro de los bordes, dejando en el centro un pequeño espacio por el que se introducirá el cordón.
6-Introducimos nuestro cordón y lo alamos recogiendo la tela y conformando pequeños pliegues.
7-Cosemos sus bordes para evitar el corrimiento del cordon.
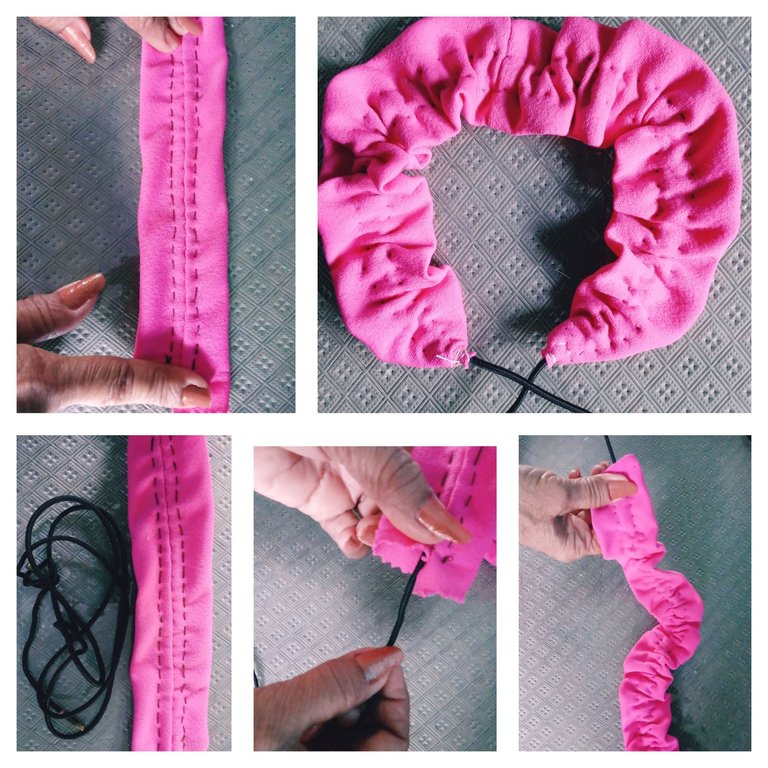
Hasta aquí amigos, hemos logrado confeccionar, nuestro corona de tela. Ahora pasaremos a confeccionar los decorativos que portará. Que son pequeñas flores de tela y pequeños muñecos de nieve.
Pasos para las flores🌸
1-Tomar un retazo de tela y utilizando un lapicero y un objeto circular (vaso), realizar seis círculos, que varian según la cantidad de pétalos deseados.
2-Utilizando una tijera cortarlos cuidadosamente y doblamos por su mitad.
3-Tomando una aguja con una hebra de hilo larga, vamos insertando por todo su borde cada círculo confeccionado, permitiéndonos obtener al alar la hebra, y anudar , una bella y pequeña flor.
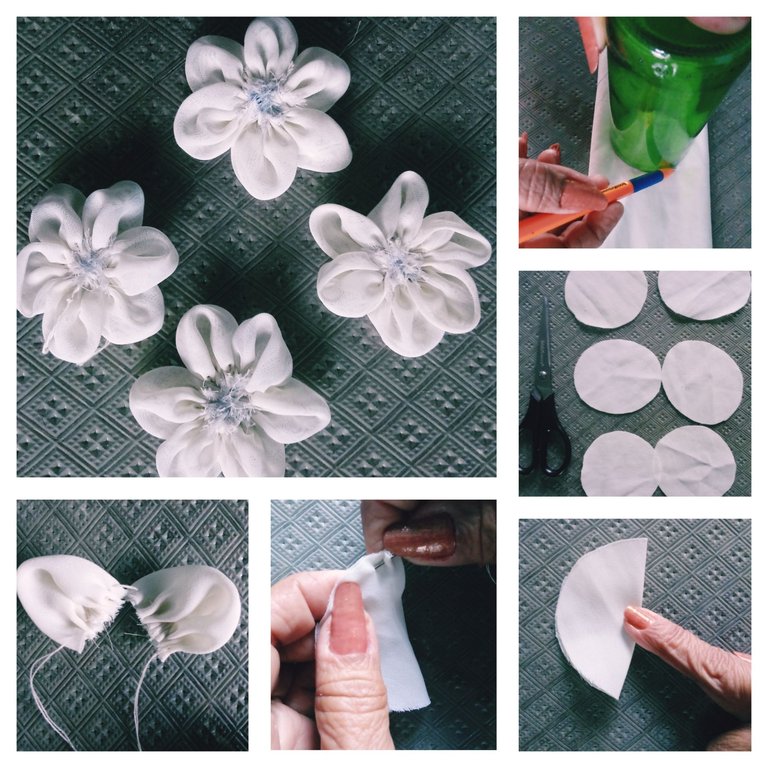
Estas flores podemos realizarla de diversos tamaños , esto dependerá del objeto circular escogido para sus pétalos.
Pasos para los muñecos de nieve ⛄.
Para confeccionar los muñecos de nieves que decorarán mi diadema, utilicé dos variantes, una : conformando muñecos compuestos sólo por: la cabeza y el sombrero, y la otra conformándolo con: cabeza, cuerpo, brazos y sombrero.
Pasos para confeccionar los sombreros:
1-Utilizando la tijera, cortar cuadrados medianos de retazos de tela.
2-Cada uno, doblarlo por su mitad , conformando triángulos medianos.
3-Cosemos utilizando aguja e hilo por su vértice, obteniendo al virarlo al revés, un sobrero en forma de cono, totalmente estructurado.
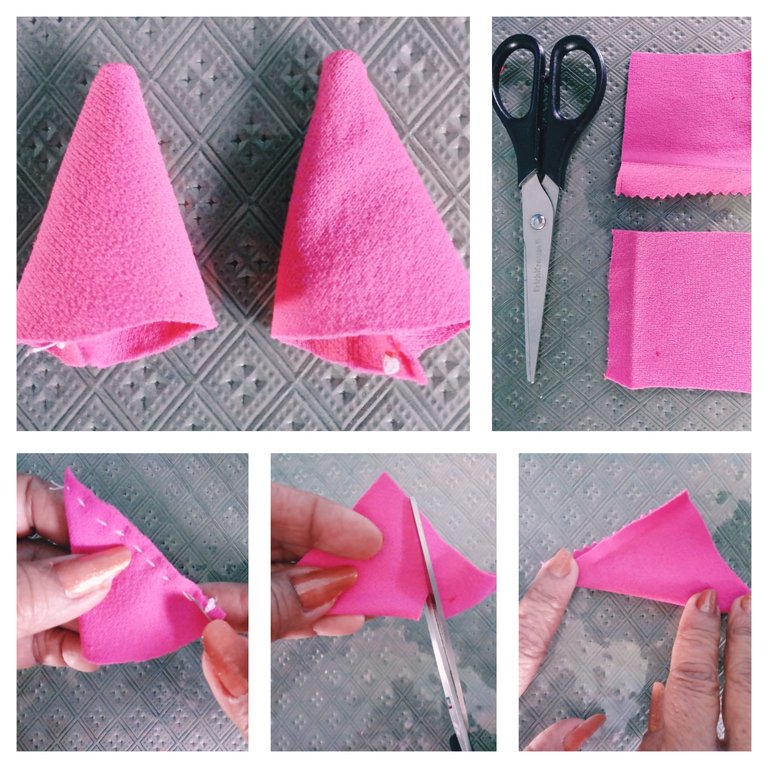
Pasos para hacer cabeza, cuerpo y brazos del muñeco.
Estas tres estructuras están confeccionadas utilizando un mismo método que nos permitirá obtener, bolitas redondas.
1-Tomar un retazo de tela, preferentemente blaco y utilizando un lapicero y un objeto circular(vaso), marcamos varios círculos sobre la tela, los que cortamos utilizando la tijera.
2-Utilizando la aguja e hilo, tomamos una hebra y comenzamos a pasarla por todo su vértice, luego alamos la hebra, conformando una estructura semejante a un capullo.
3-Rellenamos la estructura utilizando algodón ó tiritas de tela, y luego, cosemos cerrando nuestro capullo, permitiéndonos obtener nuestra bolita redonda.
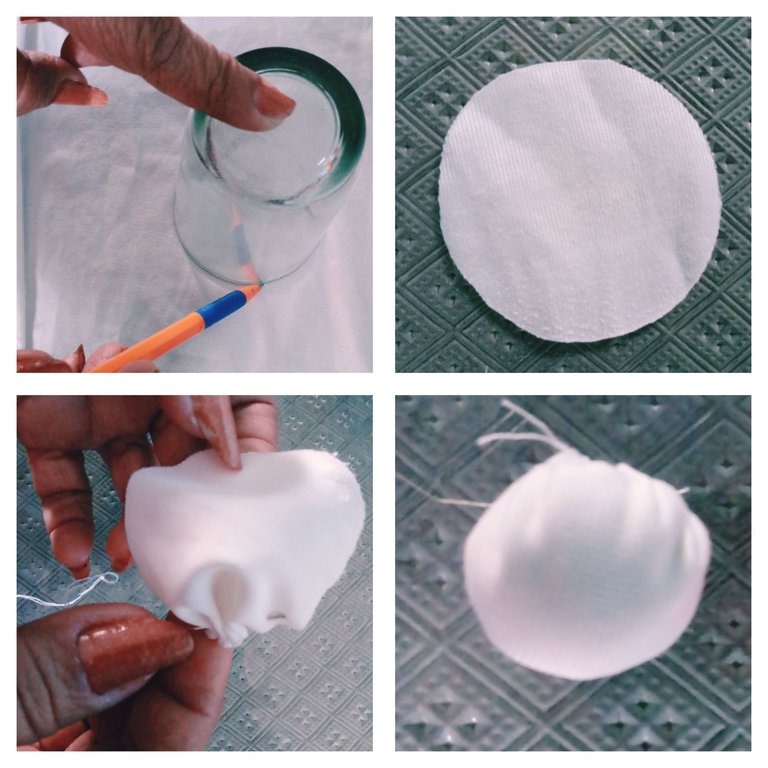
Estas bolitas confeccionadas son la base para nuestros muñecos, si lo vamos a ser del modelo que son solamente la cabecita y el sombrero, sólo necesitaremos aguja e hilo , para unirlos cosiéndolos, si los confeccionaremos con : cabeza , sombrero, brazos, cuerpo, realizamos el primer método y le agregamos cociéndole una bolita con mayor tamaño para su cuerpo y dos más pequeñas, para sus brazos.
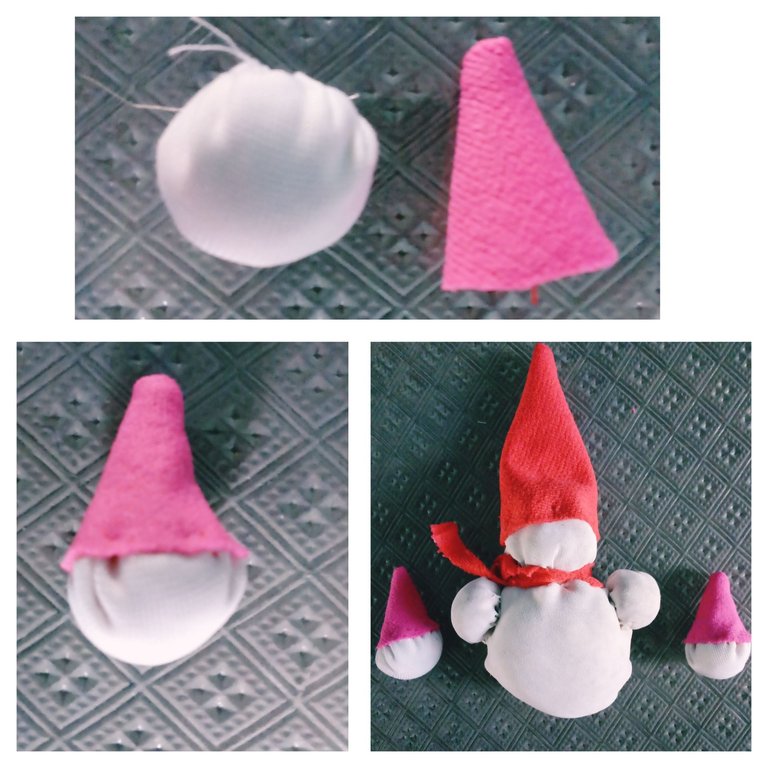
Ya tenemos listas las flores y los muñecos de nieve para nuestra diadema , ahora pasamos a coserlos a nuestra corona de tela previamente confeccionada.
Como la navidad todo es amor , alegría y felicidad , quise que mi diadema también lo reflejara a la vista, por lo que le adherí pequeñas piedras coloridas y letras brillantes deseando, un ¡feliz día!.
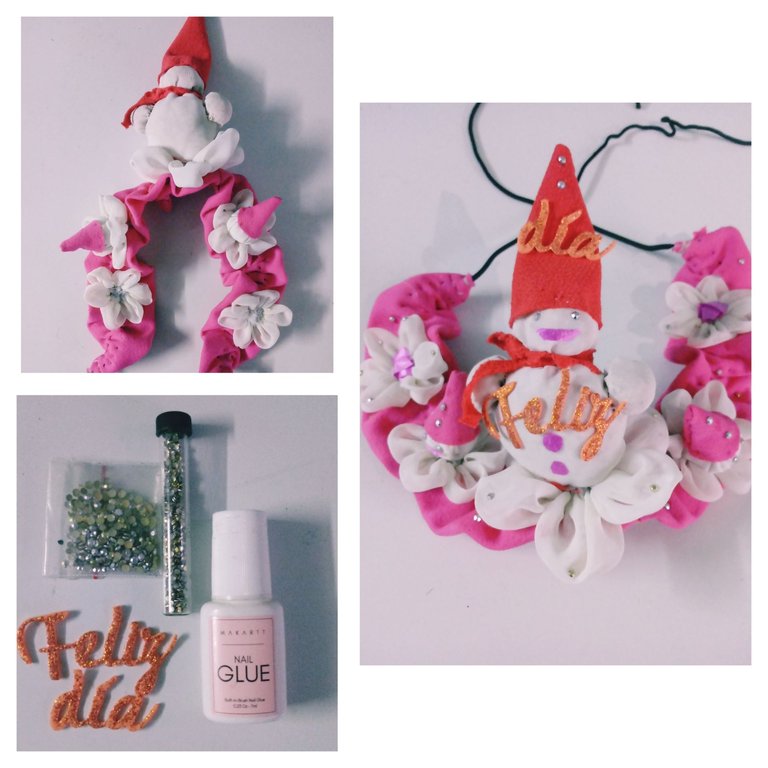
Espero que les haya gustado el proceso de confección de este tipo de diadema y que se animen a crear y personalizar las de ustedes para esta Navidad, será un gusto enorme apreciarlas y aprender sobre sus técnicas practicadas.
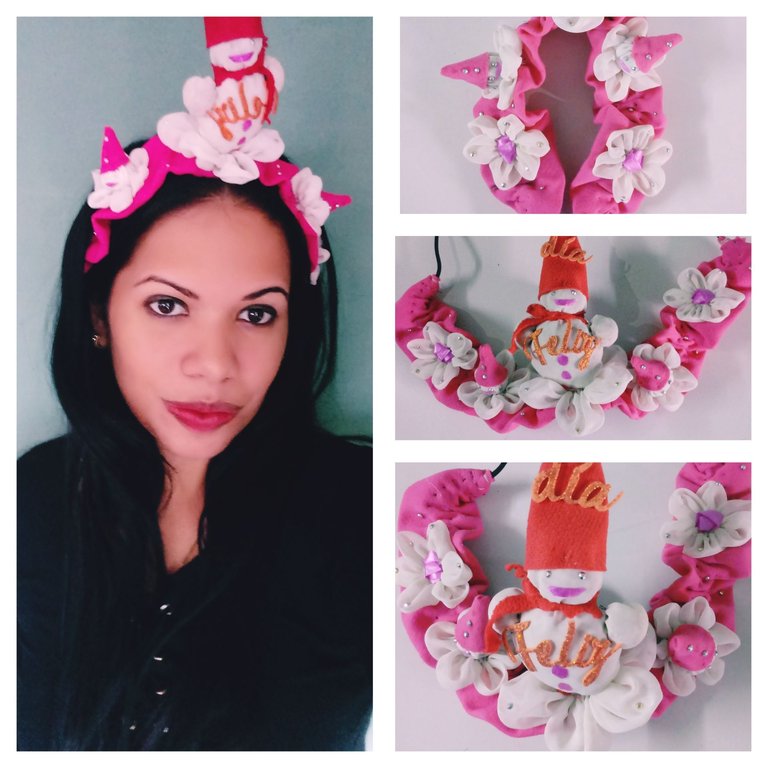
Bendiciones y excelentes días a todos. 🙋🎄
Confecciones y fotografías propias.
English
Greetings fellow creators🙋⛄🌼.
These days I have enjoyed every one of your exposed crafts, they are brilliant and creative to me!.
Today, joining you and inspired by Christmas, I bring you the making in the form of a tutorial of my personalized Christmas headband, which is decorated with flowers and small snowmen.

This sewing, as in the previous ones exposed with fabric, I will be advised by my mother, my sewing teacher, who has managed to get me to venture into new creative techniques.
I invite you to accompany me to your step by step, I hope you like it and that it will be useful for your future crafts.
Let's get started!
Materials
.Scraps of fabric
.Scissor
.Glass
.Pen holder
.Threads
.Needle
.Glue
.Shiny small stones
.Cordon

Mode of preparation
We are going to make this headband in two moments, one, creating our crown by forming a fabric ribbon, and the other, making the decorations that it will wear and show off.
Steps to the Crown
1-Take a piece of fabric, of the desired color, and place it on the table, make sure it is well stretched.
2-Using a ruler, measure and mark 60 centimeters long, and 12 centimeters wide.
3-Using the scissors cut along the marked guide, and fold in half across the width.
4-We sew, using the needle and thread all over the edge and then, we turn the fabric, allowing us to get a double fabric ribbon.

5-Make two parallel seams one centimeter from the edges, leaving a small space in the center through which the lace will be inserted.
6-We introduce our cord and praise it by picking up the fabric and forming small folds.
7-We sew its edges to avoid the running of the cord.

So far, friends, we have managed to make our fabric crown. Now we will go on to make the decorations that he will wear. Which are little fabric flowers and little snowmen.
Steps for flowers🌸
1-Take a piece of fabric and using a pen and a circular object (glass), make six circles, which vary according to the number of desired petals.
2-Using a scissors cut them carefully and fold in half.
3-Taking a needle with a long thread strand, we are inserting each made circle around its edge, allowing us to get by wing the strand, and knotting, a beautiful and small flower.

These flowers can be made in different sizes, this will depend on the circular object chosen for its petals.
Steps for the snowmen ⛄.
To make the snowmen that will decorate my headband, I used two variants, one: forming dolls composed only of: the head and the hat, and the other forming it with: head, body, arms and hat.
Steps to make the hats:
1-Using the scissors, cut medium squares of fabric scraps.
2-Each one, fold it in half, forming medium triangles.
3-We sew using needle and thread by its vertex, obtaining by turning it upside down, a cone-shaped top, fully structured.

Steps to make the doll's head, body and arms.
These three structures are made using the same method that will allow us to obtain round balls.
1-Take a piece of fabric, preferably blaco and using a pencil and a circular object (glass), mark several circles on the fabric, which we cut using scissors.
2-Using the needle and thread, we take a strand and begin to pass it through all its vertex, then wing the strand, forming a structure similar to a cocoon.
3-We fill the structure using cotton or fabric band-aids, and then, we sew closing our cocoon, allowing us to get our round ball.

These ready-made balls are the basis for our dolls, if we are going to be of the model that are only the little head and the hat, we will only need needle and thread, to join them by sewing them, if we will make them with : head, hat, arms, body, we perform the first method and we add it by cooking a ball with a larger size for his body and two smaller ones, for his arms.

We already have the flowers and the snowmen ready for our headband, now we are going to sew them to our previously made fabric crown.
As Christmas is all about love, joy and happiness, I wanted my headband to also reflect it to the eye, so I attached small colorful stones and bright letters wishing, a happy day!.

I hope you liked the process of making this type of headband and that you are encouraged to create and customize yours for this Christmas, it will be a huge pleasure to appreciate them and learn about their practiced techniques.

Blessings and great days to all. 🙋🎄
Own clothing and photographs.
Hola.
Es la primera corona o diadema de este estilo que veo, se ve muy muy linda. También es una labor minuciosa. Me encantó ver tu post.
Saludos. 🙋🏽♀️🎄😃
Saludos, muchas gracias, la navidad inspira.Bendiciones🙋🎄☀.
A mi hija le gustaría seguro ella tiene son cintillos. Gracias por compartir
Muchas gracias, lucen hermosos en especial en navidad, una fecha colorida y de unión familiar. Bendiciones🙋🎄🌈
lindo!
Muchas gracias .Saludos🙋🎄