In my previous post, I discussed how to mix the Electric Bass. Despite the fact that I have always stated that I am not an expert in this field. Also, let me emphasize that you have complete control over what you mix.
In this post, I'll go over some tips for mixing drums in my opinion. You are not required to follow this, but as a beginner, it is something to consider when mixing drums.
As for the topics I'll try to cover in this post, they are as follows:
- Sub-Group
- Track Reverb
- Balancing Processing
- Audio Sequence Processing
- Kick and Snare Processing
- Toms processing
- Hihat processing
- Overhead Processing
- Reverb Settings
- Stereo-Buss processing
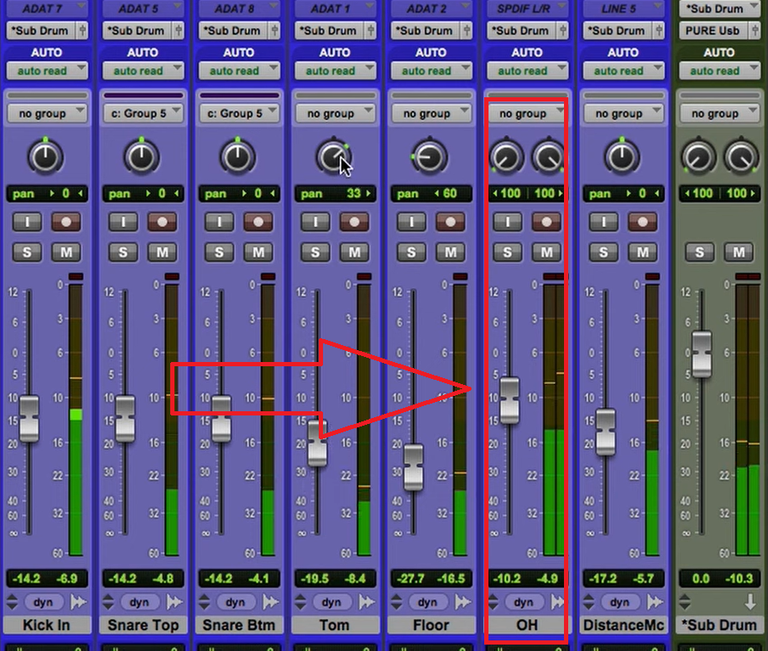
1. Sub-Group
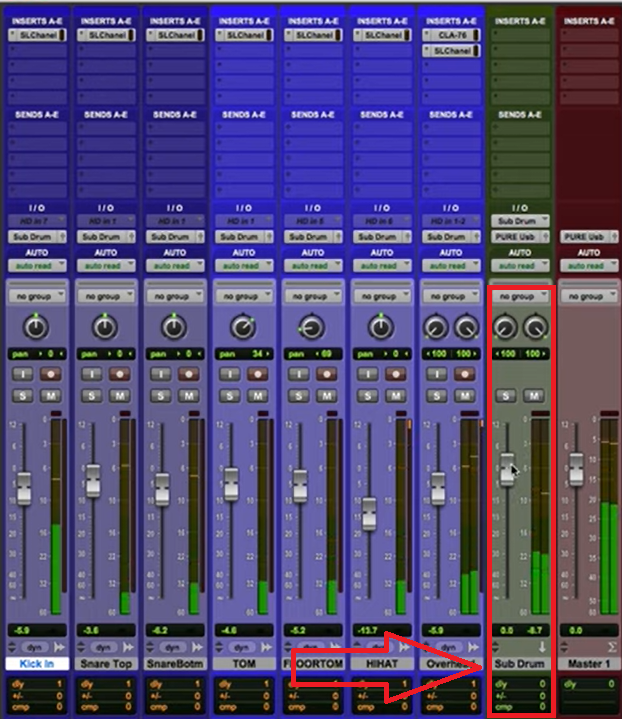
Unlike other musical instruments that produce only one type of sound, such as a guitar, a drum instrument produces a variety of sounds; including kick, snare, side stick, and close. Hi-hat, Open Hi-hat, Low Tom, Mid Tom, High Tom, bell, ride, crash/cymbal, and other percussion instruments. All of these sounds have different frequencies, ranging from low to high.
Because of the different frequencies produced by a drum instrument, mixing cannot be done at the same time. For example, if we use a mixer to increase the low sound on kick, the high sound on crash/cymbal will change, and vice versa. As a result, mixing the drums necessitates the use of multiple channels, each with a unique touch.
After you've separated each sound from the drum instrument onto a different channel, you'll need to make a Sub-group. The subgroup serves to unify the overall sound output of the drum, making balancing the drum with other instruments easier.
2. Track Reverb
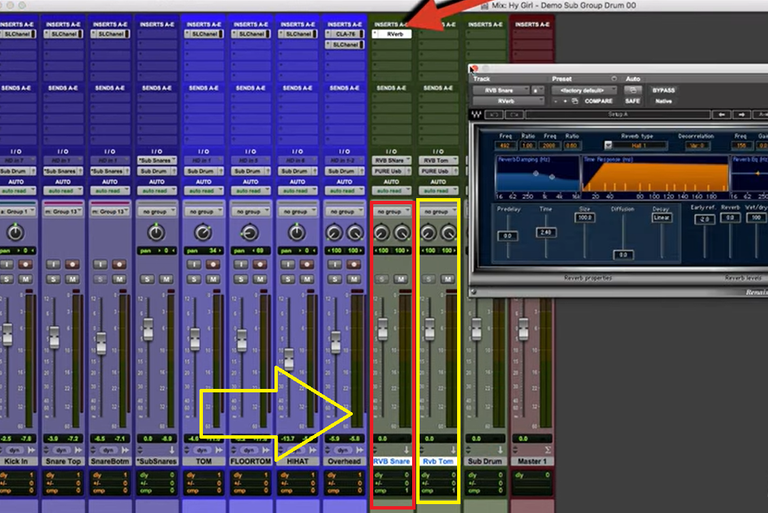
As previously stated, the drum is a separate unit from the type of sound. It also necessitates using a different effect for each type, such as the reverb effect. Reverb is an echo effect that must be added to every instrument, so the use of reverb on each type of sound on a drum instrument is also done with a different touch.
In addition to the use of different reverb between the types of sounds on the drum, the reverb effect is also different for each different genre. Examples of the use of reverb on different snare music genres are Pop, Rock, Metal, Jazz, and others.
Another example is that toms typically necessitate a longer pre-delay and decay than snares. Tom's reverb equalizer is set to a darker value than the Snare drum reverb to create the illusion of a much deeper reflection.
3. Balancing Processing
To begin balancing, there are two options:
- First, set Kick and Snare volume in sub-group to -10 dBfs. You use these two tracks as a guide for drum balancing. After that, you open the overhead, adjust the balance to your liking, and then continue with the other audio track.
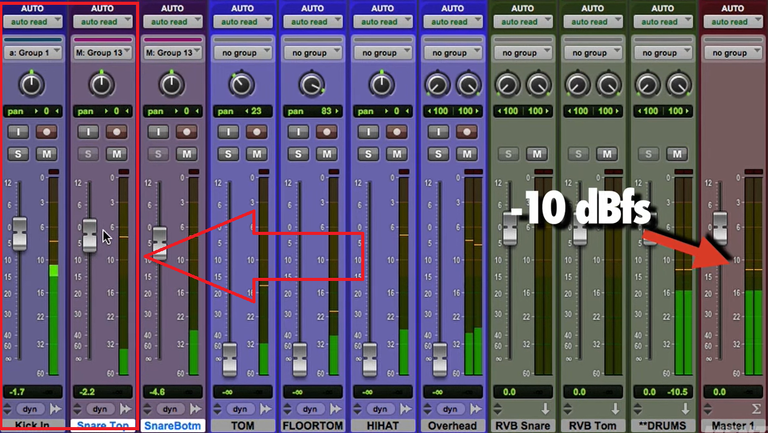
- The second method is to open track overhead in the sub-group at -10 dBfs. Now that the reference is overhead, open the snare and kick and fine-tune the balance.
You can control the type of balance you want on the balancing drum using these two methods.
4. Audio Sequence Processing
You can use the same sequence as in the drum balance process above when processing the audio processing sequence for drum tracks. Which begins with the kick and snare, then adjusts the overhead, and is followed by another audio track, or which begins with the overhead and then adjusts the kicks and snare.
But I'll try to explain the focus difference.
When you concentrate on the kick and snare first and then adjust the overhead, the resulting drum tone is usually more processed and has more separation between Kick, Snare, Tom, hi Hat, and overhead. This method is commonly used in progressive metal, pop-rock, and other music that calls for a more distinct drum sound.
The second method, focusing on the overhead and room mics, just kick and snare, usually results in a more natural and organic drum tone. Traditional jazz, traditional folk, and acoustic bands are typically the types of music that necessitate this approach.
What must be remembered, there is no right or wrong between the two approaches, so it is necessary to be wiser to choose which approach is more suitable for your project.
5. Kick and Snare Processing
I will explain the processing on each track between Kick and Snare.
First I'll start with the kick drum.
First, we will discuss the equalizer on the kick drum.
All of the equalizer positions used in this post can be found in the equalizer guide, which can be found in my previous post.
Using the equalizer, you can experiment with four aspects of the kick drum's sound: adding a sub kick, the body of the kick, the definition of the beater from the kick, and the sharpness of the beater.
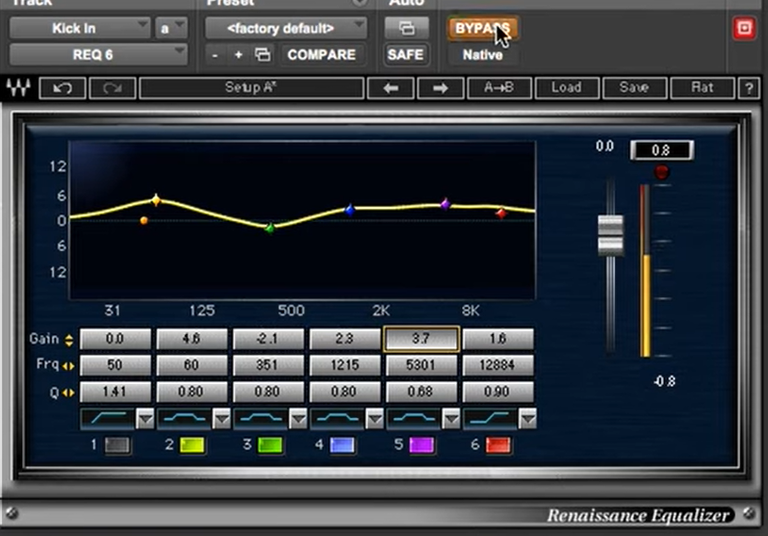
| Aspect | Action | Frequency |
|---|---|---|
| Adding a sub kick | Bell Amplifier | 60-80Hz |
| Adding the body of the kick | Bell Amplifier | 1-1,5kHz |
| Definition of the beater | Bell Amplifier | 5-6kHz |
| Sharpness of the beater | Bell Amplifier | 8-10kHz |
| Reduces the muddy Kick | Bell Attenuation | 300-400Hz |
I emphasize once more that you have complete control over the energy of the equalizer. In this case, I'm simply attempting to assist you in recognizing the characteristics of the equalizer position on the instrument.
The next process I will use the compressor on the kick.
Because the sound produced by the kick drum is very percussive and dynamic, you must first determine how much dynamics from this kick you want to reduce. From there, you can choose which settings you think are appropriate.
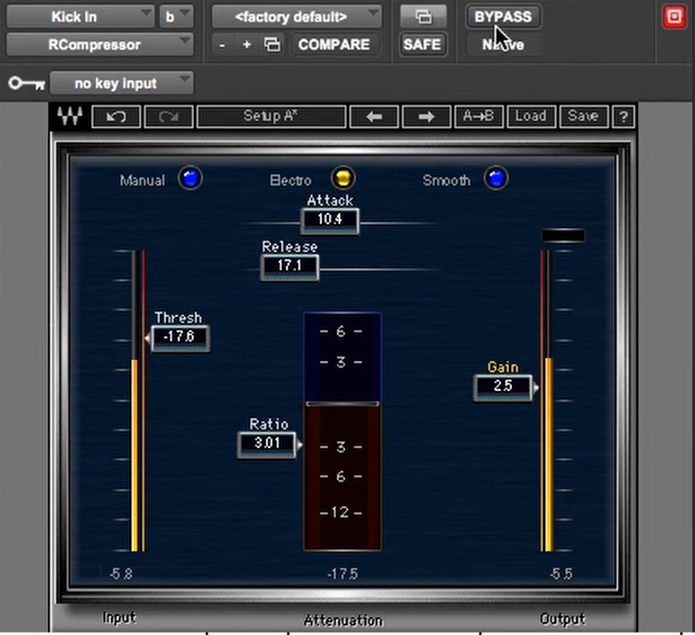
| Option | Ratio | Att&Real | Thres | Gain |
|---|---|---|---|---|
| Dynamic | 3:1 | Fast to Medium | Fast to Medium | 3-5dB |
| Tight | 4:1 | Fast to Medium | Fast to Medium | 4-8dB |
| Extra Tight | 5:1 | Fast to Medium | Fast to Medium | 5-10dB |
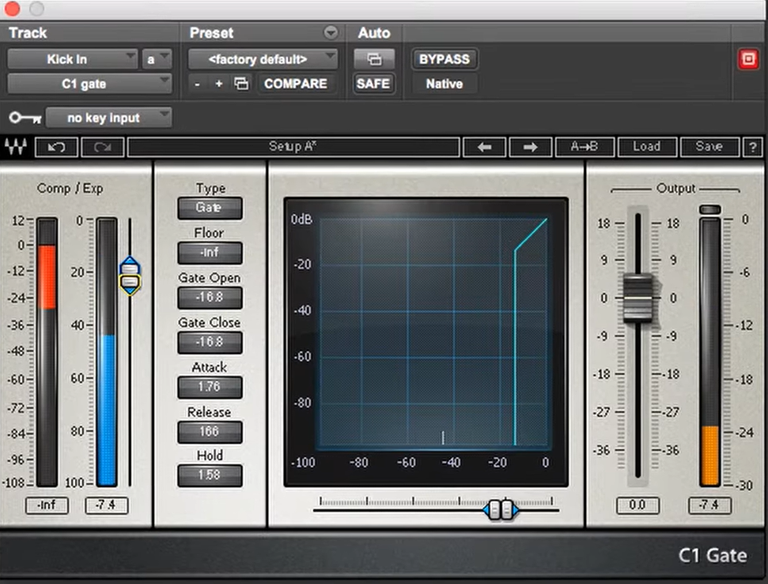
The next processing is Gate.
A gate is a processor used to reduce leaks into the microphone. For those of you mixing for the first time, I recommend skipping the gate and instead focusing on the balance stand and setting the tonality of the drum first. However, if you believe that using this gate will make the mixing process smoother, you can do so.
We'll now move on to the snare drum's processing.
First, we'll go over the equalizer on the snare drum.
Using an equalizer, you can experiment with four aspects of the snare drum's sound: increasing the weight of the snare, increasing the definition of the snares, increasing the beat, and increasing the sharpness of the pounding of the strings.
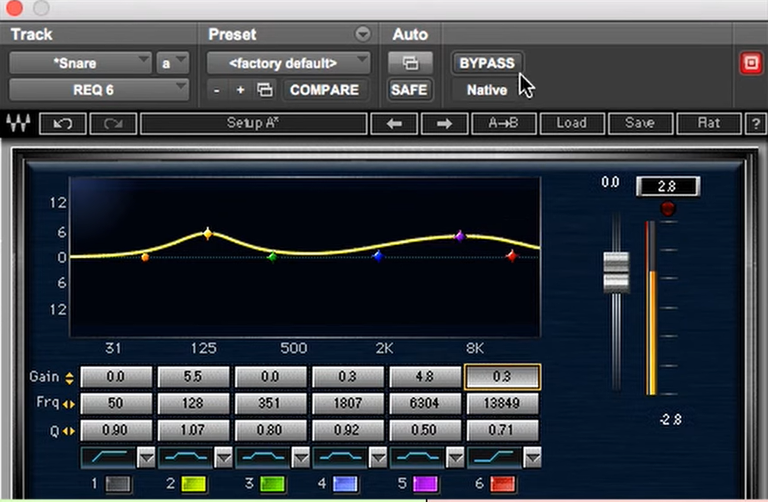
| Aspect | Action | Frequency |
|---|---|---|
| increasing the weight of the snare | Bell Amplifier | 150-250Hz |
| increasing the definition of the snares | Bell Amplifier | 800Hz-2kHz |
| increasing the beat | Bell Amplifier | 5-6kHz |
| increasing the sharpness of the pounding of the strings | Hi Shelf | 8-10kHz |
| Reduces the Rumbling Snare | HPF | 90Hz |
The next process is to use a compressor on the snare drum.
Because the snare drum's sound is also very percussive and dynamic, you must first determine how much dynamics from this snare you want to reduce, and then you must determine what settings you believe are appropriate.
| Option | Ratio | Att&Real | Thres | Gain |
|---|---|---|---|---|
| Dynamic | 3:1 | Fast to Medium | Fast to Medium | 3-5dB |
| Tight | 4:1 | Fast to Medium | Fast to Medium | 4-8dB |
| Extra Tight | 5:1 | Fast to Medium | Fast to Medium | 5-10dB |
The next processing is Gate.
Same as above, I didn't go into more detail about the gate, but you can try and feel the difference if you think you understand it.
6. Toms processing
Now let's get into Tom's process
I'll start with the equalizer on Tom.
Using an equalizer, you can experiment with four aspects of the Tom drum sound: the body of the Tom sound, the definition of the Tom sound, the pounding behavior of the Tom, and the sharpness of the Tom beats.
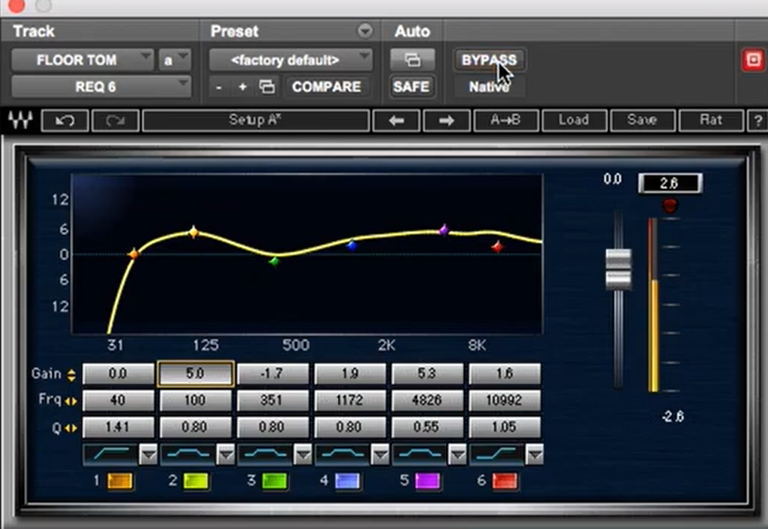
| Aspect | Action | Frequency |
|---|---|---|
| Body of the Tom sound | Bell Amplifier | 110-125Hz |
| Definition of the Tom sound | Bell Amplifier | 2kHz-3kHz |
| Pounding behavior | Bell Amplifier | 5-6kHz |
| Sharpness of the Tom beats | Hi Shelf | 10kHz |
| Reduces the Muddy Tom | HPF | 80Hz |
| Reduces the Rumbling Tom | Bell Amplifier | 300-400Hz |
The next step is to apply the compressor to the Tom drum.
Because Tom's sound is very percussive, you must first determine how many percussive elements you want to remove from Tom, and then decide what settings you believe are appropriate.
| Option | Ratio | Att&Real | Thres | Gain |
|---|---|---|---|---|
| Dynamic | 3:1 | Fast to Medium | Fast to Medium | 3-5dB |
| Tight | 4:1 | Fast to Medium | Fast to Medium | 4-8dB |
| Extra Tight | 5:1 | Fast to Medium | Fast to Medium | 5-10dB |
The next processing is Gate.
Same as above, I didn't go into more detail about the gate, but you can try and feel the difference if you think you understand it.
7. Hi-hat processing
We'll start with the equalizer.
There are two things that you can explore about the hi-hat sound using an equalizer, namely increasing the definition of the hi-hat and increasing the sharpness of the hi-hat sound.
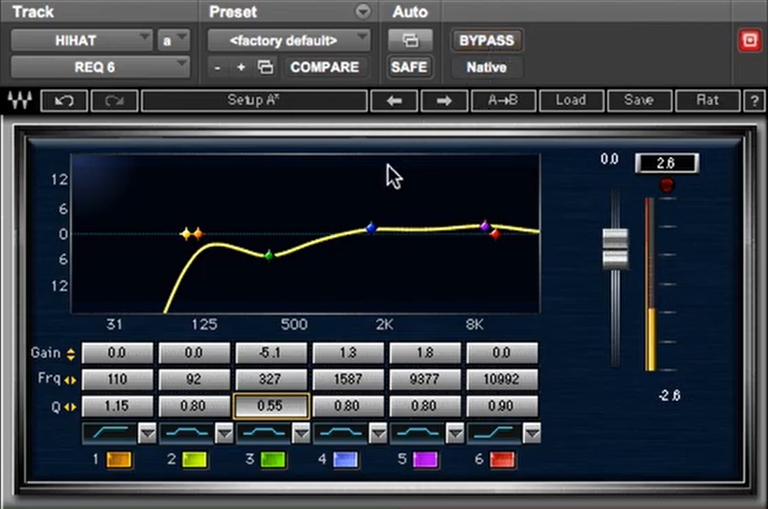
| Aspect | Action | Frequency |
|---|---|---|
| Increasing the definition of the hi-hat | Bell Amplifier | 1-2kHz |
| Increasing the sharpness of the hi-hat | Bell Amplifier | 8kHz-10kHz |
| Reduces the Weight hi-hat | Bell Amplifier | 250-350Hz |
| Reduces the Rumbling hi-hat | HPF | 110Hz |
The next processing uses a compressor on a hi-hat.
The sound of Hi-hat is also very percussive. So you have to determine first how much dynamics from this heart you want to reduce from there, then you decide what settings you feel are suitable
| Option | Ratio | Att&Real | Thres | Gain |
|---|---|---|---|---|
| Dynamic | 3:1 | Fast to Medium | Fast to Medium | 3-5dB |
| Tight | 4:1 | Fast to Medium | Fast to Medium | 4-8dB |
| Extra Tight | 5:1 | Fast to Medium | Fast to Medium | 5-10dB |
8. Overhead Processing
First, I will start with the equalizer.
There are four things you can explore on the overhead drum sound by using the Equalizer. namely increasing the energy of the kick, increasing the energy of the snare, increasing the beat of the overall kit, and the sharpness of the cymbal
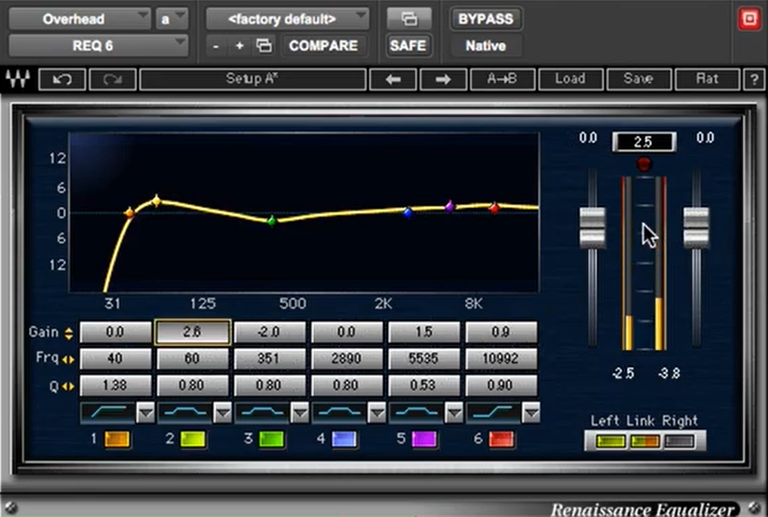
| Aspect | Action | Frequency |
|---|---|---|
| Increasing the energy of the kick | Bell Amplifier | 60-110Hz |
| Increasing the energy of the snare | Bell Amplifier | 125-160Hz |
| Increasing the beat of the overall kit | Bell Amplifier | 5-6kHz |
| sharpness of the cymbal | Bell Amplifier | 8-12kHz |
| Reduces the Muddy Drum | Bell Amplifier | 300-400Hz |
| Reduces the Rumbling Drum | HPF | 40Hz |
Next use the compressor on the overhead drum.
Because the overhead drum sound is also very percussive so as usual, you have to first determine how much dynamics from this overhead you want to reduce. From this, then you determine what settings you feel are suitable.
| Option | Ratio | Att&Real | Thres | Gain |
|---|---|---|---|---|
| Dynamic | 3:1 | Fast to Medium | Fast to Medium | 3-5dB |
| Tight | 4:1 | Fast to Medium | Fast to Medium | 4-8dB |
| Extra Tight | 5:1 | Fast to Medium | Medium to Fast | 5-10dB |
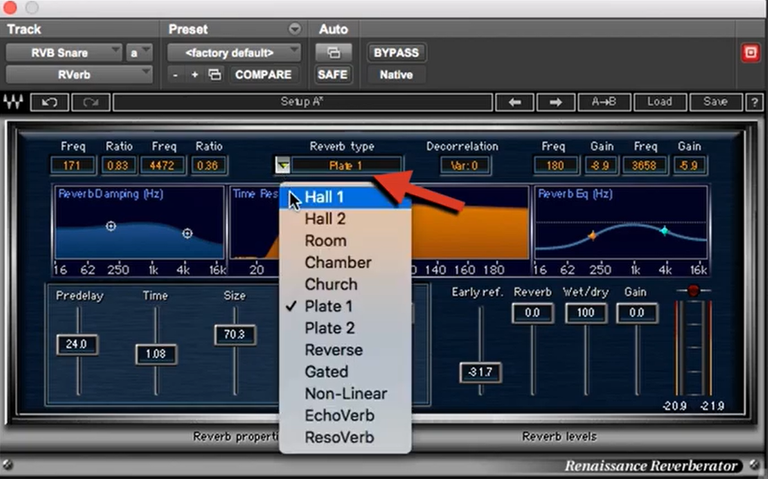
9. Reverb Settings
Here I will try to discuss the Reverb settings on the snare and Tom Drum.
Reverb Settings on the Snare Drum.
There are two types of reverb that are often used for snare drums, namely plate reverb, and hall reverb. If you want to get a brighter reverb sound, you can try using a reverb plate. However, if you want to get a snare reverb sound that gives a rather large impression, you can use hall reverb.
The two most important parameters to set first when configuring the settings are pre-delay and decay. For songs that have a fast beat, you can start with a pre-delay of 5-10 ms. Alternatively, for songs with relatively slow beats, you can return to 10-15 ms.
Then, for decay, you can adjust it to the beat of the song. Try to run out of decay when the next beat comes in so that your reverb doesn't cloud the next beat.
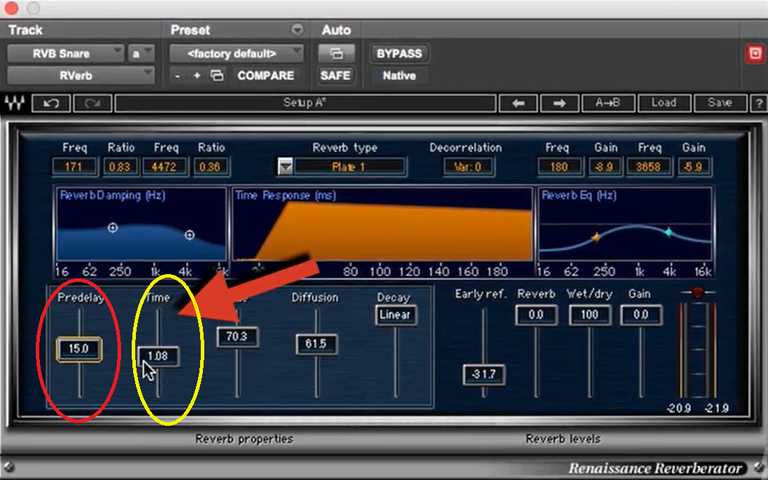
Sometimes the Equalizer filter setting of the reverb isn't enough to make the snare reverb sound just right in the mix, which is why we frequently add an EQ processor to the reverb insert.
Reverb Settings on the Tom Drum.
There are two fundamental things that distinguish the snare reverb and tom reverb; is decayed and filtered. In the reverb tom, you can set a longer decay, then you raise the low frequency of the equalizer a little, and the high frequency you reduce relatively more.
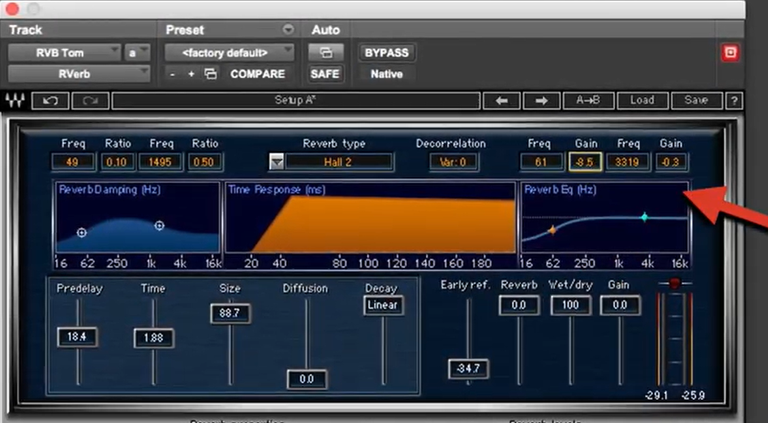
The reverb tone that you are trying to get from this tom reverb is one that is longer and more backward.
As usual, you can also add an equalizer processor after the reverb to make Tom's reverb sound more fitting in the mix.
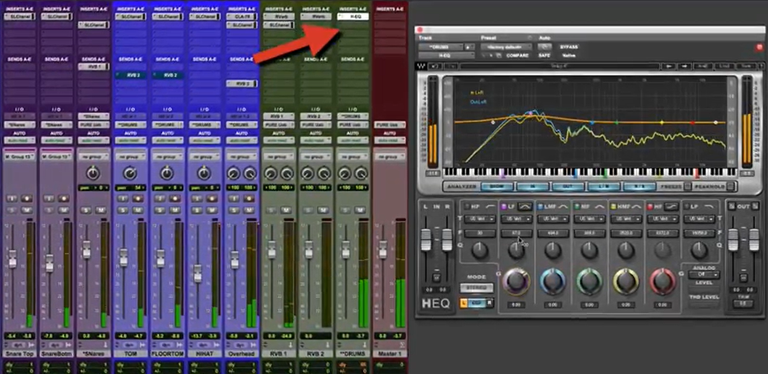
10. Stereo-buss processing
As I mentioned at the beginning of this post, this subgroup processing is a very useful effect to make it easier for you to balance with other instruments so that it sounds more fit with the context of the song when played with other instruments.
For stereo-Buss processing, there are two fundamentally two things, namely Equalizer and compressor. But for those who are professionals will add another processing.
But what you have to remember is for the equalizer settings that you must pay attention to is not to add to reduce too extreme, because here because it is only adding a little in some areas to make your whole drum more powerful not too drastically change the tone.
Don't overprocess the same compressor so that it drastically changes the dynamics of your inner mix unless that's the tone you want to pursue.
That's my step-by-step explanation about mixing drums. What is certain is the explanation above is my personal opinion as a beginner. For those who are seniors, of course, they have other tricks and tips that are more powerful than here.


FOLLOW ME ON
DISCORD FACEBOOK INSTAGRAM TELEGRAM TWITTER

The rewards earned on this comment will go directly to the person sharing the post on Twitter as long as they are registered with @poshtoken. Sign up at https://hiveposh.com.
The amount of detail contained in this post is staggering! I'm a fellow musician, but even I had to stop to take in some of the stuff you're throwing out there. Even if I'm not using a lot of drums, the editing techniques you're using are helpful for proper mixing, in general.
!1UP
Thank you, I'm also just learning
You have received a 1UP from @entrepidus!
@vibes-curator, @neoxag-curator, @pal-curator, @vyb-curatorAnd they will bring !PIZZA 🍕
Learn more about our delegation service to earn daily rewards. Join the family on Discord.
PIZZA Holders sent $PIZZA tips in this post's comments:
@curation-cartel(6/20) tipped @resyiazhari (x1)
Join us in Discord!
Fantastic! I've started playing around with my own music production, and although I am still very much a beginner, I am figuring out my software. I am using protools as it's the software that came with my scarlet solo interface. I need to add drums to my tracks, but I find the idea very daunting. I'll be coming back to this as a guide! Thank you so much!
thanks. happy to help you guys
Cool thanks for sharing this tutorial. I’m using ableton live but all the tips translate pretty well. Mixing is difficult. Somewhere between an art and a science don’t you think??
True, it is art and the ability to produce art. But what is known is 100% Control is in your hands. Please read my previous tutorial. Hope it can be useful
Congratulations @resyiazhari! You have completed the following achievement on the Hive blockchain and have been rewarded with new badge(s):
Your next payout target is 500 HP.
The unit is Hive Power equivalent because your rewards can be split into HP and HBD
You can view your badges on your board and compare yourself to others in the Ranking
If you no longer want to receive notifications, reply to this comment with the word
STOPCheck out the last post from @hivebuzz:
Support the HiveBuzz project. Vote for our proposal!