When I first picked up a copy of Monster Hunter 4 Ultimate, I gave the game a shot without any previous knowledge or tutorials. I tried a handful of weapons, eventually landing on the Insect Glaive, and after bumbling my way through a few quests, I hit a wall and gave up.
It took a few months until I was reminded of the game again when looking for something to play with a friend. This time, I prepared. I read up and watched videos, and took the time to go through each individual weapon to find something I liked to play. I eventually landed on the greatsword, because of its simplicity and sheer killing power. But when I began to get bored of it, I decided to dabble with some of the more complicated weapons.
In MH4U, there are few melee weapons more complicated than the Charge Blade. It's an over-sized sword and shield, with the ability to morph into a giant double-sided axe, the shield serving as an axe-head. It's mechanic revolves around charging energy in the sword through attacks, then storing that energy into the shield, and using the axe mode to discharge said energy back into the monster. It's a fluid, cyclical weapon with outstanding damage potential and incredible defense, alongside a very high skill ceiling for beginning players.
After a hundred hours and several hundred uses of the Charge Blade, it clicked with me. And nearly a thousand hours of gameplay later, not one of the other weapons in Monster Hunter gives me as much satisfaction to use effectively.
But therein lies the key. Efficiency. Without much of an explanation, the Charge Blade starts off as a clunky and needlessly complicated weapon. There's much to play with, but no clear sign of how, or when. Understanding the Charge Blade can turn you into a freakish killing machine, effectively stun-locking monsters and eviscerating them in minutes, in both MH4U and MHW. While the weapon has been made much stronger due to a simple change in mechanics, it still takes some skill to use effectively - and today, we'll go through all the ins and outs of using the Charge Blade.
Controlling the Charge Blade
For the sake of this guide, I'll refer to X (3DS)/Triangle (PS4) as the primary attack button, or attack 1, and A/Circle as the secondary attack button, or attack 2.
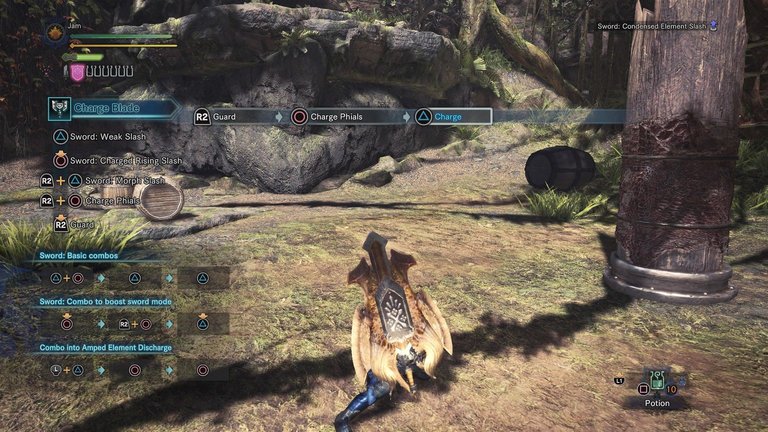
The Charge Blade starts off as a sword and shield. Hitting attack 1 thrice gives you the basic combo - two sword slashes, and a roundhouse slash. In-between every attack, hitting attack 1 and 2 at the same time gives you a shield bash. Holding attack 2 gives you a charged sword slash - your character slowly pulls the sword backward, and after a slight flash, letting go of attack 2 gives you the most sword charge in a single attack.
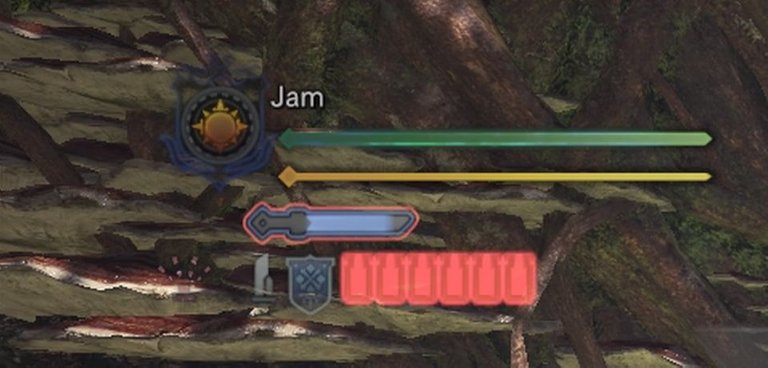
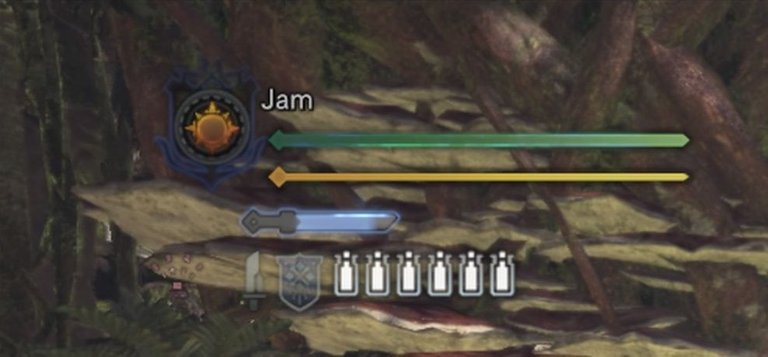
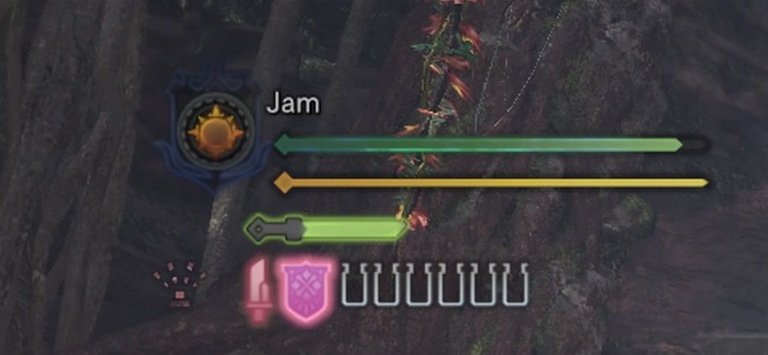
With the evade button, you can sidestep after every attack, positioning around the monster to evade attacks and continue slashing. However, you do have a shield. R2 is your block, and on its own, the shield's blocking power is akin to a greatsword. Once your sword glows red (your phials will glow red, too), hitting R2 and attack 2 simultaneously will store the sword's charge in your shield's phials. A red charge stores 5 phials. A yellow charge stores 3. Overcharging your sword will cause you to bounce, indicated by a glowing sword.
In theory, this is where you morph to axe mode and start discharging the energy in your phials. But this is inefficient. Never use an unboosted axe.
Red Shield
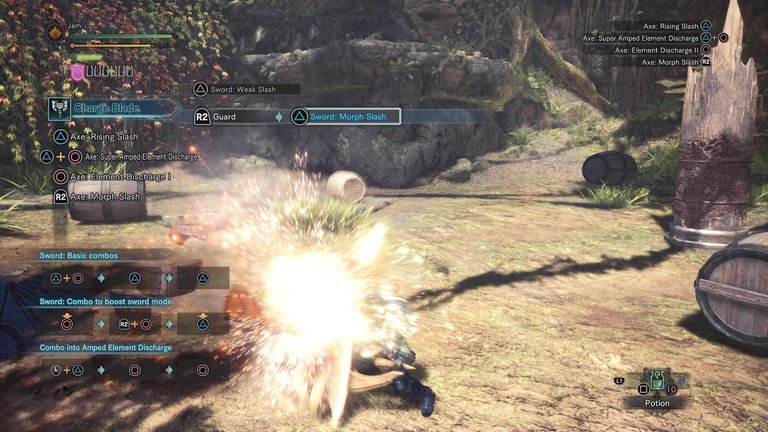
Instead, while in sword and shield mode, give the air a whack with attack 1, then hit attack 1 and 2 simultaenously for a shield bash, then hit that combination again to go into an Amped Elemental Discharge.
That's: Attack 1 > Attack 1+2 > Attack 1+2
Your AED is usually locked behind an axe combo, but this is the fastest way to get to it, and allows you to keep your phials. But instead of running its course, cancel the animation with R2.
It might take a few tries to get the button combination right, but after some time you should be able to cancel an Amped Elemental Discharge into an Elemental Roundhouse. Not only will this deal a little bit of phial damage (impact damage), but you will also use up all your stored phials to charge your shield. It's red now. This effect lasts 30 seconds per phial, for a total of two and a half minutes with five phials.
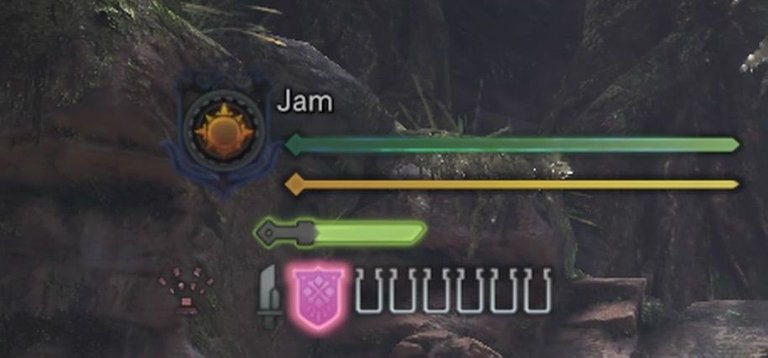
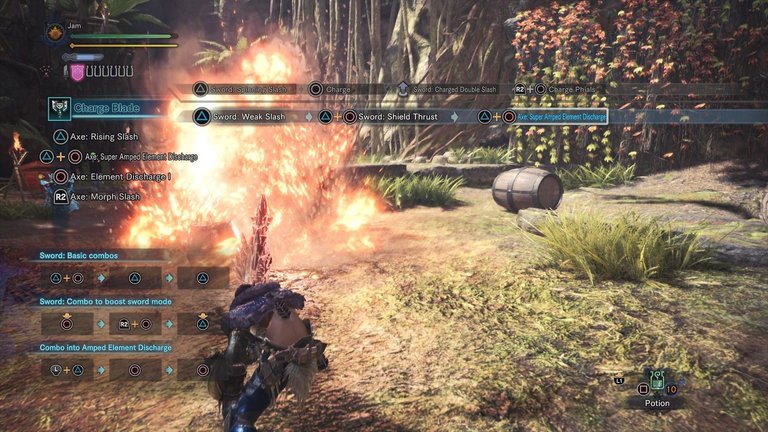
A red shield does several things for you. First, it improves your block significantly, bringing it up to par with a lance. Second, it changes your AED into an SAED, which is a slightly longer animation but deals a significant amount of damage, while dispersing all your phials in a single straight line.

To reiterate. Now that you have a red shield, attack your target to recharge your sword. Use the prolonged attack 2, the charged sword slash. From there, store your charge in your shield as phials. Repeat the shortcut combo:
Attack 1 > Attack 1+2 > Attack 1+2
This time, your sword and shield will morph directly into an SAED, discharging everything. In 4U, this uses up your red shield charge, making it an ineffective attack for general gameplay, usually only useful for waking up a sleeping target, or finishing off a monster close to death. For World, however, this would be your bread-and-butter, as SAEDs no longer consume your shield charge.
You can cancel an SAED in two ways. Hitting R2 at the start of the animation consumes your phials and reups your shield charge. Hitting attack 1 while pulling back on the analog stick (in the opposite direction of your hunter) will turn your SAED into an AED. This is invaluable in 4U, for keeping your red shield while making use of the Charge Blade's best attack.
Axe Mode
Aside from these finisher moves, the Charge Blade has other tools in its arsenal. While in sword and shield mode, hit guard and attack 1 to morph into axe mode. Attack 1 gives you a straightforward axe combo, relatively useless aside from checking your distance - for example, while in axe mode, you can hold the analog stick forward and hit attack 1 to do an overhead axe chop, allowing you to gauge the distance between yourself and the monster for an aimed finisher.
Attack 2 lets you go into elemental discharge 1, then elemental discharge 2, and finally, the third hit is your AED/SAED. In 4U, this is a viable mode of attack, as it deals a decent amount of axe damage and KO damage while taking relatively little time. In World, the motion values for these axe attacks have been significantly nerfed, making it much better to simply stay in sword and shield mode until you're ready for a finisher. All phial attacks, including the ED combo, AED/SAED, elemental roundhouse (shield charge slash) and shield bash deal impact damage, and never bounce.
Positioning Tools
In 4U, positioning was limited to rolling in axe mode, and utilizing a sidestep + roundhouse slash after an attack. For example, you could use attack 1 + 2 from idle to do an advancing slash, then go into a shield bash, then sidestep to get to a better position, and hit attack 1 for a quick roundhouse.
World greatly expands the mobility of the Charge Blade, namely with a single new attack in the form of a sliding slash. Moving the analog stick and hitting attack 2 repositions your character with a stylish slide-and-slash - this does pitiful damage, but allows you to easily slide away from a monster in order to get a better hit with a finisher. A common scenario is charging up on a downed monster with attack 2, using the sliding slash to get away from the head, storing your phials, then shield bashing into an SAED. The slide is just enough distance to typically get back in range with a shield bash to hit the monster's head with the axe during the SAED, for massive damage.
Guard Points
One constant within both games is the importance of taking proper advantage of the Charge Blade's guarding capabilities for offense. The shield is not there to block - it's there to counter. Any attack that deals minimal knockback can be countered with a number of things. Hitting attack 1 right after a blocked attack with minimal knockback will let you morph into axe mode. Hitting evade gives you a roll/sidestep. Hitting and holding attack 2 lets you combo into the charged slash. Hitting attack 1 and 2, however, lets you immediately combo into the SAED. This is how the Charge Blade counters attacks, by blocking and immediately launching into a finisher.
Guard Points allow you to effectively increase the guarding power of the Charge Blade, but unlike a regular block, they have a limited window. While most attacks deal some knockback even with a red shield, some deal a much more significant amount - a guard point allows you to mitigate a large amount of that knockback, thus creating more openings to counter. The Guard Point is simply guard + attack 1. The axe morph. The beginning of this animation causes your hunter to put their shield in front of them while sheathing their sword into it for the morph, creating a small guarding window. Once an attack connects with this guard, you can counter into a full morph with attack 1 or a finisher with attack 1 and 2.
There is another guard point at the end of the elemental roundslash, or whenever you morph back from axe mode into sword and shield. This is a longer guard window, but it's harder to time because it takes more foresight.
In MH4U, inputting the axe morph incorrectly will result in a different morphing animation without a guard point. To avoid this, set your kick button to start in the options menu, and use start to axe morph. This will result in a guaranteed guard point. Axe morphing after a sword slash always results in a guard point.
AEDs vs SAEDs
Between 4U and World, the primary difference is the addition of a change in how the shield charge works. In 4U, an SAED consumes the shield charge. In World, it does not. Thus, the gameplay changes significantly.
4U Charge Blade users must prioritize using attacks as openings to guard point and AED on the head. Two consecutive AEDs cause a KO in most monsters, giving a large opening for more phial charging and extra damage, through the ED > AED combo. It's imperative to learn to guard point roars and charges, as these typically offer the greatest openings for an AED to the head. By moving the analog stick during the AED animation, you can minimally adjust how the AED will land. This is called headsniping.
In World, you only need to ensure that your axe lands on the monster during an SAED, and that preferably most of your phials hit the monster. Aiming for the head is no longer necessary, as most SAEDs cause a significant flinch or trip. That being said, it is a nice extra for some KO damage. AEDs still have their use, especially on smaller monsters like Kirin, where it is much more effective to concentrate axe and phial damage on the monster's head exclusively, and where its small size makes an SAED of more than three phials mostly useless.
Charged Sword
World adds a new move to the Charge Blade's arsenal, allowing for more impact damage and natural mind's eye (no bouncing) on sword and shield mode. Holding attack 1 immediately after storing your phials while in red shield will charge your sword. You need a charged shield to charge your sword, and the effect lasts 30 seconds, taking 30 seconds away from your shield's charge. It's useful on monsters that cause tremendous bouncing (and on monsters with special armor mechanics, like Lavasioth/Kirin/Radobaan, but be mindful that you should focus on monster weakzones (that never bounce) anyway.
Impact Phials vs. Element Phials
Charge Blades come in two flavors: impact phials and element phials. In all games with this weapon (including Monster Hunter Generations), impact phial Charge Blades are superior. In World, this is more true than ever due to capped elemental damage values and the existence of several raw-boosting armor skills. Impact phials ignore hitzones, dealing a set amount of damage dependant on a weapon's total raw, the Felyne Bombardier food skill and the Artillery armor skill. Affinity and sharpness are ignored.
Phials deal about 40-50% of an SAED's total attack, making them incredibly significant, and making raw the single most important thing in choosing a Charge Blade. This is why the Akantor Severance is best in most situations in 4U, losing out to the Ceadeus Regalia only against monsters with water weakness. In World, the Diablos Tyrannis II is the best Charge Blade, despite negative affinity and very little blue sharpness.
There are times when an element phial Charge Blade can be viable, but these times are hard to come by. Element phials are more effective in 4U, specifically against larger monsters with high elemental weaknesses, like Ukanlos, Akantor, Gravios and Basarios. With perfect play and a very specific build, an element phial Charge Blade can tear through other monsters with weak hitzones. But the versatility of impact phials makes them better in most cases, while the Diablos Charge Blade is flat-out unchallenged in World. That being said, an elemental SAED is quite the sight.
Using a Charge Blade in Solo Play
The Charge Blade revolves around quickly getting a red shield, then unloading phials. In both games, it's best to aim for the head as it is the most common weakzone, but the importance of headsniping is greater in 4U. Guard points are a key in solo play, as is learning a monster's behavior - sometimes, you need to know when to guard point twice in quick succession due to an attack combo, rather than guarding once, then getting caught in the middle of your counter.
A good example is Diablos' zig zag in World. It always attacks twice, in two diagonal patterns. It's important to get close enough to block the first hit, then block the second. The knockback is enough to give you a clean shot on the head.
Tail swipes are another great opening, especially for Rathalos, Rathian, Pukei-Pukei and Paolumu. Roars from all monsters give you a free counter, but some require at least Guard 1/Guard +1 to effectively punish. All Tigrex variants in MH4U require Guard +2 for effective Charge Blade play. Brachydios requires Guard +2 for his headon attacks, which always give a clean opening for an AED to the head.
Pay attention to your shield. Once it starts glowing yellow, it's time to recharge before you lose charge. Always keep your shield charged.
Everything else is a matter of practice. Start by getting your shield charge and phials, then find your openings to counterattack. Know when you can counter, and when to not be greedy. Make mistakes, learn from them, and improve.
Charge Blade Armor Skills
Due to its versatility and guarding power, most evasion skills are useless on the Charge Blade. There are very few exceptions - Evade Extender is useful on monsters with wide hitboxes and instant charges, where guarding reveals no openings, like GQ Teostra, while Tremor Res becomes invaluable for GQ Rajang and Deviljho - but in general, the defensive capabilities of the Charge Blade means you can go for full offense while ignoring evasion skills, tremor resistance, and earplugs, in exchange for using tremors, roars and attacks as opportunities to guard and attack.
Phial damage means affinity means less for the Charge Blade than most other weapons, and even in MH4U, the only time Razor Sharp is truly valuable is against monsters with aggressive charging patterns and constant heavy roaring, like Tigrex and Diablos.
Below are a few important armor skills, giving you an idea of what to build for a Charge Blade, what skills to prioritize, and why.
MH4U
| Skill | Description | Priority |
|---|---|---|
| Artillery Novice | Increases phial power. Cheap skill. | High |
| Sharpness +1 | Increases sharpness. | High |
| Honed Blade | Increases sharpness and raw. | High |
| Challenger +2 | Massively increases raw and affinity when monster is enraged. | High |
| Weakness Exploit | Decreases weakzone defense. | High |
| Attack Up (S/M/L/XL) | Increases weapon raw. | Medium |
| Guard +2 | Reduces knockback, useful for Tigrex and Brachydios. | Low |
| Razor Sharp | Halves the rate at which sharpness drops. Useful for guarding. | Low |
| Load Up | Gives you an extra phial, useful for SAEDs. | Low |
| Guard Boost | Lets you guard beams and previously unguardable attacks. | Low |
| Tremor Res | Cancels tremors. Useful for Rajang. | Low |
| Earplugs | Cancels roars. HG Earplugs for greater roars. | Low |
| Evade Extender | Useful for Lv. 140 Teostra, instant charges and novas. | Low |
| Focus | Charges phials faster. | Low |
Artillery
Artillery is a 10, 15 and 20 point skill, that begins with Artillery Novice. The reason this skill is so important is because it is incredibly cheap, and you should never invest more than 10 points into it. This is because the Charge Blade has a cap for phial damage, which is reached by combining Artillery Novice with the food skill Felyne Bombardier, which can easily be applied on every quest in the end-game without much RNG.
Handicraft/Edgemaster
Depending on where you are in the game and what Charge Blade you use, there are very few skills that give as much of a boost as Sharpness +1. Armor pieces, charms and jewels with Handicraft are thus very valuable, because while sharpness does not affect your phials, it does affect everything else, including the axe chop. A jump from green to blue is a change from 1.05 damage to 1.2, and white is even more significant, at 1.32. Going from white to purple is 1.44. Edgemaster, while only accessible in late High Rank and late G-Rank, is Sharpness +1 and Attack Up (L) (20 extra true raw) rolled together.
Challenger
With a 15 point investment, Challenger +2 is more expensive than most of the other skills on this list, but gives you a whopping 25 extra raw and 20% affinity once a monster is enraged. Once you're comfortable with a monster's enraged state, this skill gives you a massive amount of extra damage for a lower skill point investment than Attack Up or Critical Eye.
Weakness Exploit
Weakness Exploit in 4U adds an additional 5 points to a weakzone over 45, essentially increasing your attack by 5% on a weakzone of 45, and a diminishing percentage the higher the weakzone. Weakness Exploit is useful on all monsters with a weakzone under 60, especially if you're prone to hitting the head. Some monsters with weakzones over 60 or just under 45 cannot make good use of Weakness Exploit.
This is especially useful when deciding whether to take Attack Up L or Weakness Exploit, or deciding between a build with Sharpness +1 and Weakness Exploit, or just Honed Blade (Edgemaster). On monsters like Rajang, Weakness Exploit offers an immense damage boost. On monsters like Tigrex with a very high weakzone on the head and hitzones under 45 on the rest of its body, WE is not as useful. Same goes for Deviljho, which has small weakzones. Here's a chart to help you decide.
Attack
Attack in 4U is a skill with a 10, 15, 20 and 25 point investment, giving you AuS, AuM, AuL and AuXL respectively. Because it takes so many points, it's not worth prioritizing unless you've got Challenger, Artillery and Handicraft on your set already, and you can't make better use of Weakness Exploit.
Guard
It's important to make a dedicated Guard +2 set for select monsters, particularly all Tigrexes and Brachydios. This gives you the ability to block any and all roars and headon attacks without significant knockback, assuming red shield and a guard point.
Optional Skills
Tremor Res, Earplugs, Evade Extender and Focus all have their uses, depending on the matchup. Tremor Res is useful on Rajang, allowing you to punish his attacks with a very narrow dodge without having to time it perfectly. It is less useful on Deviljho, but can save you from a few dire situations in Guild Quests. Evade Extender is mandatory for Guild Quest Teostra, and can be useful for getting out of geysers when fighting G-rank Shagaru Magala. Focus is great on an Apex Zinogre set, alongside Load Up, because spamming SAEDs is the best way to knock it out of Apex and Charged states.
Element Skills
The basic elemental set in 4U is Sharpness +1/Honed Blade, Elemental Atk Up, (Element) Up +1/+2/+3, and Load Up. The strategy is to get a red shield and six phials and immediately unload them into the monster, one SAED after the other. The extent to which you can build the set above depends on your charms.
MHW
| Skill | Description | Priority |
|---|---|---|
| Artillery (3) | Increases phial power by up to 30%. | High |
| Capacity Boost (1) | Gives an extra phial. | High |
| Non-Elemental Boost (1) | Increases raw of non-elemental weapons by 10%. | High |
| Weakness Exploit (3) | Increases weapon affinity by 50% when hitting weakzones. | High |
| Attack Boost (7) | Increases weapon raw. | High |
| Focus (3) | Charges phials faster. | High |
| Handicraft (5) | Increases sharpness. | Low |
| Agitator (5) | Increases raw and affinity when monster is enraged. | Medium |
| Guard (5) | Reduces knockback. Useful for some roars. | Low |
| Earplugs (5) | Cancels roars. | Low |
| Flinch Free (3) | Reduces your character's flinches. Useful for multiplayer. | Low |
| Maximum Might (3) | Increases affinity at full stamina by up to 30%. | Low |
| Protective Polish (1) | No sharpness loss for a limited time. | Low |
| Slugger (3) | Increases KO power by up to 30%. | Low |
Artillery
Skills work very differently in World - instead of requiring a set number of points to activate, any point in a skill gives you some effect, while hitting the cap is possible with certain armor, deco and charm combinations. In terms of effectiveness, Artillery is arguably your cheapest and most important skill. Until you get three artillery decorations, utilize the Artillery Charm III.
Capacity Boost
This is World's equivalent of Load Up, giving you an extra phial and an extra 20% damage on the phial portion of your SAEDs. The cheapest way to get this is the Dodogama Greaves, but a magazine jewel (if you're lucky enough to have one) is just as good.
Non-Elemental Boost
A flat-out 10% extra true raw before all other calculations for the cost of one skill point is slightly broken, but too good to pass up. This is just as important as Artillery, but nowhere near as cheap at first. Wait until you get an elementless jewel, rather than utiziling Diablos armor for the set bonus.
Weakness Exploit
Increases your weapon's affinity by 50% when hitting a weakzone. This allows you to instantly and quickly eliminate the Diablos CB's low affinity. When combined with Attack Boost 4+, you're effectively getting 25% affinity whenever you attack a weakzone. With the Affinity Booster present, that increases to 75%. Maximum Might and Agitator further increase that number - two levels in Maximum Might bring your affinity up to almost 100% for a solid minute.
Attack Boost
This is an easy pick for Charge Blade due to the usefulness of raw damage in boosting both general damage and phial damage. However, you don't have to max out on it, unless you've got your other skills maxed out. A minimum of 4 points to unlock the 5% bonus affinity can make a big difference.
Focus
This is a skill that does not seem to affect your sword's charging rate much, but you'll notice it allow you to cycle to SAEDs much quicker over the course of a hunt. Think of it as an accumulative bonus. This skill requires you to know how to efficiently and quickly drop SAEDs on the monster, otherwise, you might find yourself wasting it by charging phials faster than you can use them.
Handicraft
Handicraft 4 is required to get the Diablos Charge Blade to white sharpness, but keeping that requires a Protective Polish jewel - which, even if you have it, oftentimes means dropping a magazine or elementless jewel. It's typically not worth it, despite the extra damage you get by staying in white sharpness. Opt for a quick Handicraft 2 from the Death Stench Boots instead, once you have a magazine jewel to replace the Dodogama legs. That should allow you to stay in blue sharpness for the majority of any hunt.
Agitator
An easy pick for early sets, Agitator maxes out at 5 but is usually much easier to fit in at 2 utilizing the Nergigante Arms. This is MHW's equivalent of Challenger +2, giving you extra raw and affinity whenever a monster is enraged.
Optional Skills
Guard 1, Earplugs 5, Flinch Free, Maximum Might, Protective Polish. These are just a few skills that have room in a Charge Blade's arsenal. Due to the removal of the charm system and a revamp of how armor skills work, you can fit a lot more skills and play around with sets to suit different purposes and monsters. For example, Capacity Boost is useless against smaller monsters like Kirin, or monsters that are tricky to pin down length-wise like Odogaron. You are better off going for more sharpness, or more KO through Slugger 3. If you have trouble blocking certain roars, Earplugs can be a wise investment, and if online play gets too chaotic for you, then Flinch Free keeps you from tripping due to Dual Blade or Longsword users. There are lots of monsters and many ways to hunt them - play around with your decorations and see what you can build.
Using a Charge Blade Online
In both 4U and World, a lot of the magic of efficient, stylish Charge Blade play is lost because of erratic and unpredictable monster behavior. This, combined with burst damage, makes the Charge Blade less useful, unless in teams capable of efficiently stun-locking a monster with paralysis, mounting and KO damage.
You can still be of great use to a team by being more conservative with your play, keeping SAEDs for sure knockdowns or certain monster attacks with long recovery (after Rathian's tail flip, or during Teostra's tail swipes for example). Be mindful of where you aim your bursts. In 4U, your job is to apply as many AEDs to the head as possible, to get at least two or three KOs, thus creating windows for a crapton of extra damage.
When playing with a Greatsword user, let them wake the monster up. Otherwise, your SAED takes priority as long as you land the axe on the head. This goes for both games.
Otherwise, the most important thing is to have fun - and not ruin other people's fun. The Charge Blade is a weapon with quite a bit of range, especially in axe mode, so be mindful of how your attacks will affect other hunters. If there is another Charge Blade user, or a Hunting Horn or Hammer user, try and share the head rather than hogging the space for yourself. Angle your attacks to hit the monster and not other players, and don't SAED a teammate out of their own big attack.
good
Congratulations @jamthewriter! You received a personal award!
You can view your badges on your Steem Board and compare to others on the Steem Ranking
Vote for @Steemitboard as a witness to get one more award and increased upvotes!