In this tutorial you will learn how to start earning on steemit by creating a gripping steemit Ad Title like a Boss ! We will cover working with images, How to display a specific image in your Ad Title. This is important for when people are browsing because it will make your add stand out!
- Don't forget to bookmark this page so you may return at some point if needed.
Important!

Before we get started I must introduce you to a very powerful tool, the steemit post limit checker. This will show you how many posts your account can still make before you hit your post limit for the day. I can't stress how important this is! If you over post and go over the limit your earnings will suffer. So please before you post go to steemit post limmit checker and make sure.
Please note: In this tutorial I will be using the 'Markdown' post creator and editor.
Working with images
When it comes to uploading images on steemit it is important to reduce image file size as much as possible. This is very important because if your image file size is to big your page will load very slowly and use a ton of data. In turn this will cause your steemit to have a high bounce rate because users wont be able to engage with your page properly.
I have noticed many users on steemit upload pictures directly from a camera or phone without considering picture dimensions or file size. I have come across some pictures on steemit that are as big as 2MB! This is way to big!
You want to aim for around 50Kb, if possible maybe even smaller. The size and what quality you choose is entirely up to you. I find I can often reduce a image file size quite significantly without being able to see any degraded picture quality by eye. The difference it will make in your page load speed will be well worth the extra effort that I can promise you. This will make a huge improvement for visitor's reading your page, especially if they are using a limited or mobile device. The next time you visit steemit take a look at your data usage after browsing for a while, you might be surprised.
I can recommend using a free online image resizing tool that will allow you to resize image dimensions as well as file size. My recommended maximum image width for steemit is 850px. I have found this is a best average maximum size for all computers and devices.
Below are a few recommended sites that will help with this.
http://www.imageoptimizer.net/Pages/Home.aspx
After you have resized your image file and chosen your new dimensions the next step will be to find free online image hosting. I use https://postimg.org to host all my images, it's free and simple to use. Being able to resize and then host your images on steemit will always give you an advantage!

Displaying a specific image in your Story Ad Title.
As I am sure you have noticed, steemit by default, places the very first image of your post in your Story Ad Title . Well let's change things up!
Being able to a allocate any image of your choice in your Story Title is extremely useful, I use this simple little trick to create eye catching content getting peoples attention on steemit, it works very well. Remember a picture speaks a thousand words! By being able to do this you will get peoples attention and as much eyeball traffic to your steemit story as possible.
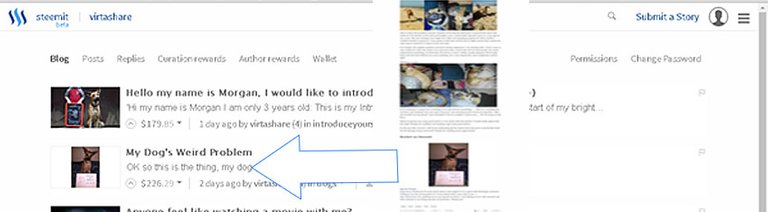
In the above image you will see the example story for this tutorial My Dogs Weird Problem. Notice I lure you in with a pick of a funny looking dog being verified on steemit. Next if you visit the page you will notice the first image is of a very cute puppy, sneaky I know :-). However I used the last image on the page for my title add picture.
To achieve this all you need to do is wrap your specific image URL of choice in a<h1> open and </h1> closing tag. This will trick steemit into thinking your header is allocated at this point. It appears steemit will always display the first image allocated below the header <tag>
Example: <h1>https://s9.postimg.org/eurcaimwf/steemit_tutorial.jpg </h1>
The above Example code display's the exact image below. The <h1> tags allow me to display this pic as my 'Title Post Image' and keep the image as a example for this tutorial were it should be :-)

Once you have saved, visit your post and you will be happy to see the image displaying in your Story Title :-)
Title and Introductions
Titles
My best advice here is to start with what you think is a good working title and simply shorten it as much as possible. Make it unique, stand out with a punch! 'My Dog's Weird Problem' for example tells you what you need to know but leaves you guessing enough to be intrigued. Together with his allocated title image we have a winner!
Introduction
This is the very first sentence you write on your steemit page. Your first sentence is very important because you will notice it is an extension of your title and get's peoples attention. Here you want to give enough info to intrigue people but leave them wanting to know more.

As for content that is entirely up to you. My best advice is to just be yourself and have fun! Remember people want to engage with you and share a story or experience. When writing your steemit consider asking questions and or for advice. Don't be scared to try new things and step out of your comfort zone, this is often when you will surprise yourself. Did I mention I am dyslexic? True story :-) I have only recently started writing and it's all thanks to steemit.
Thank you for visiting my tutorial. I hope you had fun I am looking forward to any comments or questions you may have.
Many Thanks
Nice info, thank you very much. :)
@tryptamin, much appreciated :-)
If anyone has any questions I will be more than happy to help. Thanx
Hey, allocating the image of choice for the thumbnail did not work at all for me the way you demonstrate it. I'm not sure if I'm doing anything wrong.
Hey my thumbnail for my post is not appearing can you help me step by step
Thank you for the excellent advice on the limit checker and how to choose which image will be the thumbnail. Very useful.
No problem glad I could help!
Hello, thank you so so much for this tutorial it just helped me so much for an idea for my next post. It all makes sense now a big thank you, from a clueless steemit girl!
Lol glad to help!
I followed you @virtashare. Was wondering about the photo resizing. thanks for the info.
Glad to help :-)
It's probably worth mentioning the best size for a designated profile pic is 850X850px
in my second post I put an image at top of message box but it didn't turn up as a thumbnail. How come? My poor post stuck out like a sore imageless thumb!!!
very helpful for new steemers, thanks a lot!
Nice!