Repository
What Will I Learn?
- You will learn how to install the gem in ruby on rails.
- You will learn how to configure authentication in ruby on rails using the bcrypt gem.
- You will learn basic knowledge about views, controllers & routes.
Requirements
- OS: Ubuntu/Mac OS
- A text editor like sublime
- Basic understanding of Ruby on Rails
- Internet connection
Difficulty
- Intermediate
Tutorial Contents

In this tutorial, we are going to build an authentication system (like login/sign-up) from scratch using the bcrypt gem.
First, we need to generate a new project, to get to know how to do that please refer my previous tutorials. Links are added to the curriculum.
After setting up the project, next, we need to install the library called Bcrypt to our Gemfile. The bcrypt library is used to hash and salt passwords in a secure way.
Text Editor: app/Gemfile
gem 'bcrypt`
Now run bundle command to install the gem in the terminal.
Terminal
bundle
Creating User Model
First, you will need to create a model to store user information.
Terminal
rails g model User
- The above command will generate a migration and user model.
Now go to the app > db > migrations > timestamp_create_users.rb file in the text editor like sublime and add the following code into that file.
Text Editor:
create_table :users do |t|
  t.string :email
  t.string :password_digest
  t.timestamps
end
- The above code will create a new table named users with columns email & password digest of data type string.
- The email attribute will store a unique email address, and the password digest attribute will store the hashed, salted password.
Now run the migration command to migrate the database but first of all, we need to create the database then need to migrate.
Terminal
rake db:create
rake db:migrate
It's time to add code to our user model so that the model will support the authentication. Go to app > model > user.rb. Please always use the text editor to open the files. Now add the following code into that file.
Text Editor:app/models/user.rb
has_secure_password
validates :email, uniqueness: true, presence: true
has a secure password: It adds two additional properties to your user:
a) password
b) password confirmationIn addition, it adds a number of different validations (presence, length with a maximum of 72, and confirmation). And also, it adds a method called authenticate which allows you to authenticate the user against the database.
Validates: It will validate the presence, uniqueness and presence of email while saving the user.
Controllers
First of all, you will generate a dashboard controller, for that run the following command.
Terminal
rails g controller dashboard
- The above command will generate a dashboard controller under the controller section.
Now go to the app > controllers > dashboard_controller.rb and a show method there.
Text Editor: app/controllers /dashboard_controller.rb
def show
end
And then root the rails app to dashboard show page.
Text Editor: app/config/routes.rb
root 'dashboard#show'
Now when you hit the localhost:3000, it will redirect to dashboard show page.Next, you will need to generate the sessions controller where login/logout are handle.
Terminal
rails g controller sessions
The above command will generate a sessions controller under the controller section.
Now go to the app > controllers > sessions_controller.rb and the following methods.
Text Editor: app/controllers /sessions_controller.rb
def new
end

def create
end

def destroy
end
I will explain it later how to use these methods
And Finally, generate our users' controllers.
Terminal
rails g controller users
The above command will generate a users controller under the controller section.
Now go to the app > controllers > users_controller.rb and a the following methods.
Text Editor: app/controllers/user_controller.rb
def new
end

def create
end
Now update our routes for the users and sessions
Text Editor: app/config/routes.rb
  get 'login', to: 'sessions#new'
  get 'logout', to: 'sessions#destroy'

  resources :sessions, only: [:create]
  resources :users, only: [:new, :create]
- The login & log out is a get type routes which will redirect to new session and destroy session respectively.
- resources session will generate a route of post type which will redirect to session create method.
- resources user will generate two routes:
- new with getting type to open the sign-up page
- create with post type for creating a new user
You can also check the routes by running the following command under the project path in the terminal & also see the reference image below:
rake routes

Now you will add tell the application to check the user logged in or not every time when the user accesses the application. Go to app > controllers > application_controller.rb. Application controller is the root controller and calls every time before the called controller. let's say there is a request coming to open the sign-up page then the app will first go the application controller and then go to the users controller.
Text Editor: app/controllers/application_controller.rb:
class ApplicationController < ActionController::Base
  protect_from_forgery with: :exception
  before_action :require_valid_user!

  def current_user
    if !session[:user_id].blank?
      @user ||= User.find(session[:user_id])
    end
  end

  def require_valid_user!
    if current_user.nil?
      flash[:error] = 'You must be logged in to access that page!'
      redirect_to login_path
    end
  end
end
- before_action :require_valid_user! : This function by default call for every page.
- The current_user function returns the currently logged in user or nil if the user isn't logged in.
- The require_valid_user! function redirects the user to the login page if he/she is not logged in.
Now it's time to work on the session controller. This controller contains methods that are used to log in/out of the app. Open the app > controllers > sessions_controller.rb in the text editor. You will have to work on the create and destroy methods.
- Create Method
  def create
    reset_session
    @user = User.find_by(email: session_params[:email])

    if @user && @user.authenticate(session_params[:password])
      session[:user_id] = @user.id
      flash[:success] = 'Welcome back!'
      redirect_to root_path
    else
      flash[:error] = 'Invalid email/password combination'
      redirect_to login_path
    end
  end

  def session_params
    params.require(:session).permit(:email, :password)
  end
The create method handle the process of logging in:
- resets the user's session: This helps prevent session fixation and other attacks.
- Next, we find the user by his/her email address.
- Next code of block under if/else, checks if the user exists and they are allowed to authenticate. If not, an error is displayed and the user is redirected to the login page. If the user was successfully authenticated they are redirected to the dashboard page.
- session params: This method will be used to permit the params.
2 . Destroy Method
  skip_before_action :require_valid_user!, except: [:destroy]
def destroy
    reset_session
  end
- The destroy function resets the user's session, causing them to be logged out.
- skip action will be added at the top under the class.
Users Controller
Everything were setup, now you will have to create a user, to handle that open up app > controllers > users_controller.rb and modify some code.
app/controllers/users_controller.rb:
class UsersController < ApplicationController
  skip_before_action :require_valid_user!
  before_action :reset_session

  def new
    @user = User.new
  end

  def create
    @user = User.new(user_params)

    if @user.save
      session[:user_id] = @user.id
      flash[:success] =  'You have successfully created an account!'
      redirect_to root_path
    else
      render :new
    end
  end

  def user_params
    params.require(:user).permit(:email, :password, :password_confirmation)
  end
end
- The user's controller skips the action of valid a user because there is no user right now and for the safety, we called before action reset session function to reset a session if there is.
- Create method is handling the new user and saved it in the database if the right params are passed other it will render new method by showing the form errors.
Views
Now, backend functionality is complete. it's time to work on the frontend. First of all, we need to add the bootstrap library and wrap the rendering of our views in a div with a class of container.
Text Editor: app/views/application.html.erb:
<head>
 <%= stylesheet_link_tag 'https://maxcdn.bootstrapcdn.com/bootstrap/4.0.0-beta/css/bootstrap.min.css' %>
</head>

  <body>
    <div class='container'>
    <%= yield %>
    </div>
  </body>
Now you will modify the landing page i.e dashboard show page. There will be a link to sign in and sign up for the user. Open up the file app > views > dashboard > show.html.erb
Text Editor: app/views/dashboard.html.erb:
<h1>Dashboard</h1>
<p>Welcome to your dashboard.</p>

<% if flash[:success] %>
  <div class='alert alert-success'><%= flash[:success] %></div>
<% end %>

<%= link_to 'Click here to log out.', logout_path %>
- The above page is shown when the user logged in the app and there is a link to log out the app.
- The alert message will be shown after login which will pass from the controller.
Now you will have to create a new user and create a form for that, open up the app >views > users > new.html.erb and add the following code.
Text Editor: app/views/users/new.html.erb:
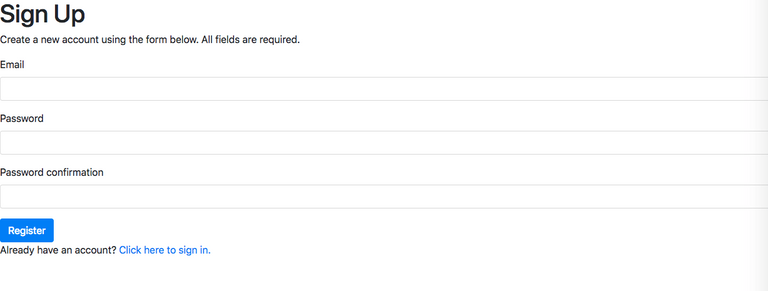
<h1>Sign Up</h1>
<p>Create a new account using the form below.  All fields are required.</p>

<% if @user.errors.any? %>
  <div class='alert alert-danger'>
    <p>Please correct the following errors:</p>
    <ul>
      <% @user.errors.full_messages.each do |msg| %>
        <li><%= msg %></li>
      <% end %>
    </ul>
  </div>
<% end %>

<%= form_for @user do |f| %>
  <div class='form-group'>
    <%= f.label :email %>
    <%= f.email_field :email, class: 'form-control' %>
  </div>
  <div class='form-group'>
    <%= f.label :password %>
    <%= f.password_field :password, class: 'form-control' %>
  </div>
  <div class='form-group'>
    <%= f.label :password_confirmation %>
    <%= f.password_field :password_confirmation, class: 'form-control' %>
  </div>
  <%= f.submit 'Register', class: 'btn btn-primary' %>
<% end %>

<p >
  Already have an account? <%= link_to 'Click here to sign in.', login_path %>
</p>
- This is the sign sign-up for user. The first if/else code of block display any validation errors that may be present. we create a form for the user. You'll notice we have an email field along with two different password fields here, one for password and one for password confirmation.
- Finally, we have a "Register" button that submits the form.
- At the very bottom, we have a link to login so that user can log in if they have already an account.
- See reference image below
We have signed up and a dashboard page but we don't have a login page for now. let's create this page.Open up the app > views > sessions > new.html.erb and the following code.
Text Editor: app/views/sessions/new.html.erb
<p>Please log in to continue.</p>

<%- if flash[:error] %>
<div class='alert alert-danger'><%= flash[:error] %></div>
<% end %>

<%= form_for :session, url: sessions_path do |f| %>
  <div class='form-group'>
    <%= f.label :email %>
    <%= f.email_field :email, class: 'form-control', placeholder: 'Email' %>
  </div>
  <div class='form-group'>
    <%= f.label :password %>
    <%= f.password_field :password, class: 'form-control', placeholder: 'Password' %>
  </div>
  <div class='form-group'>
    <%= f.submit 'Log In', class: 'btn btn-primary' %>
  </div>
<% end %>

<p >
  New User? <%= link_to 'Click here to create an account.', new_user_path %>
</p>
- The first if/else block of coded display any errors that may be present.
- Next is the session form into which user have to fill their registered email address and their password to log in.
- At the very bottom, we have an option to create a new account.
- See sign in the form below:

- And after successful login user will see the dashboard page.

So this is the tutorial about to add basic authentication in ruby in rails application
.
Curriculum
https://steemit.com/utopian-io/@amn/how-to-add-exception-notification-in-ruby-on-rails-using-the-exception-notifies-gem
https://steemit.com/utopian-io/@amn/how-to-add-email-confirmation-while-sign-up-using-devise-in-ruby-on-rails
https://steemit.com/utopian-io/@amn/how-to-upload-images-in-ruby-on-rails-using-paperclip
Hey @amn
Thanks for contributing on Utopian.
We’re already looking forward to your next contribution!
Want to chat? Join us on Discord https://discord.gg/h52nFrV.
Vote for Utopian Witness!
Thank you for your contribution.
Your contribution has been evaluated according to Utopian policies and guidelines, as well as a predefined set of questions pertaining to the category.
To view those questions and the relevant answers related to your post, click here.
Need help? Write a ticket on https://support.utopian.io/.
Chat with us on Discord.
[utopian-moderator]
Thanks for reviewing it @portugalcoin and I know there are lots of information available but no one had well explained it as I did.
Congratulations! This post has been upvoted from the communal account, @minnowsupport, by amn from the Minnow Support Project. It's a witness project run by aggroed, ausbitbank, teamsteem, theprophet0, someguy123, neoxian, followbtcnews, and netuoso. The goal is to help Steemit grow by supporting Minnows. Please find us at the Peace, Abundance, and Liberty Network (PALnet) Discord Channel. It's a completely public and open space to all members of the Steemit community who voluntarily choose to be there.
If you would like to delegate to the Minnow Support Project you can do so by clicking on the following links: 50SP, 100SP, 250SP, 500SP, 1000SP, 5000SP.
Be sure to leave at least 50SP undelegated on your account.
Congratulations @amn! You have completed the following achievement on Steemit and have been rewarded with new badge(s) :
Click on the badge to view your Board of Honor.
If you no longer want to receive notifications, reply to this comment with the word
STOPDo not miss the last post from @steemitboard:
SteemitBoard World Cup Contest - The results, the winners and the prizes
Congratulations @amn! You have completed the following achievement on Steemit and have been rewarded with new badge(s) :
Click on the badge to view your Board of Honor.
If you no longer want to receive notifications, reply to this comment with the word
STOPCongratulations @amn! You received a personal award!
Click here to view your Board
Congratulations @amn! You received a personal award!
You can view your badges on your Steem Board and compare to others on the Steem Ranking
Vote for @Steemitboard as a witness to get one more award and increased upvotes!