What will I learn?
- About component, state, and prop
- Making your own custom component and using it
- Building login screen and handling user inputs using props and state.
Requirements
- A laptop/PC with Mac OS/ Linux/ Windows
- Preinstalled node.js
- Preinstalled Code editor
Note: This tutorial is performed in Visual Studio Code Editor in the laptop with Windows 10 Home, 64 bit OS
Difficulty
Intermediate, you must have good knowledge of JavaScript to catch up this tutorial.
Tutorial Content
In my previous session, I explained to you about why I choose react native over other platform and I also described the project structure of the react native and what are they supposed to do. Today we will be learning about components, state, props and how to use them efficiently to make a simple login screen.
Component:
As per definition from official documentation “Components let you split the UI into independent, reusable pieces, and think about each piece in isolation.”
React component can be termed as anything we see on screen. Each application consists of many individual components. A single layout of an application is made up of a bunch of component for example: TextInput and Button are two different component that can be bunched up together to create a single component.
Component must compulsorily have a render method because render method describes how the component is supposed to look in the screen.
Components manage their own state and data to handle many complex UI.
export default class App extends React.Component {
  render() {
    return (
      <View style={styles.container}>
        <TextInput placeholder="Add Some text"/>
        <Button title="submit"/>
      </View>
    );
  }
}
Here App is a component.
There are many pre-defined components provided to us by react but sometimes they are not enough. We can need our own component as per the requirement of our application so, we can also make our own custom component. Let us create our own component.
import React,{Component} from "react";
import {View,TextInput,StyleSheet} from "react-native";
class TextInputComponent extends Component{
    render(){
        return(

            <View
            style={styles.mainView}>
            <TextInput
            style={styles.textInput}
                placeholder="My first custom component"
            />
            </View>
        );
    }
}

const styles=StyleSheet.create(
    {
        textInput:{

            width:"100%"
        },
        mainView:{
            width:"100%"
        }
    }
);
export default TextInputComponent;
We can create the component in react native by simply extending Component and in order to make it work we have to import it from react-native. As already stated each component must compulsorily require render method to create a view. Here in our view we have added TextInput so that we can display it via our App.js component. We have set the width of our TextInput as 100% so that we can display the placeholder value we have set in this component.
Now in order to use this custom component we have to first import it:
import TextInputComponent from './components/TextInputComponent';
Only after importing this we can use it in our main root component.
import React from 'react';
import { StyleSheet, Text, View,TextInput,Button } from 'react-native';
import TextInputComponent from './components/TextInputComponent';

export default class App extends React.Component {
  render() {
    return (
      <View style={styles.container}>
        <TextInputComponent/>
        <Button title="submit"/>
      </View>
    );
  }
}

const styles = StyleSheet.create({
  container: {
    flex: 1,
    backgroundColor: '#fff',
    alignItems: 'center',
    justifyContent: 'center',
  },
});
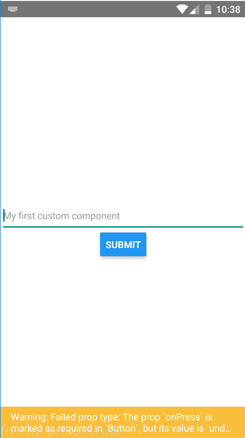
Here we have only used the and it gives the output like this:

Here we used our first custom component that is TextInputComponent to display the placeholder. Similarly, we can create tons of other components to handle many different functionalities.
State & props:
As we can see that we created our first own custom component but how can we manage the state, data movement within and between the component?
This is where the state and props come into play. State are mutable that is they can be changed whereas props are immutable that is they cannot be changed but can be passed from parent to child.
State can be defined by this.state and they are null by default.
“In react, if the state changes in the component then the component will automatically render and update the DOM if there are changes and if there are no changes then the DOM also doesn’t change. manages the virtual DOM for you. By having virtual DOM update behind the scenes.”
As state is null by default we should initialize it first and the value of state should be set using this.setState if we want to change it.
For example: Let us add onPressEvent in our button and change the value of state once the button is clicked. It can be done by:
state={
    firstState:""
  };

  onButtonClicked=val=>{
    this.setState({
      firstState:"Button clicked"
    });
    alert(this.state.firstState)
  };
And in our Button we have to add onPress event like this:
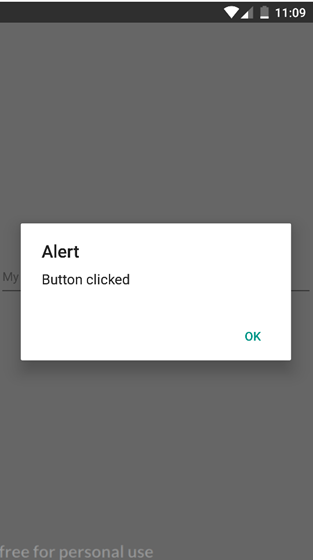
Here we are initially defining our firstState to be empty. And after the user has clicked the button we have set our firstState to be “Button clicked” and we have displayed the alert in order to display whether the state has been changed to “Button clicked or not”. In order to change the value of state, we should do it using this.setState.
If we run this and press the button we will get output like this:

We successfully used state to change the value of the component but what if we want the value to be moved to another component. That’s when we can use props. The value of the props cannot be changed but we can pass it from parent to child component. It is used for the communication between the components.
In order to make use of props and state efficiently we will now be making a simple Login screen where the user will be allowed to input username and password in custom component and after the user presses the submit button we will be displaying username and password in out main component.
Open TextInputComponent.
state={
        username:"",
        password:""
    }
    onButtonClicked=val=>{

       // alert(this.state.username+","+this.state.password)
        this.props.onInputAdded(this.state.username,this.state.password);
      };
    usernameChangeHadler=val=>{
        this.setState({
            username:val

        });
    };
    passwordChangedHandler=val=>{
        this.setState({
            password:val
        });
    };
As we have two Textinput for allowing user to input username and password and we also have button which allows users to type the input and click the button the state is used as the value of the input from the user changes. A user can initially type ‘ram’ and then again erase and type ‘shyam’. These type of data that attend to change within the component are handled using state. So we define the state named username and password which is assigned empty. useramechangedHandler and passwordChangedHandler are called when onChangeText fires in TextInput.
Here when the username and password change then we should also update the value of username and password state accordingly hence we are doing that using this.setState.
The render method looks like this:
render(){
      return(

          <View
          style={styles.mainView}>

          <TextInput
              onChangeText={this.usernameChangeHadler}
              style={styles.textInput}
              placeholder="Enter the username here"
          />

          <TextInput
          onChangeText={this.passwordChangedHandler}
          style={styles.textInput}
          placeholder="Enter your password here"/>

          <Button title="submit"
              onPress={this.onButtonClicked}/>
          </View>
      );
  }
Now, when the user presses the submit button onButtonClicked method gets called.
we should then send the value of username and password to the main component and display it in the main component. This is where we use props. Props carry the value from one component to another component and allow fluent data communication between component.
We have called this.props.onInputAdded(this.state.username,this.state.password);
when the button is pressed and in this line, we are simply passing our username and password in the method name onInputAdded via props.
In order to get this value in our main component we have to write following line of code:
state={
    username:"",
    password:""
  };
  onUsernamePasswordAdded=(username,password)=>{
    console.log("inside input")
    this.setState({
      username:username,
      password:password
    });
  };
In our TextInputComponent we sent our value using onInputAdded so in our main component, we can receive it by calling the same function and receiving the username, password. We have set the state of username and password in the main component as we have to display it also. So, the render method looks like this:
render() {
    return (
      <View style={styles.container}>
        <TextInputComponent onInputAdded={this.onUsernamePasswordAdded}/>
        <Text>{this.state.username}</Text>
        <Text>{this.state.password}</Text>
      </View>
    );
  }
}
Here we are displaying the username and password using Text component provided by react native.
In TextInputComponent we are receiving the props we have sent from TextInputComponent via onInputAdded and we are setting it to our function onUsernamePasswordAdded of this component.
So this is how props work.
The final code of TextInputComponent looks like this:
import React,{Component} from "react";
import {View,Button,TextInput,StyleSheet,Text} from "react-native";
class TextInputComponent extends Component{
    state={
        username:"",
        password:""
    }
    onButtonClicked=val=>{
       // alert(this.state.username+","+this.state.password)
        this.props.onInputAdded(this.state.username,this.state.password);
      };
    usernameChangeHadler=val=>{
        this.setState({
            username:val

        });
    };
    passwordChangedHandler=val=>{
        this.setState({
            password:val
        });
    };
    render(){
        return(

            <View
            style={styles.mainView}>

            <TextInput
                onChangeText={this.usernameChangeHadler}
                style={styles.textInput}
                placeholder="Enter the username here"
            />

            <TextInput
            onChangeText={this.passwordChangedHandler}
            style={styles.textInput}
            placeholder="Enter your password here"/>

            <Button title="submit"
                onPress={this.onButtonClicked}/>
            </View>
        );
    }
}

const styles=StyleSheet.create(
    {
        textInput:{

            width:"100%"
        },
        mainView:{
            width:"100%"
        }
    }
);
export default TextInputComponent;
and the final code of App.js look like this:
import React from 'react';
import { StyleSheet, Text, View,TextInput,Button } from 'react-native';
import TextInputComponent from './components/TextInputComponent';

export default class App extends React.Component {
  state={
    username:"",
    password:""
  };

  onUsernamePasswordAdded=(username,password)=>{
    console.log("inside input")
    this.setState({
      username:username,
      password:password
    });
  };


  render() {
    return (
      <View style={styles.container}>
        <TextInputComponent onInputAdded={this.onUsernamePasswordAdded}/>
        <Text>{this.state.username}</Text>
        <Text>{this.state.password}</Text>
      </View>
    );
  }
}

const styles = StyleSheet.create({
  container: {
    flex: 1,
    backgroundColor: '#fff',
    alignItems: 'center',
    justifyContent: 'center',
  },
});
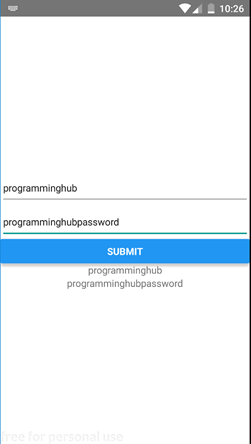
Now if we run this we will get this following output:

Initially, the placeholder will be displayed saying user to display username and password.

If a user adds username and password and presses submit button then the entered username and password gets displayed below the button.
So we successfully created our first custom component, used state and props for data communication and much more. This is some of the most fundamental things to understand in react native. Without proper understating of props, state component we cannot build react native application. I have tried my best to simplify this tutorial and if you don’t get it you can ask me in the comment section below.
All above codes can be downloaded from my github link. Click here to download.
CURRICULAM
Posted on Utopian.io - Rewarding Open Source Contributors
Hey @programminghub I am @utopian-io. I have just upvoted you!
Achievements
Utopian Witness!
Participate on Discord. Lets GROW TOGETHER!
Up-vote this comment to grow my power and help Open Source contributions like this one. Want to chat? Join me on Discord https://discord.gg/Pc8HG9x
Thank you for the contribution It has been approved.
Need help? Write a ticket on https://support.utopian.io.
Chat with us on Discord.
[utopian-moderator]