A Step-by-Step Guide to Monetizing Your Interests PART 3
Are you ready to take your online presence to the next level?
In this tutorial, I will guide you through the process of creating your very own social shopping website.
For example, you can transform your user profile on Waivio into a dedicated website. This transition allows you to feature your affiliate shop as the main store on your website, while your personal blog will take center stage as the key newsfeed.
Alternatively, if you are interested in a themed website, you can launch an advanced website. In this tutorial, you will learn how with a click of a button and by leveraging existing projects, you can launch a beautifully organized shop complete with product categories, themed newsletters, and more.
Summary:
Why launch a social shopping website?
Step 1: Choosing a name for your website (or linking an existing domain)
Step 2. Configuration
2.1: Color

2.2-2.3: Desktop and Mobile Logo

2.4: List Default Images

2.5: Main Banner

2.6: Base Object

2.7: Default Hashtags

2.8: Website Header
Step 3. Settings
3.1-3.2: Language and Currency

3.3: Google Analytics 4 Property ID

3.4: Beneficiary Payment

3.5: Referral Payment

3.6: "Save"
Step 4. Affiliate Codes
Step 5: Website Hosting
What's next?
Links & Resources:
Link to a page with all projects: https://www.waivio.com/object/ewg-social-gifts-projects/webpage
Custom domain instructions: https://www.waivio.com/object/qym-custom-domain/page
A Step-by-Step Guide to Monetizing Your Knowledge
Social Shopping (Concept): here
Your Shop on Waivio (PART 1): here
Social.Gifts Tutorial (PART 2): here
Advanced Shop (PART 4): COMING SOON
A Complete Guide to Importing Products on Hive
How to Add a Product (PART 1): here
How to Import Products on Hive with DataFinity (PART 2): here
How to Export Products from Spreadsheet (PART 3): here
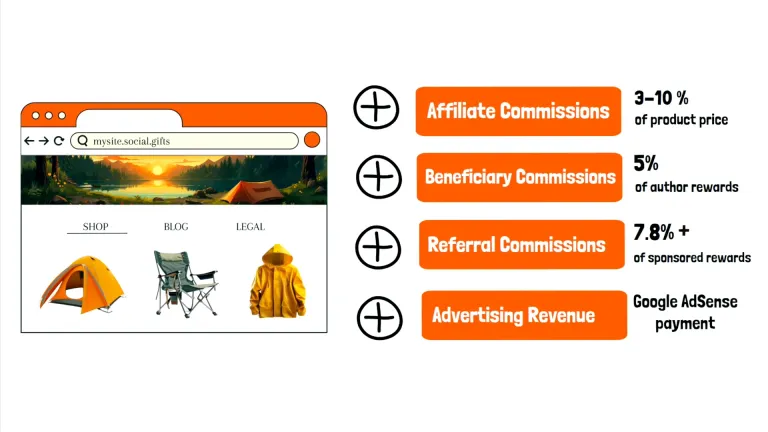
Why launch a social shopping website?
Launching a website unlocks new income streams. You will gain access to four sources of revenue:
- Affiliate commissions from referrals (3%-10%);
- Beneficiary commissions (5% of author rewards);
- Referral commissions (7.8%+ of sponsored rewards);
- Advertising revenue from Google AdSense integration
Moreover, launching a website gives you the freedom to organize and customize your social shop in any way you envision.
You can customize your website to match your branding, including the logo, main banner, and website colours.
As the website owner, you have full control over the objects displayed on your website. On Waivio there are consensus rules that determine which version of objects to show (decided by the balance of votes), so if your vote is not strong enough certain objects may not appear as you want them to be in your profile shop. In contrast, on the website you have the ultimate control where your vote cannot be challenged. You can also grant administrative privileges to other users that you trust.
Another handy feature is the ability to search for all the items you've marked with a heart on your website.
Plus, if you use the Waivio Chrome Extension to upload products from Amazon to Waivio, these items will automatically appear on your profile and, consequently, on your website.
Your website visitors will be able to log in, post, comment, and upvote posts, follow other users, manage their wallets, and utilize many other tools available on the Hive social blockchain.
Let’s launch your social shopping website!
Step 1: Choosing a name for your website (or linking an existing domain)
Let's begin by navigating to the "TOOLS" section, then under "Websites," click on "Create." Choose "Social.Gifts" from the template options. Think of a sub-domain name that encapsulates the essence of your shop. For example, my shop is focused on baby products for new parents, so I'll put the baby.social.gifts. If the domain is available, proceed to read and accept the terms and conditions and click on "Create new website".

Custom Domain: If you have your own domain that you want to use for your social shopping website, choose “Custom Domain” instead. Select Social.Gifts as the website template. Enter your existing domain. Important: Your domain should be configured according to the instructions provided prior to launching it. For further instructions on setting up and connecting your personal domain please review the attached article.
And that's it - let's check out the website. As you can see, we already have a fully functional website!
By default, your website is created using your own profile, including the profile logo, shop, and blog. However, you can customize it even further to match your brand.
After refreshing the page, you'll find settings and configurations for your new website.
Step 2. Configuration
In the Configuration section, you'll have the opportunity to customize your shop's appearance.
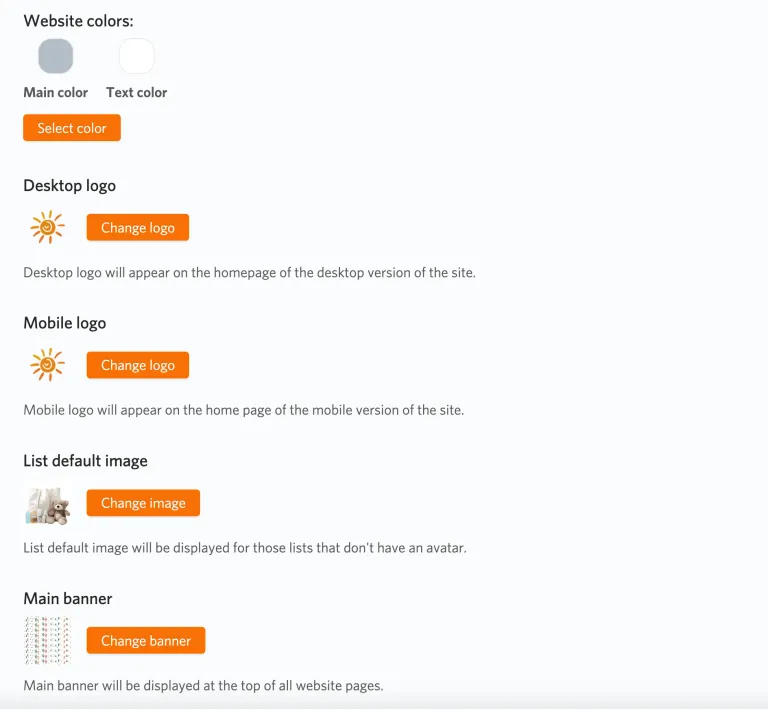
2.1 Color
Choose the colours for your text and buttons that align with your brand's aesthetics.
2.2 - 2.3 Desktop and Mobile Logo
Next, if you want to change your logo, upload both your desktop and mobile logos to ensure a consistent look across all devices.
2.4 List Default Images
If a website has products organized in categories but doesn’t have specific images for them your user logo will be used as a default image. You can change upload a new image in "list default images" section.
2.3 Main Banner
Let's add a banner to be displayed at the top of all website pages. Here I am using an image I generated with Midjourney (Use the --ar 16:4 command to create narrow banners in MJ.)
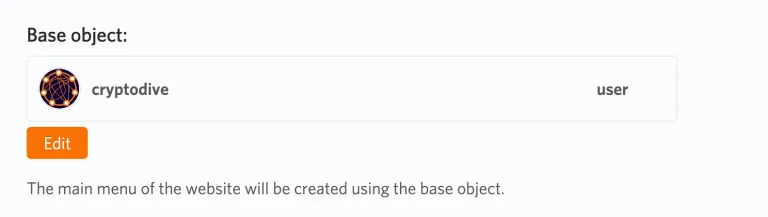
2.4 Base Object
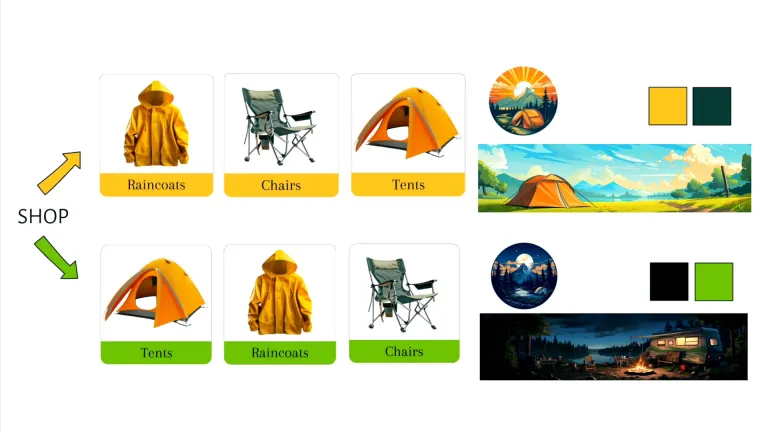
In the "Base Object" section, you can choose to link your website to a specific user profile or even a public object on the Hive blockchain.
By default, it's linked to your own profile, and as a result, the information from your profile is transformed into a dedicated website, including your shop and your blog.
If you are looking to launch a themed website, you can easily create an advanced shop with just a click of a button by leveraging existing projects with thousands of products carefully organized in categories. And once you add affiliate codes, all of these thousands of products will include your codes in the purchase links.
For example, let’s use an existing business object called the “
” (lbm-camping-checklist) which has hundreds of categories and thousands of camping-related products listed. By simply setting it as the base object for my site, my entire website will instantly become one of the most comprehensive camping sites out there.

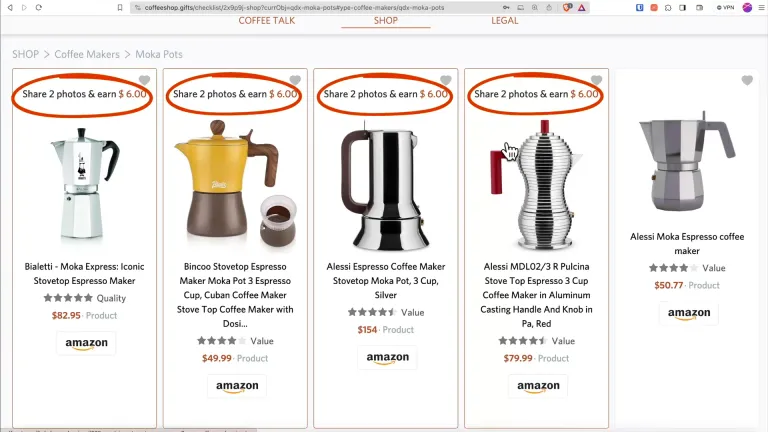
Another example is the “
” object (3urenj-coffee-shop), which also includes thousands of coffee-making products, serving accessories, various types of coffee and even books. As you can see, these advanced websites not only feature product catalogs but also include information pages (like the Checklist) and community newsfeeds.
One more example is the “
” object (tlc-clean-girl-aesthetics), which features thousands of make-up and beauty products that align with clean girl aesthetics.
As the list of objects continues to expand with more people creating websites, please see the descriptions to explore other existing projects: https://www.waivio.com/object/ewg-social-gifts-projects/webpage
If your desired topic for your affiliate website isn't covered here, you can create your own business object, this will be explained in our next tutorial - “Advanced Shop”.
2.5 Default Hashtags
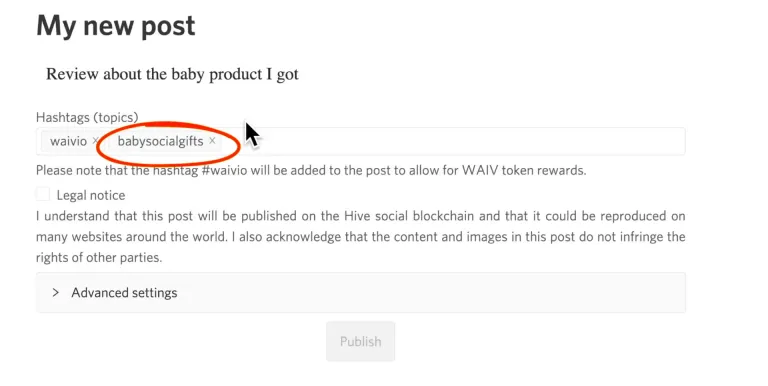
A default hashtag will be automatically added to all new posts created by users on your website.
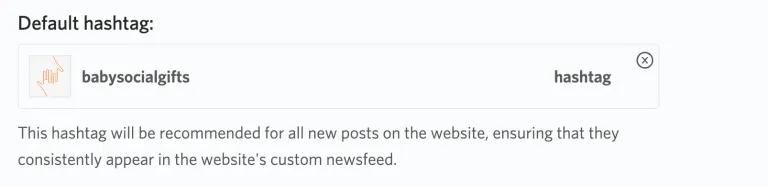
This feature is particularly beneficial for websites employing custom newsfeeds that display posts with specific hashtags only. A default hashtag helps guarantee that users won't overlook adding the tag, ensuring their post appears on the website.
If your website doesn't utilize custom newsfeeds, you can leave this field empty.
2.6 Website Header
You can also customize the website header, such as changing Baby.social.gifts to your brand name or a short message.
Step 3. Settings
Let's move on to the "Settings" section to fine-tune the functionality of the website.
3.1 – 3.2 Language and Currency
Here, you can select the language and currency for your website. If you want to
market your website in a specific location, you can choose your local language and currency; otherwise, English and USD are solid choices.
3.3 Google Analytics 4 Property ID
Next, you can add your Google Analytics 4 property ID to get detailed reports and insights into the performance of your website, such as website activity, visitor count, geographical distribution of your audience and other metrics. You can get this ID by creating a Google Analytics account for your website. Then just copy and paste the ID, and you will see your website statistics in your Google Analytics account.
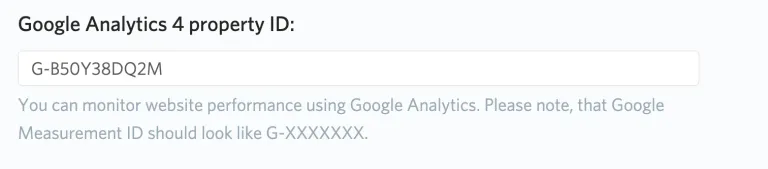
If you want to track conversions on your website, you can use the "buy_now" event. To configute it go to Admin -> Data Display -> Events -> turn on the “buy_now” event.
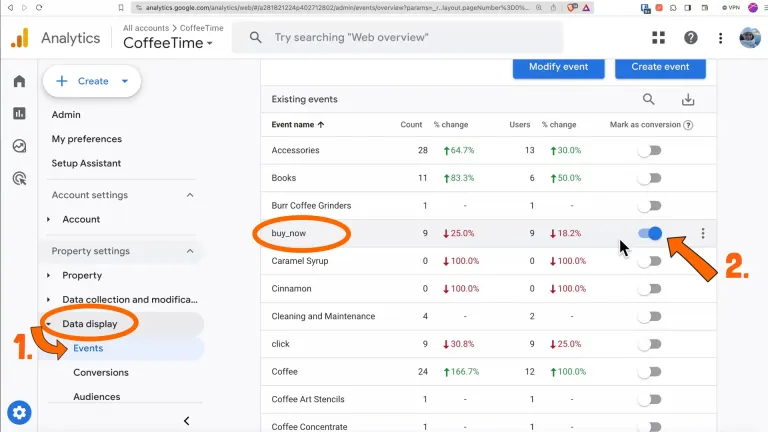
Buy_now is triggered every time a visitor clicks a button that takes them to an affiliated site, such as Amazon, Walmart, Target, or any other.
3.4 Beneficiary Payment
When your visitor receives upvotes for the posts they publish on your website – you can get a commission on their author rewards. In the following section – indicate which account would receive such commission and how much commission you want to collect (this value is set to 5% by default).

3.5 Referral Payment
You can also earn a commission when your visitors participate in sponsored campaigns, such as when they write a review for a sponsored product. Again, choose the recipient account.
If a product in your shop gets a sponsored reward - it will automatically be reflected on your website - you don’t need to do anything on your part. Your visitors will be able to see all the sponsored products and submit their reviews on your website to get the reward.
Sponsors define the commission levels provided to all parties assisting them in facilitating transactions. The referral portion of the sponsored rewards is set at a minimum level of 2.8%, but it can be higher for specific campaigns. In combination with the 5% author rewards, your total commissions from sponsored rewards will be 7.8%. Please refer to the referral policy for more information.
3.6 CLICK "SAVE" to save your settings, and your selections will be applied to your website.
Step 4. Affiliate Codes
Now let's move to affiliate codes. Just like you did for your profile shop, search relevant affiliate programs and input your affiliate codes.
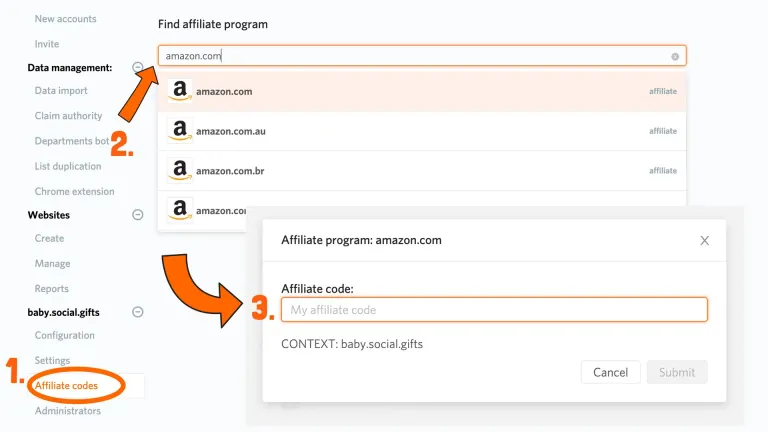
This integration ensures that all your products in your shop come with your affiliate codes, giving you the opportunity to earn with visitors every purchase.
It's useful to occasionally check that your affiliate codes are active, especially for Amazon, since the codes can expire if a certain threshold in sales is not achieved. That's the beauty of this interface because, unlike other platforms, if your code expires, here, you won't need to update it individually for every product. Just update it one time here and it will automatically be applied to all your products.
Step 5: Website Hosting
To keep your website up and running, there are hosting fees associated with maintaining your online presence on Social.Gifts. When you're ready to fund your website, navigate to the "Manage" tab, where you'll find the button "Pay Now." Here choose the amount you can transfer in WAIV tokens to pay the hosting fees. WAIV tokens will be converted to USD at the current market rate. Click Continue to sign and finish the transaction.
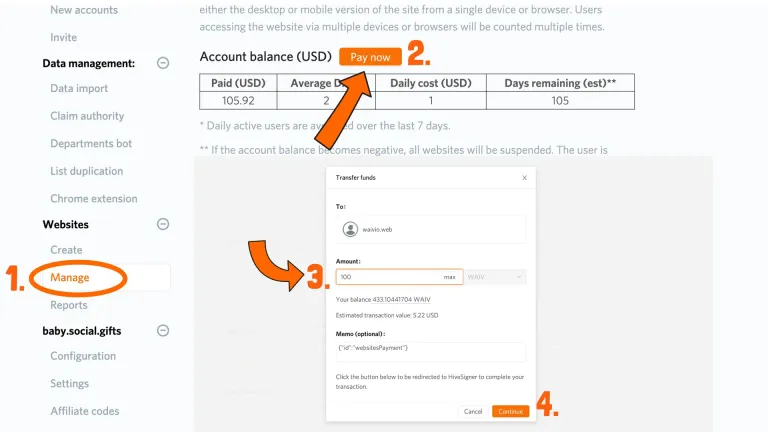
For hosting prices check the info in the section. Currently, for active websites, the plan starts at 1 USD/day, which includes up to 200 daily visitors. There is an additional fee of 0.005 USD per day for every extra active user. If you want to retain your website name without running the website, a fee of 0.20 USD/day is applied. You can change the status of your website by checking or unchecking the checkmark under the "active" column.
What's next? 😉
Now that your configuration and setup are complete, it's time to reveal your Social.Gifts shop to the world.
Congratulations on launching your very own Social.Gifts website!
Your carefully curated collection, within the immersive Hive environment, is ready to offer visitors a unique social shopping experience.
Your Social.Gifts shop is equipped with a range of features that make social shopping on your website possible. From dynamic newsfeeds to visitor posts and reviews, your shop has become a lively community hub. It's not just about browsing – it's a space for connection, sharing, and discovery.
While we've covered a lot in this tutorial, there are more advanced settings to customize your website further, such as creating specific newsfeeds, adding pages, forms, widgets and much more. Get ready to unleash the full potential of your Social.Gifts shop! See you in the next tutorial.
#waivio #waiv #hive #hiveblockchain #shop #hivetutorial #business #commerce #amazon #shop #ecommerce #hiveblockchain #crypto #cryptocurrency #features #hivefeatures #product #brand #marketing #entrepreneur undefined#hobby #leo #peakd #leofinance #items #shopping undefined#affiliatemarketing #marketing undefinedundefined#affiliatelinks
I'm always blown away by how easy Waivio makes it to launch cool social shopping sites.
It's kind of wild – you just tweak the base object in the setup, and voilà!, you've got a comprehensive shop with a community of like-minded people fully operational.
Even my friends who know a ton about building websites the old-school way are impressed. It would take a dedicated team of software developers to operate something like that.
And the whole web3 aspect of it? It turns the usual cut-throat business competition into something way more collaborative. We're talking about a whole new kind of economy where everyone wins, not just one 'top dog.' It takes a minute to wrap your head around it, but once you do, it's like, 'Wow, why haven't we always done it this way?
I'm impressed with Waivio and I haven't even used it. But I am thinking up a shop to build. :-)
That's very cool 🤩! Do you have a specific theme in mind for your shop?
If by "theme," you means products to sell ... yes.
Can you do a post about getting an amazon affiliate link?
Everytime I try to sign up it says I don't have enough of social following.
Hi @holybread
I am not too sure how much of a social following Amazon wants to see, when I was signing up I gave them my YouTube channel link which has around 1000 subscribers. Maybe you can try to give your hive link?
Here is the video I found on signing up on amazon associates:
https://affiliate-program.amazon.com/home
The easiest way to start is by launching your social shopping website as described in the tutorial, and then using that URL to apply for an affiliate code from Amazon.
You can use your regular Amazon account for this, but to obtain affiliate codes, visit:
US: https://affiliate-program.amazon.com
Canada: https://associates.amazon.ca
The application process is straightforward and, most importantly, instant. It literally took me just 3 minutes to get my codes.
It’s interesting to see different social.gifts websites!
It would be fun if you share what you are building in the comments 🤩
As a data admin, I had the chance to participate in several projects:
Coffee: MyCoffeeGifts.com, CoffeeShop.Gifts
(They use very similar base objects.)
Camping: GoCampingList.com, CampingHive.com
(The same base object.)
There are also multiple other projects under development right now.
Cool👏
Congratulations @cryptodive! You have completed the following achievement on the Hive blockchain And have been rewarded with New badge(s)
Your next target is to reach 11000 upvotes.
You can view your badges on your board and compare yourself to others in the Ranking
If you no longer want to receive notifications, reply to this comment with the word
STOPCheck out our last posts: